1. Introduction
This manual provides detailed instructions for the installation, operation, and maintenance of your JUXIESHI H61C LGA 1155 Motherboard. Please read this guide thoroughly before proceeding with installation to ensure proper setup and optimal performance. This motherboard is designed to support Intel 2nd and 3rd Generation Core processors.
2. Product Overview
The JUXIESHI H61C motherboard is an ITX form factor board (slightly larger than standard ITX) featuring an LGA 1155 socket, designed for Intel 2nd and 3rd generation processors. It includes 8GB (2x4GB) of 1600MHz DDR3 RAM, an NVME/NGFF M.2 slot, and various connectivity options for a versatile computing experience.
Key Features:
- Intel LGA 1155 Socket: Supports Intel Core 2nd & 3rd Gen processors (e.g., i3-2100, i5-2400, i7-2600K, i3-3220, i5-3470, i7-3770K, Celeron G1620, Xeon E3 1230 V2).
- Dual Channel DDR3 Memory: Two DDR3 slots supporting up to 32GB RAM (1333/1600/1866MHz). Includes two 4GB 1600MHz DDR3 RAM modules.
- Storage & Expansion: SATA/NVME M.2 slot (PCIe 2.0 x4, up to 1535MB/s), one PCIe 2.0 X16 slot, and one PCIe 2.0 X1 slot.
- Connectivity: Realtek 100Mbps LAN, multiple USB 2.0 ports, HDMI-compatible, and VGA outputs.
- Audio: Realtek ALC661 2.1 Channel Audio Codec.
- Robust Design: Six-layer PCB with two-layer copper, all-solid capacitors, and optimized power circuitry.
Component Identification:
Refer to the diagram below for a visual guide to the motherboard's key components and ports.

Figure 2.1: Labeled diagram of the JUXIESHI H61C motherboard, indicating the location of the CPU socket, RAM slots, M.2 slot, PCIe slots, and various I/O ports.

Figure 2.2: The JUXIESHI H61C motherboard shown alongside the included DDR3 RAM modules.
3. Specifications
| Feature | Specification |
|---|---|
| CPU Socket | LGA 1155 |
| Chipset | Intel H61 Express |
| Supported CPUs | Intel Core 2nd/3rd Gen (i3/i5/i7), Pentium, Xeon E3 Series |
| RAM Type | DDR3 (1333/1600/1866MHz) |
| RAM Slots | 2 (Dual Channel) |
| Max RAM Capacity | 32 GB |
| Included RAM | 2 x 4GB DDR3 1600MHz |
| M.2 Slot | SATA (NGFF) / NVME M.2 (PCIe 2.0 x4) |
| PCIe Slots | 1 x PCIe 2.0 X16, 1 x PCIe 2.0 X1 |
| SATA Ports | 3 x SATA 2.0 (3Gb/s) |
| USB Ports | 8 x USB 2.0 (Rear I/O and internal headers) |
| Display Outputs | 1 x HDMI-compatible, 1 x VGA |
| LAN | Realtek 100Mbps Ethernet |
| Audio | Realtek ALC661, 2.1 Channels (3 x Audio jacks) |
| Power Connectors | 24-Pin ATX, 4-Pin CPU Power |
| FAN Interfaces | 4-Pin, 3-Pin |
| Form Factor | ITX (190mm x 170mm) |
| Dimensions | 19 x 16.99 x 4.01 cm |
4. Setup Guide
Before beginning installation, ensure your workspace is clean, well-lit, and static-free. It is recommended to wear an anti-static wrist strap.
4.1 CPU Installation
- Locate the LGA 1155 CPU socket on the motherboard.
- Gently push down the small metal lever on the side of the socket and pull it away from the socket to open the retention frame.
- Carefully align your Intel LGA 1155 CPU with the socket. Ensure the gold triangle on the CPU matches the triangle on the socket. Do not force the CPU into the socket.
- Once the CPU is seated correctly, close the retention frame and push the lever back into its original position until it clicks.
- Apply a thin, even layer of thermal paste to the top of the CPU (if not pre-applied to your cooler).
- Install your CPU cooler according to its manufacturer's instructions, ensuring it is securely fastened and making good contact with the CPU.

Figure 4.1: Close-up view of the LGA 1155 CPU socket on the JUXIESHI H61C motherboard, highlighting its location.
4.2 RAM Installation
The motherboard supports dual-channel DDR3 RAM. Two 4GB 1600MHz DDR3 RAM modules are included.
- Locate the two DDR3 DIMM slots on the motherboard.
- Open the clips at both ends of the DIMM slot.
- Align the notch on the DDR3 RAM module with the key in the DIMM slot.
- Insert the RAM module firmly into the slot until the clips on both sides snap into place, securing the module. Repeat for the second RAM module.

Figure 4.2: Illustration of the DDR3 RAM slots on the JUXIESHI H61C motherboard, indicating their dual-channel configuration.
4.3 M.2 SSD Installation
The motherboard features a versatile M.2 slot supporting both SATA (NGFF) and NVME (PCIe 2.0 x4) M.2 SSDs. The default mode is NGFF Protocol. For NVME M.2, manual switching is required.
- Locate the M.2 slot on the motherboard.
- If installing an NVME M.2 SSD, adjust the M.2 mode switching caps as shown in Figure 4.3 to select "NVME Protocol". If installing a SATA (NGFF) M.2 SSD, ensure the caps are set to "NGFF Protocol" (default).
- Insert the M.2 SSD into the slot at a slight angle.
- Gently push down the SSD and secure it with the provided screw.

Figure 4.3: Diagram illustrating the M.2 mode switching caps for selecting between NGFF (SATA) and NVME protocols on the JUXIESHI H61C motherboard.

Figure 4.4: Location of the SATA/NVME M.2 slot and PCIe expansion slots on the JUXIESHI H61C motherboard.
4.4 PCIe Card Installation
The motherboard has one PCIe 2.0 X16 slot and one PCIe 2.0 X1 slot.
- Open the retention clip at the end of the desired PCIe slot.
- Align your PCIe expansion card with the slot and press down firmly until it is fully seated and the retention clip snaps into place.
- Secure the card to your PC case with a screw.
4.5 Connecting Peripherals and Power
Connect all necessary cables and peripherals to the motherboard.
- I/O Shield: Install the included I/O shield into your PC case before installing the motherboard.
- Motherboard Installation: Carefully place the motherboard into your PC case, aligning it with the standoffs. Secure it with screws.
- Power Connectors: Connect the 24-pin ATX power cable and the 4-pin CPU power cable from your power supply to the corresponding ports on the motherboard.
- SATA Devices: Use the included SATA cable to connect your SATA storage devices (HDDs/SSDs) to the SATA 2.0 ports on the motherboard.
- Front Panel Connectors: Connect your PC case's front panel cables (power button, reset button, HDD LED, power LED, front USB, front audio) to the appropriate headers on the motherboard. Refer to the motherboard diagram (Figure 2.1) for header locations.
- Fans: Connect case fans and the CPU cooler fan to the 4-pin and 3-pin fan headers.
- Display: Connect your monitor to either the HDMI-compatible or VGA port on the motherboard's rear I/O panel.
- USB Devices: Connect your keyboard, mouse, and other USB devices to the USB 2.0 ports.
- Network: Connect an Ethernet cable to the 100Mbps LAN port for network access.
- Audio: Connect speakers or headphones to the audio jacks.
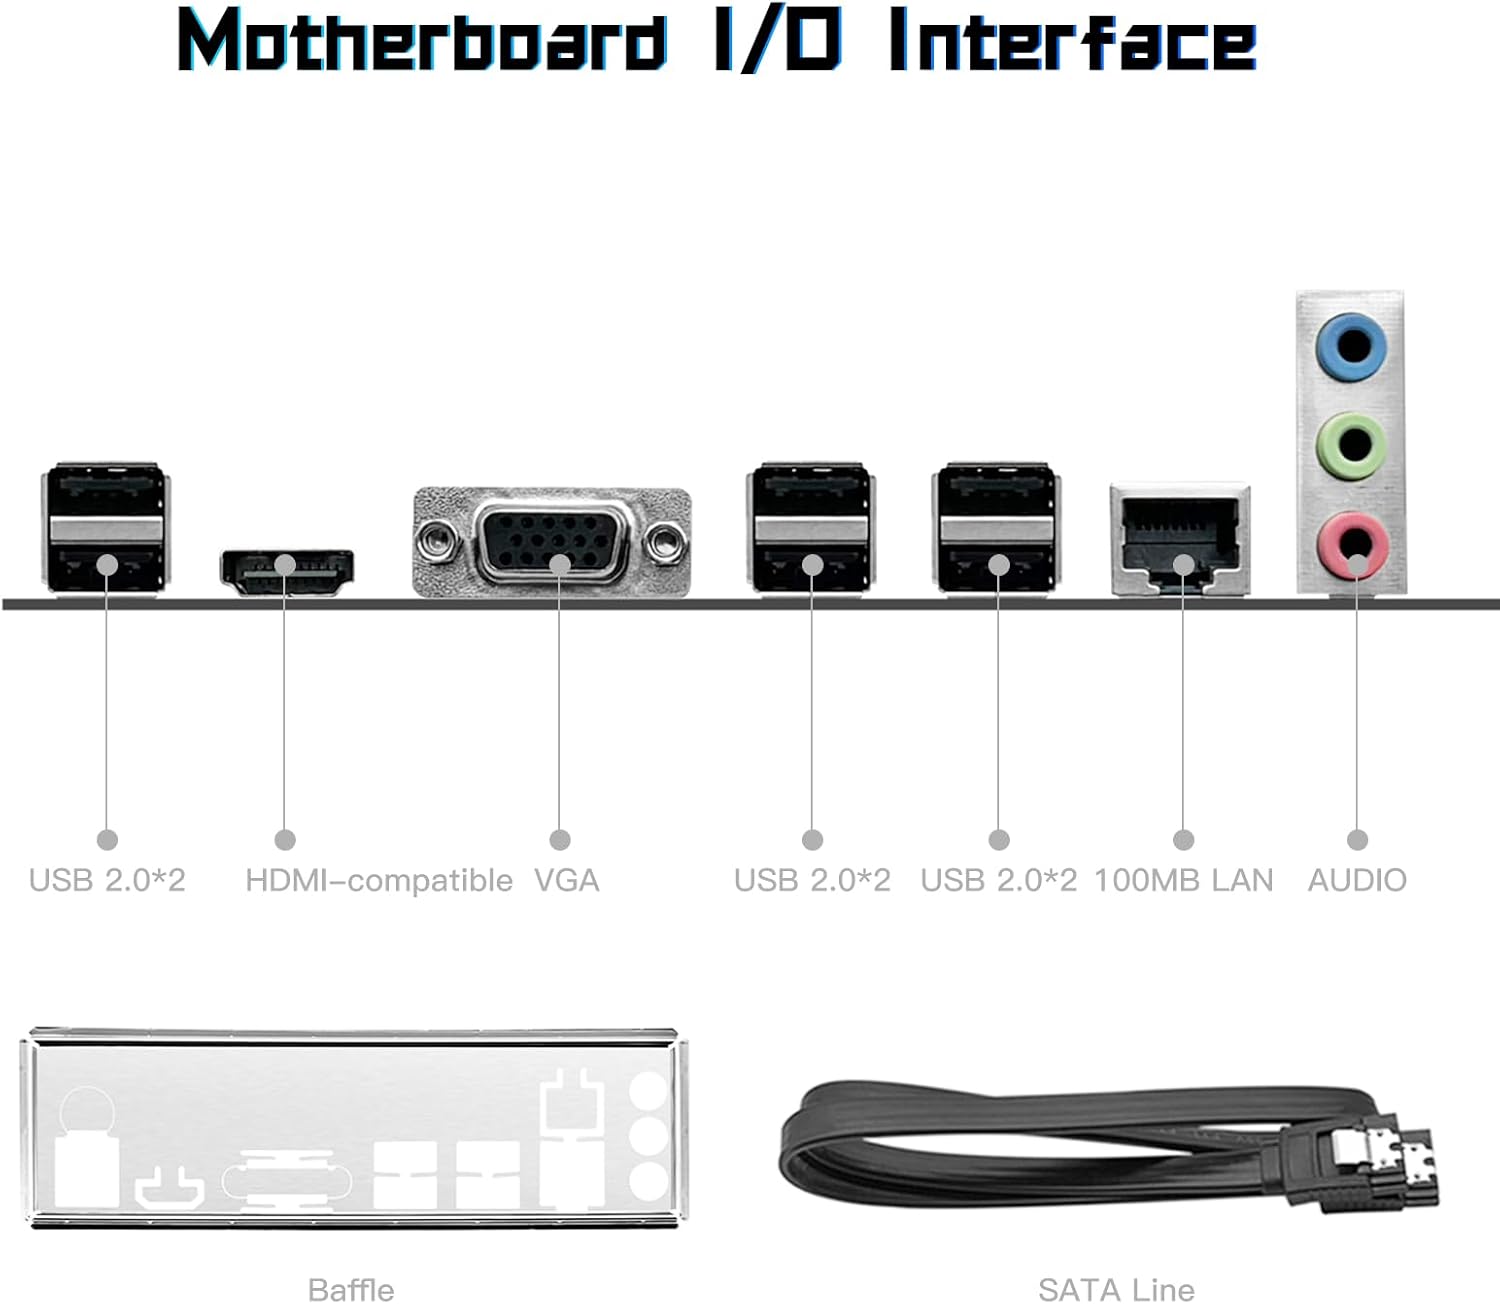
Figure 4.5: Overview of the JUXIESHI H61C motherboard's rear I/O panel, showing HDMI, VGA, USB 2.0, LAN, and audio ports, along with the included I/O shield and SATA cable.
5. Operating Instructions
After completing the hardware installation, you can proceed with powering on your system and installing the operating system.
5.1 Initial Power On
- Ensure all power cables are securely connected and the power supply switch is in the "ON" position.
- Press the power button on your PC case.
- The system should power on, and you should see a display on your monitor. If not, refer to the Troubleshooting section.
- Access the BIOS/UEFI setup by pressing the designated key during startup (usually DEL or F2). Configure boot order and other settings as needed.
5.2 Operating System and Driver Installation
It is recommended to install a fresh operating system (e.g., Windows 10, Windows 11, Linux) for optimal performance. After OS installation, install the necessary drivers.
- Operating System: Boot from your OS installation media (USB drive or DVD) and follow the on-screen instructions to install your preferred operating system.
- Drivers: After OS installation, install drivers for the chipset, LAN, audio, and any other integrated components. Driver Talent/DriveTheLife or the Windows 10 system's built-in driver management are recommended for driver installation.
6. Maintenance
Proper maintenance ensures the longevity and stable operation of your motherboard.
- Dust Removal: Regularly clean dust from inside your PC case, especially from fans and heatsinks, using compressed air. Ensure the system is powered off and unplugged before cleaning.
- Cable Management: Ensure cables are neatly routed to promote good airflow within the case.
- Software Updates: Keep your operating system and drivers updated to the latest versions for security and performance improvements.
- BIOS Updates: Only update the BIOS if necessary and follow the manufacturer's instructions carefully. Incorrect BIOS updates can render the motherboard inoperable.
7. Troubleshooting
If you encounter issues, refer to the following common troubleshooting steps.
7.1 System Does Not Power On / No Display
- Power Connections: Double-check that the 24-pin ATX and 4-pin CPU power cables are securely connected to the motherboard and power supply. Ensure the power supply switch is ON.
- Front Panel Connectors: Verify that the power button cable from your case is correctly connected to the motherboard's front panel header.
- RAM: Reseat the RAM modules. Try booting with only one RAM module installed in different slots to rule out a faulty module or slot.
- CPU: Ensure the CPU is correctly seated in its socket and the CPU cooler is properly installed.
- Display Cable: Confirm your monitor cable is securely connected to the motherboard's HDMI or VGA port and the monitor is powered on and set to the correct input.
- Peripherals: Disconnect all non-essential peripherals (USB devices, extra storage drives, PCIe cards) and try booting with only the CPU, RAM, and primary display connected.
7.2 Operating System Issues / Driver Problems
- Driver Installation: Ensure all necessary drivers (chipset, LAN, audio) are installed. Use Driver Talent/DriveTheLife or Windows Update for driver management.
- OS Reinstallation: If issues persist, consider reinstalling the operating system.
7.3 M.2 SSD Not Detected
- Mode Switching: Verify that the M.2 mode switching caps are correctly set for either NGFF (SATA) or NVME protocol, matching your installed SSD type.
- Seating: Ensure the M.2 SSD is fully seated in its slot.
- BIOS Settings: Check BIOS settings to ensure the M.2 slot is enabled and configured correctly.
If the motherboard is Dead On Arrival (DOA), cannot boot, or you experience other persistent issues, please contact JUXIESHI customer support via Amazon for assistance.
8. Warranty and Support
For warranty information and technical support, please refer to the terms and conditions provided at the point of purchase or contact JUXIESHI customer service directly through the Amazon platform. Specific warranty duration details are not provided in this manual.
When contacting support, please have your product model (H61C) and purchase details ready.