
Inefala f4068c40
Inefala Android 15 Car Stereo User Manual
Model: f4068c40
Product Overview
The Inefala Android 15 Car Stereo is designed for Chevrolet Chevy Silverado and GMC Sierra models from 2014 to 2018. It features a 10.1-inch HD capacitive touchscreen, Android OS with 2GB RAM and 64GB ROM, and an Octa 4-core CPU. This unit integrates advanced connectivity options including wireless/wired Carplay and Android Auto, Mirror Link, GPS navigation, WiFi, Bluetooth, FM/RDS Radio, and HiFi audio capabilities. It also supports steering wheel controls (SWC) and includes a backup camera input.
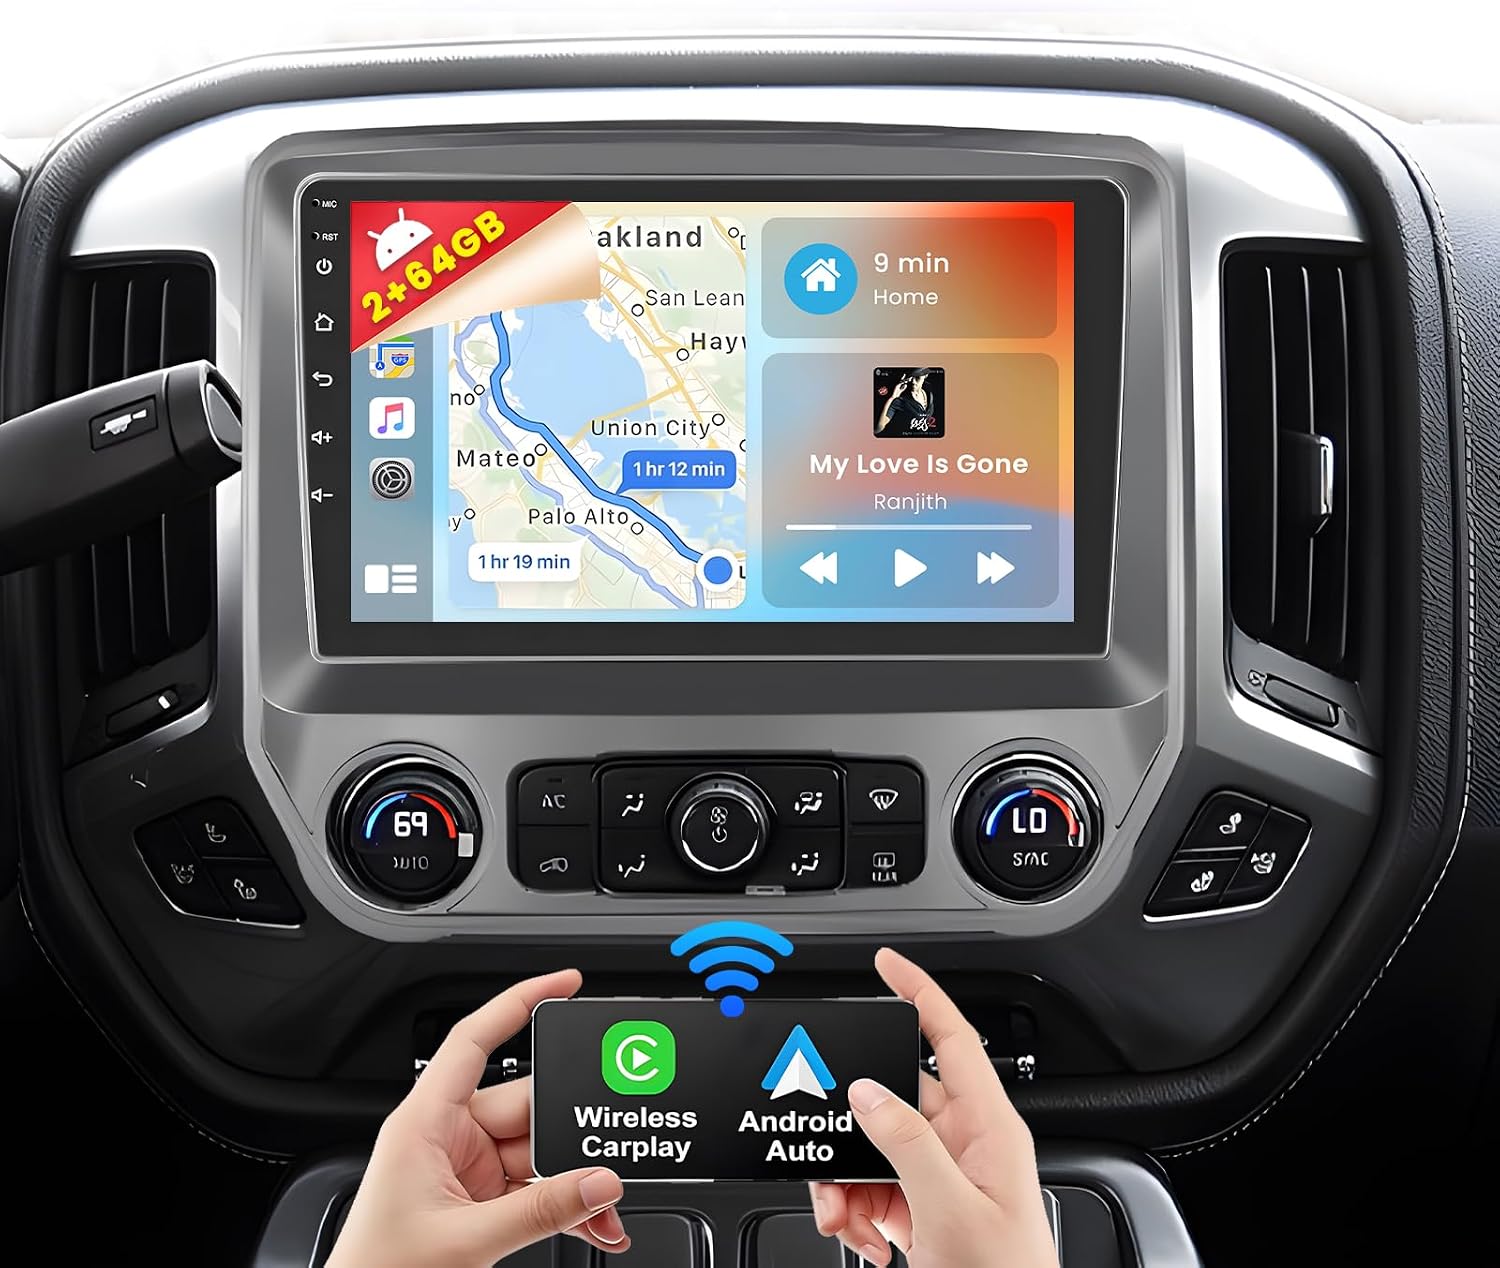
Image: The Inefala Android Car Stereo with its 10.1-inch HD touchscreen displaying navigation and media playback, integrated into a vehicle's dashboard. This image highlights the main interface and its capabilities.
Package Contents
Verify that all components listed below are included in your package:
- 1 x Android Car Stereo
- 1 x GPS Antenna
- 1 x Radio Antenna
- 1 x Backup Camera Input Cable
- 2 x RCA Cable
- 3 x USB Cable
- 1 x Audio Cable
- 1 x Canbus
- 1 x Backup Camera
- 1 x Installation Tool
- 1 x Instruction Manual (this document)
- 1 x External Microphone
- 1 x Small Microphone

Image: A visual representation of all items included in the product package, such as the main unit, various cables (power, RCA, USB, audio), antennas (GPS, radio), Canbus, backup camera, installation tools, and microphones. This helps users confirm they have all necessary parts.
Installation Guide
This section provides general guidance for installing the car stereo. Professional installation is recommended.
1. Compatibility Check
Ensure your vehicle's central control panel matches Option A as shown in the compatibility diagram. This product is specifically designed for Chevrolet Chevy Silverado and GMC Sierra models from 2014-2018 with the specified dashboard configuration.

Image: A diagram illustrating compatible and incompatible car dashboard configurations. Users should compare their vehicle's dashboard with "Option A" to ensure proper fitment before proceeding with installation.
2. Pre-Installation Steps
- Disconnect the vehicle's battery to prevent electrical shorts.
- Carefully remove the original car stereo and dashboard trim.
- Identify the wiring harnesses from your vehicle.
3. Wiring Connections
- Connect the provided power cable to the vehicle's wiring harness.
- Connect the GPS antenna and radio antenna to their respective ports on the new stereo.
- If installing the backup camera, connect the backup camera input cable and route the camera wiring to the rear of the vehicle.
- Connect the RCA cables, USB cables, and audio cable as needed for external devices or amplifiers.
- Connect the Canbus module if your vehicle requires it for steering wheel controls or other integrated functions.
- Connect the external microphone for improved call quality.
4. Mounting the Stereo
- Secure the new car stereo into the dashboard opening using the provided installation tools.
- Ensure all cables are neatly tucked away and not pinched.
- Reinstall the dashboard trim pieces.

Image: A side-by-side comparison showing the vehicle's dashboard before and after the installation of the Inefala Android Car Stereo. This visual demonstrates the seamless integration and improved aesthetic of the new unit.
Operating Instructions
1. Initial Power On and Setup
- Reconnect the vehicle's battery.
- Turn on the vehicle's ignition. The stereo should power on automatically.
- Follow the on-screen prompts for initial setup, including language selection and time zone.
2. Wireless Carplay & Android Auto
This unit supports both wireless and wired Carplay/Android Auto. Connect your smartphone to access navigation, calls, messages, and music directly on the stereo's display.
- Wireless Connection: Enable Bluetooth and Wi-Fi on your phone. Pair your phone with the car stereo via Bluetooth. Follow the prompts on the stereo to initiate Carplay or Android Auto.
- Wired Connection: Connect your phone to the stereo using a USB cable. The system should automatically detect and launch Carplay or Android Auto.

Image: A visual guide demonstrating the compatibility of the car stereo with Apple Carplay, Android Auto, and Mirror Link, highlighting both wireless and wired connection options for each feature.
3. WiFi Connectivity & GPS Navigation
Connect the stereo to a Wi-Fi network (e.g., mobile hotspot) to access online content and update maps. The integrated GPS allows for accurate real-time navigation.
- Go to Settings > Network & Internet > Wi-Fi to connect to an available network.
- Use pre-installed navigation apps or download others from the Play Store for GPS functionality.

Image: The car stereo's display showing various applications accessible via Wi-Fi, such as YouTube, Spotify, and social media platforms. This illustrates the unit's capability to connect to the internet for online content and app downloads.
4. Bluetooth Functions
The Bluetooth feature enables hands-free calling, phonebook synchronization, and audio streaming.
- Go to Settings > Connected devices > Pair new device to connect your phone.
- Once paired, you can make/receive calls and play music through the car's speakers.

Image: A visual demonstrating the Bluetooth functionality, showing the car stereo's interface for making calls and a smartphone connected via Bluetooth for music playback and phonebook access.
5. FM/RDS Radio & HiFi Audio
Access local radio stations with FM/RDS functionality and enjoy high-fidelity audio output.
- Select the Radio application to scan for and save stations.
- Adjust audio settings in the Equalizer or Sound Settings menu to customize your listening experience.

Image: The car stereo's FM/RDS radio interface, showing frequency tuning and preset stations. This image highlights the radio functionality and its user-friendly display.

Image: A visual representation of the HiFi sound effect, showing sound waves within a car interior and the car stereo's audio settings interface, emphasizing the high-quality audio output.
6. Steering Wheel Controls (SWC)
The unit supports your vehicle's original steering wheel controls for safe operation while driving.
- Access the Steering Learn function in the settings menu to map your steering wheel buttons to the stereo's functions.
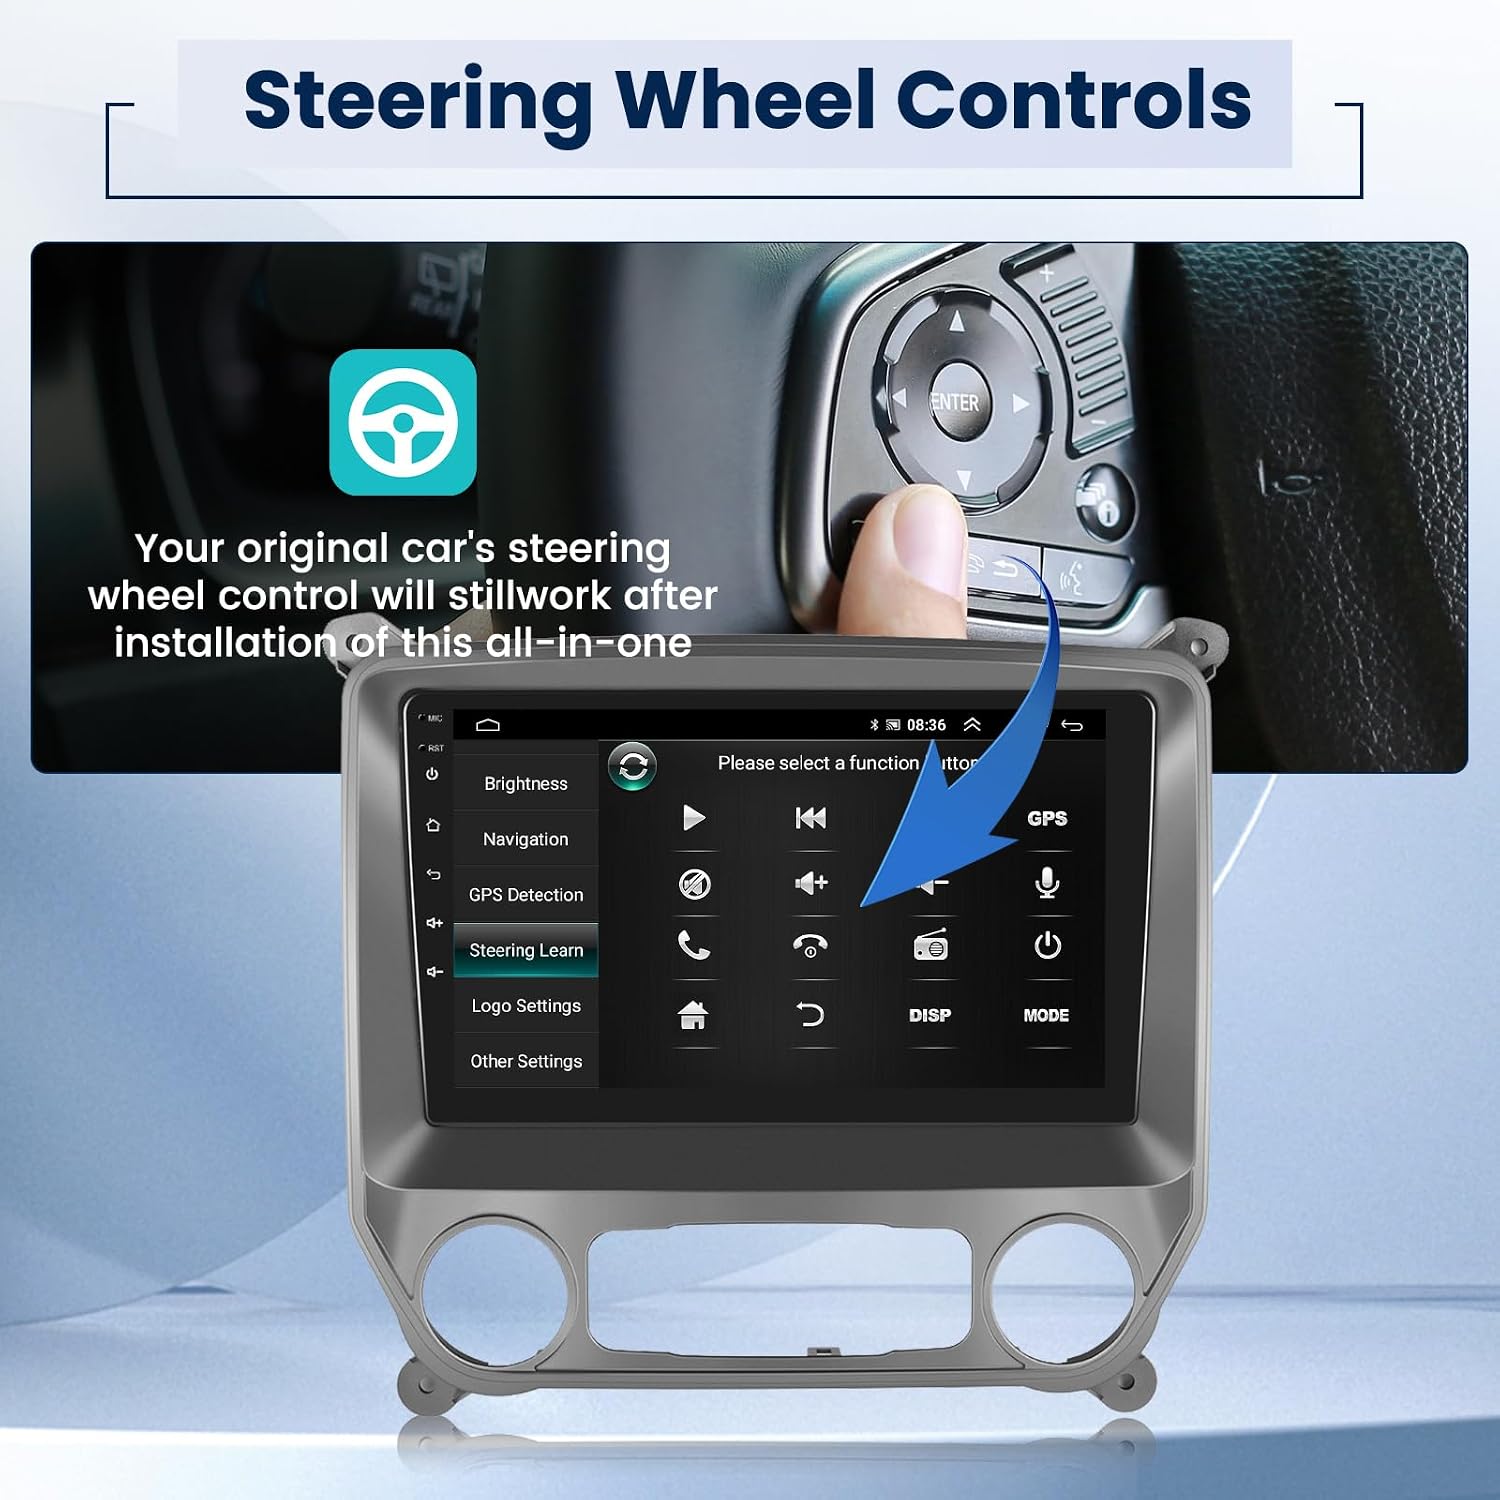
Image: The car stereo's interface for learning steering wheel controls, with an overlay showing a hand interacting with a steering wheel button. This demonstrates how to configure the SWC feature.
7. Backup Camera Functionality
When the vehicle is shifted into reverse gear, the stereo automatically displays the backup camera feed.

Image: The car stereo displaying the reverse camera feed with parking guidelines, showing a vehicle backing up in a parking lot. An inset image shows the physical backup camera. This illustrates the automatic switching and utility of the backup camera.
Maintenance
Proper maintenance ensures the longevity and optimal performance of your car stereo.
- Screen Cleaning: Use a soft, lint-free cloth slightly dampened with water or a screen cleaner. Avoid abrasive materials or harsh chemicals.
- Software Updates: Periodically check for system updates via Wi-Fi in the settings menu to ensure you have the latest features and bug fixes.
- General Care: Avoid exposing the unit to extreme temperatures, direct sunlight for prolonged periods, or excessive moisture.
Troubleshooting
This section addresses common issues and their solutions.
| Problem | Possible Cause / Solution |
|---|---|
| 1. Cannot turn on the car stereo. |
|
| 2. Display shows "Video Warning" or cannot watch video while driving. | Turn off the "Video Warning" function in the stereo's settings. |
| 3. Car radio shows "No Signal" when reversing. |
|
| 4. Cannot search FM radio stations. |
|
| 5. Cannot connect Bluetooth. |
|

Image: A visual summary of common troubleshooting steps for the car stereo, covering issues like power, video playback restrictions, reverse camera signal, FM radio reception, and Bluetooth connectivity. This provides quick solutions to frequent problems.
Specifications
| Feature | Detail |
|---|---|
| Model Number | f4068c40 |
| Operating System | Android 15 |
| RAM | 2GB |
| ROM | 64GB |
| CPU | Octa 4-core |
| Display Size | 10.1 Inches |
| Resolution | 1024 x 600 |
| Connectivity | Bluetooth, USB, Wi-Fi |
| Special Features | Wireless/Wired Carplay, Android Auto, Mirror Link, GPS Navigation, FM/RDS Radio, HiFi Audio, SWC, Backup Camera Input |
| Product Dimensions | 12.6 x 11.02 x 2.17 inches |
| Item Weight | 7.55 pounds |
Warranty and Support
Inefala provides comprehensive support for its products.
- Warranty: 24 months warranty from the date of purchase.
- Returns: 30-day refund/replacement policy.
- Technical Support: Online consultation support with a response within 24 hours.
- Contact: For any quality issues or questions, please contact Inefala customer service directly at inefalatech@163.com.

Image: An infographic detailing Inefala's customer support commitments, including a 24-month quality assurance, 30-day free return policy, and a promise of online replies within 24 hours. This reinforces the brand's commitment to customer satisfaction.
Related documentsf4068c40


Ask a question about this manual
Ask about setup, troubleshooting, compatibility, parts, safety, or missing instructions. Manuals+ will review the question and use this page’s manual context to help answer it.