1. Introduction
This manual provides detailed instructions for the installation, operation, and maintenance of your litillbuly Android 13 Car Stereo Radio. This head unit is designed for Chevrolet Chevy Camaro models from 2010 to 2015, offering advanced features such as Wireless CarPlay, Android Auto, GPS navigation, Bluetooth connectivity, and more. Please read this manual thoroughly before installation and use to ensure proper function and safety.
2. Product Overview
Key Features:
- Android 13 System: Equipped with 4GB RAM and 64GB ROM for smooth performance.
- 10.33-inch HD 1080P Capacitive Touch Screen: Provides a clear and responsive display.
- Wireless CarPlay & Android Auto: Seamless integration with your smartphone for navigation, calls, messages, and music.
- Bluetooth Hands-Free: For safe calling and audio streaming.
- Steering Wheel Controls (SWC): Retains original vehicle steering wheel control functionality.
- Built-in DSP: Enhances audio quality with various EQ settings.
- Online & Offline GPS Navigation: Pre-loaded North American maps with real-time traffic support via online apps.
- Reversing Assistance: Supports connection to a rear camera for parking assistance.
- Mirror Link: Compatible with Android and iOS devices.
- WiFi/WLAN Internet: Access online content and download apps.

Image: The litillbuly 10.33-inch car stereo head unit seamlessly integrated into a Chevrolet Camaro dashboard, showcasing its Android interface with various application icons.

Image: Visual representation highlighting the 10.33-inch screen size and confirming compatibility with Chevrolet Camaro models from 2010 to 2015.
What's in the Box:
The package includes all necessary components for installation and operation:
- litillbuly Android 13 Car Stereo Head Unit
- Power Connector
- Antenna Adapter
- Original USB Adapter
- Installation Tools (Screwdriver, Crowbar)
- Can Bus Decoder
- OEM Rear Camera Cable
- Reversing Line
- RCA Cable
- Microphone
- USB Cables (x2)
- Speaker
- 4G Antenna
- GPS Antenna
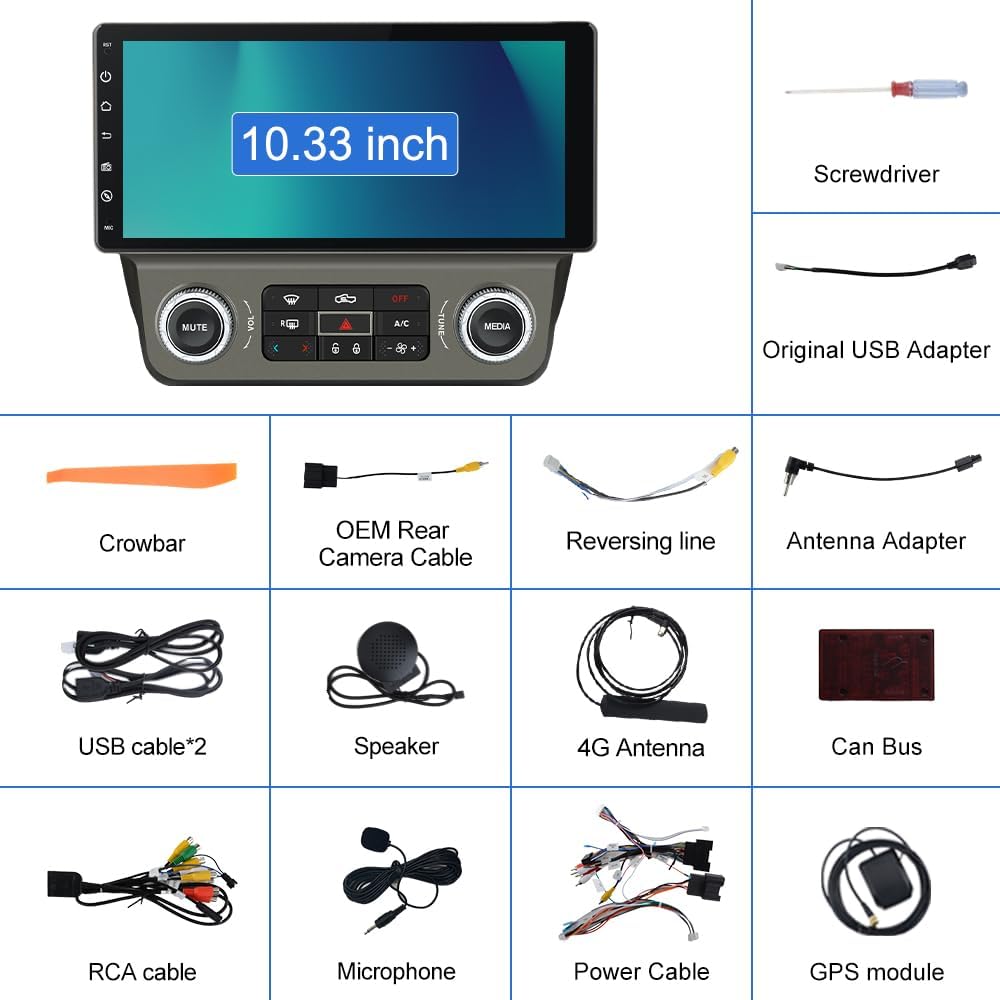
Image: A comprehensive diagram illustrating all components included in the package, such as the head unit, various cables, antennas, and installation tools.
3. Setup and Installation
Installation requires basic mechanical ability and common tools. It is recommended to disconnect the vehicle's battery before beginning the installation process.
3.1 Pre-Installation Check:
- Verify all components listed in the 'What's in the Box' section are present.
- Ensure your Chevrolet Chevy Camaro is within the compatible model years (2010-2015).
3.2 Removal of Factory Unit:
Carefully remove the existing factory radio and trim panels using the provided crowbar and screwdriver. Refer to your vehicle's specific service manual for detailed instructions on panel removal.

Image: A visual comparison showing the vehicle's dashboard before and after the installation of the litillbuly car stereo, demonstrating the integrated fit.
3.3 Wiring Connections:
- Connect the main power cable harness to the new head unit and the vehicle's wiring. The included Can Bus decoder ensures proper communication with the vehicle's systems.
- AC Function Adapter: Connect the dedicated adapter to ensure the AC function works correctly. This adapter typically connects to the CANBUS TX/RX, Power Cable, CANBUS Box, AC Connector, and External Speakers.
- GPS Antenna: Connect the GPS antenna and route it to a location with a clear view of the sky, typically on the dashboard or under the windshield.
- 4G Antenna: Connect the 4G antenna for cellular data connectivity.
- USB Cables: Connect the two USB cables for external device connectivity.
- Microphone: Connect the external microphone for improved call quality.
- Reversing Camera (Optional): If installing a reversing camera, connect the reversing line and the camera's power and video cables. The red cable (2) connects to the backup light '+' and the black cable (1) connects to 'GND'.

Image: A detailed wiring diagram illustrating how to connect the AC function adapter to the car stereo system, showing connections for CANBUS, power, and AC.

Image: A wiring diagram demonstrating the correct connections for a reversing camera, indicating where to connect the red wire to the backup light and the black wire to ground.
3.4 Final Assembly:
Once all connections are secure, carefully mount the head unit into the dashboard opening and reattach any removed trim panels. Reconnect the vehicle's battery.
4. Operating Instructions
4.1 Initial Power On:
After installation, turn on your vehicle's ignition. The head unit will boot up, displaying the Android 13 interface.

Image: The Android 13 logo, signifying the operating system running on the car stereo unit.
4.2 Wireless CarPlay & Android Auto:
Connect your iPhone or Android phone wirelessly via Bluetooth. Once connected, you can access phone functions, navigation, music, and messaging through the head unit's display or voice assistant.

Image: The car stereo screen displaying both Wireless CarPlay and Android Auto interfaces, showing various compatible applications.

Image: A visual representation of the Wireless CarPlay and Android Auto features, demonstrating how they integrate with the car stereo for smartphone functionality.
4.3 Bluetooth Hands-Free:
Pair your phone via Bluetooth to make and receive calls safely. The external microphone enhances voice clarity. Adjust volume using the head unit or steering wheel controls.
4.4 Steering Wheel Controls (SWC):
The unit supports your vehicle's original steering wheel controls for functions like volume adjustment, track skipping, and answering calls. Configuration may be required in the system settings.

Image: The car stereo screen showing a navigation map, alongside an illustration of how steering wheel controls can be used to operate the unit.

Image: An icon representing Steering Wheel Controls (SWC), with visual cues for common functions like volume, track change, and call management.
4.5 Navigation:
The unit comes with pre-installed North American maps for offline use. For real-time traffic and online mapping, connect to WiFi and download preferred navigation apps from the app store.

Image: A GPS icon, symbolizing the navigation capabilities of the car stereo system.
4.6 Media Playback:
Enjoy music and videos from various sources, including USB drives, Bluetooth streaming, and online services via WiFi. The built-in DSP allows for sound customization with preset EQ modes (jazz, rock, pop, classic, etc.).
4.7 Reversing Assistance:
When a compatible rear camera is connected, the display automatically switches to the camera view when the vehicle is put into reverse, providing visual assistance for parking.

Image: The car stereo screen showing a reverse assist view with dynamic parking guidelines, alongside a display of Bluetooth music playback.

Image: A reverse assist icon, signifying the parking assistance feature of the car stereo.
4.8 Split Screen Functionality:
The head unit supports split-screen mode, allowing you to run two applications simultaneously, such as navigation and music playback.

Image: The car stereo screen showcasing its split-screen capability, with a music player on one side and a navigation map on the other.
5. Maintenance
- Screen Cleaning: Use a soft, lint-free cloth to clean the touch screen. Avoid abrasive cleaners or solvents.
- Software Updates: Periodically check for software updates through the system settings to ensure optimal performance and access to new features.
- General Care: Keep the unit free from dust and extreme temperatures.
6. Troubleshooting
If you encounter issues, refer to the following common problems and solutions:
| Problem | Possible Cause / Solution |
|---|---|
| Unit does not power on. | Check power cable connections and vehicle's fuse box. Ensure the vehicle's battery is charged. |
| AC/Heat controls not working correctly or draining battery. | Verify the AC function adapter is correctly connected as per the wiring diagram. Ensure the CANBUS decoder is properly installed and configured. Some vehicle models may require specific software settings or additional adapters for full AC control compatibility, especially if the original vehicle had separate driver/passenger controls. Consult a professional installer if issues persist. |
| No sound or poor audio quality. | Check speaker connections. Verify audio settings and EQ. Ensure volume is not muted. |
| GPS signal is weak or inaccurate. | Ensure the GPS antenna is installed in a location with a clear view of the sky. Check antenna connection. |
| Wireless CarPlay/Android Auto not connecting. | Ensure Bluetooth is enabled on both the head unit and your phone. Forget and re-pair the device. Update phone's operating system. |
| Reverse camera not displaying. | Check the reversing camera's power and video connections. Ensure the reversing line is correctly connected to the vehicle's backup light signal. Confirm camera compatibility. |
| Google Maps (or other online apps) requires phone tethering. | This unit supports WiFi connectivity. For online maps and other internet-dependent apps, you can either connect to a mobile hotspot from your phone (tethering) or use a dedicated 4G SIM card if the unit supports it (check specifications). |
| Slow boot-up time. | A slight delay during boot-up is normal for Android systems. If excessively slow, try clearing cache or performing a factory reset (backup data first). |
| Temperature display issues. | Verify CANBUS settings related to climate control. Ensure all wiring for AC functions is correct. This may be a compatibility issue with specific vehicle climate control systems. |
7. Specifications
| Feature | Detail |
|---|---|
| Operating System | Android 13 |
| RAM | 4GB |
| ROM | 64GB |
| Display Size | 10.33 Inches |
| Resolution | 1280 x 480 |
| Connectivity | Bluetooth, Wi-Fi, 4G (via antenna) |
| Special Features | Wireless CarPlay, Android Auto, DSP, Mirror Link, Steering Wheel Control, Reversing Assistance |
| Map Type | North America (pre-loaded) |
| Audio Output Mode | Stereo |
| Mounting Type | Dashboard Mount |
| Product Dimensions | 10.33 x 5.81 x 10.33 inches |
| Item Weight | 5.02 pounds |
8. Warranty Information
This litillbuly car stereo unit comes with a 1-year warranty from the date of purchase. This warranty covers manufacturing defects and malfunctions under normal use. Please retain your proof of purchase for warranty claims. The warranty does not cover damage caused by improper installation, misuse, accidents, or unauthorized modifications.
9. Support and Contact
For further assistance, technical support, or warranty inquiries, please contact litillbuly customer service through the retailer where the product was purchased. You may also refer to the official litillbuly website for additional resources or contact information.