1. Introduction
This manual provides detailed instructions for the installation, operation, and maintenance of the Yitouniu EWeLink 4CH Smart WiFi 85-250V Switch Controller, Model EWB4CH-D1. This device allows remote control of up to four electrical appliances via the eWeLink mobile application, Bluetooth, or RF remote control, and supports voice control through compatible smart assistants like Amazon Alexa and Google Assistant.
Please read this manual thoroughly before installation and use to ensure proper functionality and safety.
2. Product Overview and Features
The EWB4CH-D1 is a versatile 4-channel smart switch controller designed for various applications, including smart home automation, access control, and DIY projects. It offers multiple control methods and operating modes for enhanced flexibility.
Key Features:
- 4-Channel Control: Independently control up to four electrical devices.
- Multiple Control Methods:
- eWeLink App (iOS/Android) for remote control.
- Bluetooth connectivity for local control and pairing.
- RF 433MHz remote control support.
- Manual buttons on the device.
- Voice Control: Compatible with Amazon Alexa and Google Assistant for hands-free operation.
- Flexible Operating Modes: Supports Point (Momentary), Self-Locking (Toggle), and Interlocking modes.
- Scheduling and Timers: Set timed schedules for connected devices via the eWeLink app.
- Device Sharing: Share control of the device with multiple users through the eWeLink app.
- Wide Voltage Input: AC 85-250V and Micro USB 5V input options.
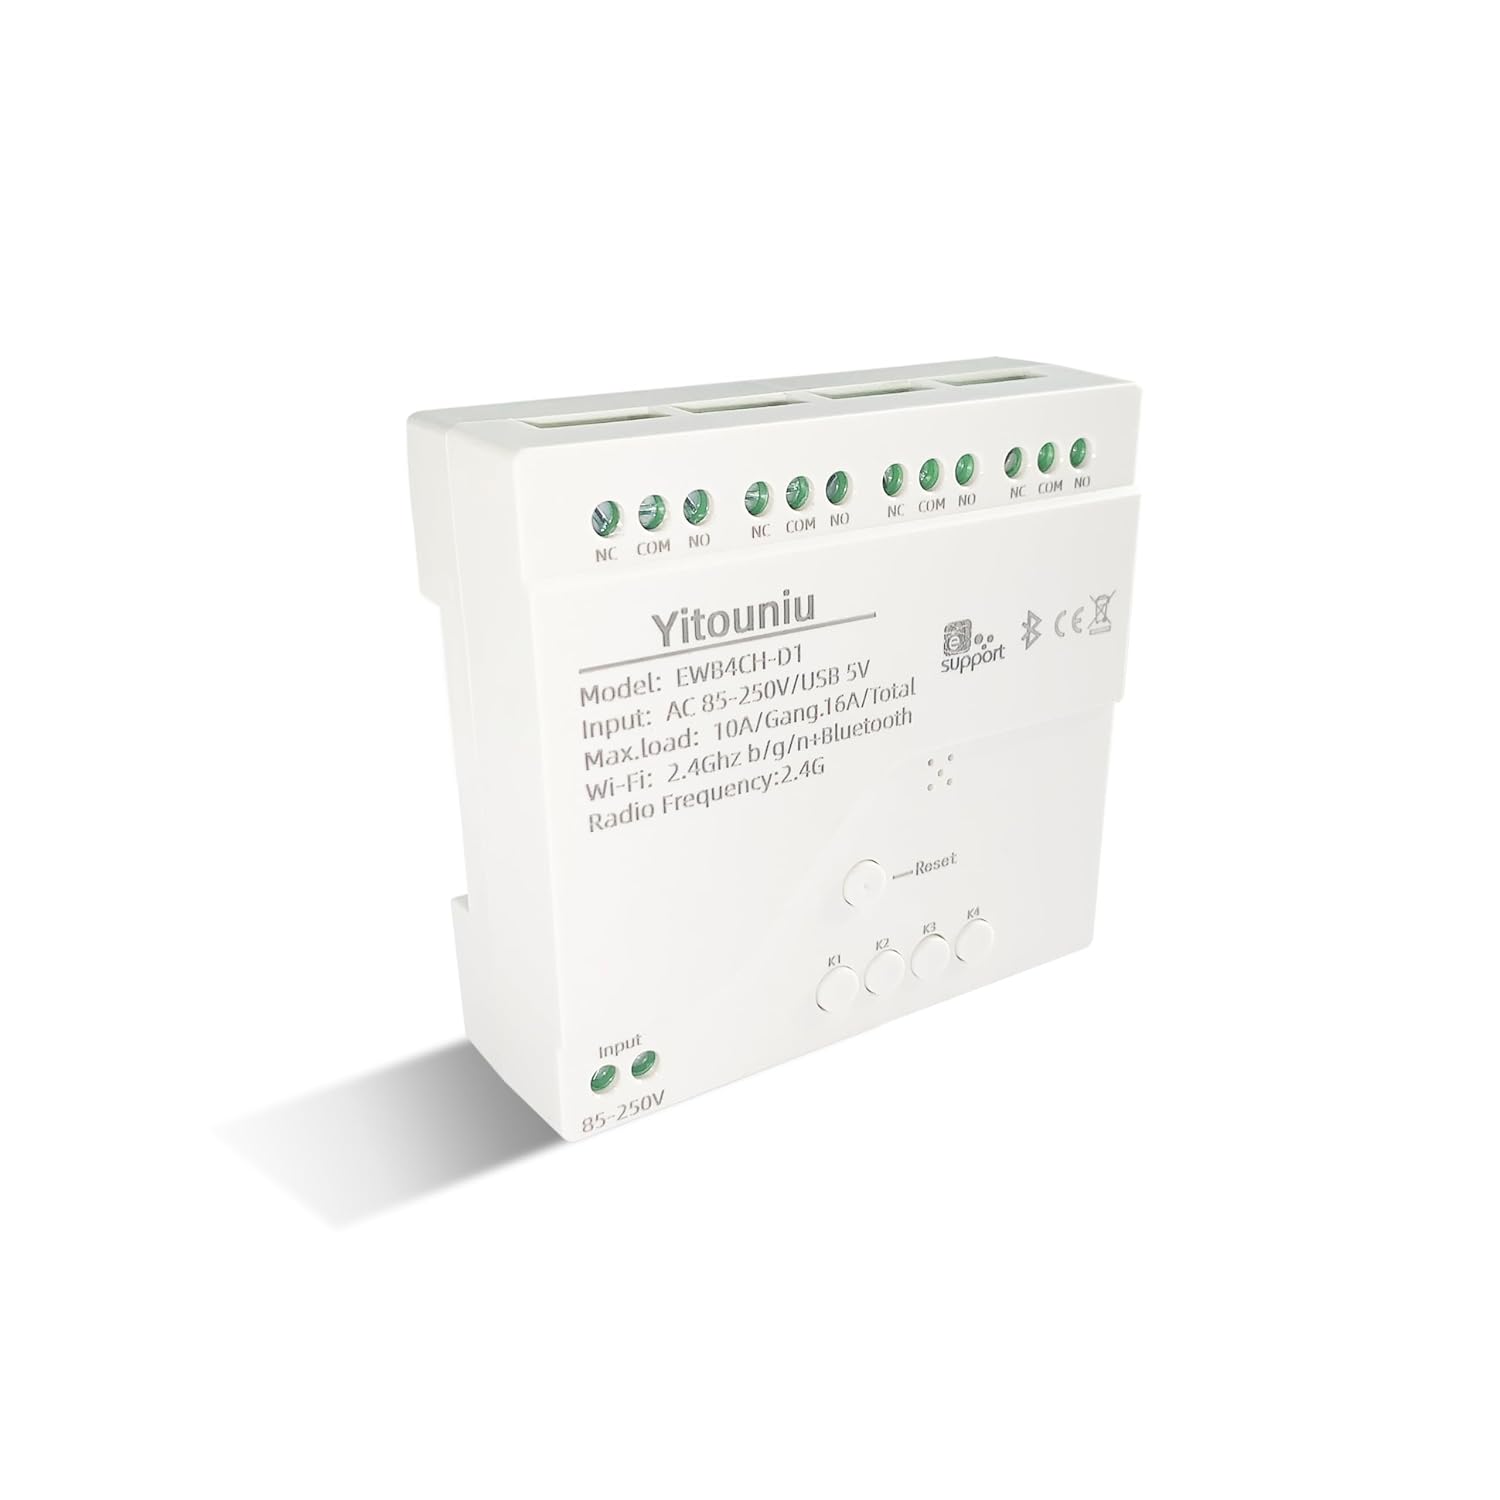
Image 1: Front view of the Yitouniu EWB4CH-D1 Smart Switch Controller, showing input terminals, control buttons, and model information.

Image 2: The Yitouniu EWB4CH-D1 Smart Switch Controller alongside its internal circuit board, illustrating the components and relay switches.
3. What's in the Box
Upon opening the package, verify that all components are present:
- 1x Yitouniu EWeLink 4CH Smart WiFi Switch Controller (Model EWB4CH-D1)
- 1x Instruction Manual (this document)
4. Specifications
| Parameter | Value |
|---|---|
| Model | EWB4CH-D1 |
| Input Voltage | AC 85-250V, Micro USB 5V |
| Maximum Current (per gang) | 10A |
| Maximum Load (total) | 16A / 3500W (for 4 gangs) |
| Wireless Standard | Wi-Fi 2.4GHz b/g/n + Bluetooth |
| Operating Temperature | -20°C to 70°C |
| Material | Flame retardant ABS |
| Product Dimensions (L x W x H) | 3.15 x 2.95 x 0.98 inches (80 x 75 x 25 mm) |
| Weight | 3.84 ounces (109g) |
| Operation Mode | ON-OFF-ON |
| Contact Type | Normally Open (NO), Common (COM), Normally Closed (NC) |
| Connector Type | Screw Terminal |
| Actuator Type | App, RF Remote, Manual Button |
5. Setup
5.1 Safety Precautions
WARNING: Installation involves high voltage. Ensure power is disconnected at the circuit breaker before performing any wiring. If you are unsure about electrical wiring, consult a qualified electrician. Improper installation can lead to electric shock, fire, or property damage.
5.2 Wiring Diagram
The device features screw terminals for input power and four independent relay outputs. Each output has Normally Open (NO), Common (COM), and Normally Closed (NC) contacts.
- Input Power: Connect AC 85-250V to the 'Input 85-250V' terminals. Alternatively, for low-voltage applications or testing, connect a 5V Micro USB power supply to the Micro USB port.
- Load Connections (Channels K1-K4): Each channel (K1, K2, K3, K4) has three terminals:
- NC (Normally Closed): Connected to COM when the relay is OFF.
- COM (Common): The common terminal for the relay.
- NO (Normally Open): Connected to COM when the relay is ON.
Connect your appliance's power line to the COM terminal and the control line to either NO or NC, depending on whether you want the appliance to be ON or OFF when the relay is activated.

Image 3: Top view of the Yitouniu EWB4CH-D1 controller, clearly showing the input terminals and the NC, COM, NO terminals for each of the four channels.
5.3 eWeLink App Installation and Device Pairing
- Download the eWeLink App: Search for "eWeLink" in the Apple App Store (iOS) or Google Play Store (Android) and install it.
- Register/Log In: Open the app and create a new account or log in with an existing one.
- Enter Pairing Mode: Power on the EWB4CH-D1 controller. Press and hold the 'Reset' button on the device for approximately 5-7 seconds until the Wi-Fi indicator LED flashes rapidly.
- Add Device in App: In the eWeLink app, tap the '+' icon (usually in the bottom center or top right) to add a new device. Select 'Quick Pairing' or 'Bluetooth Pairing' if available.
- Connect to Wi-Fi: Follow the on-screen instructions to connect the device to your 2.4GHz Wi-Fi network. Enter your Wi-Fi password when prompted. (5GHz Wi-Fi networks are not supported).
- Name Your Device: Once successfully paired, give your device a descriptive name (e.g., "Living Room Lights Controller").
6. Operating Modes
The EWB4CH-D1 supports three distinct operating modes, configurable within the eWeLink app:
- Point (Momentary) Mode: When activated, the relay turns ON for a set duration (0.5 seconds to 1 hour) and then automatically turns OFF. This mode is suitable for applications like garage door openers or momentary button presses.
- Self-Locking (Toggle) Mode: Each channel operates independently. When activated, the relay turns ON and stays ON until it is manually turned OFF. This is ideal for controlling lights or other devices that need to remain in a specific state.
- Interlocking Mode: In this mode, only one channel can be ON at a time. When one channel is activated, any other currently active channel will automatically turn OFF. This is useful for controlling motors with forward/reverse functions or blinds.
To change the operating mode, access the device settings within the eWeLink app.
7. App Control and Voice Control
7.1 eWeLink App Control
After successful pairing, you can control each of the four channels independently from anywhere using the eWeLink app. The app provides real-time status updates for each channel.
- Remote On/Off: Tap the respective channel button in the app to turn devices on or off.
- Scheduling: Set up single, repeating, or countdown timers for automated control.
- Scenes: Create custom scenes to control multiple devices with a single tap or based on specific conditions.
- Device Sharing: Share control of your device with family members or other users by inviting them through the app.

Image 4: Illustration showing how one mobile phone can control multiple smart switches, and how a single smart switch can be controlled by multiple mobile phones.

Image 5: Screenshot of the eWeLink app interface highlighting the 'Share Device' option, allowing users to grant control access to others.
7.2 Voice Control Integration
The EWB4CH-D1 is compatible with Amazon Alexa and Google Assistant. To enable voice control:
- Link eWeLink Account: In your Alexa or Google Home app, search for the "eWeLink Smart Home" skill/service and link it to your eWeLink account.
- Discover Devices: Once linked, ask your smart assistant to "Discover devices" or manually initiate device discovery in the app.
- Voice Commands: You can now use voice commands to control your connected appliances.
Example Commands:
- "Alexa, turn on [Device Name]"
- "Hey Google, turn off [Device Name]"

Image 6: Depiction of smart speakers (Amazon Echo, Google Home) used for voice control, with example commands for turning on/off lights.

Image 7: Illustration of using voice commands with Alexa or Google Assistant to control a garage door, demonstrating hands-free operation.
8. Maintenance
To ensure optimal performance and longevity of your EWB4CH-D1 controller:
- Cleaning: Disconnect power before cleaning. Use a dry, soft cloth to wipe the device. Do not use liquid cleaners or solvents.
- Firmware Updates: Periodically check the eWeLink app for available firmware updates. Keeping the firmware updated ensures the latest features and security patches.
- Environmental Conditions: Avoid exposing the device to extreme temperatures, high humidity, or direct sunlight.
9. Troubleshooting
If you encounter issues with your EWB4CH-D1 controller, refer to the following common problems and solutions:
- Device not pairing:
- Ensure your Wi-Fi network is 2.4GHz. 5GHz networks are not supported.
- Verify the Wi-Fi password is correct.
- Make sure the device is in pairing mode (Wi-Fi LED flashing rapidly). If not, press and hold the 'Reset' button.
- Move the device closer to your Wi-Fi router.
- Device offline in app:
- Check your internet connection.
- Ensure the device is powered on.
- Restart the device by disconnecting and reconnecting power.
- Check if your router settings have changed or if there's Wi-Fi interference.
- Voice control not working:
- Confirm that your eWeLink account is correctly linked to your Alexa or Google Home app.
- Ensure the device is discovered by your smart assistant.
- Use the exact device name configured in the eWeLink app for voice commands.
- RF remote control not responding:
- Ensure the RF remote is paired with the controller (refer to specific RF pairing instructions if provided with your remote).
- Check the battery in the RF remote.
10. Safety Information
Please observe the following safety guidelines:
- Do not attempt to disassemble or modify the device. This may void the warranty and pose safety risks.
- Ensure proper wiring according to local electrical codes and this manual.
- Do not exceed the maximum current and load ratings of the device (10A per gang, 16A/3500W total).
- Keep the device away from water, moisture, and flammable materials.
- This device is intended for indoor use only.
- Keep out of reach of children.
11. Warranty and Support
For warranty information and technical support, please refer to the seller's policy or contact the manufacturer directly. Typically, support can be accessed through the eWeLink app's 'FAQ & Feedback' section or the official eWeLink website.