1. Introduction
Thank you for purchasing the KH Alert Combination Gas & Carbon Monoxide Detector. This device is designed to provide continuous monitoring of your indoor environment for the presence of carbon monoxide (CO) and combustible natural gas, while also displaying temperature and humidity levels. Please read this manual thoroughly before installation and operation to ensure proper use and maximum safety.
2. Important Safety Information
Please observe the following safety guidelines:
- This detector is designed for indoor use only. Do not expose it to rain or moisture.
- Do not install the detector in areas with excessive dust, dirt, or grease, as this can affect sensor performance.
- Avoid installing near ventilation openings, doors, windows, or areas with strong air currents, which may prevent gas from reaching the sensor.
- Do not paint the detector. Paint can clog the sensor openings and interfere with proper operation.
- Regularly test the detector as instructed in this manual to ensure it is functioning correctly.
- In case of an alarm, evacuate the premises immediately and contact emergency services.
- This device is not a substitute for proper maintenance of fuel-burning appliances.
3. Product Features
The KH Alert Combination Gas & Carbon Monoxide Detector offers comprehensive monitoring capabilities:
- 4-in-1 Detection: Monitors Carbon Monoxide (CO), Combustible Gas (Natural Gas/Methane), Temperature, and Humidity.
- High Sensitivity Sensors: Equipped with catalytic combustion sensor for gas, electrochemical sensor for CO, and dedicated sensors for temperature and humidity.
- Real-time LCD Display: Provides clear, real-time readings of all monitored parameters.
- Loud Alarm: Features an 85dB high-volume alarm and visual light indicators for clear alerts.
- Easy Installation: Simple plug-and-play design for standard 110V-220V AC sockets.
- Self-Test Function: Allows for easy verification of detector functionality.

Figure 3.1: Overview of 4-in-1 Detection Capabilities
4. Package Contents
Upon opening the package, please verify that all items are present and in good condition:
- 1 x KH Alert Combination Gas & Carbon Monoxide Detector
- 1 x User Manual (this document)
5. Product Overview
Familiarize yourself with the components and dimensions of your detector:

Figure 5.1: Detector Components and Dimensions
Key Components:
- LCD Display: Shows real-time readings for CO, Gas, Temperature, and Humidity.
- Power Light: Indicates the device is powered on.
- Fault Light: Illuminates if a malfunction is detected.
- Alarm Light: Flashes during an alarm event.
- Self-Test Button: Used to manually test the alarm function.
- Voice Alarm/Speaker: Emits audible alerts.
- Air Inlet: Where ambient air enters for sensor analysis.
- AC Plug: For direct connection to a standard wall outlet.
6. Setup and Installation
The KH Alert detector is designed for simple plug-and-play installation:
- Choose a Location: Select a location where the detector can effectively monitor both carbon monoxide and natural gas. Ideal locations include:
- Near fuel-burning appliances (furnace, water heater, gas stove).
- In common living areas or bedrooms.
- At least 5 feet (1.5 meters) away from cooking appliances to avoid false alarms from cooking fumes.
- Avoid dead air spaces (e.g., behind curtains or furniture).
- Plug In: Insert the detector directly into a standard 110V-220V AC wall outlet. Ensure the outlet is not controlled by a switch that could accidentally turn off power to the detector.
- Power On: Once plugged in, the detector will power on automatically. The power light will illuminate, and the device will begin its self-initialization process. This may take a few moments.

Figure 6.1: Detector Plugged into a Wall Outlet
7. Operating Instructions
7.1 Display Information
The LCD display provides continuous real-time readings:
- Temperature: Displays the ambient temperature in Fahrenheit or Celsius.
- CO Concentration: Shows Carbon Monoxide levels in Parts Per Million (PPM).
- Gas Concentration: Shows Combustible Gas levels as a percentage of Lower Explosive Limit (%LEL).
- Humidity: Displays relative humidity as a percentage (%RH).
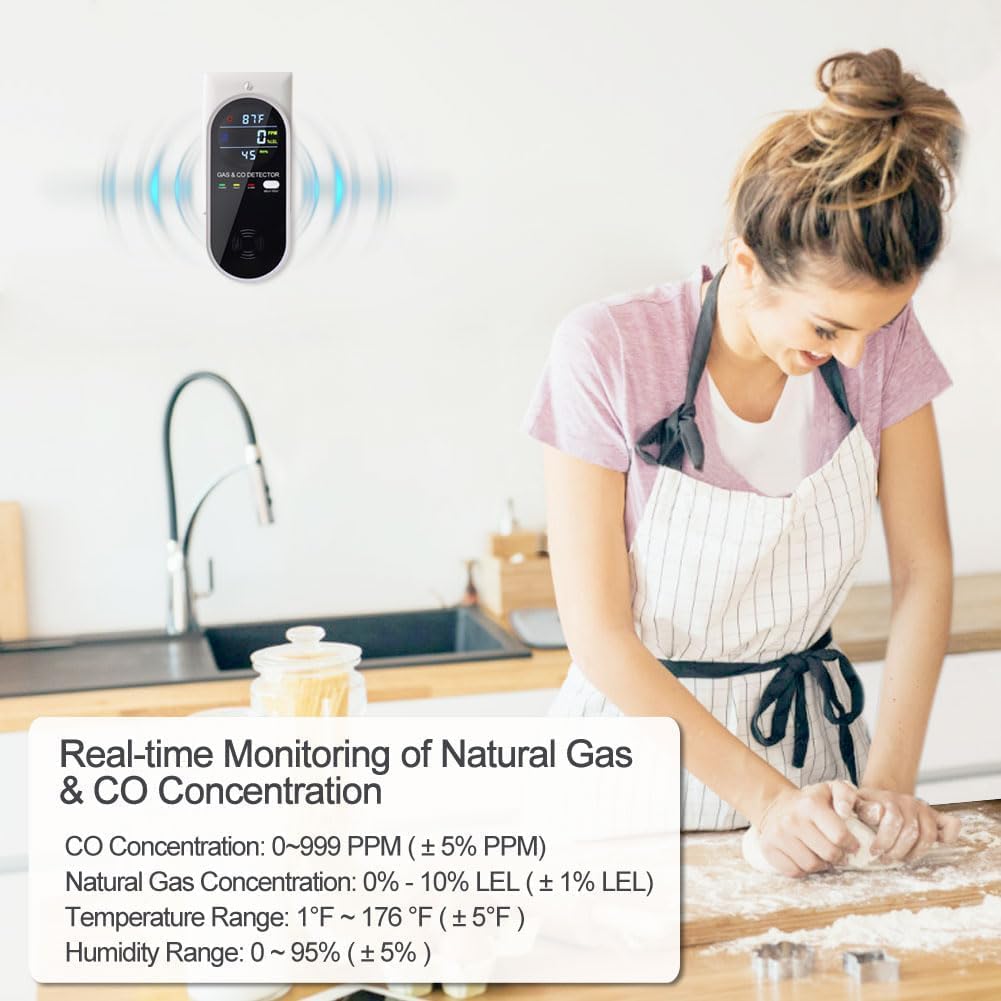
Figure 7.1: Real-time Display Readings
7.2 Self-Test Function
It is recommended to test your detector weekly to ensure proper operation:
- Press and hold the SELF-TEST button on the front of the detector.
- The detector will emit a loud alarm sound, and the alarm light will flash. The display may show test patterns or specific values during the test.
- Release the button. The detector should return to normal monitoring mode.
- If the alarm does not sound or the display does not respond during the self-test, refer to the Troubleshooting section.

Figure 7.2: Performing a Self-Test
8. Testing the Detector with Gas Sources
Beyond the self-test, you can perform functional tests using actual gas sources to verify sensor response. Exercise extreme caution when performing these tests.
8.1 Testing Carbon Monoxide (CO)
The carbon monoxide detector can be tested using a lit cigarette or a gas alignment device (e.g., a CO calibration gas canister). Ensure proper ventilation after the test.
- Light a cigarette and allow it to burn for a few seconds to produce smoke.
- Carefully bring the lit end of the cigarette near the air inlet of the detector. Do not touch the detector with the cigarette.
- The detector should register an increase in CO concentration on the display and eventually trigger the alarm if the concentration exceeds the threshold.
- Alternatively, use a CO calibration gas canister according to its instructions, directing a small amount of gas towards the air inlet.
8.2 Testing Combustible Gas
The combustible gas detector can be tested using a lighter (without igniting a flame) or a small amount of natural gas from an appliance. Ensure proper ventilation after the test.
- Using a lighter, press the gas release button without igniting the flame.
- Direct the released gas towards the air inlet of the detector for a few seconds.
- The detector should register an increase in gas concentration (%LEL) on the display and eventually trigger the alarm if the concentration exceeds the threshold.

Figure 8.1: Methods for Testing CO and Combustible Gas
9. Alarm Indications and Actions
The detector provides distinct alarms for different conditions:
| Indication | Description | Recommended Action |
|---|---|---|
| CO Alarm | Loud intermittent beeping, flashing alarm light, CO concentration displayed. | Immediately move to fresh air. Call emergency services or your gas provider. Do not re-enter the premises until it has been deemed safe by professionals. |
| Gas Alarm | Loud continuous beeping, flashing alarm light, gas concentration displayed. | Immediately open windows and doors to ventilate. Turn off gas appliances. Evacuate the premises and call your gas provider or emergency services. Do not use electrical switches or phones inside the building. |
| Fault Indication | Fault light illuminated, possibly with a specific error code on display. | The detector is malfunctioning. Unplug and re-plug the device. If the fault persists, contact customer support for assistance. Replace the unit if necessary. |
10. Maintenance
Proper maintenance ensures the longevity and accuracy of your detector:
- Regular Cleaning: Gently wipe the exterior of the detector with a soft, damp cloth. Do not use cleaning agents, solvents, or abrasive materials. Do not spray cleaners directly onto the detector.
- Avoid Obstructions: Ensure the air inlet and speaker grille are free from dust, dirt, or any obstructions.
- Do Not Disassemble: Do not attempt to open or repair the detector yourself. This will void the warranty and could lead to malfunction.
- Test Regularly: Perform the self-test weekly as described in Section 7.2.
11. Troubleshooting
If you encounter issues with your detector, refer to the table below:
| Problem | Possible Cause | Solution |
|---|---|---|
| Detector does not power on. | No power to the outlet; faulty outlet. | Check if the outlet is live by plugging in another device. Try a different outlet. |
| Alarm sounds frequently without apparent gas/CO. | False alarm due to fumes (cooking, aerosols, cleaning products); high humidity. | Ventilate the area. Relocate the detector away from sources of fumes or high humidity. Ensure proper ventilation during cooking or cleaning. |
| Self-test fails (no sound/light). | Detector malfunction. | Unplug the detector, wait 30 seconds, and plug it back in. Perform the self-test again. If it still fails, the unit may need replacement. |
| Fault light is on. | Internal sensor error or malfunction. | Unplug and re-plug the detector. If the fault light remains on, the unit requires service or replacement. Contact customer support. |
| Display shows incorrect temperature/humidity. | Sensor obstruction or environmental factors. | Ensure the temperature/humidity sensor area is clear. Allow time for the sensor to acclimate to the room temperature. |
If the problem persists after trying these solutions, please contact customer support.
12. Specifications
| Parameter | Value |
|---|---|
| Model Number | KH158 |
| Power Source | Plug-in (110V-220V AC) |
| CO Detection Range | 0 to 2000 PPM |
| Combustible Gas Detection Range | 0 to 10% LEL |
| Temperature Range | 1 to 176 ℉ (℃ equivalent) |
| Humidity Range | 0% to 95% RH |
| Alarm Volume | 85 dB (at 1 meter) |
| Sensor Type (CO) | Electrochemical |
| Sensor Type (Gas) | Catalytic Combustion |
| Product Dimensions (H x W x D) | 4.69" x 2.05" x 1.93" |
| Item Weight | 0.2 Pounds (approx. 3.2 ounces) |
13. Warranty and Support
KH Alert is committed to providing high-quality products and customer satisfaction. This product comes with a worry-free after-service policy, including unconditional returns or exchanges within 180 days of purchase.
If you have any questions, concerns, or require technical assistance, please do not hesitate to contact us via email. Our customer support team will endeavor to help you resolve any issues promptly.
Please retain your purchase receipt as proof of purchase for warranty claims.