Uckazy E60CCC-LIN
Uckazy 8.9 Inch CarPlay & Android Auto Radio Upgrade Touch Screen for BMW CCC Systems (Model E60CCC-LIN)
Model: E60CCC-LIN | Brand: Uckazy
Introduction
This manual provides comprehensive instructions for the installation, setup, operation, and troubleshooting of your Uckazy 8.9 Inch CarPlay and Android Auto Radio Upgrade Touch Screen. This unit is designed to enhance your driving experience by integrating modern multimedia features while retaining your vehicle's original functionalities.
Compatibility
This device is compatible with specific BMW 3 and 5 Series models equipped with the CCC system from 2005 to 2008. Please verify your vehicle's system before installation.
- BMW 3 Series: E90, E91, E92, E93 (2005-2008)
- BMW 5 Series: E60, E61, E63, E64 (2005-2008)
Important Note: This unit is designed for vehicles with the CCC (Car Communication Computer) system. It is not compatible with CIC (Car Information Computer) systems. To confirm your system type, check the LVDS port: CCC systems typically use a 10-pin LVDS port, while CIC systems use a 4-pin LVDS port.

Image: Compatibility chart for BMW 3 and 5 Series (E90, E91, E92, E93, E60, E61, E63, E64) from 2005-2008, highlighting the 10-pin LVDS port for CCC systems and contrasting it with the 4-pin LVDS port for incompatible CIC systems.
What's in the Box
Please ensure all components are present before beginning installation:
- 8.9-inch Touch Screen Display
- Plug and Play Power Cable
- USB Cable
- AUX Cable
- Installation Tools (plastic crowbars, touch pen)
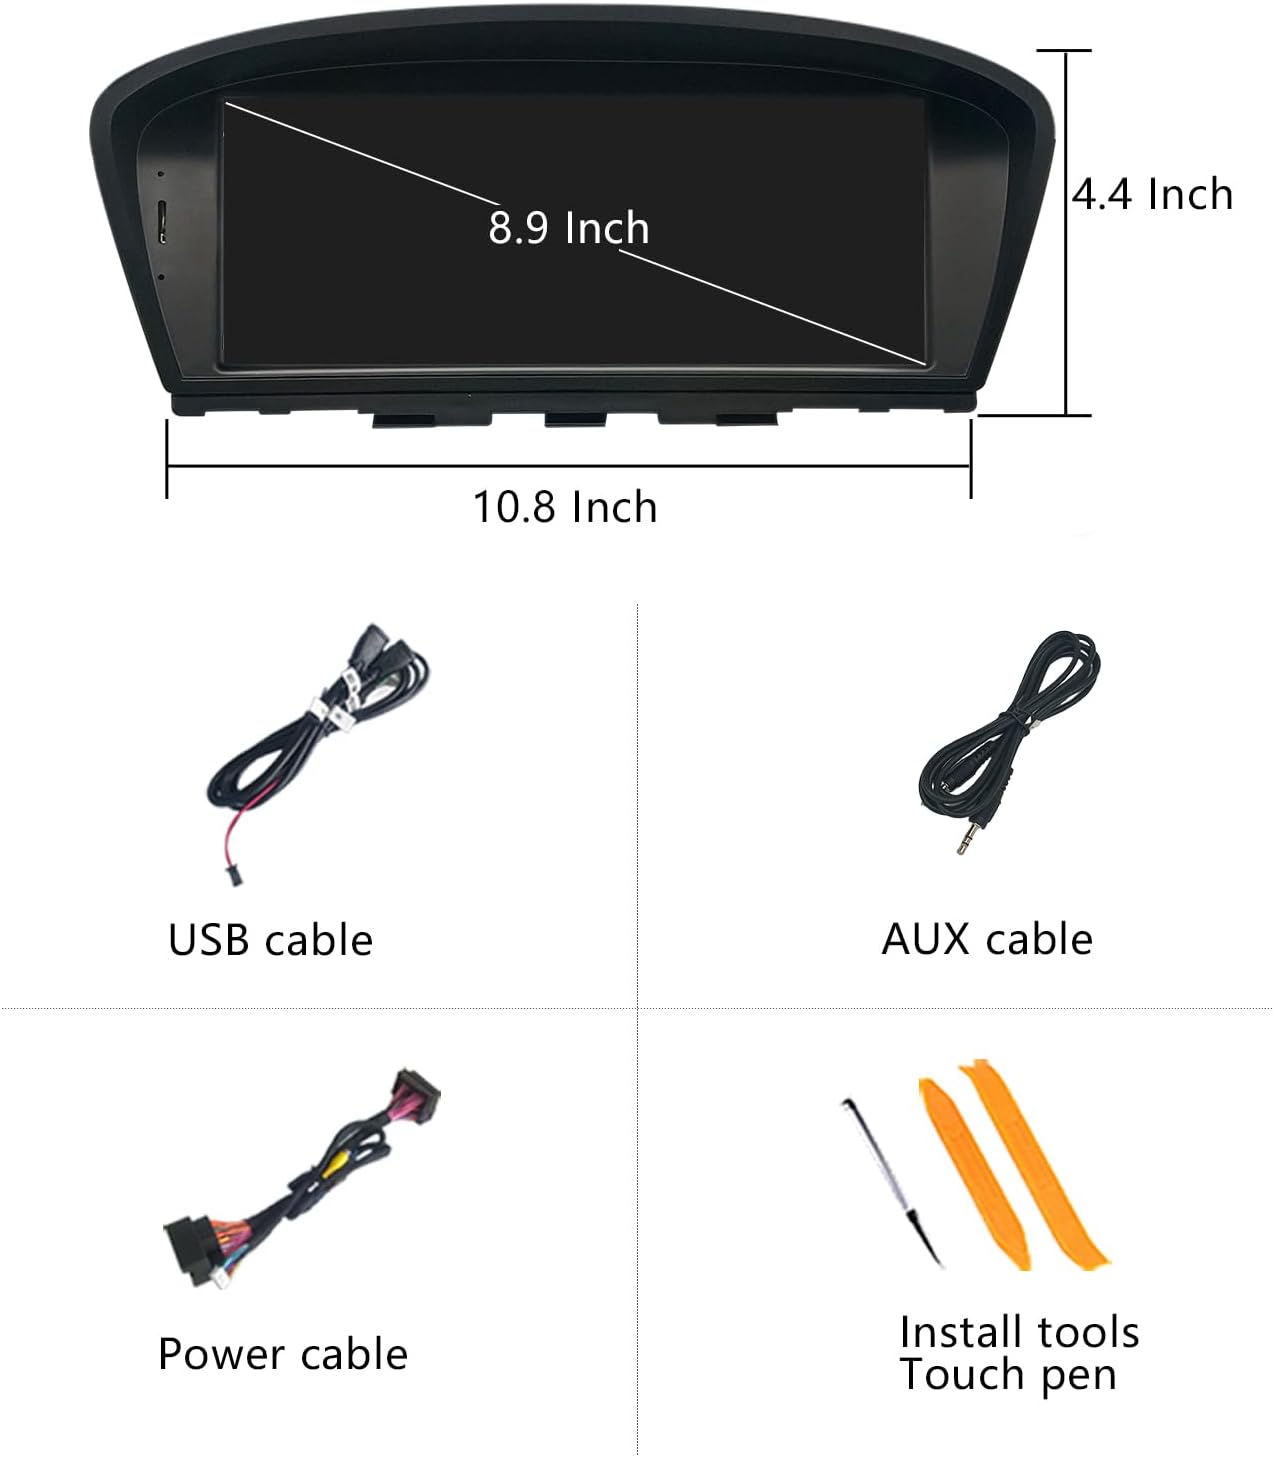
Image: The product package contents, showing the 8.9-inch display unit, a USB cable, an AUX cable, the main power cable harness, and a set of installation tools including plastic pry tools and a touch pen.
Installation
Installation involves replacing the original car screen and connecting the new unit using the provided cables. It is recommended to disconnect the car battery before starting any electrical work. Exercise caution when handling vehicle trim and wiring.
1. Fiber Optic Cable Transfer (for vehicles with fiber optic audio)
If your vehicle uses fiber optic cables for audio, you will need to transfer them from the original power harness to the new unit's power cable. This step is crucial for sound functionality.
Video: This video demonstrates the process of transferring fiber optic cables from the original car harness to the new unit's power cable. This step is essential for ensuring audio output from the new system, especially if you experience a "no sound" issue after installation.
Steps:
- Carefully cock the snap on the original power connector and pull out the fiber optic cable.
- Locate the corresponding slot on the new power cable harness.
- Insert the fiber optic cable into the new harness, ensuring it snaps securely into place.

Image: A diagram illustrating the wire definitions and linking process for the car system. It shows various connections including ACC-OUT, Rear-Camera-PWR, and GND, and how to connect the fiber optic cable from the original CD unit to the Linux system harness.
2. Power Cable Connection
Connect the provided plug-and-play power cable to the vehicle's original power cable. Ensure a secure connection, paying attention to the correct interface.
3. Wired CarPlay/Android Auto Connection
For wired CarPlay or Android Auto functionality, connect your device to USB1. USB2 is primarily for data storage.

Image: A diagram illustrating the connection for wired CarPlay or Android Auto, emphasizing the use of USB1 for this function.
If you experience noise in the sound when using CarPlay or Android Auto, ensure the connection is made via the designated USB port and check all audio settings.
Setup
After physical installation, configure the system settings for optimal performance.
1. Initial System Boot and Language Settings
Upon first power-on, the system may display in a default language. Navigate to the settings menu to change the language to English if necessary. The video below demonstrates navigating the system menu.
Video: This video provides a demonstration of the product's operating system display, including navigation through menus and settings. It shows how to switch between the original car system and the new Linux system interface.
2. OEM Screen Resolution Settings
To ensure proper display of original car information, set the correct OEM screen resolution. Incorrect settings may prevent original car data from displaying correctly.
- Go to Setup > Car Settings > Original Car Screen Resolution.
- Select the appropriate resolution for your vehicle. If unsure, try each option until the original car information displays correctly.

Image: A screenshot of the system settings menu, specifically showing the "Original Car's Screen Resolution" options, such as 400x240, 640x240, 800x480, and 1280x480 NBT.
3. Camera Settings
If you have an original or aftermarket reverse camera, configure its settings for proper operation.
- Go to Setup > Car Settings > Reversing Settings > Camera Type.
- Select "Original" for factory cameras or "Aftermarket" for installed cameras. Incorrect selection will prevent the reverse camera from working.

Image: A screenshot of the system settings menu, specifically showing the "Reversing Settings" options, including "Camera Type" for selecting between original and aftermarket cameras.
4. AUX Audio Settings
For audio output from the new system, the vehicle's AUX input must be correctly configured and activated.
- Automatic AUX Switch: Go to Setup > Car Settings > Auto Switch to AUX. Select "Harman Head Unit" or "Alpine Head Unit" based on your car's audio system.
- Manual AUX Setting: If automatic switching does not work, manually activate AUX.
- Go to the original car system's main menu and select "Multimedia".
- Then select "External devices".
- Long press the number key "8" on your iDrive controller every time before entering the new system to get CarPlay sound.

Image: A composite image showing screenshots for configuring AUX audio. It illustrates both the automatic AUX switch setting (selecting Harman or Alpine Head Unit) and the manual method involving navigating the original car's multimedia menu and pressing the '8' button on the iDrive controller.
Operating the System
Your new Uckazy display offers a dual-system experience, allowing seamless switching between the Linux system and your original car system.
1. Switching Between Systems
The unit allows for a one-click switch between the new Linux system and your original BMW car system, retaining all original functions.

Image: A visual representation of switching between the original car system interface and the new Linux system interface, which features icons for OEM Car Info, CarPlay, Android Auto, and HiCar.
2. CarPlay and Android Auto
The system supports both wireless and wired Apple CarPlay and Android Auto, providing access to navigation, phone contacts, messages, music, and voice assistants (Siri/Google Voice Assistant).

Image: A display showing the wireless CarPlay and Android Auto interfaces on the unit, with a smartphone demonstrating the connection process for CarPlay.

Image: A comprehensive view of smartphone interaction features, including wireless CarPlay, wireless Android Auto, Mirrorlink for displaying phone content, and voice control functionality (e.g., "Hey, Siri!").
3. Other Features
- Wireless Mirrorlink: Connect iOS and Android phones to mirror their screens.
- Bluetooth & Wi-Fi: For connectivity and internet access.
- Built-in DSP with 16 EQ segments: Customize audio output for enhanced sound quality.
- Day and Night Mode: Automatic light sensitivity adjusts display brightness based on your car's original headlights.

Image: A split image illustrating the automatic day and night mode feature, where the screen's brightness and theme adjust according to ambient light conditions detected by the car's original headlight sensors.

Image: A grid of six images demonstrating support for original OEM system features, including steering wheel control, compatible OEM reversing camera and parking radar, iDrive control, sound from the original car stereo, retention of the original CD player, and preservation of the original car system.
Maintenance
To ensure the longevity and optimal performance of your Uckazy display, follow these maintenance guidelines:
- Cleaning: Use a soft, lint-free cloth to clean the screen. For stubborn smudges, lightly dampen the cloth with water or a screen-safe cleaner. Avoid harsh chemicals or abrasive materials.
- Temperature: Avoid exposing the unit to extreme temperatures for prolonged periods.
- Software Updates: Periodically check for software updates from the manufacturer to ensure the system runs efficiently and has the latest features.
Troubleshooting
This section addresses common issues you might encounter.
No Sound After Installation
This is a common issue, often related to the fiber optic cable connection or AUX settings.
- Fiber Optic Cable: Ensure the fiber optic cables from your original car's CD unit are correctly transferred and securely connected to the new unit's power harness. Refer to the "Fiber Optic Cable Transfer" section and the accompanying video in the Installation section.
- AUX Settings: Verify that the AUX audio input is correctly configured and activated in both the new system's settings and your original car's multimedia menu. Refer to the "AUX Audio Settings" section under Setup.
- Volume Levels: Check both the unit's volume and your car's original audio system volume.
Display Issues / Incorrect Resolution
If the display is distorted or original car information is not showing correctly:
- OEM Screen Resolution: Ensure the correct OEM screen resolution is selected in the system settings. Refer to the "OEM Screen Resolution Settings" section under Setup.
- Connections: Recheck all video cable connections to ensure they are secure.
CarPlay/Android Auto Not Connecting
If you are having trouble connecting your smartphone:
- Wireless Connection: Ensure Bluetooth is enabled on your phone and the unit, and that Wi-Fi is active for wireless CarPlay/Android Auto.
- Wired Connection: For wired connections, ensure you are using the designated USB1 port.
- Permissions: Grant all necessary permissions on your smartphone when prompted.
Specifications
| Product Dimensions | 10.8 x 4.4 x 5.7 inches |
| Item Weight | 3.4 pounds |
| Model Number | E60CCC-LIN |
| Screen Size | 8.9 Inch |
| Screen Resolution | HD 1920x720 (IN-CELL) |
| Connectivity Technology | Bluetooth, Wi-Fi |
| Special Feature | Touchscreen, DSP with 16 EQ segments |
| Compatible Devices | Smartphone (iOS & Android) |
| Audio Output Mode | Stereo |

Image: A side-by-side comparison showing the original BMW car display (Before installation) versus the new Uckazy 8.9-inch display with CarPlay interface (After installation), highlighting the visual upgrade.

Image: A visual comparison demonstrating the difference in clarity and detail between an 800x480 resolution screen and the 1920x720 IPS screen of the Uckazy unit, emphasizing higher color brightness and wider viewing angles.
Warranty and Support
For warranty information, technical support, or further assistance, please contact Uckazy customer service or refer to the product's purchase platform for seller contact details. Many common issues can be resolved by reviewing this manual or contacting support with clear descriptions and images of the problem.