BUNGPUNG BP-HDC-MC02
BUNGPUNG 8K@60Hz HDMI eARC Audio Extractor Adapter User Manual
Model: BP-HDC-MC02
Brand: BUNGPUNG
1. Product Overview
The BUNGPUNG 8K@60Hz HDMI eARC Audio Extractor Adapter (Model: BP-HDC-MC02) is designed to extract audio signals from an HDMI source or a TV with ARC/eARC functionality. This allows the audio to be outputted to an AV receiver or amplifier, providing enhanced sound experiences while maintaining high-quality video passthrough.
This adapter supports video resolutions up to 8K@60Hz (4:2:0 12bit) and 4K@120Hz (4:4:4 12bit), with backward compatibility for lower resolutions. It is compatible with HDMI 2.1, HDCP 2.3, and HDR, supporting deep color (30/36/48 bit). The device ensures high performance with no noticeable lag or loss in image and sound quality.

Image: Front view of the BUNGPUNG 8K@60Hz HDMI eARC Audio Extractor Adapter, showcasing its compact design and labeling.
2. Key Features
- HDMI eARC Audio Extraction: Extracts audio from HDMI sources or eARC/ARC enabled TVs to an AV receiver.
- High Resolution Support: Supports 8K@60Hz (4:2:0 12bit) and 4K@120Hz (4:4:4 12bit) video resolutions.
- Advanced Compatibility: Fully compatible with HDMI 2.1, HDCP 2.3, and HDR. Supports deep color (30/36/48 bit).
- Wide Device Compatibility: Works with Blu-ray players, DVDs, HD players, gaming consoles (PS3/4 Pro, Xbox), PCs, streaming devices (Fire TV, Apple TV, Chromecast, Roku), and outputs to Full HD TVs, monitors, projectors, speakers, amplifiers, and soundbars.
- Durable Construction: Features a robust metal body for rapid heat absorption and dissipation, reducing EMI/RFI noise interference.
- Plug-and-Play: Compact size and easy installation.
- Stable Power Supply: Independent power supply ensures stable operation.
3. Package Contents
Please verify that all items are present in the package:
- 1 x BUNGPUNG 8K@60Hz HDMI eARC Audio Extractor Adapter (Model: BP-HDC-MC02)
- 1 x DC 5V Power Adapter
- 1 x User Manual (this document)
4. Product Diagram and Components
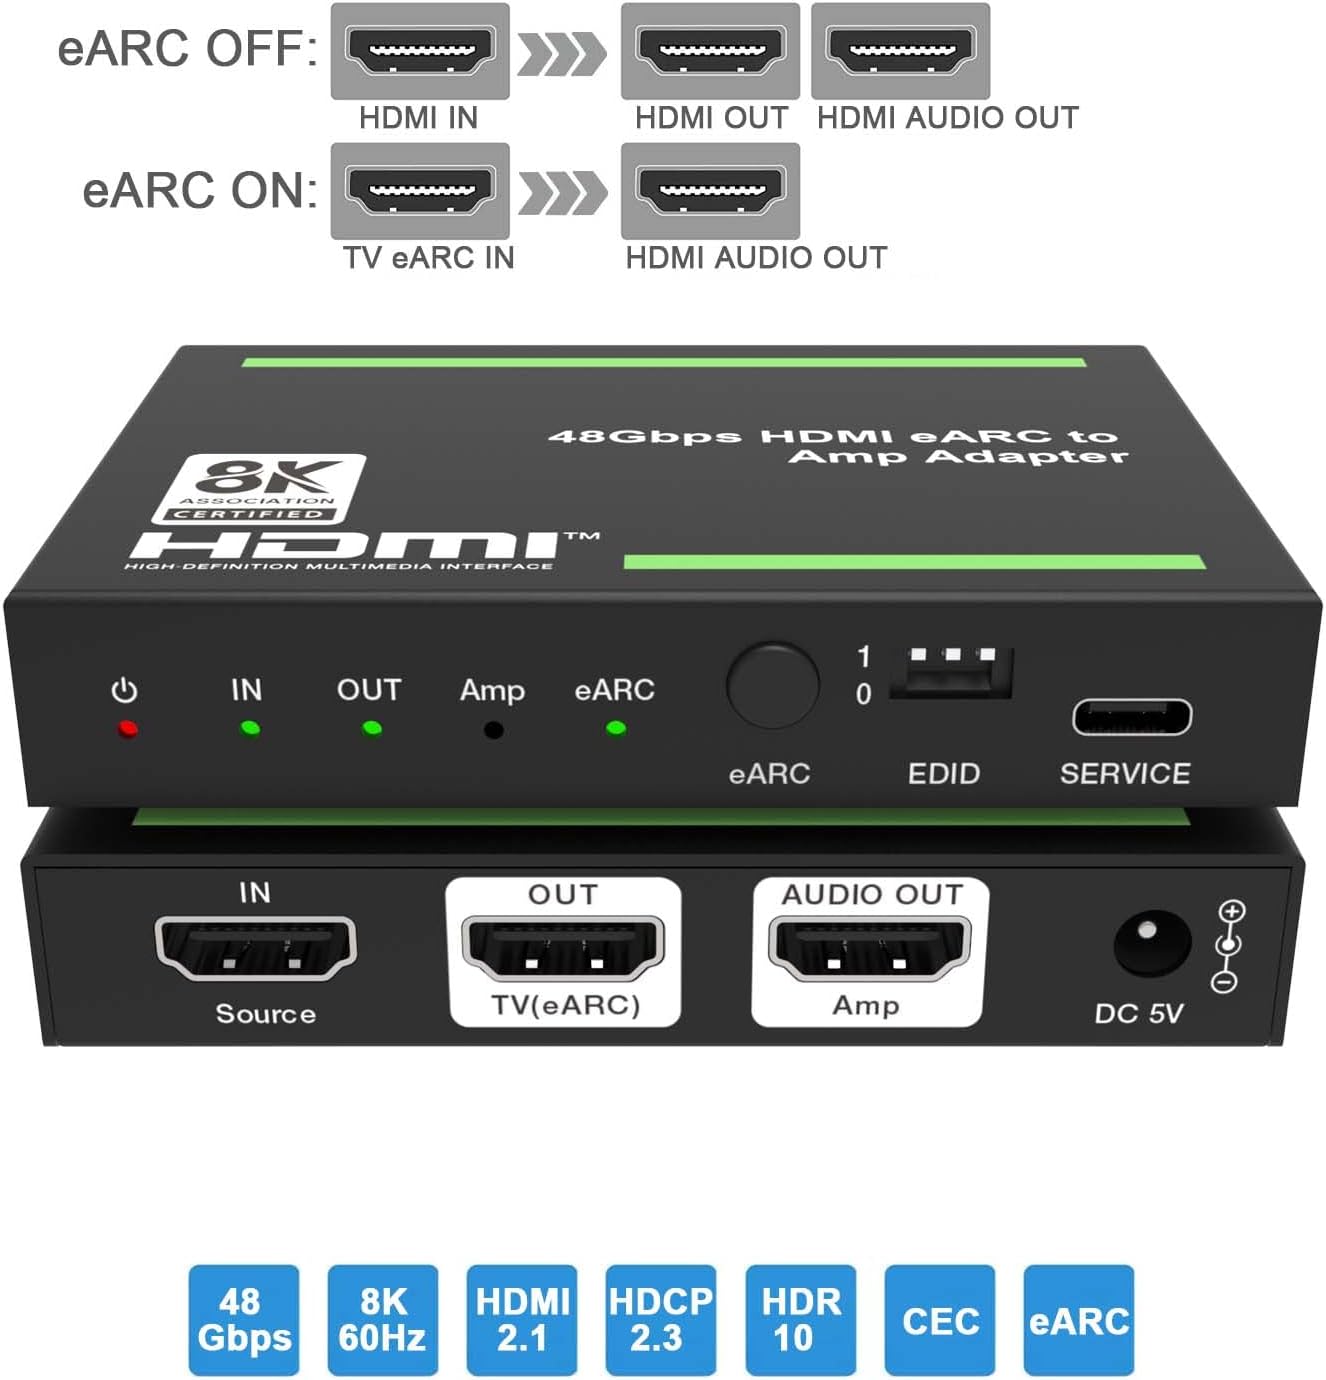
Image: Top and bottom views of the adapter, highlighting the input/output ports and control elements.
Front Panel Controls and Indicators:
- Power LED: Red indicator, illuminates when the device is powered on.
- IN LED: Green indicator, illuminates when an input signal is detected.
- OUT LED: Green indicator, illuminates when the HDMI OUT port is connected to a TV.
- Amp LED: Green indicator, illuminates when the AUDIO OUT port is connected to an amplifier.
- eARC LED: Flashes when ARC/eARC function is enabled and CEC communication is working. Off when ARC/eARC is disabled.
- eARC Button: Press to enable or disable the eARC function.
- EDID DIP Switch: Used to set the EDID mode (see Section 6 for details).
- SERVICE Port: For firmware updates and debugging.
Rear Panel Ports:
- IN (Source): HDMI input port for connecting source devices (e.g., Blu-ray player, gaming console, PC).
- OUT (TV(eARC)): HDMI output port for connecting to a TV or display. This port also functions as an ARC/eARC audio channel when the eARC function is enabled.
- AUDIO OUT (Amp): HDMI audio output port for connecting to an amplifier or AV receiver.
- DC 5V: Power input port for the included 5V DC power adapter.
5. Setup Instructions
Follow these steps to set up your HDMI eARC Audio Extractor Adapter:
- Connect Source Device: Connect an HDMI cable from your source device (e.g., Blu-ray player, game console, PC) to the IN (Source) port on the adapter.
- Connect Display Device: Connect an HDMI cable from the OUT (TV(eARC)) port on the adapter to the HDMI input of your TV or display.
- Connect Audio Receiver: Connect an HDMI cable from the AUDIO OUT (Amp) port on the adapter to an HDMI input on your AV receiver or amplifier.
- Connect Power: Plug the included 5V DC power adapter into the DC 5V port on the adapter, then plug the adapter into a power outlet. The Power LED will illuminate.
- Configure eARC (Optional): If you wish to extract audio from your TV's eARC/ARC channel to your AV receiver, ensure your TV's eARC/ARC function is enabled. Then, press the eARC Button on the adapter to enable eARC mode. The eARC LED will flash.
- Set EDID (Optional): Adjust the EDID DIP Switch according to your audio and video requirements. Refer to Section 6 for detailed EDID settings.

Image: Diagram illustrating typical connection scenarios for the HDMI eARC Audio Extractor, showing connections from a Blu-ray player to the adapter, then to a TV and a 7.1 channel audio amplifier.
Connection Scenarios:

Image: Diagram showing eARC OFF mode, where HDMI IN provides video to HDMI OUT and audio to HDMI AUDIO OUT.

Image: Diagram showing eARC ON mode, where TV eARC IN provides audio to HDMI AUDIO OUT.
6. Operating Instructions
LED Indicators:
| No. | Name | Function Description |
|---|---|---|
| 1 | Power LED | When the device is powered on, the red LED will be on. |
| 2 | IN LED | When the input signal is detected, the green LED will be on. |
| 3 | OUT LED | When the OUT port connects to a TV, the green LED will be on. |
| 4 | Amp LED | When the AUDIO OUT port connects to an amplifier, the green LED will be on. |
| 5 | eARC LED | On: The ARC/eARC function is turned on. CEC communication and ARC/eARC is working properly. Flashing: The ARC/eARC function is turned on. CEC communication and ARC/eARC is not working properly. Off: The ARC/eARC function is turned off. |
eARC Button Operation:
Press the eARC button on the front panel to toggle the eARC function on or off. When eARC is enabled, the adapter can extract audio from the TV's eARC/ARC channel and send it to the connected AV receiver via the AUDIO OUT port.
7. EDID Management
The EDID (Extended Display Identification Data) DIP switch allows you to manually configure the audio and video capabilities reported by the adapter to the source device. This can be useful for resolving compatibility issues or forcing specific audio formats.

Image: Detailed diagram explaining the function of each LED indicator and the settings for the EDID DIP switch.
EDID DIP Switch Settings:
| DIP Switch Setting (1-0) | Description |
|---|---|
| [DIP]=111 | Copy OUT port sink video and audio EDID (Default) |
| [DIP]=110 | Copy AUDIO OUT port sink video and audio EDID |
| [DIP]=101 | FRL12G_8K_HDR, 2.0CH |
| [DIP]=100 | FRL12G_8K_HDR, 5.1CH |
| [DIP]=011 | FRL12G_8K_HDR, 7.1CH |
| [DIP]=010 | FRL10G_8K_HDR, 2.0CH |
| [DIP]=001 | FRL10G_8K_HDR, 5.1CH |
| [DIP]=000 | FRL10G_8K_HDR, 7.1CH |
Note: "FRL" refers to Fixed Rate Link, a signaling method used in HDMI 2.1 for higher bandwidths. "12G" and "10G" indicate the data rate per lane (12 Gbps or 10 Gbps). "HDR" indicates High Dynamic Range support. "CH" indicates audio channels.
8. Maintenance
To ensure the longevity and optimal performance of your adapter, follow these maintenance guidelines:
- Keep the device in a cool, dry place, away from direct sunlight, high temperatures, and humidity.
- Avoid exposing the device to water or other liquids.
- Clean the device with a soft, dry cloth. Do not use abrasive cleaners or solvents.
- Ensure proper ventilation around the device to prevent overheating.
- Disconnect power when the device is not in use for extended periods.
9. Troubleshooting
If you encounter issues with your HDMI eARC Audio Extractor Adapter, please refer to the following common problems and solutions:
| Problem | Possible Cause / Solution |
|---|---|
| No video output on TV/display. |
|
| No audio output from AV receiver/amplifier. |
|
| Audio is distorted or intermittent. |
|
| eARC function not working or eARC LED is flashing. |
|
10. Specifications
| Feature | Detail |
|---|---|
| Model Number | BP-HDC-MC02 |
| HDMI Version | HDMI 2.1 |
| HDCP Version | HDCP 2.3 |
| Max Resolution Support | 8K@60Hz (4:2:0 12bit), 4K@120Hz (4:4:4 12bit) |
| Color Depth Support | 30 bit, 36 bit, 48 bit |
| HDR Support | Yes |
| eARC/ARC Support | Yes |
| CEC Support | Yes |
| Product Dimensions (L x W x H) | 3.94 x 2.76 x 0.79 inches (95 x 68 x 18 mm) |
| Item Weight | 0.007 ounces (approx. 0.2 grams) |
| Power Supply | DC 5V |
| Compatible Devices | Amplifier, Speaker, Blu-ray player, DVD, HD player, Amazon Fire TV, Apple TV, PS3/4 Pro, Xbox, PC/Laptop, HD camera, Chromecast, Fire Stick, Roku, HDDVR, Full HD TV, monitor, projector, soundbars. |
11. Warranty and Support
This BUNGPUNG product is covered by a one-year warranty from the date of purchase. This warranty covers manufacturing defects and initial defects.
If you have any questions regarding product compatibility, setup, operation, or encounter any initial defects, please do not hesitate to contact BUNGPUNG customer support. Please refer to the product packaging or the seller's information on the purchase platform for specific contact details.
Ask a question about this manual
Ask about setup, troubleshooting, compatibility, parts, safety, or missing instructions. Manuals+ will review the question and use this page’s manual context to help answer it.