1. Introduction
This manual provides comprehensive instructions for the Geekworm X1100-C1 Metal Case, designed to house your Raspberry Pi 5 and X1100 2.5-inch SATA HDD/SSD Shield. Please read this manual carefully before installation and operation to ensure proper use and longevity of your product.
2. Package Contents
The X1100-C1 Metal Case package includes the following items:
- 1 x X1100-C1 Metal Case
- 1 x Screws Pack (for assembly)
- 4 x Rubber Pads
Note: The Raspberry Pi 5, 2.5-inch SATA HDD/SSD, active cooler, or power adapter are not included and must be purchased separately.
3. Compatibility
The Geekworm X1100-C1 Metal Case is compatible with:
- Raspberry Pi 5
- Geekworm X1100 2.5 Inch SATA HDD/SSD Shield (ASIN: B0CP8YYTRH)
It also supports the installation of the Raspberry Pi 5 active cooler.
4. Installation Guide
Follow these steps to assemble your Raspberry Pi 5 and X1100 SATA HDD/SSD Shield into the X1100-C1 Metal Case.
4.1. X1100 Kit Assembly
- Prepare the X1100 Board: Fix 4 pieces of M2.5x5mm screws with M2.5x14mm F/F spacers together on the X1100 2.5" SATA HDD/SSD Shield.
- Install HDD/SSD: Insert your 2.5" SATA HDD/SSD into the X1100 board. Secure it using 2 pieces of M3x8mm screws.
- Mount Raspberry Pi 5: Place the Raspberry Pi 5 board above the spacers on the X1100. Fix the Pi 5 using 4 pieces of M2.5x5mm screws.
- Connect USB 3.0: Plug in the USB 3.0 connector from the X1100 board to the Raspberry Pi 5.
- Install Active Cooler (Optional): If using, install the Raspberry Pi 5 active cooler or another compatible third-party cooler onto the Pi 5. Ensure proper connection to the fan header.

Image: Raspberry Pi 5 mounted on the X1100 board, secured with screws and spacers.

Image: Raspberry Pi 5 with X1100 board and an active cooler installed.
4.2. Case Assembly
- Disassemble the Case: Unscrew the 4 pieces of KM2.5x4mm screws from the bottom of the X1100-C1 metal case to separate the top and bottom covers.
- Insert X1100 Kit: Carefully push the assembled X1100 kit (with Pi 5 and HDD/SSD) into the X1100-C1 metal case. Align it with the bottom mounting holes and fix the kit using 4 pieces of KM2.5x4mm screws.
- Unplug USB 3.0 Connector: Temporarily unplug the USB 3.0 connector from the case side to allow for top cover placement.
- Attach Top Cover: Put the top cover back onto the case and fix it with the 4 pieces of KM2.5x4mm screws.
- Reconnect USB 3.0: Plug the USB 3.0 connector back into the appropriate port on the case.
- Apply Rubber Pads: Stick the 4 rubber pads at the bottom of the X1100-C1 case for stability and scratch protection.
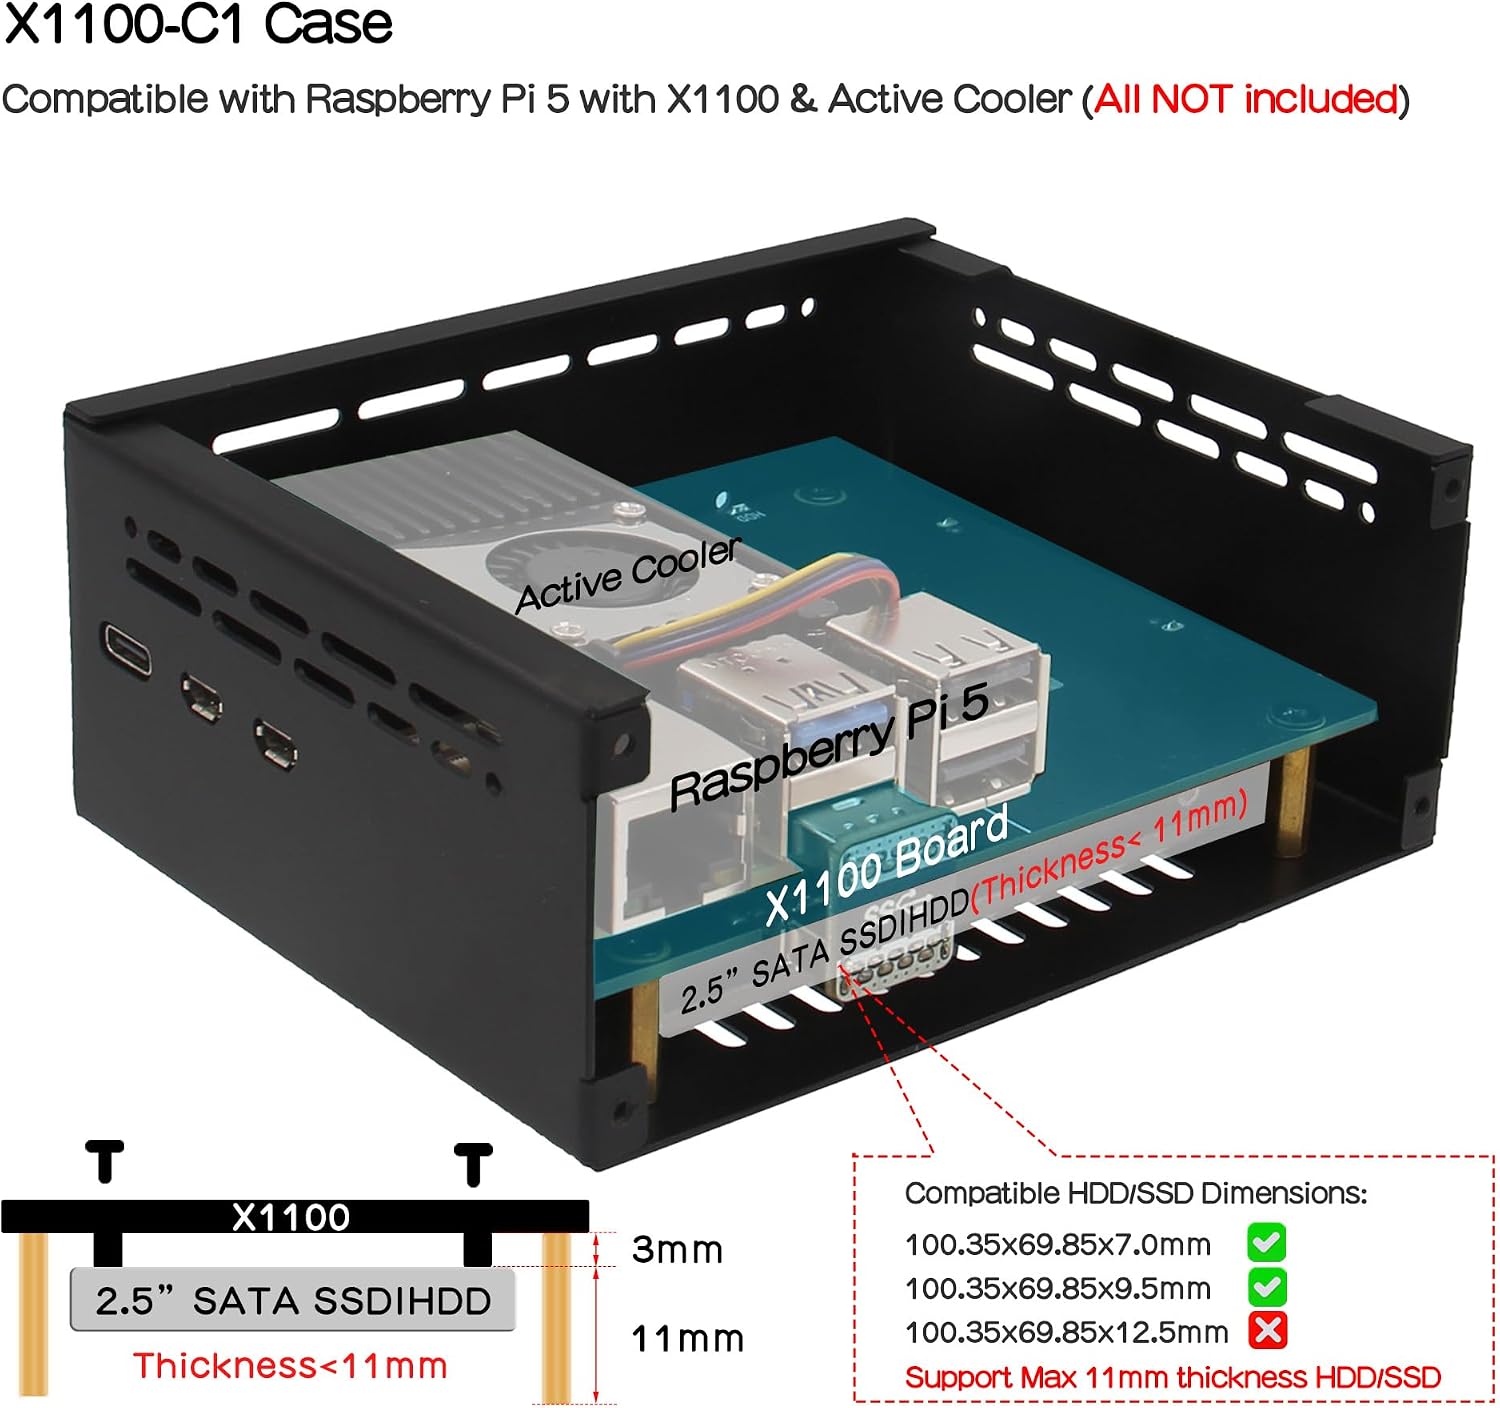
Image: Internal view of the X1100-C1 case, showing the Raspberry Pi 5 and X1100 board installed, along with HDD/SSD compatibility details.
4.3. Installation Video
For a visual guide, please refer to the official installation video below:
Video: Official installation guide for the Geekworm X1100-C1 case, demonstrating assembly steps for the X1100 board, Raspberry Pi 5, and active cooler.
5. Operating Instructions
5.1. Power On/Off
The case features a dedicated power button for easy control. Simply press the power button to power on or power off your Raspberry Pi system.
5.2. LED Indicators
The case includes an SSD Status LED to provide visual feedback on your storage device's activity:
- On: Indicates power is supplied and the SSD is in standby mode.
- Flashing: Indicates the SSD is actively reading or writing data.

Image: External view of the X1100-C1 case, highlighting the power button, SSD status LED, TF card slot, and cable outlet.
5.3. VESA Mounting
The X1100-C1 case is designed with VESA mounting holes, allowing you to securely mount it on a wall or other compatible surfaces. This feature helps save space and keeps your setup organized.

Image: External view of the X1100-C1 case, displaying the Pi5 USB-C, Pi5 Micro HDMI, Ethernet, USB 3.0, USB 2.0 ports, and heat dissipation holes.
6. Maintenance
To ensure optimal performance and longevity of your Geekworm X1100-C1 Metal Case and the enclosed components, follow these maintenance guidelines:
- Cleaning: Regularly clean the exterior of the case with a soft, dry cloth to remove dust. Avoid using liquid cleaners directly on the case or near openings.
- Ventilation: Ensure that the heat dissipation holes are not obstructed to maintain proper airflow and prevent overheating.
- Environment: Operate the device in a cool, dry environment, away from direct sunlight, excessive heat, and moisture.
7. Troubleshooting
If you encounter any issues with your X1100-C1 Metal Case, consider the following common troubleshooting tips:
- Wi-Fi Interference: USB 3.0 devices and metal casings can sometimes interfere with Wi-Fi signals. If you experience poor Wi-Fi performance, it is strongly recommended to use a wired Ethernet connection for network access.
- Power Issues: Ensure you are using a compatible and sufficient power supply for your Raspberry Pi 5. Geekworm recommends using a PD 27W power supply for Raspberry Pi 5.
- SSD Not Detected: Verify that the 2.5" SATA HDD/SSD is correctly seated in the X1100 shield and that all connections are secure. Check the SSD Status LED for activity.
- Loose Connections: Double-check all internal and external connections, including the USB 3.0 connector between the X1100 and Raspberry Pi 5, and the power cable.
8. Specifications
| Feature | Specification |
|---|---|
| Model Number | X1100-C1 |
| Material | Aluminum |
| Color | Black |
| Case Dimensions (L x W x H) | 114 x 91.8 x 41.8 mm / 4.49 x 3.61 x 1.65 inches |
| Weight | 215 Grams |
| Compatible Devices | Raspberry Pi 5, Geekworm X1100 2.5" SATA HDD/SSD Shield |
| Compatible HDD/SSD Thickness | Max 11mm |
| Cooling Method | Air (supports active cooler) |
| Features | VESA mounting hole, precise hole placement, power button, SSD status LED |

Image: Detailed dimensions of the X1100-C1 metal case.
9. Warranty and Support
For warranty information and technical support, please refer to the official Geekworm website or contact their customer service directly. Keep your purchase receipt as proof of purchase for any warranty claims.
Geekworm Website: Visit Geekworm Store