1. Introduction
This manual provides comprehensive instructions for the setup, operation, and maintenance of your HP Poly CCX 400 IP Phone. Please read this manual thoroughly before using the device to ensure proper functionality and to maximize your user experience. Keep this manual for future reference.
2. Product Overview and Key Features
The HP Poly CCX 400 is an entry-level business IP phone designed for clear communication and ease of use. It features a color touchscreen interface and integrates advanced audio technologies.
- Poly HD Voice and Acoustic Clarity: Ensures clear audio quality for all conversations.
- Poly Acoustic Fence Technology: Reduces background noise for distraction-free calls.
- Intuitive Color Touchscreen: Simplifies navigation and access to contacts and features.
- Operating System: Powered by Android 9.0 for a familiar user experience.
- VoIP Technology: Utilizes Voice over Internet Protocol for communication.
- Multiple Line Support: Supports up to 24 total phone lines.
- Caller ID and Speakerphone: Standard features for enhanced communication.
- Connectivity: Features 2 Network (RJ-45) ports with Power over Ethernet (PoE) support and USB connectivity.
- Flexible Placement: Designed for desktop use and is wall-mountable (optional kit sold separately).
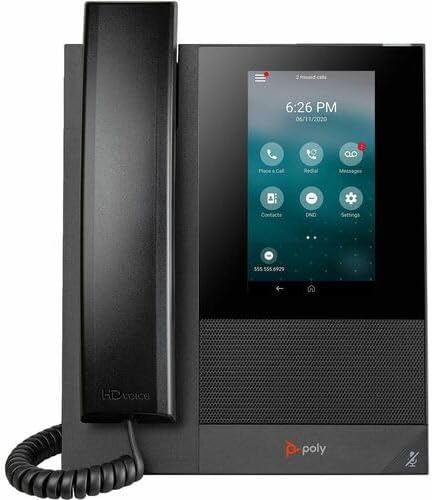
Figure 2.1: Front view of the HP Poly CCX 400 IP Phone, showing the handset on the left and the color touchscreen display on the right. The screen displays call options, time, and date.
3. Package Contents
Verify that all items are present in your product package. If any items are missing or damaged, contact your vendor.
- HP Poly CCX 400 IP Phone Base Unit
- Handset
- Handset Coiled Cord
- Ethernet Cable (RJ-45)
- Desk Stand
- Power Adapter (if not using Power over Ethernet)
- Quick Start Guide (not included in this manual)
4. Physical Components and Ports
Familiarize yourself with the various components and connection ports of your CCX 400 IP Phone.
4.1 Front View
The front of the phone features the handset, the color touchscreen display, and integrated speakerphone grille.
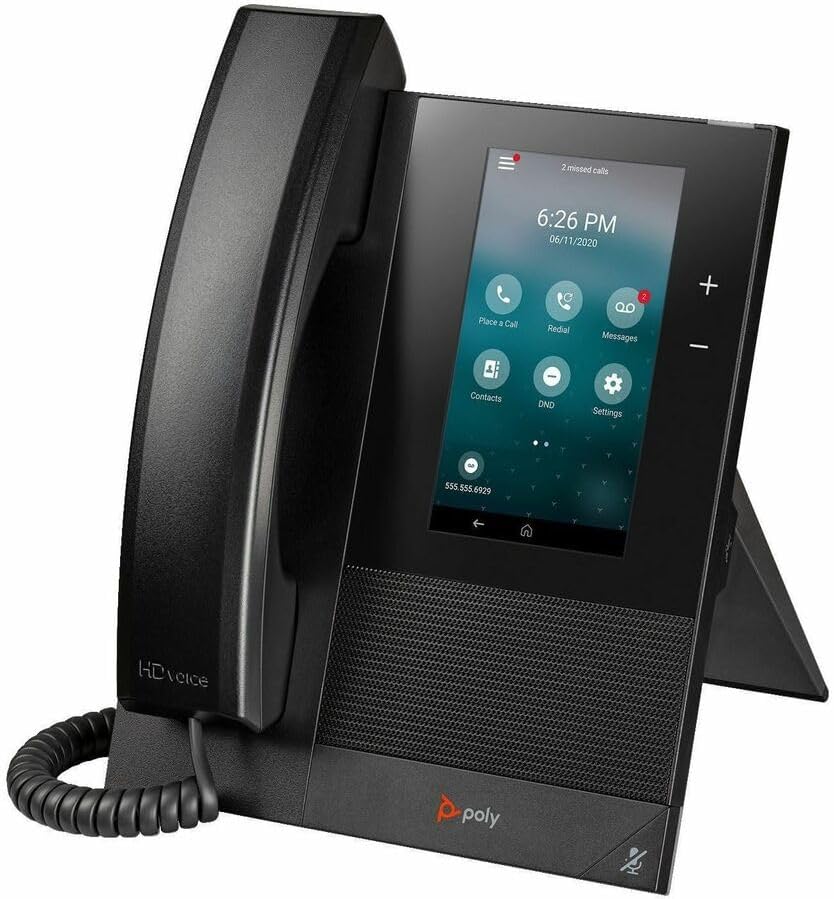
Figure 4.1: Angled view of the HP Poly CCX 400 IP Phone, showing the handset resting on the cradle and the touchscreen display angled for desktop use.
4.2 Rear View and Ports
The rear of the phone houses all necessary connection ports for power, network, and accessories.

Figure 4.2: Rear view of the HP Poly CCX 400 IP Phone, highlighting the various ports. These include a 5V DC power input, two RJ-45 network ports (one with PoE), a USB port, and a handset port.
- 5V DC Power Input: For connecting the external power adapter (if PoE is not used).
- LAN Port (RJ-45, PoE): Connects to your network switch or router. Supports Power over Ethernet (PoE) for power delivery.
- PC Port (RJ-45): Connects a computer to the phone, allowing the computer to share the network connection.
- USB Port: For connecting USB accessories.
- Handset Port: Connects the coiled cord from the handset.
5. Setup Instructions
Follow these steps to set up your HP Poly CCX 400 IP Phone.
- Attach the Desk Stand: Align the desk stand with the slots on the back of the phone and snap it into place.
- Connect the Handset: Plug one end of the coiled handset cord into the handset and the other end into the handset port on the back of the phone.
- Connect to Network:
- Using PoE: Connect one end of the Ethernet cable to the LAN port on the back of the phone and the other end to a PoE-enabled network switch or router. The phone will power on automatically.
- Without PoE: Connect one end of the Ethernet cable to the LAN port on the back of the phone and the other end to your network switch or router. Then, connect the power adapter (if included) to the 5V DC power input on the back of the phone and plug it into a power outlet.
- Optional PC Connection: If desired, connect a second Ethernet cable from your computer to the PC port on the back of the phone.
- Initial Boot-up: The phone will power on and begin its boot sequence. This may take a few minutes. Follow any on-screen prompts for initial configuration, which may include language selection and network settings if not automatically provisioned.
- Wall Mounting (Optional): If you intend to wall-mount the phone, you will need the optional CCX 400 wall mount kit (sold separately). Refer to the instructions provided with the wall mount kit for installation.
6. Operating Instructions
This section covers basic operations of your CCX 400 IP Phone.
6.1 Making and Answering Calls
- To Make a Call:
- Pick up the handset, press the speakerphone button, or tap the "Place a Call" icon on the touchscreen.
- Dial the number using the on-screen keypad.
- Tap the "Call" button or wait for the call to connect.
- To Answer a Call:
- Pick up the handset, press the speakerphone button, or tap the "Answer" icon on the touchscreen when the phone rings.
- To End a Call:
- Hang up the handset or tap the "End Call" icon on the touchscreen.
6.2 Using the Touchscreen Interface
The CCX 400 features a responsive color touchscreen. Navigate by tapping icons, swiping through menus, and using the on-screen keypad.
- Home Screen: Displays time, date, and quick access icons for calls, contacts, messages, and settings.
- Contacts: Tap the "Contacts" icon to access your phone directory.
- Messages: Tap the "Messages" icon to check voicemail or other notifications.
- Settings: Tap the "Settings" icon to configure phone preferences, network settings, and display options.
6.3 Volume Control and Speakerphone
- Adjusting Volume: Use the physical volume buttons on the side of the phone (if present) or the on-screen volume controls during a call.
- Speakerphone: Press the dedicated speakerphone button (if present) or tap the speaker icon on the touchscreen to toggle speakerphone mode during a call.
6.4 Do Not Disturb (DND)
Activate DND to silence incoming calls and notifications. Tap the "DND" icon on the home screen to enable or disable this feature.

Figure 6.1: A user engaged in a call using the HP Poly CCX 400 IP Phone, demonstrating its use in a typical office environment.
7. Maintenance
Proper maintenance ensures the longevity and optimal performance of your phone.
- Cleaning: Use a soft, dry, lint-free cloth to clean the phone's surfaces and screen. Do not use liquid cleaners, aerosol sprays, or abrasive materials, as these can damage the device.
- Environmental Conditions: Keep the phone away from excessive heat, direct sunlight, and moisture. Ensure adequate ventilation around the device.
- Cable Management: Ensure all cables are securely connected and not under strain to prevent damage.
8. Troubleshooting
This section addresses common issues you might encounter with your CCX 400 IP Phone.
| Problem | Possible Cause | Solution |
|---|---|---|
| Phone does not power on. | No power from PoE or power adapter. |
|
| No dial tone. | Network connectivity issue or service not registered. |
|
| Poor call quality (echo, static). | Network congestion, faulty cable, or environmental interference. |
|
| Touchscreen is unresponsive. | Temporary software glitch. |
|
9. Specifications
Detailed technical specifications for the HP Poly CCX 400 IP Phone.
| Feature | Specification |
|---|---|
| Model | CCX 400 |
| Part Number | 84C14AA#ABA |
| Brand | HP (Poly) |
| Connectivity Technology | Corded (Handset and Base Unit) |
| IP Phone Technology | VoIP |
| Total Number of Phone Lines | 24 |
| Caller ID | Yes |
| Speakerphone | Yes |
| Network Ports | 2 x RJ-45 (LAN with PoE, PC) |
| USB Port | Yes |
| Operating System | Android 9.0 |
| Color | Black |
| Form Factor | Desktop, Wall Mountable (with optional kit) |
| Product Dimensions (L x W x H) | 11.14 x 9.37 x 2.99 inches |
| Item Weight | 2.75 pounds |
| UPC | 197497515633 |
10. Safety Information
Please observe the following safety precautions to prevent damage to the device or injury to yourself.
- Do not expose the phone to water or moisture.
- Avoid placing the phone near heat sources or in direct sunlight.
- Use only the power adapter supplied with the phone or a compatible PoE source.
- Do not attempt to open or repair the phone yourself. Refer all servicing to qualified personnel.
- Keep the phone away from children.
11. Warranty and Support
For warranty information, technical support, or service inquiries regarding your HP Poly CCX 400 IP Phone, please refer to the official HP or Poly website or contact your authorized reseller. Warranty terms and conditions may vary by region and purchase agreement.
Manufacturer: HP Inc.
Brand: Poly