1. Introduction
This manual provides detailed instructions for the setup, operation, and maintenance of your Depusheng TX2 Wireless In-Ear Monitor System. This 2-channel UHF wireless IEM system is designed to deliver clear, high-fidelity audio with minimal latency, suitable for various professional audio environments.

Figure 1: Depusheng TX2 Wireless In-Ear Monitor System components.
2. Package Contents
Please verify that all items listed below are included in your package:
- 1 x Wireless Host Transmitter
- 2 x UHF Bodypack Receivers
- 2 x 6.35mm Audio Data Cables
- 2 x In-Ear Headphones
- 1 x Power Adapter
- 2 x Antennas
- 1 x Instruction Manual

Figure 2: Included components and accessories.
3. Product Overview
3.1. Transmitter (Rack Mount Unit)
The transmitter unit features a robust metal housing designed for rack mounting. It includes a front panel for monitoring and control, and a rear panel for audio inputs and power.

Figure 3: Transmitter Front Panel Controls.
- 1. 6.35mm Headphone Output: For direct monitoring from the transmitter.
- 2. Set Selection: Button to enter and confirm menu selections.
- 3. DOWN Selection: Button to navigate down or decrease values.
- 4. Headphone Volume Potentiometer: Adjusts the volume for the 6.35mm headphone output.
- 5. LED Indicator: Status indicator light.
- 6. Power Switch: Turns the transmitter on/off.

Figure 4: Transmitter Rear Panel Connections.
- 7. Left Channel Input: XLR/TRS combo input for the left audio channel.
- 8. Right Channel Input: XLR/TRS combo input for the right audio channel.
- 9. Left Volume Adjustment Potentiometer: Adjusts the input level for the left channel.
- 10. Right Volume Control Potentiometer: Adjusts the input level for the right channel.
- 11. Antenna: Connects the UHF antennas for wireless transmission.
- 12. DC Power Socket: Connects the power adapter.
3.2. Bodypack Receiver
The bodypack receivers are compact, portable units that receive the audio signal from the transmitter. Each bodypack features a display, controls for channel and volume, and a battery compartment.

Figure 5: Bodypack Receiver Battery Compartment.
- LCD Display: Shows current channel, frequency, and battery status.
- Power/Volume Knob: Turns the unit on/off and adjusts headphone volume.
- Set Button: For channel selection and confirmation.
- ESC Button: To exit menu or cancel selection.
- Antenna: Receives the wireless signal.
- Headphone Jack: 3.5mm output for in-ear headphones.
- Battery Compartment: Holds two AA batteries.
4. Setup Instructions
4.1. Transmitter Setup
- Mounting: Install the transmitter into a standard audio rack if desired.
- Antenna Connection: Screw the two included antennas onto the antenna connectors on the rear panel of the transmitter.
- Power Connection: Connect the power adapter to the DC power socket (12) on the rear panel and plug it into an appropriate power outlet.
- Audio Input: Connect your audio source (e.g., mixing console, sound card) to the Left (7) and Right (8) channel inputs on the rear panel using the provided 6.35mm audio data cables or XLR cables (not included).
- Power On: Press the Power Switch (6) on the front panel to turn on the transmitter. The LCD display will illuminate.
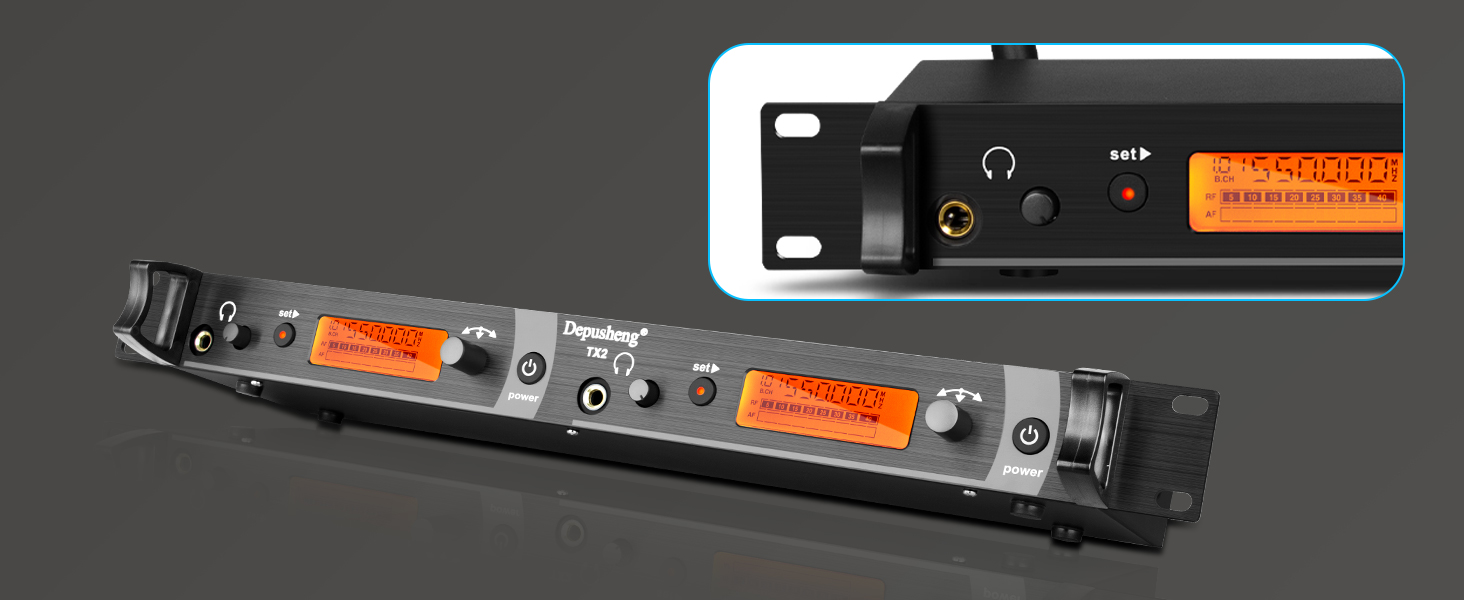
Figure 6: System Connection Diagram.
4.2. Bodypack Receiver Setup
- Battery Installation: Open the battery compartment on the back of the bodypack receiver. Insert two AA batteries, ensuring correct polarity. Close the compartment securely.
- Power On: Rotate the Power/Volume knob clockwise to turn on the bodypack receiver. The LCD display will show the current channel and battery status.
- Headphone Connection: Plug the in-ear headphones into the 3.5mm headphone jack on the top of the bodypack.
- Channel Synchronization:
- On the transmitter, use the 'Set' and 'DOWN' buttons to select the desired channel (e.g., CH01, CH02). The system supports 40 switchable frequencies within the 550 MHz-580 MHz UHF band.
- On the bodypack receiver, press the 'Set' button to enter channel selection mode. Use the 'Set' or 'ESC' buttons to cycle through available channels until it matches the transmitter's channel. The RF indicator on the bodypack should light up when a signal is received.
Video 1: Demonstrates the power-on sequence, battery installation, and channel selection for the bodypack receiver.
5. Operating Instructions
5.1. Audio Level Adjustment
- Transmitter Input Level: Adjust the Left (9) and Right (10) volume adjustment potentiometers on the rear panel of the transmitter to set the appropriate input level from your audio source. Monitor the signal on the transmitter's display to avoid clipping.
- Bodypack Output Volume: Use the Power/Volume knob on the bodypack receiver to adjust the listening volume through your in-ear headphones. Start with a low volume and gradually increase it to a comfortable level.
5.2. Wearing the Bodypack and Earphones
Attach the bodypack receiver to your belt or clothing using the integrated clip. Ensure the antenna is not obstructed for optimal signal reception. Insert the in-ear headphones comfortably into your ears. The ergonomically designed earphones provide noise isolation for clear monitoring.

Figure 7: In-ear headphones for comfortable monitoring.
5.3. Wireless Range
The system offers an operating range of 164 to 229 feet (50 to 70 meters) in open spaces. Optimal performance is achieved when the line of sight between the transmitter and receiver is maintained and potential sources of interference are minimized.

Figure 8: Long-distance wireless reception capability.
6. Maintenance
- Cleaning: Use a soft, dry cloth to clean the exterior of the transmitter and bodypack receivers. Do not use liquid cleaners or solvents.
- Battery Care: Remove batteries from the bodypack receivers if the system will not be used for an extended period to prevent leakage.
- Storage: Store the system in a cool, dry place away from direct sunlight and extreme temperatures.
- Antennas: Handle antennas carefully to avoid bending or breaking.
7. Troubleshooting
| Problem | Possible Cause | Solution |
|---|---|---|
| No sound from headphones |
|
|
| Interference or static |
|
|
| Short operating range |
|
|
| Audio cuts in and out |
|
|
8. Specifications
| Feature | Specification |
|---|---|
| Model Name | TX2 |
| Connectivity Technology | Wireless |
| Wireless Communication Technology | UHF |
| Frequency Range | 550 MHz - 580 MHz (40 switchable frequencies) |
| Operating Range | 164 - 229 feet (50 - 70 meters) |
| Headphones Jack (Transmitter) | 6.35 mm Jack |
| Headphones Jack (Bodypack) | 3.5 mm Jack |
| Input Device Interface | Audio jack (XLR/TRS combo) |
| Material | Metal (Transmitter), ABS (Bodypack) |
| Color | BLACK |
| Item Weight (Transmitter) | 1.2 Kilograms / 2.65 pounds |
| Item Weight (Bodypack) | 0.1 Kilograms / 0.22 pounds |
| Power Source (Bodypack) | 2 x AA Batteries |
| Control Method | Remote |
| Audio Driver Type | Dynamic Driver (Earphones) |
| Supports Bluetooth Technology | No |
| Noise Control | None (Passive noise isolation from earphones) |
9. Warranty and Support
Depusheng aims to provide a reliable shopping experience. If you encounter any issues before purchase or during use, please contact Depusheng customer support for assistance. Refer to your purchase documentation for specific warranty terms and contact information.