Sweetcrispy HJ2-C-3789F-BK
Sweetcrispy Ergonomic Mesh Office Chair Instruction Manual
Model: HJ2-C-3789F-BK
1. Introduction
This manual provides detailed instructions for the assembly, operation, and maintenance of your Sweetcrispy Ergonomic Mesh Office Chair. Please read this manual thoroughly before assembly and use to ensure proper function and longevity of your chair.
The Sweetcrispy Ergonomic Mesh Office Chair is designed to provide comfort and support during extended periods of sitting. Key features include an adjustable headrest, adjustable lumbar support, flip-up armrests, and a rocking mode for enhanced flexibility.
2. Safety Information
Important Safety Warnings:
- Maximum weight capacity: 275 lbs (125 kg). Do not exceed this limit.
- Ensure all screws and bolts are securely tightened before use and periodically check for tightness.
- Use caution when adjusting the headrest and lumbar support to avoid pinching.
- This chair is intended for adult use only. Keep children away from the chair during assembly and adjustment.
- Do not stand on the chair.
- Avoid placing heavy objects on the chair's backrest or armrests.
3. Package Contents
Before beginning assembly, please verify that all components are present and undamaged. If any parts are missing or damaged, please contact customer support.
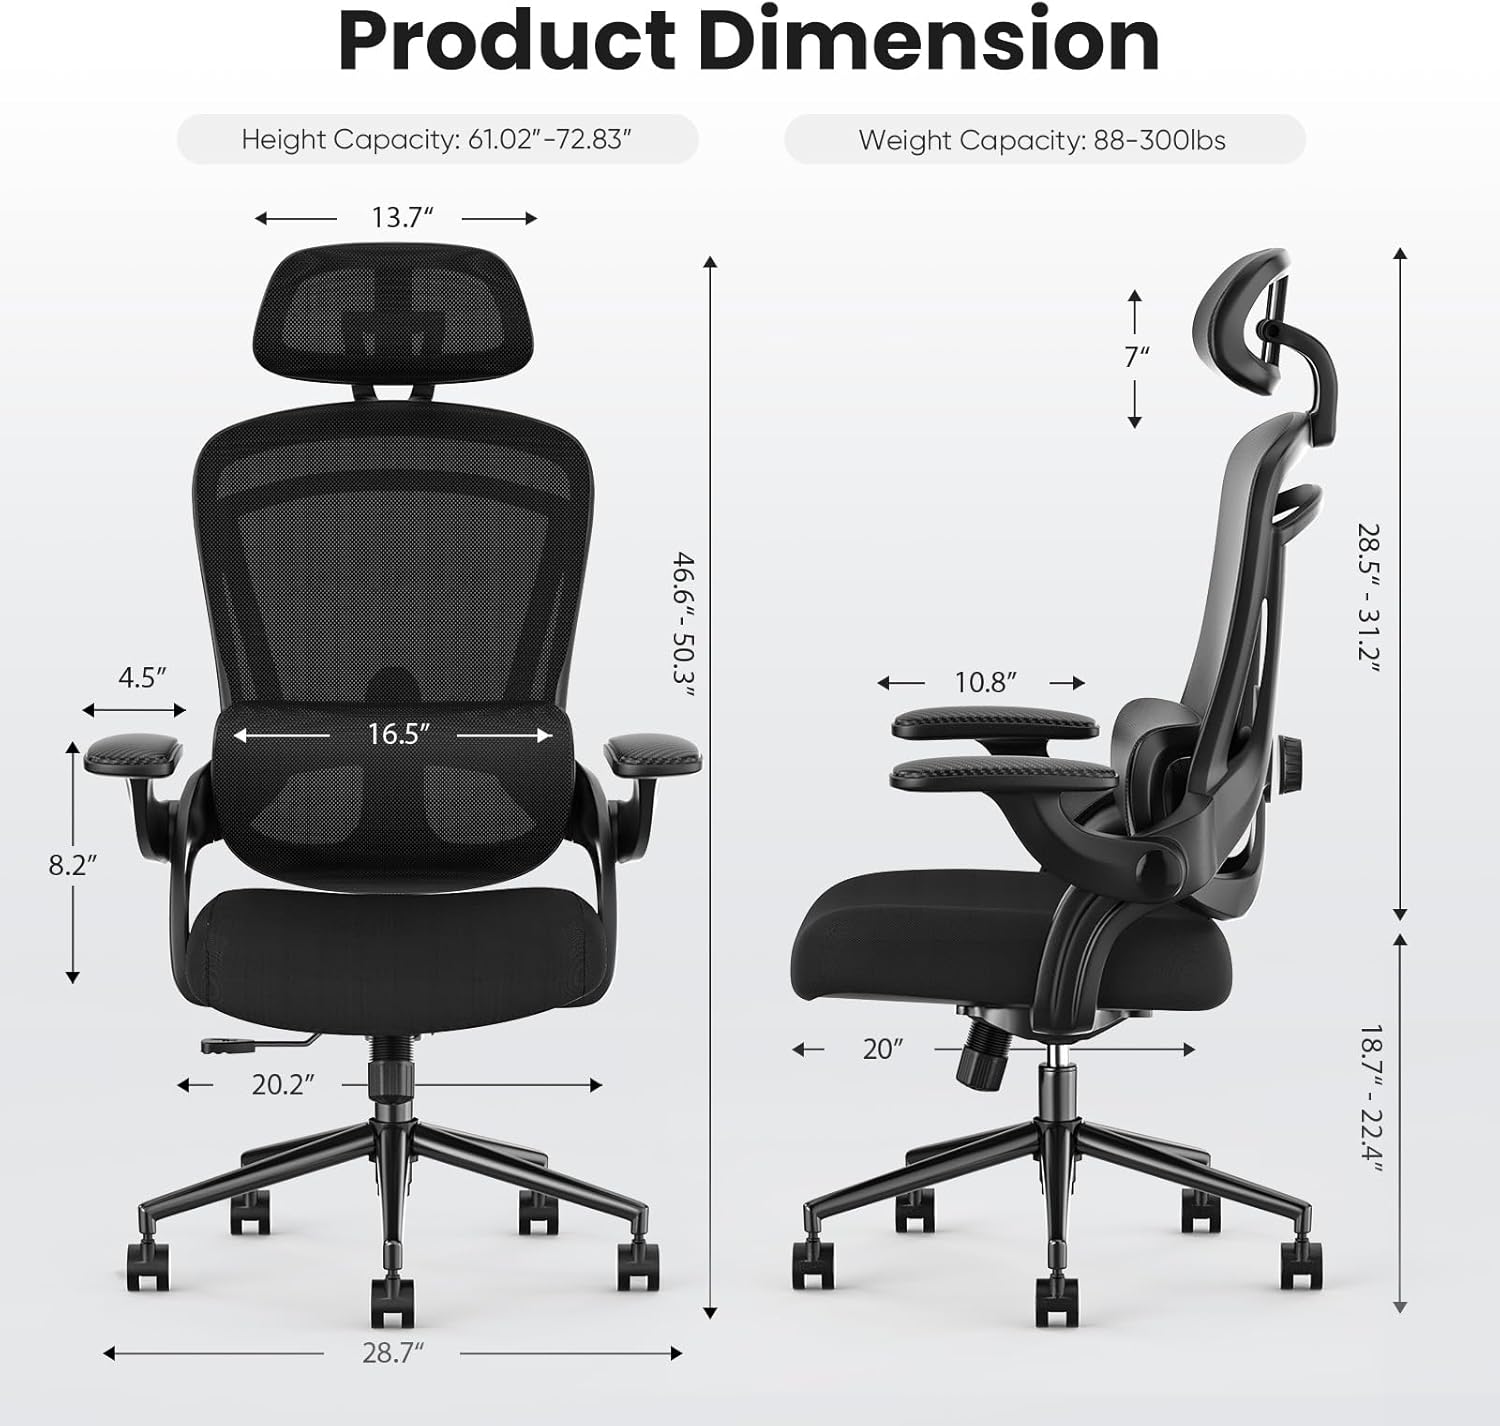
Figure 3.1: All components included in the package for the Sweetcrispy Ergonomic Mesh Office Chair. This image displays the chair's base, gas lift, seat, backrest, armrests, headrest, and various screws and tools required for assembly.
The package includes one (1) Sweetcrispy High Back Office Chair and all necessary hardware for assembly.
- Backrest Assembly
- Seat Cushion
- Headrest
- Armrests (2)
- Chair Base (5-star)
- Casters (5)
- Gas Lift Cylinder
- Mechanism Plate
- Hardware Pack (screws, washers, Allen wrench)
4. Assembly Instructions
Follow these steps carefully to assemble your Sweetcrispy Ergonomic Mesh Office Chair. It is recommended to assemble the chair on a soft, clean surface to prevent damage.
Step 1: Attach Casters to the Base
Insert the five casters into the holes at the end of each leg of the chair base. Push firmly until they click into place.

Figure 4.1: Illustration showing how to firmly insert the casters into the designated slots on the chair's five-star base.
Step 2: Insert Gas Lift into the Base
Place the gas lift cylinder into the center hole of the assembled chair base. No tools are required for this step; it will rest in place.
Step 3: Attach Mechanism Plate to the Seat Cushion
Align the mechanism plate with the pre-drilled holes on the underside of the seat cushion. Ensure the front of the mechanism plate faces the front of the seat. Secure it with the provided screws and Allen wrench.

Figure 4.2: Diagram illustrating the correct orientation and attachment of the mechanism plate to the bottom of the seat cushion using screws.
Step 4: Attach Backrest to the Seat Cushion
Connect the backrest to the seat cushion using the designated screws. Ensure a secure fit.

Figure 4.3: Visual guide for securing the backrest to the seat assembly with screws, ensuring proper alignment.
Step 5: Attach Armrests
Secure the armrests to the sides of the seat and backrest assembly using the provided screws. Ensure they are firmly attached.

Figure 4.4: Instructions for attaching both armrests to the chair frame, highlighting screw placement for stability.
Step 6: Attach Headrest
Slide the headrest into the slots at the top of the backrest. Adjust to your desired height and angle.

Figure 4.5: Guide for inserting the headrest into the top of the backrest, showing how it slides into position.
Step 7: Connect Seat Assembly to Gas Lift
Carefully place the assembled seat and backrest onto the gas lift cylinder, ensuring the center hole of the mechanism plate aligns with the top of the gas lift. Press down firmly to secure.

Figure 4.6: A person seated in the fully assembled Sweetcrispy office chair, demonstrating its use in a typical office environment.
5. Operating Instructions
Your Sweetcrispy Ergonomic Mesh Office Chair offers several adjustment features to customize your seating experience.
5.1. Seat Height Adjustment
To adjust the seat height, locate the lever on the right side beneath the seat. Pull the lever upwards while taking your weight off the seat to raise it. To lower the seat, pull the lever upwards while remaining seated.
5.2. Lumbar Support Adjustment
The mesh lumbar support can be adjusted vertically to fit your lower back curve. Locate the adjustment knobs or levers on the sides of the backrest. Move the lumbar support up or down to find the most comfortable position.

Figure 5.1: This image highlights the adjustable lumbar support mechanism, showing how it can be moved vertically by 2.36 inches to provide optimal back support.
5.3. Headrest Adjustment
The headrest can be adjusted in height and angle. To adjust the height, slide the headrest up or down. To adjust the angle, rotate the headrest forward or backward by up to 42 degrees.

Figure 5.2: Illustration detailing the 2D adjustable headrest, demonstrating its vertical adjustment range of 2.4 inches and rotational capability of 42 degrees for neck support.
5.4. Flip-up Armrests
The armrests can be flipped up by 90 degrees to save space or allow closer access to your desk. Simply lift the armrests upwards until they lock into the vertical position. To return them, pull them down.

Figure 5.3: This image shows the armrests in both the down and flipped-up positions, illustrating how they can be rotated 90 degrees for space-saving or convenience.
5.5. Rocking Mode (Tilt Function)
The chair features a 90-120 degree rocking mode. To activate or deactivate the rocking function, use the tilt lock lever located beneath the seat. To adjust the tension of the rocking motion, rotate the tension knob located at the front of the mechanism plate.

Figure 5.4: A user demonstrating the 90-120 degree rocking mode of the chair, illustrating how to relax while seated.
6. Maintenance
Proper care and maintenance will extend the life of your office chair.
- Cleaning: Spot clean the mesh and fabric surfaces with a mild detergent and a damp cloth. Avoid using harsh chemicals or abrasive cleaners.
- Inspection: Periodically check all screws and bolts to ensure they are tight. Re-tighten if necessary.
- Casters: Keep casters free of hair and debris to ensure smooth movement.
- Avoid Direct Sunlight: Prolonged exposure to direct sunlight can cause fading and material degradation.
7. Troubleshooting
If you encounter any issues with your chair, refer to the following common problems and solutions:
| Problem | Possible Cause | Solution |
|---|---|---|
| Chair does not adjust height | Gas lift cylinder malfunction or lever not engaged. | Ensure the lever is fully pulled. If the issue persists, the gas lift may need replacement. Contact customer support. |
| Chair wobbles | Loose screws or uneven floor. | Check and tighten all assembly screws. Ensure the chair is on a flat surface. |
| Casters do not roll smoothly | Debris caught in casters. | Turn the chair over and remove any hair, dust, or debris from the caster wheels. |
| Backrest does not tilt or lock | Tilt lock lever not engaged or tension too tight/loose. | Check the tilt lock lever. Adjust the tilt tension knob to your preference. |
8. Specifications
| Feature | Detail |
|---|---|
| Brand | Sweetcrispy |
| Model Name | Ergonomic Office Chair |
| Model Number | HJ2-C-3789F-BK |
| Color | Black |
| Product Dimensions | 20"D x 20.2"W x 50.3"H |
| Item Weight | 30.4 pounds |
| Maximum Weight Recommendation | 275 Pounds |
| Back Style | Mesh |
| Fill Material | Sponge |
| Special Features | Adjustable Headrest, Adjustable Lumbar, Ergonomic, Flip-up Armrest, Rocking Mode |
| Assembly Required | Yes |
| UPC | 722898002507 |

Figure 8.1: Detailed product dimensions of the Sweetcrispy Ergonomic Mesh Office Chair, including height, width, and depth measurements for various components.
9. Warranty and Support
Sweetcrispy provides a limited warranty for this product. For specific warranty terms and conditions, please refer to the documentation included with your purchase or visit the official Sweetcrispy website.
If you require assistance with assembly, operation, or troubleshooting that is not covered in this manual, please contact Sweetcrispy customer support:
- Website: Sweetcrispy Official Store (for general inquiries and product information)
- Email: Refer to your purchase documentation for direct support contact.
Please have your model number (HJ2-C-3789F-BK) and purchase date available when contacting support.
Ask a question about this manual
Ask about setup, troubleshooting, compatibility, parts, safety, or missing instructions. Manuals+ will review the question and use this page’s manual context to help answer it.