Introduction
This manual provides detailed instructions for the safe and effective use of the HABOTEST HT89A Voltage Tester. Please read this manual thoroughly before operation and retain it for future reference. The HT89A is designed for detecting AC voltage, identifying live/null wires, locating wire breakpoints, and features a flashlight for convenience.

Image: The HABOTEST HT89A Voltage Tester, a pen-style electrical testing device.
Safety Information
WARNING: To avoid possible electric shock or personal injury, always observe the safety rules and warnings listed in this manual. The protection provided by the stylus may be compromised if rendered useless or if not used according to instructions.
- Do not use the tester if it appears damaged or operates abnormally.
- Always verify the tester's operation on a known live circuit before use.
- Do not exceed the specified voltage ratings (AC 12-300V).
- This device is rated CAT III 300V. Adhere to these safety categories.
- The metal tip is for contact voltage detection; the device is not intended as a screwdriver.
- Keep hands and fingers away from the probe tip during testing.
Product Components and Features
Familiarize yourself with the parts of your HT89A Voltage Tester:
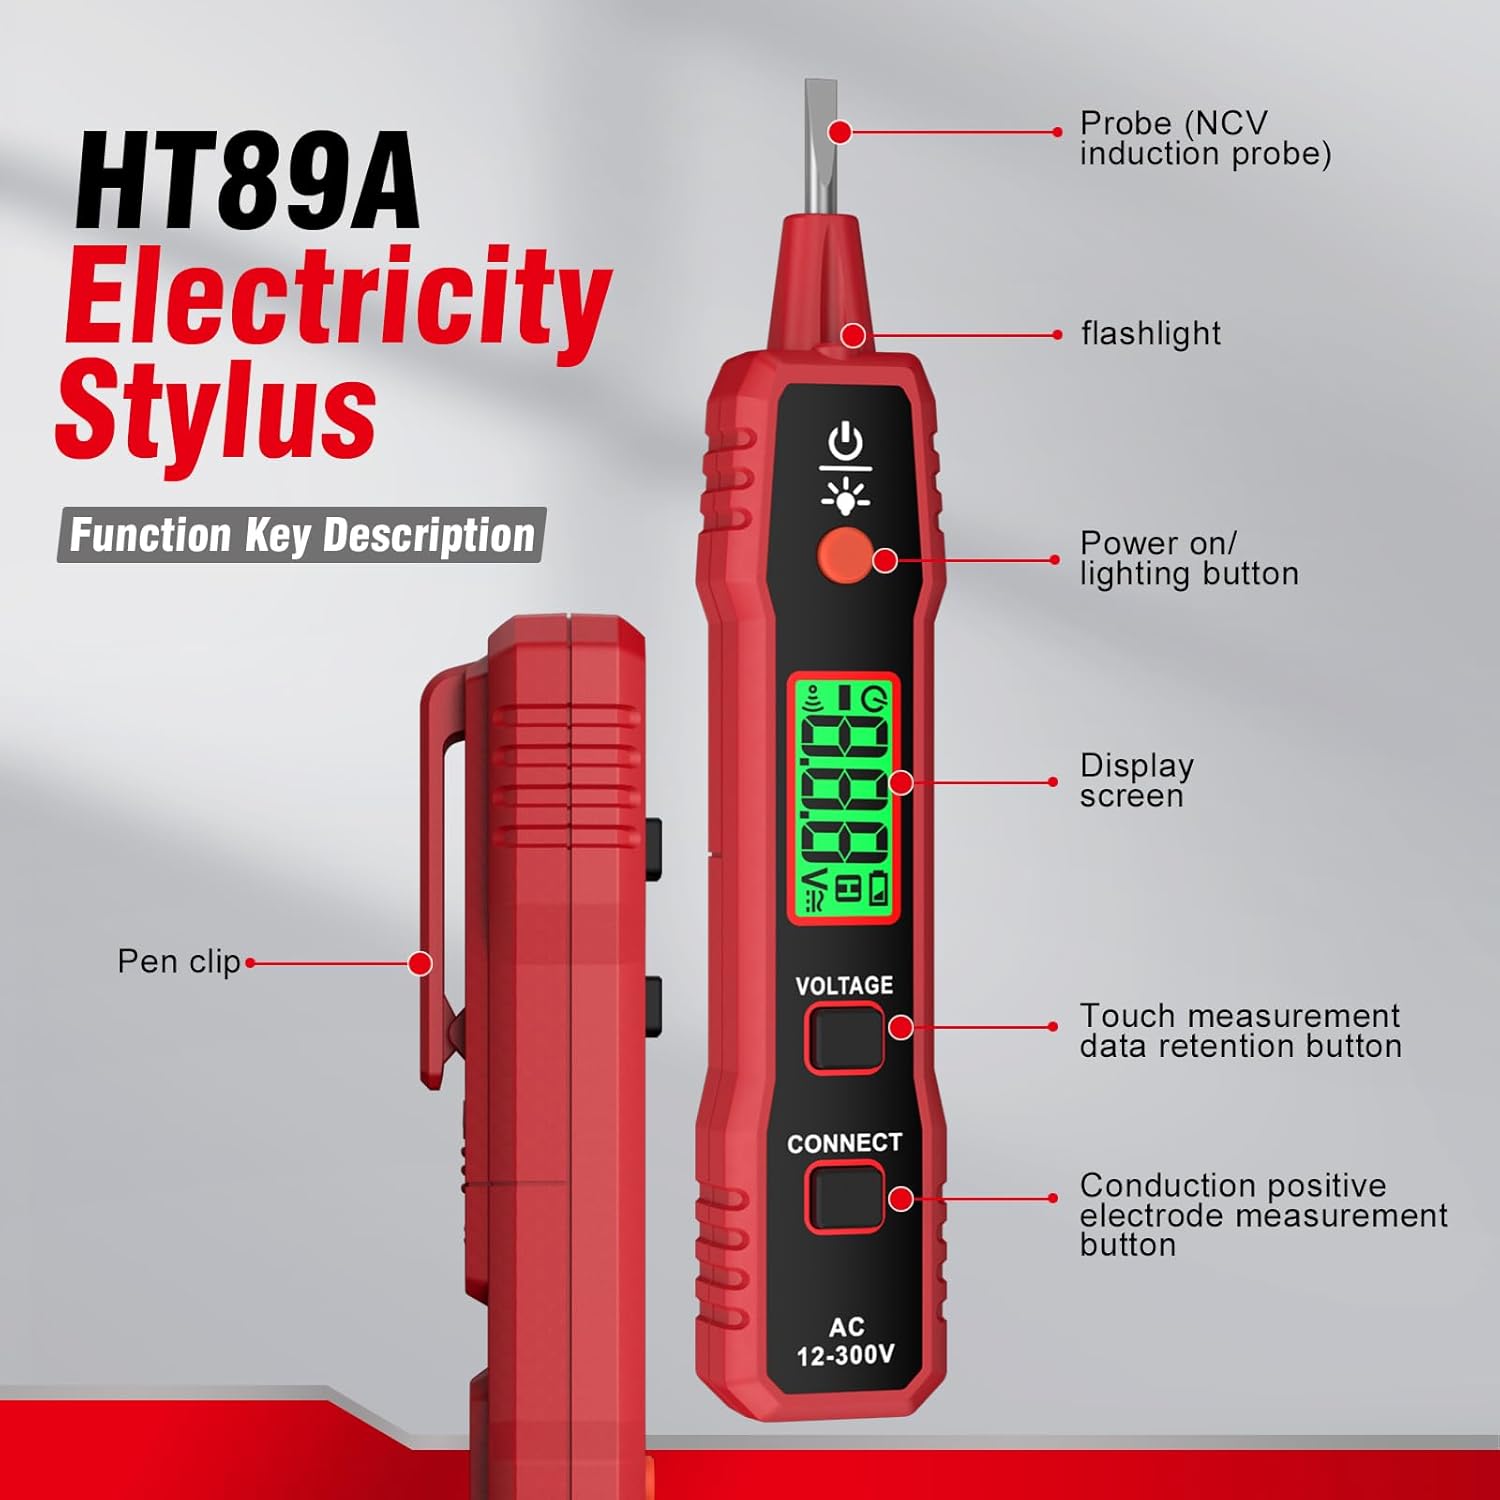
Image: Diagram illustrating the components of the HT89A Voltage Tester, including the probe, flashlight, power button, display screen, voltage button, connect button, and pen clip.
- Probe (NCV Induction Probe): Used for non-contact voltage detection and breakpoint finding.
- Flashlight: Provides illumination in dark work areas.
- Power On/Lighting Button: Activates the device and controls the flashlight.
- Display Screen: LCD display showing voltage readings, live/null indications, and battery status.
- Voltage Button: Activates touch measurement and data retention.
- Connect Button: Used for conduction positive electrode measurement.
- Pen Clip: For convenient carrying in a pocket.
Setup
Battery Installation
The HABOTEST HT89A requires one 1.5V AAA battery for operation. The device typically comes with a battery pre-installed or included in the package.
- Locate the battery compartment cover, usually at the rear of the device.
- Open the cover.
- Insert one 1.5V AAA battery, ensuring correct polarity (+/-).
- Close the battery compartment cover securely.

Image: Illustration of the battery compartment, showing where to insert the 1.5V AAA battery.
Powering On/Off
- Press the Power On/Lighting Button to turn the device on.
- The device will automatically power off after approximately 3 minutes of inactivity or no signal detection to conserve battery life.
Operating Instructions
1. Non-Contact AC Voltage Detection (NCV)
This mode allows for safe detection of AC voltage without direct contact with the conductor.
- Turn on the tester.
- Bring the probe tip close to the wire, outlet, or electrical component you wish to test.
- If AC voltage is detected, the LCD display will change from green to red, and the buzzer will emit a sound. The intensity of the sound and the speed of the flashing light indicate the strength of the detected voltage.
- If the screen remains green and no sound is heard, there is no power, and it is generally safe to proceed (always verify with other methods if critical).

Image: A hand holding the HT89A tester near an electrical outlet, demonstrating non-contact voltage detection. The screen shows a voltage reading.
2. Live/Null Wire Identification (Inductive Mode)
The tester can differentiate between live and null (neutral) wires.
- Turn on the tester.
- Insert the metal tip into an outlet slot or touch it to an insulated wire.
- For Null Wire: The display screen will show "U" and the buzzer will emit a slow sound.
- For Live Wire: The display screen will show "H" and the buzzer will emit a fast sound.

Image: The HT89A tester demonstrating live and null wire identification. The display shows "U" for neutral and "H" for live, with corresponding sound indications.
3. Wire Breakpoint Detection
This feature helps locate breaks in insulated wires.
- Turn on the tester.
- Move the NCV tip of the tester along the length of the insulated wire.
- The voltage alert signs (red screen, fast beeps) will disappear at the point where the wire is broken. This indicates the breakpoint.

Image: The HT89A tester being moved along an insulated wire to detect a breakpoint, showing the voltage alert disappearing at the break.
4. Flashlight Operation
The integrated LED flashlight assists in working in dimly lit environments.
- Press the Power On/Lighting Button briefly to toggle the flashlight on or off.

Image: The HT89A tester with its LED flashlight illuminated, providing light in a dark area.
5. Data Hold Function
The data hold function allows you to freeze the current measurement on the display for easier reading.
- During a measurement, press the Voltage Button to activate data hold. The displayed value will be locked.
- Press the button again to release the data hold and resume live measurement.

Image: The HT89A tester demonstrating the data hold function, with a 'H' symbol on the screen indicating the value is locked.
6. Conduction Positive Electrode Measurement
This function is used for specific conduction tests.
- Press the Connect Button to initiate this measurement.
- Follow specific circuit diagrams or instructions for the component being tested.
Maintenance
Cleaning
- Wipe the device with a dry, clean cloth. Do not use abrasive cleaners or solvents.
- Ensure the device is off and disconnected from any power source before cleaning.
Battery Replacement
When the battery voltage drops below 2.5 volts, a low battery symbol will appear on the display. Replace the battery promptly to ensure accurate readings.
- Turn off the device.
- Open the battery compartment cover as described in the Setup section.
- Remove the old 1.5V AAA battery.
- Insert a new 1.5V AAA battery, observing correct polarity.
- Close the battery compartment cover securely.
Storage
- Store the tester in a cool, dry place away from direct sunlight and extreme temperatures.
- If storing for an extended period, remove the battery to prevent leakage.
Troubleshooting
| Problem | Possible Cause | Solution |
|---|---|---|
| Device does not power on. | Low or dead battery; incorrect battery installation. | Replace the battery with a new 1.5V AAA battery. Ensure correct polarity. |
| No voltage detection or inconsistent readings. | Low battery; device malfunction; testing outside specified range. | Replace battery. Test on a known live circuit. Ensure voltage is within AC 12-300V range. |
| Flashlight does not work. | Low battery; LED malfunction. | Replace battery. If issue persists, contact support. |
| Display shows low battery symbol. | Battery voltage is below 2.5V. | Replace the 1.5V AAA battery immediately. |
Specifications
The following table details the technical specifications of the HABOTEST HT89A Voltage Tester:

Image: A detailed table outlining the specifications of the HT89A Voltage Tester, including display type, voltage range, and safety ratings.
| Feature | Detail |
|---|---|
| Display | LCD display |
| Range of Voltage Detection | AC 12-300V, 50/60Hz |
| Connect Detection | Yes |
| Battery Positive Detection | Yes |
| NCV (Non-Contact Voltage) | Yes |
| Alarm Mode | Sound and light alarm |
| Probe Shape | Oblate shape |
| Backlight | Red and green double color backlight |
| Live and Neutral Indication | According to LCD's display ("H" for Live, "U" for Neutral) |
| Signal Intensity Display | LCD display |
| Signal Intensity Indication Method | Sound from slow to fast; backlight from green to red; LCD data from small to big |
| Flashlight | Yes |
| Auto Power Off | No operation, no sensing signal will shut down automatically in about 5 minutes |
| Data Hold | Yes |
| Low-Battery Indication | Yes |
| Power Supply | 1 x 1.5V AAA batteries |
| Product Weight | Approx. 38g |
| Product Size | 147 x 26.5 x 26.5 mm |
| Safety Rating | EN61010-1-2-030, EN61326-1, CAT III 300V |
Note: Some product descriptions may mention CAT III 1000V and CAT IV 600V. For safety, please refer to the CAT III 300V rating as indicated in the detailed specifications table.
Warranty and Support
HABOTEST provides a 36-month after-sale service for this product. If you encounter any concerns or issues with your HT89A Voltage Tester, please contact the seller or manufacturer directly for assistance.
For general inquiries or technical support, please refer to the contact information provided with your purchase or visit the official HABOTEST website.
- Return Policy: Typically 30 days for refund/replacement (check with your retailer).
- Manufacturer: HABOTEST


