Introduction
This manual provides essential information for the safe and effective operation, setup, and maintenance of your Harukiku MIG-135 3-in-1 Welder. Please read this manual thoroughly before using the equipment to ensure proper function and safety.
Safety Information
WARNING: Welding can be dangerous. Always wear appropriate personal protective equipment (PPE) including a welding helmet, gloves, and protective clothing. Ensure adequate ventilation. Read and understand all safety warnings before operation.
General Safety Precautions
- Always ensure the welding machine is properly grounded.
- Do not operate the welder in damp or wet conditions.
- Keep children and unauthorized personnel away from the welding area.
- Disconnect power before performing any maintenance or changing accessories.
- Avoid direct exposure to welding arc rays, which can cause eye and skin damage.
Integrated Safety Features
The Harukiku MIG-135 is equipped with multiple safety protection functions to enhance user safety and equipment longevity:
- Overload Protection: Automatic shutdown system to prevent damage from excessive load.
- Overcurrent Prevention: Automatically shuts down if current exceeds safe limits.
- Overheating Prevention: Activates shutdown if internal temperature becomes too high.
- Over-Voltage Protection: Safeguards against voltage spikes.
- VRD Function (Voltage Reduction Device): Reduces open-circuit voltage to a safe level when the machine is idle, minimizing electrical shock risk. This function can be switched on or off.

Figure 1: Multiple Safety Protection Functions

Figure 2: VRD (Voltage Reduction Device) Function
Product Overview
The Harukiku MIG-135 is a versatile 3-in-1 welding machine designed for various welding tasks. It features dual voltage compatibility, AI welding assistance, and a compact, portable design.
Key Features
- AI Welding Assist: An intelligent chip automatically sets optimal welding current, voltage, and wire feed speed based on wire selection, reducing spatter and simplifying operation for beginners.
- Dual Voltage (110V/220V): Automatically switches between household AC110V and AC220V power sources, offering flexibility for different applications. Note: A 220V conversion connector is not included.
- 3-in-1 Multi-Function: Supports Gasless MIG (Flux Core), Stick (MMA), and Lift TIG welding modes. (Lift TIG torch sold separately).
- Compact and Lightweight: Weighing only 8 lbs (3.6 kg) with a handle and detachable shoulder strap, it is highly portable for home use, repair work, and outdoor projects.
- Intelligent Digital Display: Provides clear and easy-to-understand information for mode selection and parameter adjustments.

Figure 3: AI Welding Assist Control
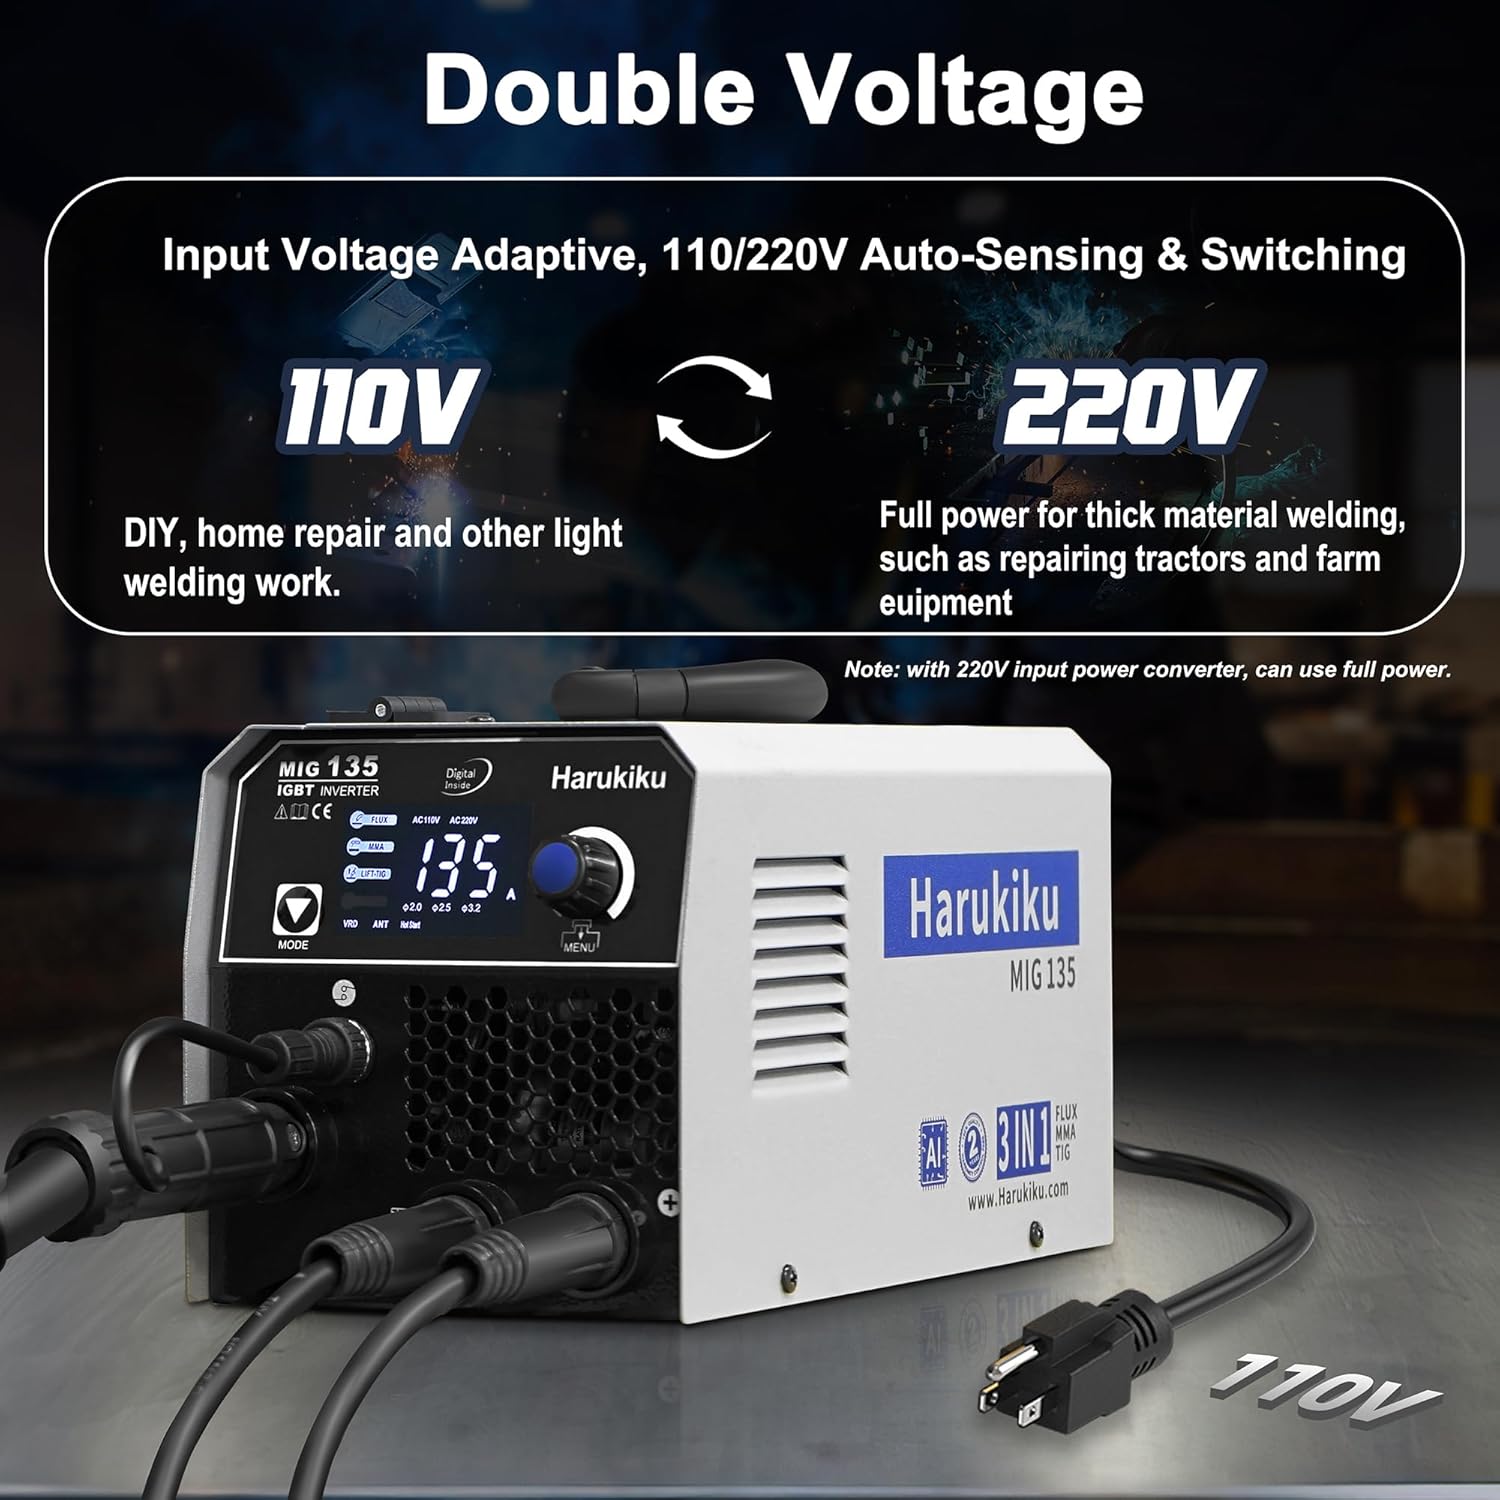
Figure 4: Dual Voltage Capability (110V/220V)

Figure 5: 3-in-1 Multi-Function Welding Modes

Figure 6: Compact Size and Included Accessories
Setup
Unpacking and Inspection
Carefully remove the welder and all accessories from the packaging. Inspect for any shipping damage. Report any damage to your supplier immediately.
Power Connection
The MIG-135 automatically adapts to 110V or 220V AC power. Ensure your power source meets the required amperage (a 40 amp circuit is recommended for optimal performance, especially on 110V). Connect the power cord to a suitable outlet.
Connecting Welding Accessories
Refer to the front panel diagram for correct connection points:

Figure 7: Welder Front Panel and Connections
- Earth Clamp: Connect the earth clamp cable to the designated 'Earth Clamp Connection' terminal. Secure the clamp to the workpiece or welding table, ensuring good electrical contact.
- MIG Torch: Connect the MIG torch cable to the 'MIG Torch Connection' terminal. If applicable, connect the MIG torch switch cable to the 'MIG Torch Switch Connection'.
- Electrode Holder (for Stick/MMA): For Stick welding, connect the electrode holder cable to the 'Electrode Holder/Lift-TIG Torch Connection' terminal.
- Lift TIG Torch (optional): For Lift TIG welding, connect the Lift TIG torch cable to the 'Electrode Holder/Lift-TIG Torch Connection' terminal. A gas cylinder will also be required for TIG welding (sold separately).

Figure 8: Connection Diagrams for Welding Modes
Wire Installation (for Flux MIG)
Open the wire feed compartment. Place the flux core wire spool onto the spindle. Thread the wire through the guide and into the drive rollers. Adjust the tension of the drive rollers to ensure smooth wire feeding without crushing the wire. Close the compartment.
Operation
Power On
Turn on the main power switch located on the rear of the machine.
Mode Selection
Press the 'MODE' button on the front panel to cycle through the available welding processes: Flux (Gasless MIG), MMA (Stick), and Lift-TIG. The selected mode will be indicated on the digital display.

Figure 9: Intelligent Digital Display
AI Welding Assist and Parameter Adjustment
The built-in AI welding assist chip simplifies parameter setting. Once a welding mode and wire type (for MIG) are selected, the machine will suggest optimal current, voltage, and wire feed speed. You can fine-tune these parameters using the adjustment knob if needed. The digital display will show the current settings.
Welding Process Specifics
- Flux MIG Welding: Select 'FLUX' mode. Ensure the correct flux core wire is installed. Adjust parameters as needed. Begin welding by pressing the torch trigger.
- Stick (MMA) Welding: Select 'MMA' mode. Insert the appropriate electrode into the electrode holder. The machine features anti-stick, arc force, and hot start functions for improved arc stability and easier ignition.
- Lift TIG Welding: Select 'LIFT-TIG' mode. Connect a Lift TIG torch and gas cylinder (not included). Initiate the arc by touching the tungsten electrode to the workpiece and then lifting it slightly.
Advanced Welding Features
- Anti-Stick: Prevents the electrode from sticking to the workpiece, making it easier to restart the arc.
- Arc Force: Provides additional current during short-circuiting to prevent the arc from extinguishing.
- Hot Start: Delivers a temporary increase in current at the beginning of the weld to ensure easy arc ignition.
Maintenance
Regular maintenance ensures the longevity and optimal performance of your welder.
- Cleaning: Periodically clean the internal components with dry compressed air to remove dust and metal particles. Ensure the machine is disconnected from power before cleaning.
- Cable Inspection: Regularly inspect all cables, connections, and the torch for wear, damage, or loose connections. Replace damaged parts immediately.
- Wire Feed System (MIG): Clean the wire feed rollers and guides. Check for proper wire tension and alignment. Replace worn contact tips and nozzles as needed.
- Electrode Holder/Earth Clamp: Ensure these components are clean and free from corrosion for good electrical contact.
Troubleshooting
If you encounter issues, refer to the following common problems and solutions:
| Problem | Possible Cause | Solution |
|---|---|---|
| Welder does not power on | No power supply; Main switch off; Internal fault | Check power outlet and circuit breaker; Ensure main switch is ON; Contact support if problem persists. |
| No welding output | Loose connections; Incorrect mode selection; Overload protection activated | Check all cable connections; Verify correct welding mode; Allow machine to cool if overload light is on. |
| Poor arc stability / Excessive spatter (MIG) | Incorrect wire feed speed/voltage; Dirty contact tip; Improper ground connection | Adjust parameters using AI assist or manually; Clean/replace contact tip; Ensure good ground connection. |
| Electrode sticks (MMA) | Low current; Incorrect electrode type; No Hot Start/Anti-Stick function (if disabled) | Increase current; Use appropriate electrode; Ensure Anti-Stick/Hot Start are active. |
| Overheat indicator on | Extended use; Blocked ventilation | Allow machine to cool down; Ensure ventilation openings are clear. |
For issues not listed here or if troubleshooting steps do not resolve the problem, please contact customer support.
Specifications
Technical specifications for the Harukiku MIG-135 Welder:

Figure 10: Detailed Electrical Specifications
| Feature | Detail |
|---|---|
| Model Number | MIG-135 |
| Input Voltage | AC 110V / 220V (Auto-sensing) |
| Max Current Output | 130 Amps |
| Welding Processes | Gasless MIG (Flux Core), Stick (MMA), Lift TIG |
| Compatible Wire Sizes | 0.030" / 0.035" / 0.040" (Flux Core) |
| Product Dimensions | 29.49 x 15.01 x 16 cm |
| Item Weight | 6.4 kg (approx. 8 lbs) |
| Material | Iron |
| Power Source | AC |
| Manufacturer | Shenzhen Huabang Zhizao Industrial Co., Ltd |
Warranty and Support
Warranty Information
The Harukiku MIG-135 Welder comes with a 1-year warranty, which can be extended for an additional year upon product registration. Please retain your proof of purchase for warranty claims. The product also includes a 30-day return and exchange policy from the date of purchase.
Customer Support
For technical assistance, warranty claims, or any questions regarding your Harukiku MIG-135 Welder, please contact Harukiku customer support. Refer to the product packaging or official website for the most current contact information.