
1. Introduction
Thank you for choosing the EXVIST ITS2EV11 Wireless HDMI VGA Extender Kit. This device is designed to transmit high-definition video and audio signals wirelessly over distances up to 100 meters (328 feet) in open environments, or up to 200 meters (656 feet) via wired connection through a network switch or router. It supports 1080P resolution at 60 frames per second, features H.265 encoding for efficient transmission, and includes HDMI loop-out, VGA output, and IR remote control extension. This manual provides detailed instructions for proper installation, operation, and maintenance of your device.
2. Safety Information
- Read all instructions carefully before operating the device.
- Do not expose the device to water, moisture, or extreme temperatures.
- Use only the provided power adapters. Using unauthorized adapters may damage the device and void the warranty.
- Do not attempt to disassemble or repair the device yourself. Refer all servicing to qualified personnel.
- Ensure proper ventilation around the units to prevent overheating.
3. Package Contents
Please verify that all items are present in your package:
- 1x Wireless HDMI Transmitter (TX Unit)
- 1x Wireless HDMI Receiver (RX Unit)
- 2x Power Adapters (DC 5V)
- 2x HDMI Cables
- 1x RJ45 Ethernet Cable (for pairing/wired extension)
- 1x IR Blaster Cable
- 1x IR Receiver Cable
- 1x User Manual (this document)
4. Product Overview
The EXVIST ITS2EV11 kit consists of a Transmitter (TX) and a Receiver (RX) unit, designed for seamless wireless and wired video extension.
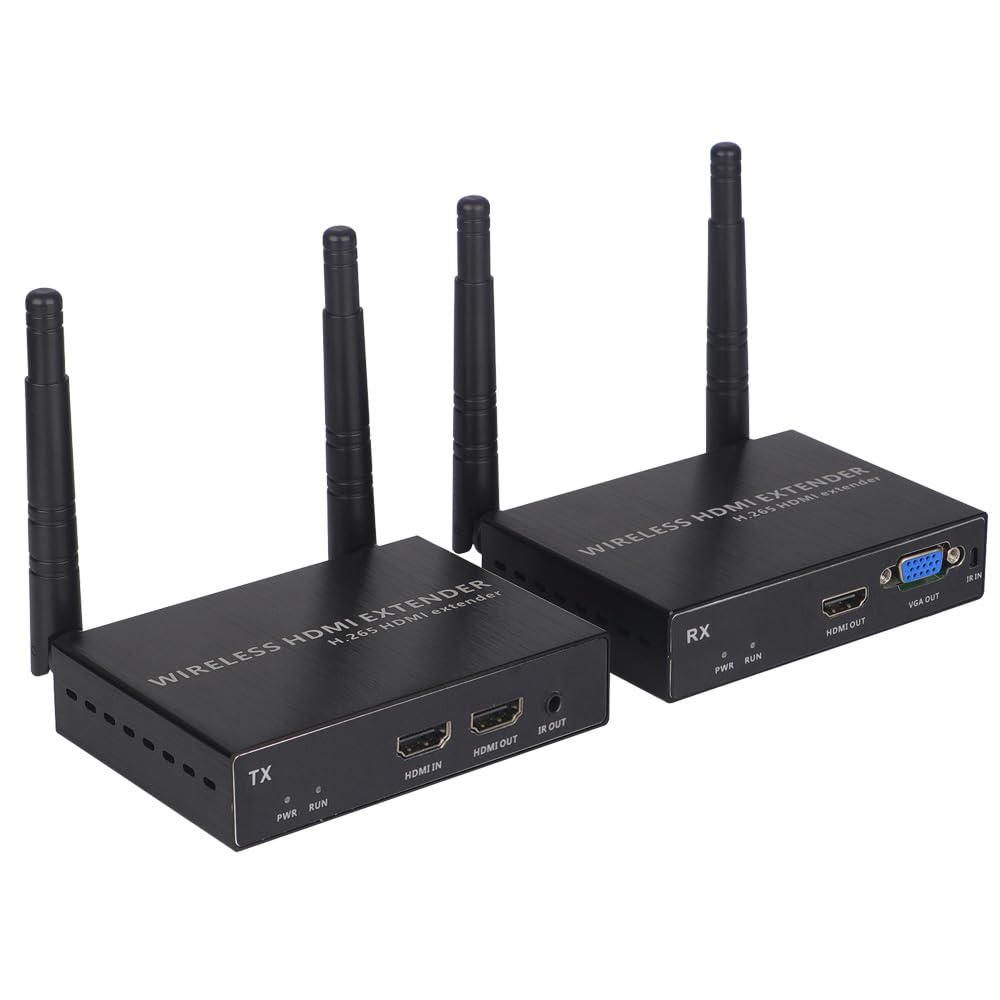
Image: The EXVIST Wireless HDMI Extender kit, showing both the Transmitter (TX) and Receiver (RX) units with their respective ports and antennas.
4.1 Transmitter (TX) Unit
- HDMI IN: Connects to your source device (e.g., laptop, PC, PS4).
- HDMI OUT (Loop-out): Connects to a local display for monitoring the source signal.
- IR OUT: Connects to the IR Blaster cable to control the source device remotely.
- DC 5V: Power input port.
- NETWORK (RJ45): For wired extension or initial pairing.
- RESET: Button for factory reset or re-pairing.
4.2 Receiver (RX) Unit
- HDMI OUT: Connects to your display device (e.g., HDTV, projector).
- VGA OUT: Provides an alternative video output for VGA-compatible displays.
- IR IN: Connects to the IR Receiver cable to receive remote control signals.
- DC 5V: Power input port.
- NETWORK (RJ45): For wired extension or initial pairing.
- RESET: Button for factory reset or re-pairing.

Image: The receiver unit showcasing its dual-band 2.4GHz & 5.8GHz antennas for stable wireless transmission.
5. Setup Instructions
The EXVIST extender kit is designed for plug-and-play operation. The units are pre-paired from the factory. Follow these steps for initial setup:
5.1 Basic Wireless Connection (1-to-1)
- Connect your HDMI source device (e.g., laptop, PC, PS4) to the HDMI IN port of the TX unit using an HDMI cable.
- Optional: Connect a local display to the HDMI OUT (loop-out) port of the TX unit to monitor the source signal.
- Connect your display device (e.g., HDTV, projector) to the HDMI OUT or VGA OUT port of the RX unit using an HDMI or VGA cable, respectively.
- Connect the provided power adapters to the DC 5V ports of both the TX and RX units, then plug them into power outlets.
- Ensure both units are powered on. The indicator lights will show connection status. After a few moments, the video signal should appear on your display connected to the RX unit.

Image: A diagram illustrating the connection flow from source devices to the TX unit, and from the RX unit to display devices via WiFi.
5.2 IR Remote Control Extension
- Connect the IR Blaster cable to the IR OUT port on the TX unit. Position the IR Blaster emitter near the IR sensor of your source device (e.g., DVD player, set-top box).
- Connect the IR Receiver cable to the IR IN port on the RX unit. Position the IR Receiver in a location where it can receive signals from your remote control.
- You can now use your source device's remote control from the location of the RX unit to control the source device connected to the TX unit.
5.3 Wired Connection (LAN Extension)
For extended distances or through complex building structures, you can connect the TX and RX units via an Ethernet cable through a network switch or router.
- Connect the NETWORK (RJ45) port of the TX unit to your network switch/router using an Ethernet cable.
- Connect the NETWORK (RJ45) port of the RX unit to the same network switch/router using another Ethernet cable.
- Ensure both units are powered on. The system will automatically detect the wired connection and prioritize it for transmission, offering lower latency and increased stability.
6. Operating Instructions
6.1 Transmission Modes
The EXVIST extender supports both 1-to-1 and 1-to-many transmission modes.

Image: Diagram illustrating 1-to-1 and 1-to-many (up to 8 receivers) transmission modes for the wireless HDMI extender.
- 1-to-1 Mode: One TX unit transmits to one RX unit. This is the standard setup described in Section 5.1.
- 1-to-Many Mode: One TX unit can transmit to multiple RX units (up to 8 receivers). To use this mode, simply power on additional RX units and ensure they are within wireless range or connected to the same network as the TX unit. The TX unit will automatically broadcast to all paired RX units.
6.2 Re-pairing Units
If the TX and RX units lose connection or you need to pair new units, follow these steps:
- Connect both the TX and RX units directly with the provided RJ45 Ethernet cable.
- Power on both units.
- Press and hold the RESET button on both units simultaneously for approximately 5-10 seconds until the indicator lights flash, indicating successful re-pairing.
- Disconnect the RJ45 cable. The units should now be paired and ready for wireless operation.
6.3 RTSP Stream Extraction (TX Unit)
The TX unit supports RTSP protocol, allowing you to extract the video stream directly for playback via VLC player or other compatible software.
- Ensure the TX unit is powered on and receiving an HDMI input signal.
- Connect the TX unit to your network via the RJ45 port.
- On a computer connected to the same network, open VLC Media Player.
- Go to Media > Open Network Stream...
- Enter the RTSP URL, typically in the format:
rtsp://[TX_Unit_IP_Address]:554/stream(The default IP address is often 192.168.1.168, but may vary. Consult your network settings or device documentation for the exact IP). - Click Play to view the stream.
7. Maintenance
- Keep the devices clean by wiping them with a soft, dry cloth. Do not use liquid or aerosol cleaners.
- Ensure the antennas are securely attached and positioned for optimal signal reception.
- Avoid placing the units in direct sunlight or near heat sources.
- Periodically check cable connections to ensure they are secure.
8. Troubleshooting
| Problem | Possible Cause | Solution |
|---|---|---|
| No video output on RX display. | No power; Incorrect connections; Units not paired; Signal interference. | Check power adapters and connections. Ensure TX and RX units are paired (see Section 6.2). Reduce distance or obstacles between units. Try a wired connection. |
| Video flickering or unstable. | Weak signal; Interference from other wireless devices; Excessive distance. | Relocate units closer to each other. Ensure antennas are properly oriented. Minimize obstacles. Avoid placing near Wi-Fi routers or microwaves. Consider wired connection. |
| IR remote control not working. | IR Blaster/Receiver incorrectly positioned; Cables loose. | Ensure IR Blaster is directly over the source device's IR sensor. Ensure IR Receiver has a clear line of sight to your remote. Check cable connections. |
| Noticeable video latency (delay). | Inherent to wireless transmission; Signal quality. | A slight delay (approx. 150ms) is normal for wireless extenders. For applications requiring minimal latency (e.g., fast-paced gaming), a wired connection is recommended. Ensure optimal signal strength. |
| Cannot connect via wired (RJ45) method. | Incorrect network configuration; Faulty Ethernet cable. | Ensure both units are connected to the same network switch/router. Verify Ethernet cables are functional. Check network settings if using static IPs (though usually automatic). |
9. Specifications
| Feature | Detail |
|---|---|
| Model Name | ITS2EV11 |
| Brand | EXVIST |
| Connectivity Technology | Wireless (2.4GHz & 5.8GHz), Ethernet, HDMI, IR |
| Connector Type | HDMI, VGA |
| Video Resolution | Up to 1080p @ 60fps (1920x1080) |
| Video Codec | H.265/HEVC |
| Wireless Transmission Distance | Up to 100 meters (328 feet) in open air |
| Wired Transmission Distance | Up to 200 meters (656 feet) via network switch/router |
| IR Support | Yes |
| Compatible Devices | TV, Projector, Smartphone, PC, Tablet, Laptop, PS4 |
| Power Supply | DC 5V |
| Form Factor | TV-Box |
| UPC | 748521688733 |
| GTIN | 748521688733 |

Image: A close-up view of the extender unit, highlighting its H.265 video compression and VGA output capabilities.

Image: A visual comparison of wired (up to 656 feet) and wireless (up to 328 feet) transmission distances for the extender.
10. Warranty Information
This EXVIST product comes with a 1-Year Warranty Against Manufacturer Defects. This warranty covers defects in materials and workmanship under normal use. It does not cover damage caused by misuse, accident, unauthorized modification, or external causes such as power surges. Please retain your proof of purchase for warranty claims.
11. Customer Support
For technical assistance, troubleshooting, or warranty inquiries, please contact EXVIST customer support through the retailer's platform or visit the official EXVIST website for contact information. Please have your model number (ITS2EV11) and purchase details ready when contacting support.