1. Introduction
This manual provides essential information for the safe operation, setup, maintenance, and troubleshooting of your Banfluxion WM210V Mini Metal Lathe. Please read this manual thoroughly before operating the machine to ensure proper use and to prevent injury or damage.
The Banfluxion WM210V is a precision 8x32 inch mini metal lathe equipped with a powerful 900W brushless motor and variable speed control, designed for various metalworking tasks including turning, threading, and polishing.
2. Safety Instructions
WARNING: Failure to follow these safety instructions may result in serious injury or death.
- Always wear appropriate personal protective equipment (PPE), including safety glasses, hearing protection, and suitable clothing. Avoid loose clothing, jewelry, and long hair that can get caught in moving parts.
- Ensure the lathe is securely mounted on a stable, level workbench before operation.
- Disconnect power before performing any maintenance, adjustments, or when changing accessories.
- Keep the work area clean and well-lit. Cluttered areas invite accidents.
- Never leave the machine running unattended.
- Do not operate the lathe under the influence of drugs, alcohol, or medication that may impair judgment.
- Always use the emergency stop switch in case of an unexpected event.
- Ensure all guards and safety devices are in place and functioning correctly before operation.
- Do not attempt to remove chips or adjust the workpiece while the machine is running.
- Familiarize yourself with all controls and functions before starting any work.
3. Product Overview
3.1 Components Diagram
The following diagram illustrates the main components of the Banfluxion WM210V Mini Metal Lathe.

3.2 Key Features
- 900W Brushless Motor: Equipped with a powerful 900W brushless motor for low noise, high efficiency, and extended service life without brush replacement.
- Metal Gear: Features wear-resistant metal gears for accurate transmission and improved durability.
- Infinitely Variable Speed: Spindle speed is adjustable in two gears: 50-1250 RPM and 1250-2500 RPM, with both forward and reverse operation. A digital display shows the current rotation speed.
- Safety Switch: An emergency stop switch allows for immediate shutdown during operation, enhancing operator safety.
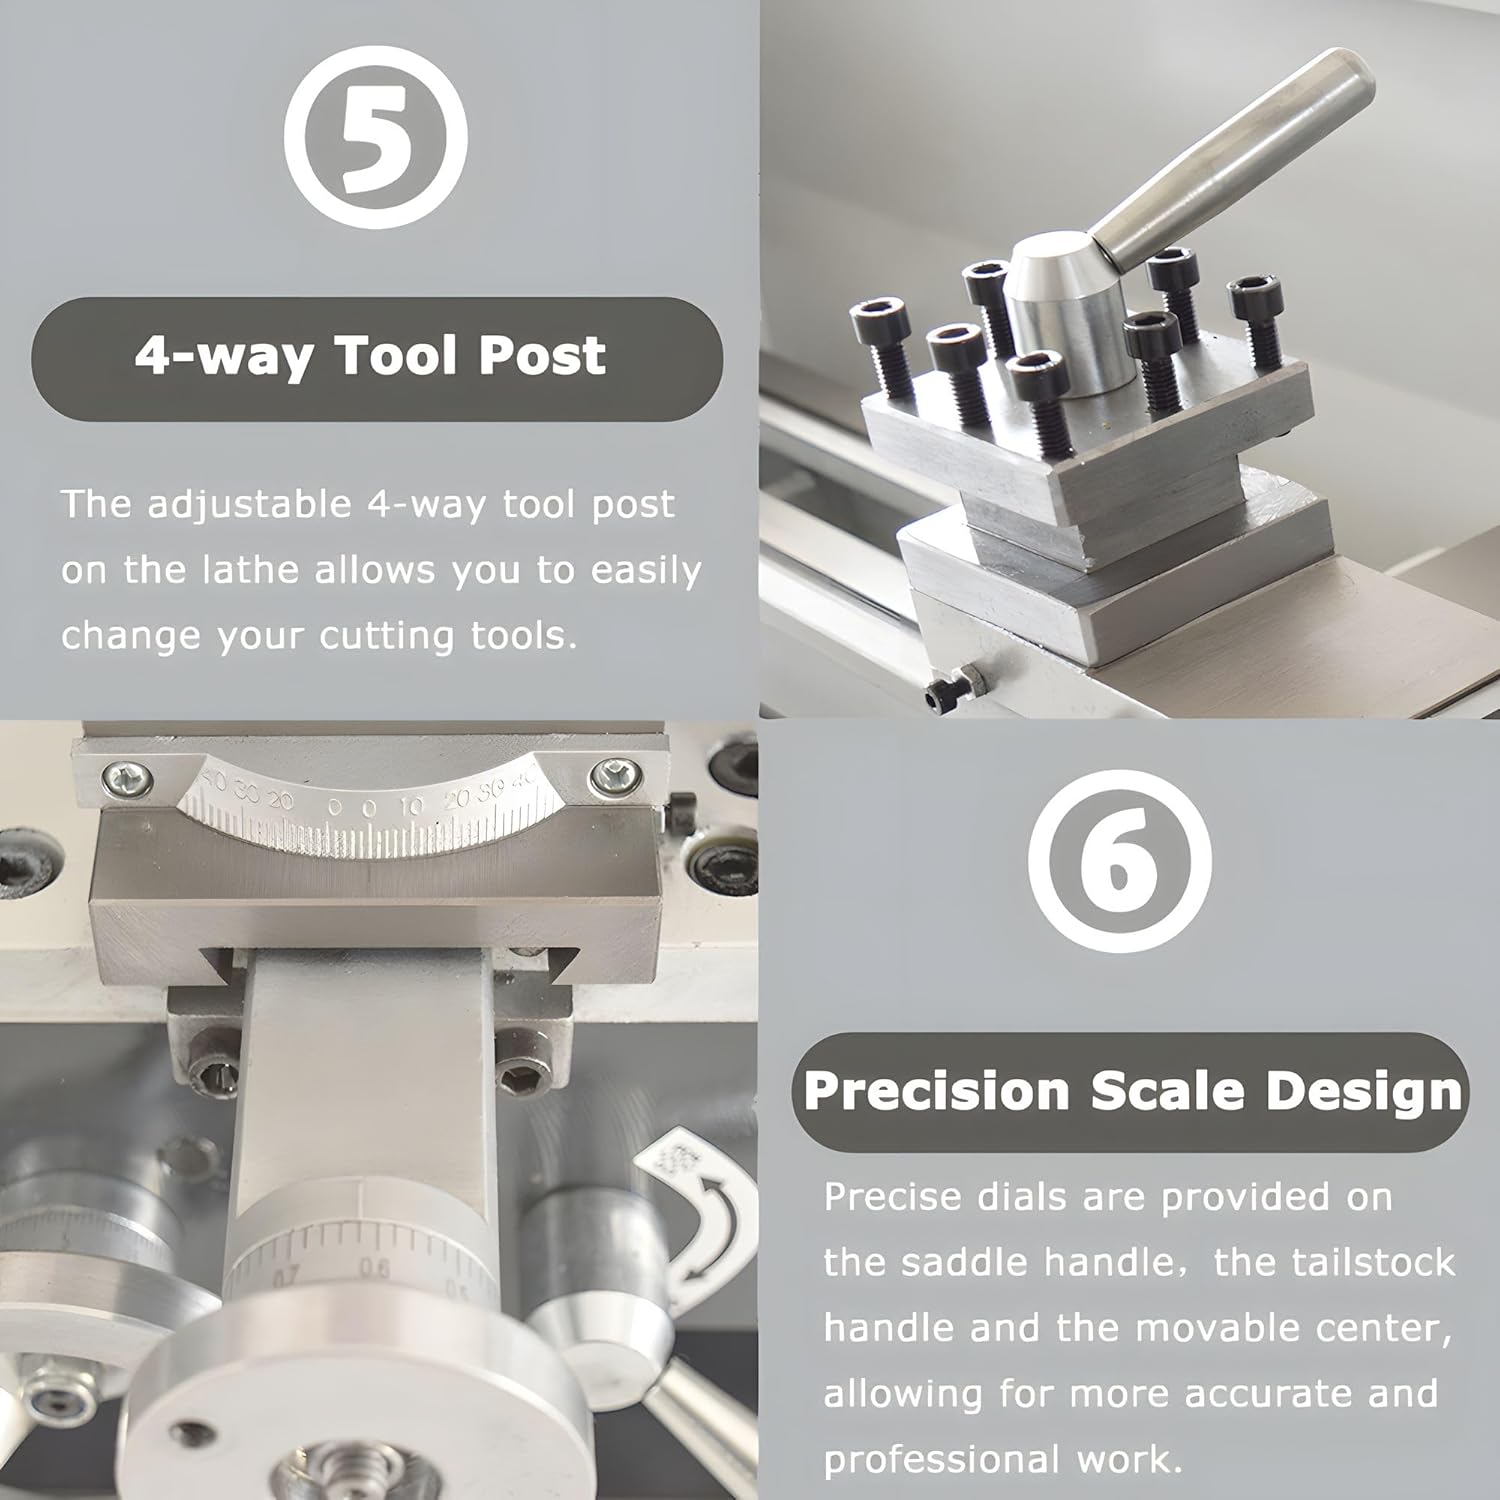
- 4-Way Tool Post: The adjustable 4-way tool post facilitates easy and quick changes of cutting tools.
- Precision Scale Design: Precise dials on the saddle handle, tailstock handle, and movable center enable accurate and professional work.
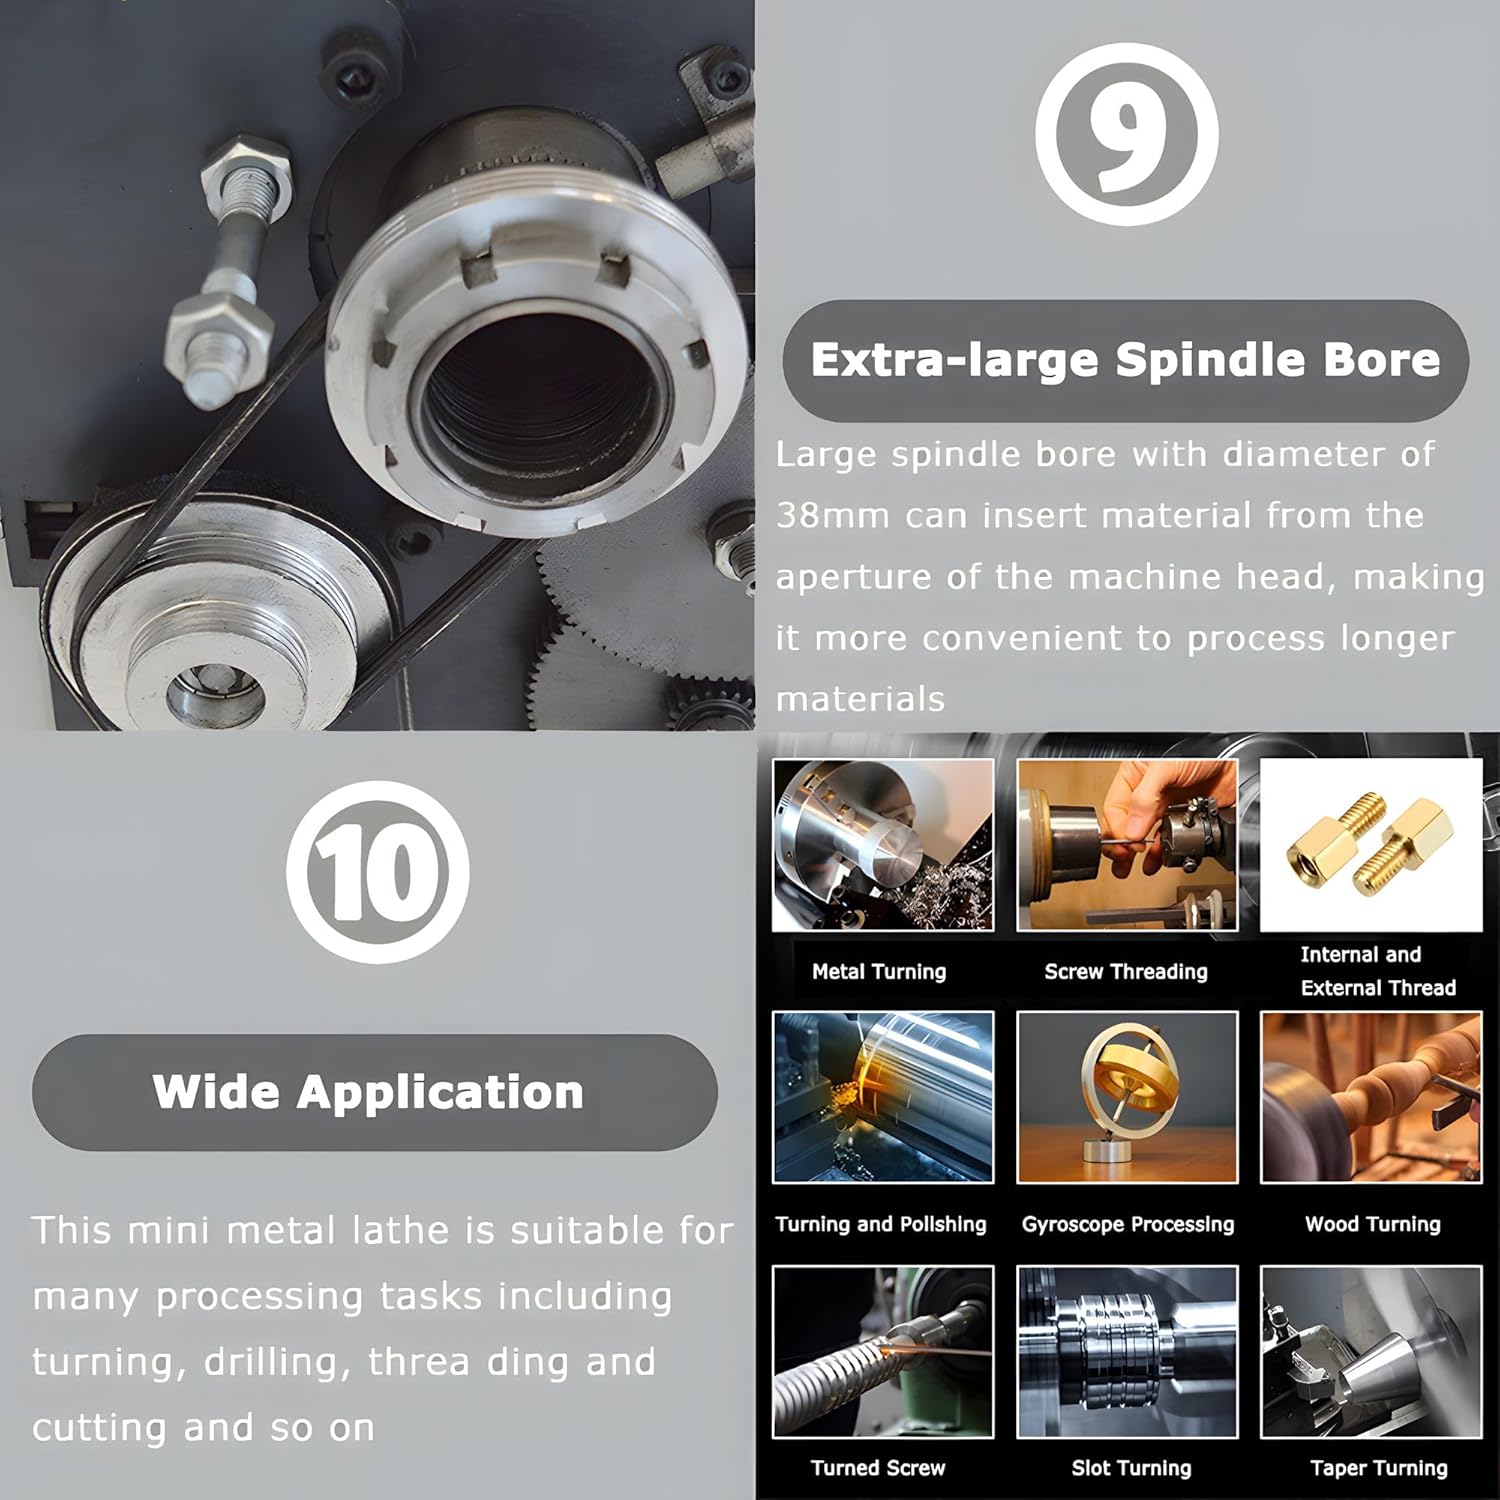
- Extra-large Spindle Bore: A large 38mm spindle bore allows for processing longer materials by inserting them through the machine head aperture.

4. Specifications
The following table details the technical specifications of the Banfluxion WM210V Mini Metal Lathe.

| Specification | Value |
|---|---|
| Model | WM210V |
| Motor | 110V Brushless Motor |
| Voltage | AC110V |
| Power | 900W |
| Length of Center | 31.5" (800mm) |
| Swing Over Bed | 8.3" (210mm) |
| Rotary Diameter of Tool Rest | 5.51" (140mm) |
| Spindle Bore | 1.50" (38mm) |
| Diameter of Chuck | 4.92" (125mm) |
| Width of Lathe Bed | 3.94" (100mm) |
| Number of Spindle Speeds | Infinitely Variable Speeds |
| Spindle Taper | MT5 |
| Tool Rest Station | Horizontal Four-station |
| Spindle Rotation Speed | 50-2500 RPM |
| Range of Inch Threads (optional accessory) | 10-44 T.P.I |
| Precision of the Spindle | 0.01mm |
| Automatic Feed Range | 0.1mm-0.2mm |
| Maximum Stroke of Tool Rest Plate | 2.16" (55mm) |
| Maximum Stroke of Middle Plate | 2.95" (75mm) |
| Maximum Stroke of Bottom Plate | 26.8" (680mm) |
| Maximum Stroke of Tailstock Sleeve | 2.36" (60mm) |
| Tail Frame Taper | MT2 |
| Product Dimensions | 45.7 x 13 x 13.4 inches |
| Item Weight | 183 pounds |

5. Setup
5.1 Unpacking and Inspection
- Carefully remove the lathe from its packaging. Retain all packaging materials for future transport or return.
- Inspect the machine for any signs of damage that may have occurred during shipping. Report any damage to the supplier immediately.
- Verify that all components and accessories listed in the packing list are present.
5.2 Mounting the Lathe
- Choose a sturdy, level workbench capable of supporting the lathe's weight (approximately 183 lbs).
- Securely fasten the lathe to the workbench using appropriate bolts and nuts. Ensure there is no wobble or movement.
- Ensure adequate clearance around the machine for safe operation and chip removal.
5.3 Electrical Connection
- Ensure the power supply matches the lathe's voltage requirements (AC110V).
- Connect the lathe to a grounded electrical outlet. Do not use extension cords unless absolutely necessary, and ensure they are rated for the machine's power requirements.
- Before plugging in, ensure the power switch is in the 'OFF' position.
5.4 Initial Checks
- Clean any protective grease or oil from the machine surfaces using a suitable degreaser.
- Lubricate all moving parts as indicated in the maintenance section.
- Manually check the movement of the carriage, cross slide, and tailstock to ensure smooth operation.
- Verify that the chuck jaws open and close smoothly.
6. Operating Instructions
6.1 Powering On/Off
- To power on, ensure the emergency stop button is disengaged (pulled out) and turn the main power switch to 'ON'.
- To power off, turn the main power switch to 'OFF' or press the emergency stop button for immediate shutdown.
6.2 Speed Adjustment
- The lathe features infinitely variable speed control. Adjust the speed using the Speed Adjustment Knob.
- The digital display will show the current RPM.
- The spindle speed is divided into two gears: Low (50-1250 RPM) and High (1250-2500 RPM). Select the appropriate gear based on the material and operation.
- Use the Forward and Reverse Switch to change the direction of spindle rotation.
6.3 Workpiece Mounting
- Ensure the chuck jaws are clean and free of debris.
- Insert the workpiece into the chuck, ensuring it is centered and securely gripped. Use a chuck key to tighten the jaws evenly. Always remove the chuck key before starting the lathe.
- For longer workpieces, use the tailstock for additional support.
6.4 Tool Installation
- Loosen the locking bolts on the 4-way tool post.
- Insert the cutting tool into the tool holder, ensuring it is properly aligned with the workpiece center height.
- Tighten the locking bolts securely.
6.5 Basic Turning Operations
- Facing: To machine the end of a workpiece flat.
- Turning: To reduce the diameter of a workpiece.
- Threading: The lathe supports inch threading. Refer to the Thread Gearing Chart for appropriate gear settings.
- Drilling: Mount a drill chuck in the tailstock to drill holes in the center of the workpiece.
- Polishing: Use appropriate tools and techniques for finishing surfaces.
Always start with light cuts and gradually increase depth as needed. Monitor the cutting action and adjust speed and feed rates for optimal results.
7. Maintenance
Regular maintenance is crucial for the longevity and performance of your lathe.
7.1 Cleaning
- After each use, clean all chips and debris from the lathe bed, carriage, and other surfaces. Use a brush or shop vacuum; never use compressed air as it can embed chips into moving parts.
- Wipe down all exposed metal surfaces with a clean cloth to prevent rust.
7.2 Lubrication
- Regularly lubricate the lead screws, cross slide, compound slide, and tailstock quill with appropriate machine oil.
- Check and replenish the oil in the gearbox (if applicable) according to the manufacturer's recommendations.
7.3 Gear Inspection
- Periodically inspect the metal gears for wear or damage. Replace any worn gears promptly to maintain accurate transmission.
8. Troubleshooting
This section addresses common issues you might encounter with your Banfluxion WM210V Mini Metal Lathe.
| Problem | Possible Cause | Solution |
|---|---|---|
| Lathe does not power on | No power supply; Emergency stop engaged; Faulty switch | Check power cord and outlet; Disengage emergency stop; Inspect power switch and wiring. |
| Spindle does not rotate | Motor issue; Belt slippage; Speed control fault | Check motor connections; Adjust belt tension; Consult for speed control repair. |
| Excessive vibration or noise | Unbalanced workpiece; Loose mounting; Worn bearings; Dull cutting tool | Ensure workpiece is balanced and secure; Tighten mounting bolts; Inspect and replace bearings; Sharpen or replace cutting tool. |
| Poor surface finish on workpiece | Dull tool; Incorrect speed/feed; Workpiece not rigid; Vibration | Sharpen tool; Adjust speed and feed rates; Ensure workpiece is securely mounted; Address vibration issues. |
| Carriage/slides stiff or difficult to move | Lack of lubrication; Chips/debris on ways; Overtightened gibs | Lubricate all moving parts; Clean ways thoroughly; Adjust gibs for proper tension. |
For issues not listed here or if solutions do not resolve the problem, please contact Banfluxion customer support.
9. Warranty and Support
For warranty information and customer support, please refer to the documentation provided at the time of purchase or contact Banfluxion directly. Keep your purchase receipt as proof of purchase for any warranty claims.
Manufacturer: Banfluxion
Part Number: CB028032