1. Introduction
Thank you for purchasing the DWVO 52-inch Tropical Ceiling Fan with Light and Remote. This manual provides detailed instructions for the safe and efficient operation of your new ceiling fan. Please read all instructions carefully before assembly, installation, and use. Keep this manual for future reference.

Image 1.1: DWVO 52-inch Tropical Ceiling Fan (Walnut finish).
2. Safety Information
WARNING: To reduce the risk of fire, electric shock, or personal injury, always follow these basic precautions:
- Read all instructions before installing the fan.
- Ensure the installation location can support the fan's weight.
- All wiring must be in accordance with national and local electrical codes.
- Turn off power at the circuit breaker before installation or servicing.
- Do not operate the fan with damaged blades.
- Do not insert objects into the path of the fan blades.
3. Package Contents
Verify that all components are present before beginning assembly. If any parts are missing or damaged, contact customer service.
- Motor Housing
- 5 Palm Leaf Blades
- Blade Brackets
- Light Kit with LED Bulb
- Glass Lampshade
- Remote Control and Receiver
- Downrods (4.5" and 12")
- Mounting Bracket
- Hardware Pack (screws, washers, wire nuts)
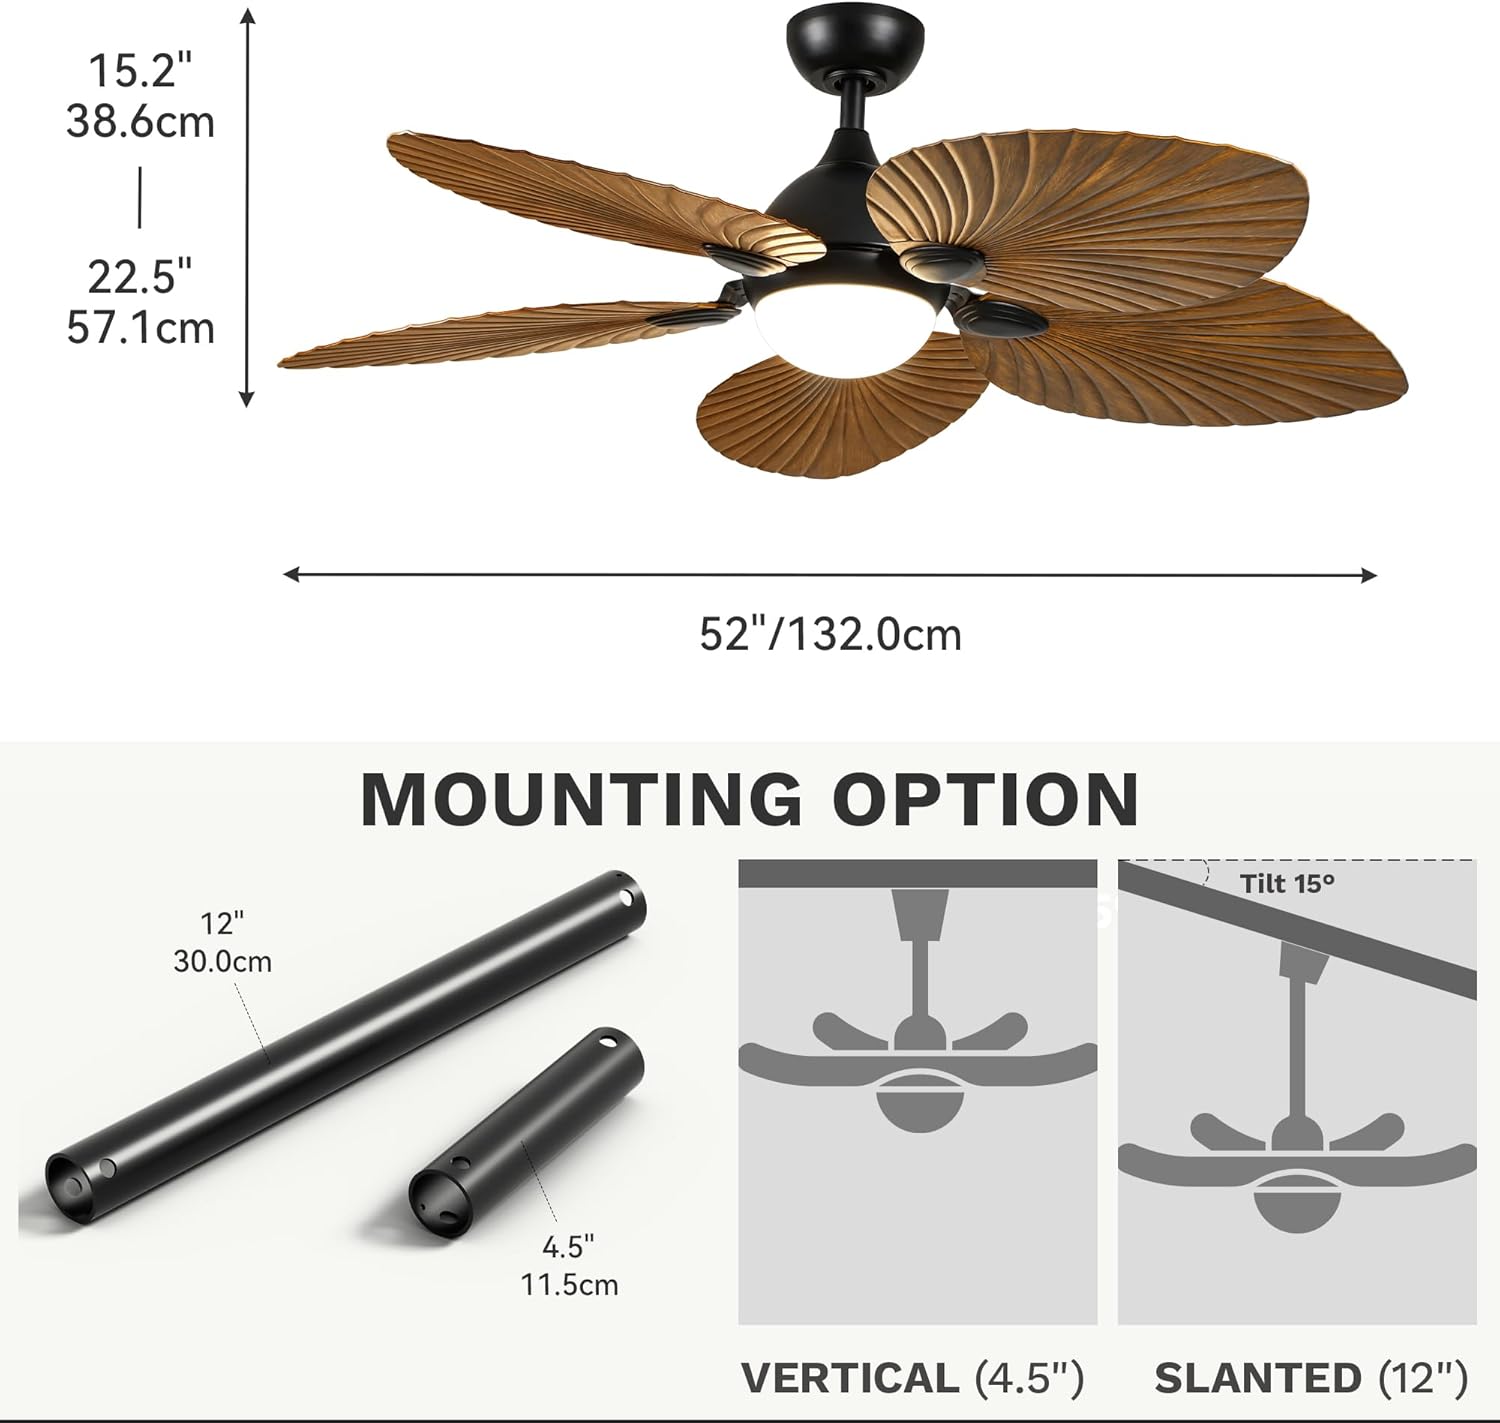
Image 3.1: Overview of fan components and dimensions (52" diameter, 22.5" height with 12" downrod).
4. Assembly
Follow these steps to assemble your ceiling fan:
- Attach Blades to Blade Brackets: Secure each palm leaf blade to its corresponding blade bracket using the provided screws. Ensure they are tightened firmly.
- Attach Blade Assemblies to Motor Housing: Carefully attach the assembled blade and bracket units to the motor housing. Use the provided screws and ensure all connections are secure.
- Install Downrod: Feed the electrical wires from the motor housing through the chosen downrod (4.5" or 12"). Insert the downrod into the motor housing and secure it with the provided screws and pins.
- Connect Receiver Wires: Connect the receiver wires to the fan motor wires according to the wiring diagram in the full manual. Use wire nuts to secure connections.
- Attach Light Kit: Connect the light kit wires to the fan's light wires. Secure the light kit to the bottom of the motor housing.
- Install Lampshade: Carefully attach the glass lampshade to the light kit.
Video 4.1: Detailed assembly instructions for the DWVO Tropical Ceiling Fan.
5. Installation
Before installation, ensure the power is OFF at the circuit breaker. This fan supports both vertical and slanted ceiling mounting.
- Mounting Bracket Installation: Secure the mounting bracket to your ceiling junction box. Ensure it is firmly attached and can support the fan's weight.
- Wiring Connections: Connect the household electrical wires to the fan's wiring (including the ground wire) as per local electrical codes. Refer to the wiring diagram in the full manual for specific connections.
- Hang the Fan: Carefully lift the assembled fan and hang it onto the mounting bracket.
- Secure Canopy: Slide the canopy up to cover the mounting bracket and secure it with the provided screws.
Image 5.1: The fan can be mounted vertically or on a slanted ceiling up to 15 degrees, using either the 4.5-inch or 12-inch downrod.
6. Operating Instructions
Your DWVO ceiling fan is designed for efficient and quiet operation with multiple features for comfort.
6.1 Reversible Design (Summer/Winter Modes)
The fan features a reversible motor, allowing for year-round use. In Summer Mode (Downdraft), the fan blades rotate counter-clockwise, pushing cool air down to create a refreshing breeze. In Winter Mode (Updraft), the blades rotate clockwise, drawing cool air up and pushing warm air down from the ceiling, helping to distribute heat evenly.

Image 6.1: Visual representation of summer (downdraft) and winter (updraft) modes for optimal air circulation.
6.2 Quiet DC Motor
Equipped with an energy-efficient DC motor, this fan operates at noise levels below 35 decibels, ensuring a tranquil environment. This makes it ideal for bedrooms, living rooms, and dining rooms where quiet operation is desired.

Image 6.2: The fan's DC motor ensures quiet operation, ideal for sleeping or quiet activities.
6.3 6-Speed Settings and Natural Wind Mode
The fan offers 6 adjustable speed settings to customize airflow. Additionally, a natural wind mode simulates a gentle, fluctuating breeze for enhanced comfort.
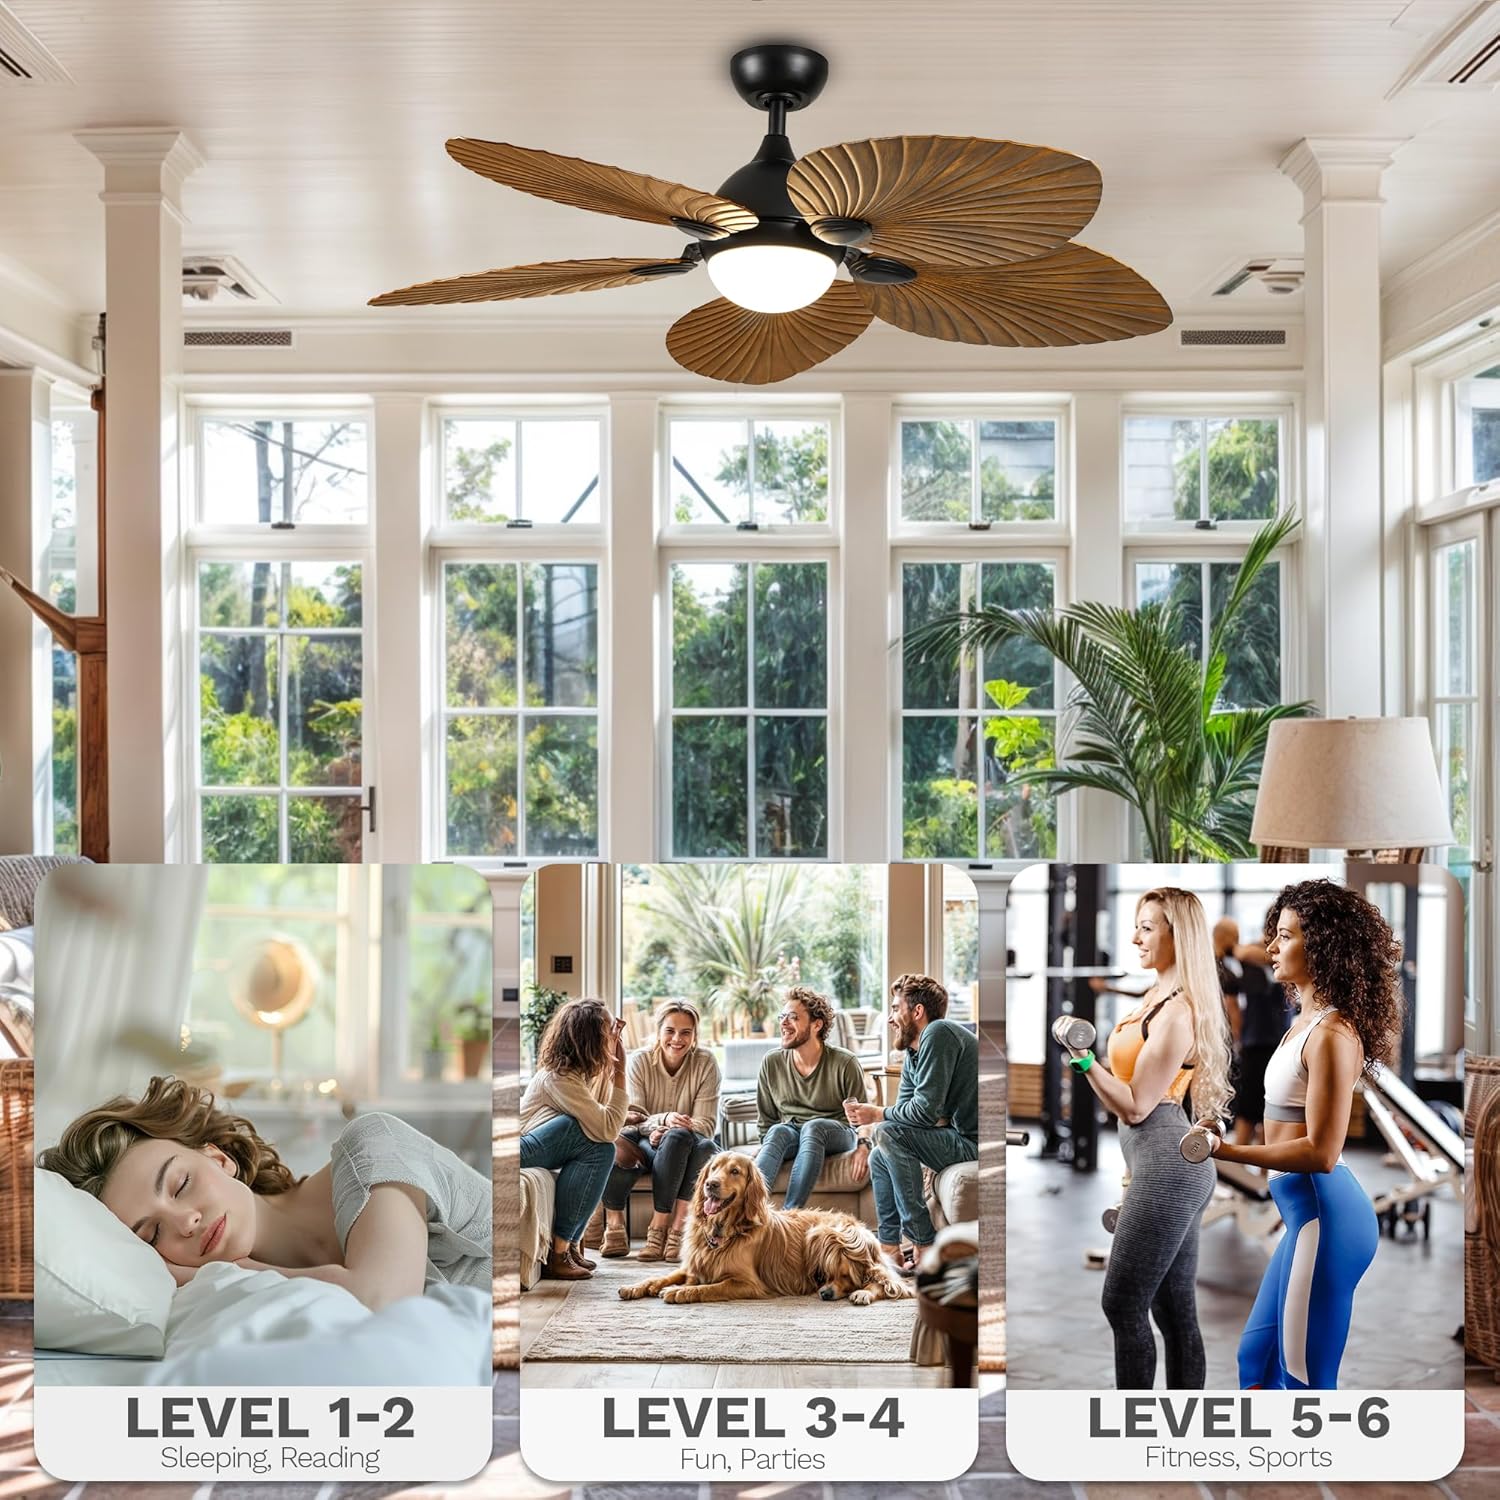
Image 6.3: Choose from various wind levels to suit different activities and preferences.
7. Remote Control Functions
The included multi-function remote control provides convenient operation of your ceiling fan and light.
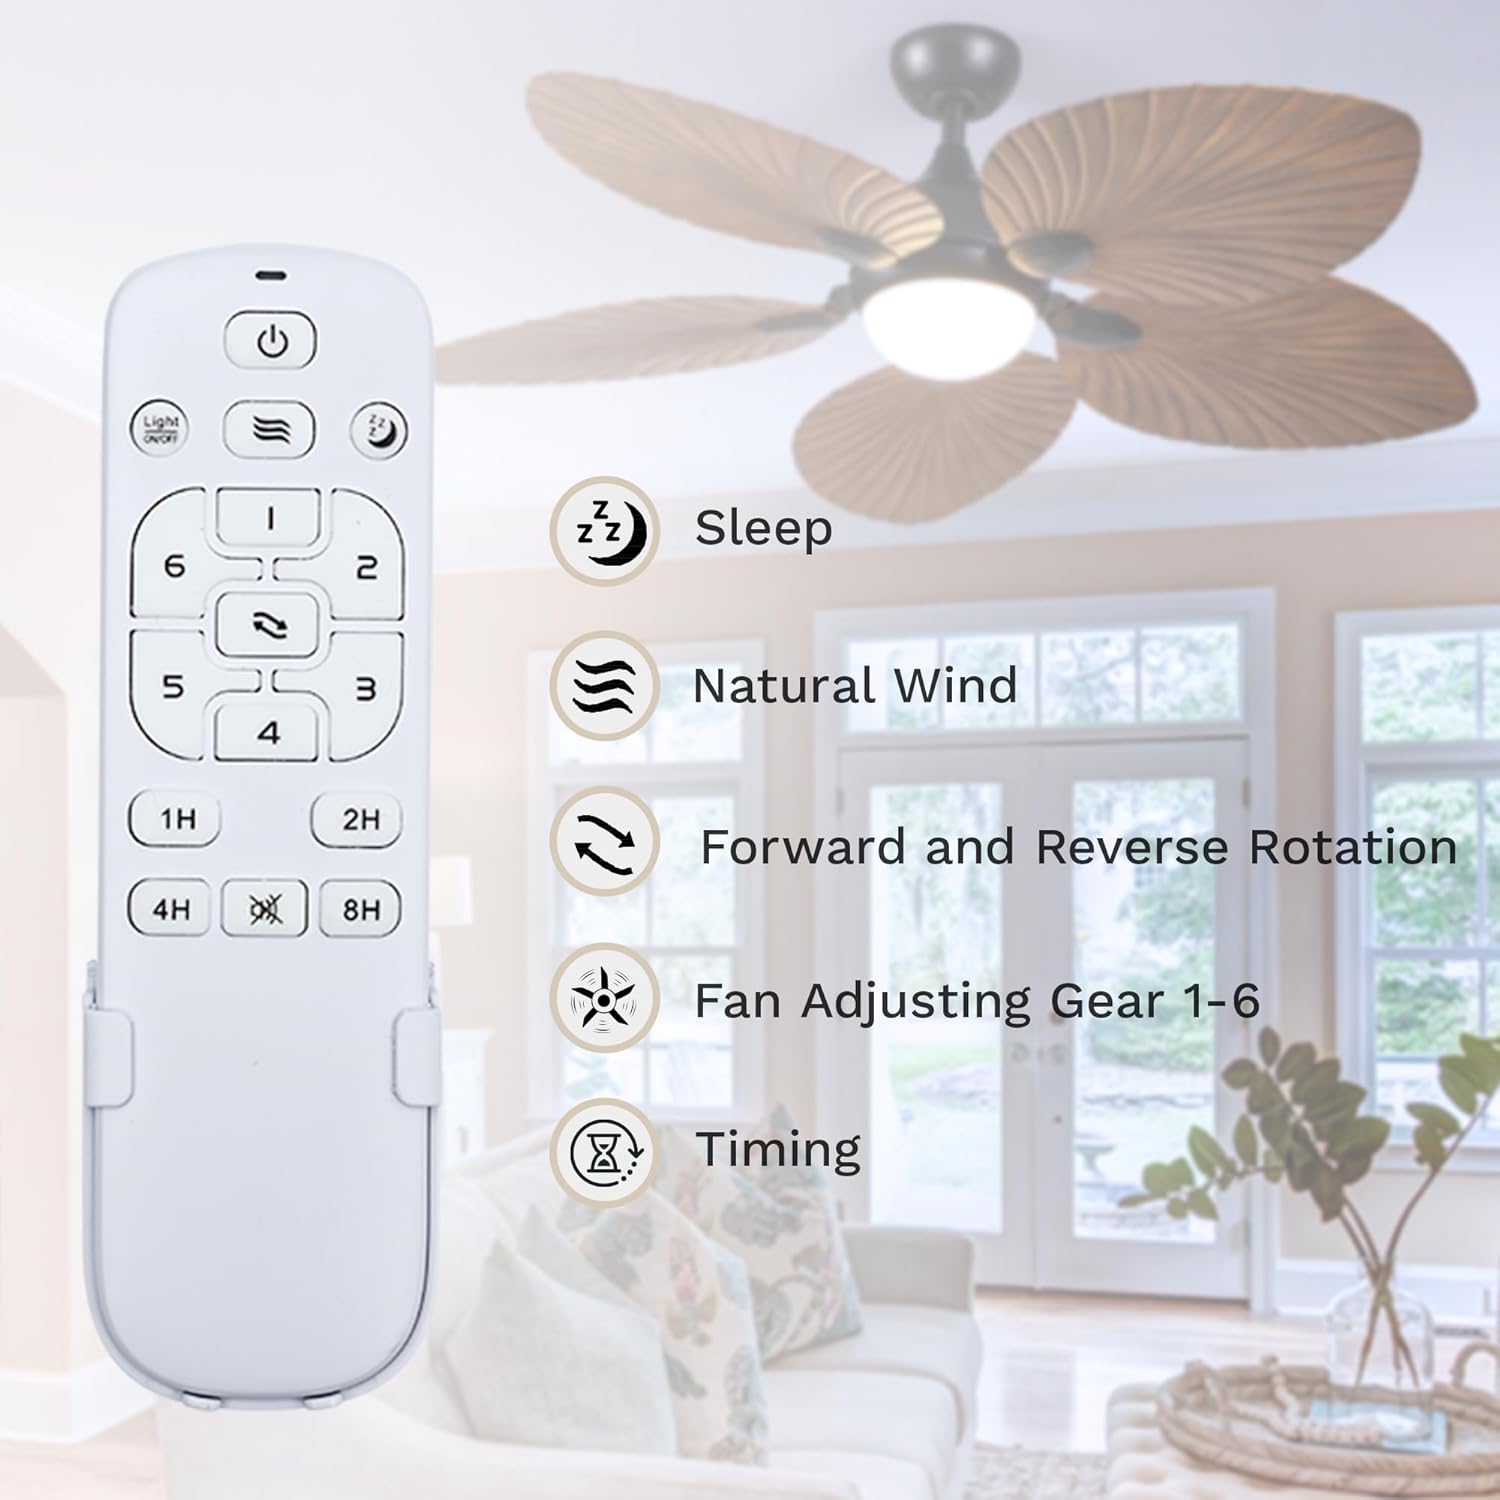
Image 7.1: Remote control layout and functions.
- Power Button: Turns the fan and light on/off.
- Fan Speed Buttons (1-6): Adjusts fan speed from low (1) to high (6).
- Light On/Off Button: Toggles the light on or off.
- Color Temperature Button: Cycles through 3000K (Warm White), 4500K (Natural White), and 6000K (Cool White).
- Natural Wind Mode: Activates a fluctuating breeze.
- Sleep Mode: Automatically cycles between 1-3 wind speeds for comfortable sleep.
- Forward/Reverse Rotation: Changes the direction of blade rotation for summer or winter modes.
- Timer Buttons (1H, 2H, 4H, 8H): Sets the fan to automatically turn off after the selected duration.
7.1 Adjustable Light Color Temperature
The integrated LED light offers three color temperature options: 3000K (Warm White), 4500K (Natural White), and 6000K (Cool White). Use the dedicated button on the remote to cycle through these options. The fan also features a memory function that retains the last-used color temperature setting.
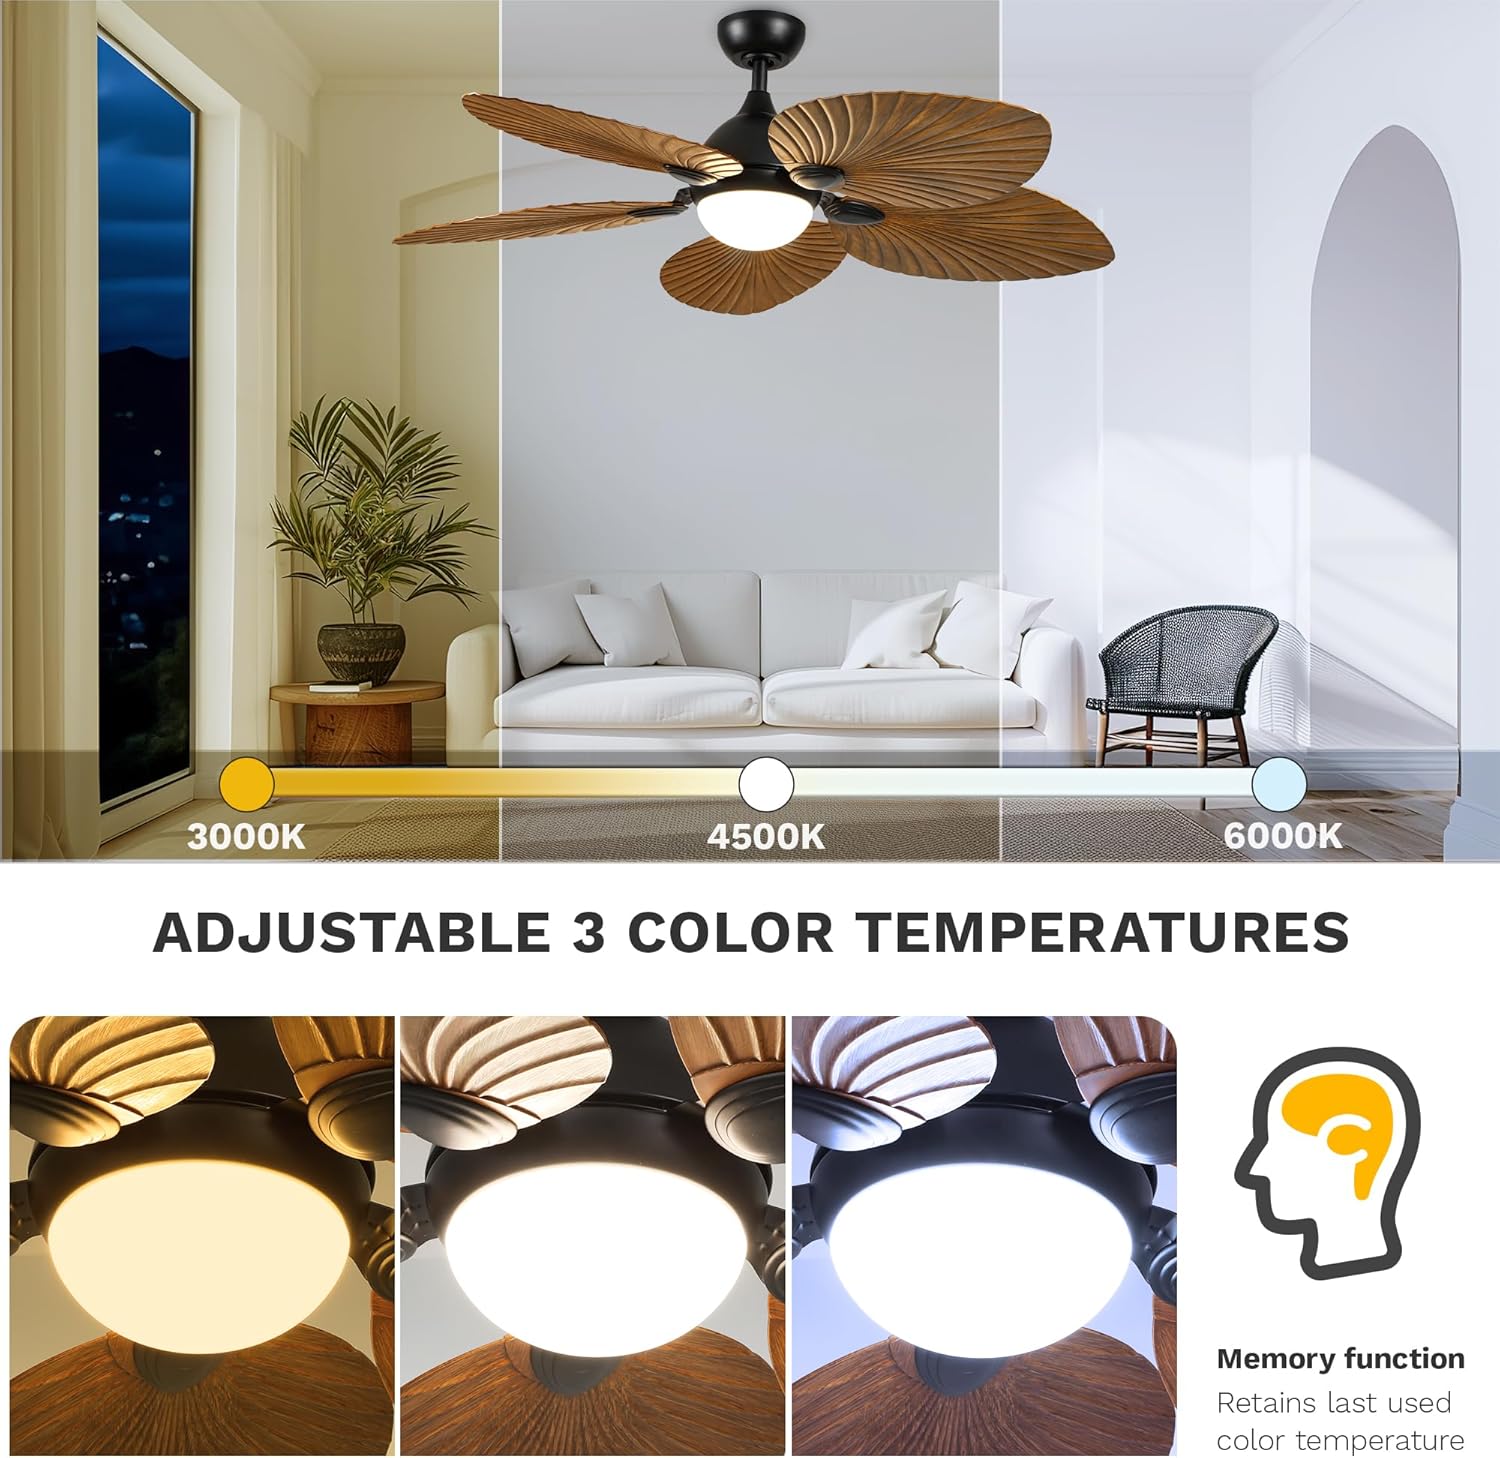
Image 7.2: Easily switch between warm, natural, and cool white light settings.
8. Maintenance
Regular maintenance ensures optimal performance and longevity of your ceiling fan.
- Cleaning: Use a soft, damp cloth to clean the fan blades and motor housing. Do not use abrasive cleaners or solvents.
- Blade Balance: If the fan wobbles, check that all blade screws are tight. Use the included balance clip if necessary.
- Light Source: The LED light source is integrated and generally does not require replacement. If issues occur, contact customer service.
9. Troubleshooting
If you experience issues with your fan, refer to the following common problems and solutions:
| Problem | Possible Cause | Solution |
|---|---|---|
| Fan does not start | No power to the fan; Loose wire connections; Remote control battery low. | Check circuit breaker; Verify all wire connections are secure; Replace remote control battery. |
| Fan wobbles | Loose blade screws; Unbalanced blades; Loose mounting bracket. | Tighten all blade screws; Use balancing kit; Ensure mounting bracket is secure. |
| Light does not work | Loose wire connection; Faulty LED driver. | Check light kit wiring; Contact customer service for LED driver replacement. |
| Remote not working | Battery low/dead; Incorrect pairing. | Replace battery; Re-pair remote with receiver (refer to full manual for pairing instructions). |
10. Specifications
| Feature | Detail |
|---|---|
| Brand | DWVO |
| Model Name | Ceiling Fan (MADWVGPDtK) |
| Product Dimensions | 52"D x 52"W x 22.5"H |
| Color | Walnut |
| Electric Fan Design | Ceiling Fan |
| Power Source | DC |
| Number of Blades | 5 |
| Speed Settings | 6 RPM |
| Noise Level | 35 Decibels |
| Wattage | 18 watts (LED Light) |
| Type of Bulb | LED (3000K, 4500K, 6000K) |
| Control Method | Remote |
| Indoor/Outdoor Usage | Indoor |
| Special Features | Reversible Motor, Timer, Natural Wind Mode |
| UPC | 197839264960 |
11. Warranty and Support
This DWVO ceiling fan comes with a limited lifetime warranty. For warranty claims or technical support, please refer to the contact information provided with your purchase or visit the official DWVO website.
Video 11.1: Overview of the DWVO tropical ceiling fan with light and remote.