1. Introduction
The PEAKMETER PM2016S is a compact and intelligent digital clamp meter designed for accurate electrical measurements. This instrument features a liquid crystal display with a maximum count value of 5999 and a backlight function for improved visibility in various environments. It offers a range of measurement functions with automatic range selection, making it suitable for both beginners and experienced users. The PM2016S can measure AC and DC voltage, AC current, resistance, frequency, and also includes continuity testing, Non-Contact Voltage (NCV) detection, and V/Ω/A auto-scan capabilities. Its portable design ensures ease of use and convenience.
2. Safety Information
WARNING: To avoid electric shock or personal injury, read and understand all instructions and safety information before using this instrument.
- Always ensure the instrument is in good working condition before use.
- Do not apply more than the rated voltage, as marked on the instrument, between the terminals or between any terminal and earth ground.
- Use caution when working with voltages above 30V AC RMS, 42V peak, or 60V DC. These voltages pose a shock hazard.
- Do not use the instrument if it appears damaged or if the insulation is compromised.
- Ensure the test leads are in good condition, without any cracks or breaks in the insulation.
- Always disconnect the test leads from the circuit before changing functions.
- Replace batteries immediately when the low battery indicator appears to ensure accurate readings.
- Adhere to local and national safety codes.
This instrument complies with EN61010-1, EN61010-2-033, EN61326, CAT. III 600V safety ratings.
3. Product Features
- High Quality Jaw Head: Durable and precise clamp mechanism for current measurement.
- Clear LCD Display and Backlight: Easy-to-read 6000-count display with backlight for visibility in various lighting conditions.
- Easy Operation: Simple, intuitive controls, often requiring just one click for common functions.
- Auto Ranging: Automatically selects the appropriate measurement range, simplifying operation.
- Data Hold: Freezes the displayed reading for convenient recording.
- Non-Contact Voltage (NCV) Detection: Safely detects AC voltage without direct contact.
- V/Ω/A Auto Scan: Automatically identifies and measures voltage, resistance, or current.
- Continuity Test: Checks for electrical continuity with an audible buzzer.
- Frequency Measurement: Measures frequency via clamp or voltage input.
- Compact and Lightweight: Handheld design for portability and ease of use.
- Auto Off: Automatically shuts down after 10 minutes of inactivity to conserve battery life.
4. Package Contents

The package typically includes the following items:
- Color Box (Packaging)
- PEAKMETER PM2016S Digital Clamp Meter
- Test Leads (Red and Black)
- AAA Batteries (2x 1.5V)
- User Manual
Description: This image displays the complete contents of the PEAKMETER PM2016S Digital Clamp Multimeter package, including the device itself, test leads, batteries, and the user manual, all presented within its retail packaging.
5. Setup
5.1 Battery Installation
The PM2016S requires two 1.5V AAA batteries. To install or replace batteries:
- Ensure the meter is turned off.
- Locate the battery compartment cover on the back of the meter.
- Use a screwdriver to open the battery compartment.
- Insert the two AAA batteries, observing the correct polarity (+ and -).
- Replace the battery compartment cover and secure it with the screw.
5.2 Connecting Test Leads
For voltage, resistance, frequency (voltage), and continuity measurements, connect the test leads:
- Insert the black test lead into the "COM" (common) input jack.
- Insert the red test lead into the "VΩ" input jack.
6. Operating Instructions
The PM2016S features an auto-ranging function, simplifying most measurements. Press the red power button to turn the meter on or off. The meter will typically start in auto-scan mode (V/Ω/A Auto Scan).
6.1 AC/DC Voltage Measurement
- Connect the test leads as described in Section 5.2.
- Turn on the meter. It will automatically detect AC or DC voltage.
- Touch the red and black test probes to the points in the circuit where you want to measure voltage.
- Read the voltage value on the LCD display.
Description: This video demonstrates the unboxing of the PEAKMETER PM2016S and its accessories, followed by a practical demonstration of measuring AC voltage using the test leads. The user connects the leads to a power outlet and the meter displays the voltage reading.
6.2 AC Current Measurement (Clamp Function)
- Ensure the meter is on.
- Press the clamp trigger to open the jaws.
- Enclose a single conductor (not a bundle of wires) within the jaws. Ensure the jaws are fully closed.
- The meter will display the AC current reading.
Description: This video demonstrates the AC current measurement function of the PEAKMETER PM2016S. The user clamps the meter around a power cable connected to an appliance (kettle), and the meter displays the current draw.
6.3 Frequency Measurement
The PM2016S can measure frequency in two ways:
- Via Test Leads (Voltage Frequency): In voltage measurement mode, the meter can display frequency. Press the "Hz/NCV" button to toggle to frequency display.
- Via Clamp (Current Frequency): When measuring AC current with the clamp, the meter can also display the frequency of the current. Press the "Hz/NCV" button to toggle to frequency display.

Description: This image shows the clear LCD display of the PM2016S, highlighting its backlight feature and the various measurement indicators, including frequency (Hz).
6.4 Non-Contact Voltage (NCV) Detection
- Press the "Hz/NCV" button to activate NCV mode. The display will show "NCV".
- Move the top end of the meter near a live AC voltage source.
- The meter will beep and the NCV indicator will light up, with the frequency of beeps and light increasing as it gets closer to the voltage source.
Description: This video demonstrates the NCV (Non-Contact Voltage) function of the PEAKMETER PM2016S. The user activates NCV mode and brings the meter near a power outlet, showing the audible and visual alerts when voltage is detected.
6.5 Continuity Test
- Connect the test leads as described in Section 5.2.
- The meter will automatically enter continuity mode if resistance is low.
- Touch the test probes to the two points you want to check for continuity.
- If there is continuity (resistance less than 30Ω), the buzzer will sound.
6.6 Data Hold and Backlight
- Data Hold: Press the "HOLD" button (often combined with the backlight button) to freeze the current reading on the display. Press again to release.
- Backlight: Press and hold the "HOLD" button (or a dedicated backlight button if present) to turn the backlight on or off.

Description: This image highlights the user-friendly design of the PM2016S, showing the main power button and other function buttons, emphasizing its easy operation.
7. Maintenance
7.1 Cleaning
Wipe the case with a damp cloth and mild detergent. Do not use abrasives or solvents. Keep the input terminals free of dirt and moisture.
7.2 Battery Replacement
When the low battery indicator appears on the display, replace the batteries as described in Section 5.1. Remove batteries if the meter is not used for an extended period to prevent leakage.
8. Troubleshooting
- No Display/Meter Not Turning On: Check battery installation and ensure batteries are not depleted. Replace if necessary.
- Inaccurate Readings: Ensure test leads are properly connected. Check for damaged leads. Verify the correct measurement function is selected (though auto-ranging minimizes this). Ensure the clamp jaws are fully closed for current measurements.
- "OL" or Overload Indication: The measured value exceeds the meter's range. Select a higher range if available, or ensure the input is within the meter's specifications.
- No NCV Detection: Ensure NCV mode is active. The NCV sensor is typically at the top of the clamp head; ensure it is close to the AC source.
9. Specifications
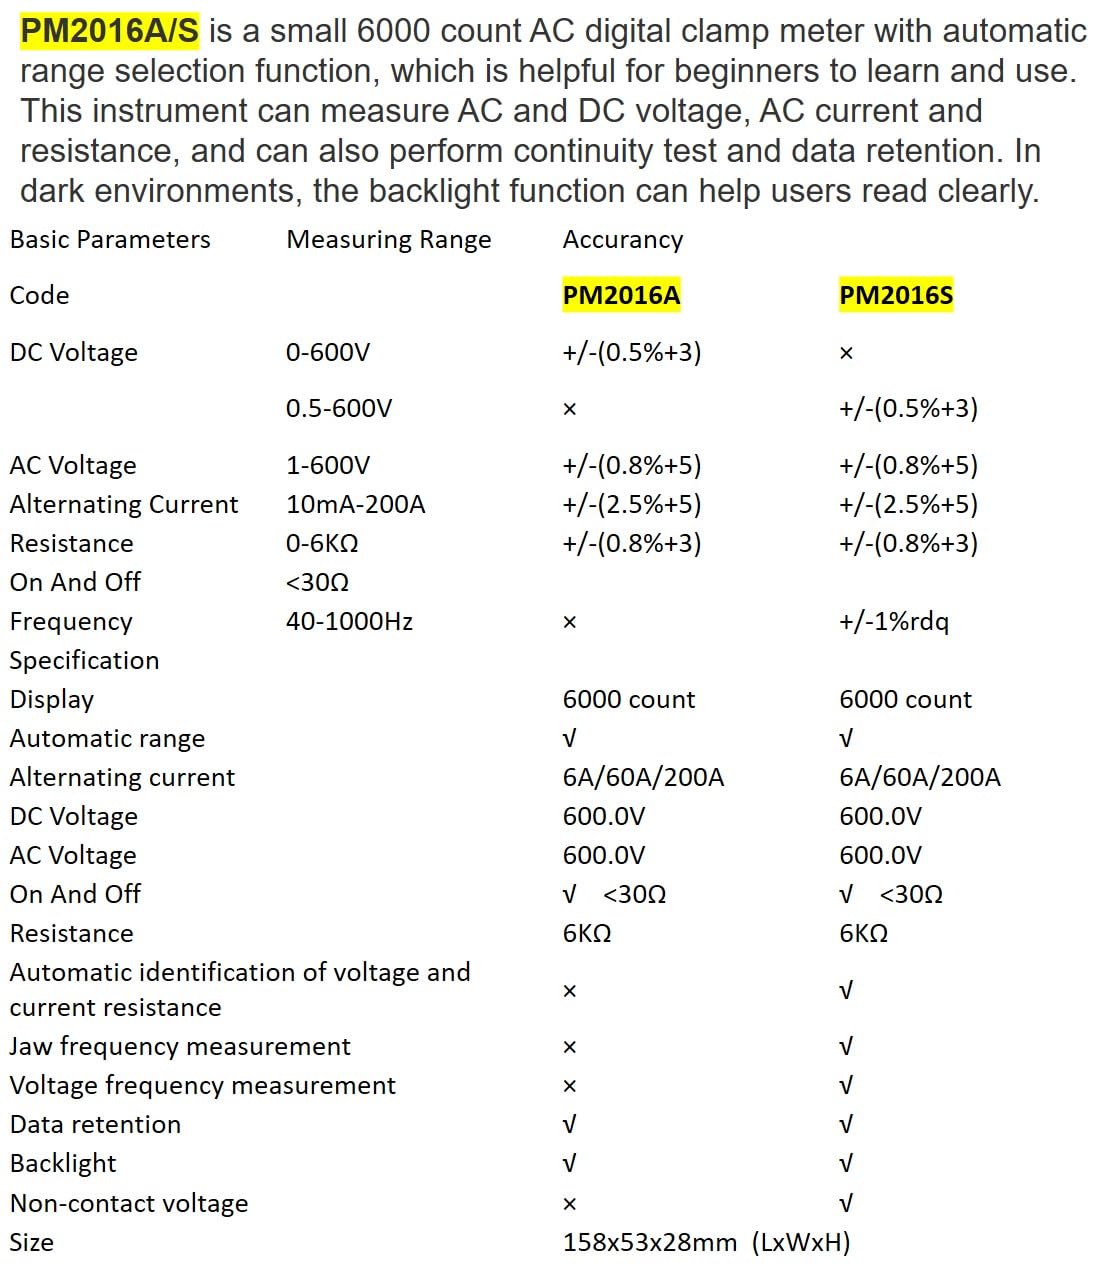
Description: This image presents a comprehensive table detailing the basic parameters, measuring ranges, and accuracy for both the PM2016A and PM2016S models, including features like display count, auto-ranging, and NCV.
| Parameter | Range (PM2016S) | Accuracy (PM2016S) |
|---|---|---|
| DC Voltage | 0.5~600V | ±(0.5%+3) |
| AC Voltage | 1.0~600V | ±(0.8%+5) |
| AC Current | 6A/60A/200A | ±(2.5%+8) |
| Resistance | 0~6kΩ | ±(0.8%+3) |
| Frequency | 60Hz~1000Hz | ±(1.0%+5) |
| Display | 6000 counts | |
| Auto Range | Yes | |
| Continuity | <30Ω | |
| V/Ω/A Auto Scan | Yes | |
| Frequency (Clamp) | Yes | |
| Frequency (Voltage) | Yes | |
| Data Hold | Yes | |
| Backlight | Yes | |
| NCV | Yes | |
| Power Supply | 2*1.5V AAA Batteries | |
| Net Weight | 122.4g (without batteries) | |
| Size | 158mm*55mm*29mm | |
| Jaw Size | Ø20mm | |
| Safety Rating | EN61010-1, EN61010-2-033, EN61326, CAT. III 600V | |

Description: This image provides a visual representation of the physical dimensions of the PEAKMETER PM2016S, including its length, width, and jaw opening size, along with its weight.
10. Warranty and Support
The PEAKMETER PM2016S Digital Clamp Multimeter comes with a 1-year warranty from the date of purchase. This warranty covers defects in materials and workmanship under normal use.
For technical support, warranty claims, or service inquiries, please contact your retailer or the manufacturer directly. Keep your purchase receipt as proof of purchase for warranty purposes.