Introduction
This manual provides detailed instructions for the setup, operation, maintenance, and troubleshooting of your Ownpets PET0412-UK Automatic Pet Feeder. Please read this manual thoroughly before using the product to ensure proper function and safety for your pet.
Product Overview
The Ownpets PET0412-UK Automatic Pet Feeder is designed to provide scheduled meals for your pet, ensuring consistent feeding even when you are away. It features remote control via a smartphone application, two-way audio communication, and a built-in camera for monitoring your pet's activities.

Image: The Ownpets Automatic Pet Feeder, showcasing its design and a smartphone screen displaying a cat eating from the feeder.
Package Contents
Verify that all items are present in the package:
- Automatic Pet Feeder Unit
- Stainless Steel Food Bowl
- Power Adapter (5V/2A)
- Silica Gel Packet
- Cleaning Brush/Reset Pin
- Instruction Manual
Important Safety Information
- This device is intended for indoor use only.
- Do not immerse the main unit in water or other liquids.
- Use only the provided power adapter.
- Keep out of reach of children and pets to prevent tampering.
- Ensure the power cord is placed where pets cannot chew on it.
- Only use dry kibble with a size between 2mm and 15mm. Do not use wet food.
Setup Guide
1. Unpacking and Assembly
- Remove all components from the packaging.
- Place the stainless steel food bowl into the designated slot at the base of the feeder.
- Open the lid of the food reservoir and insert the silica gel packet into its compartment to maintain food freshness.
2. Power Connection
The feeder supports dual power sources: AC adapter and D-sized batteries (not included).
- AC Power: Connect the provided 5V/2A power adapter to the feeder's power port and plug it into a wall outlet.
- Battery Backup: For power outage protection, install four (4) D-sized batteries into the battery compartment located at the bottom of the unit. Note: When operating on battery power alone, the camera function may be limited or unavailable.
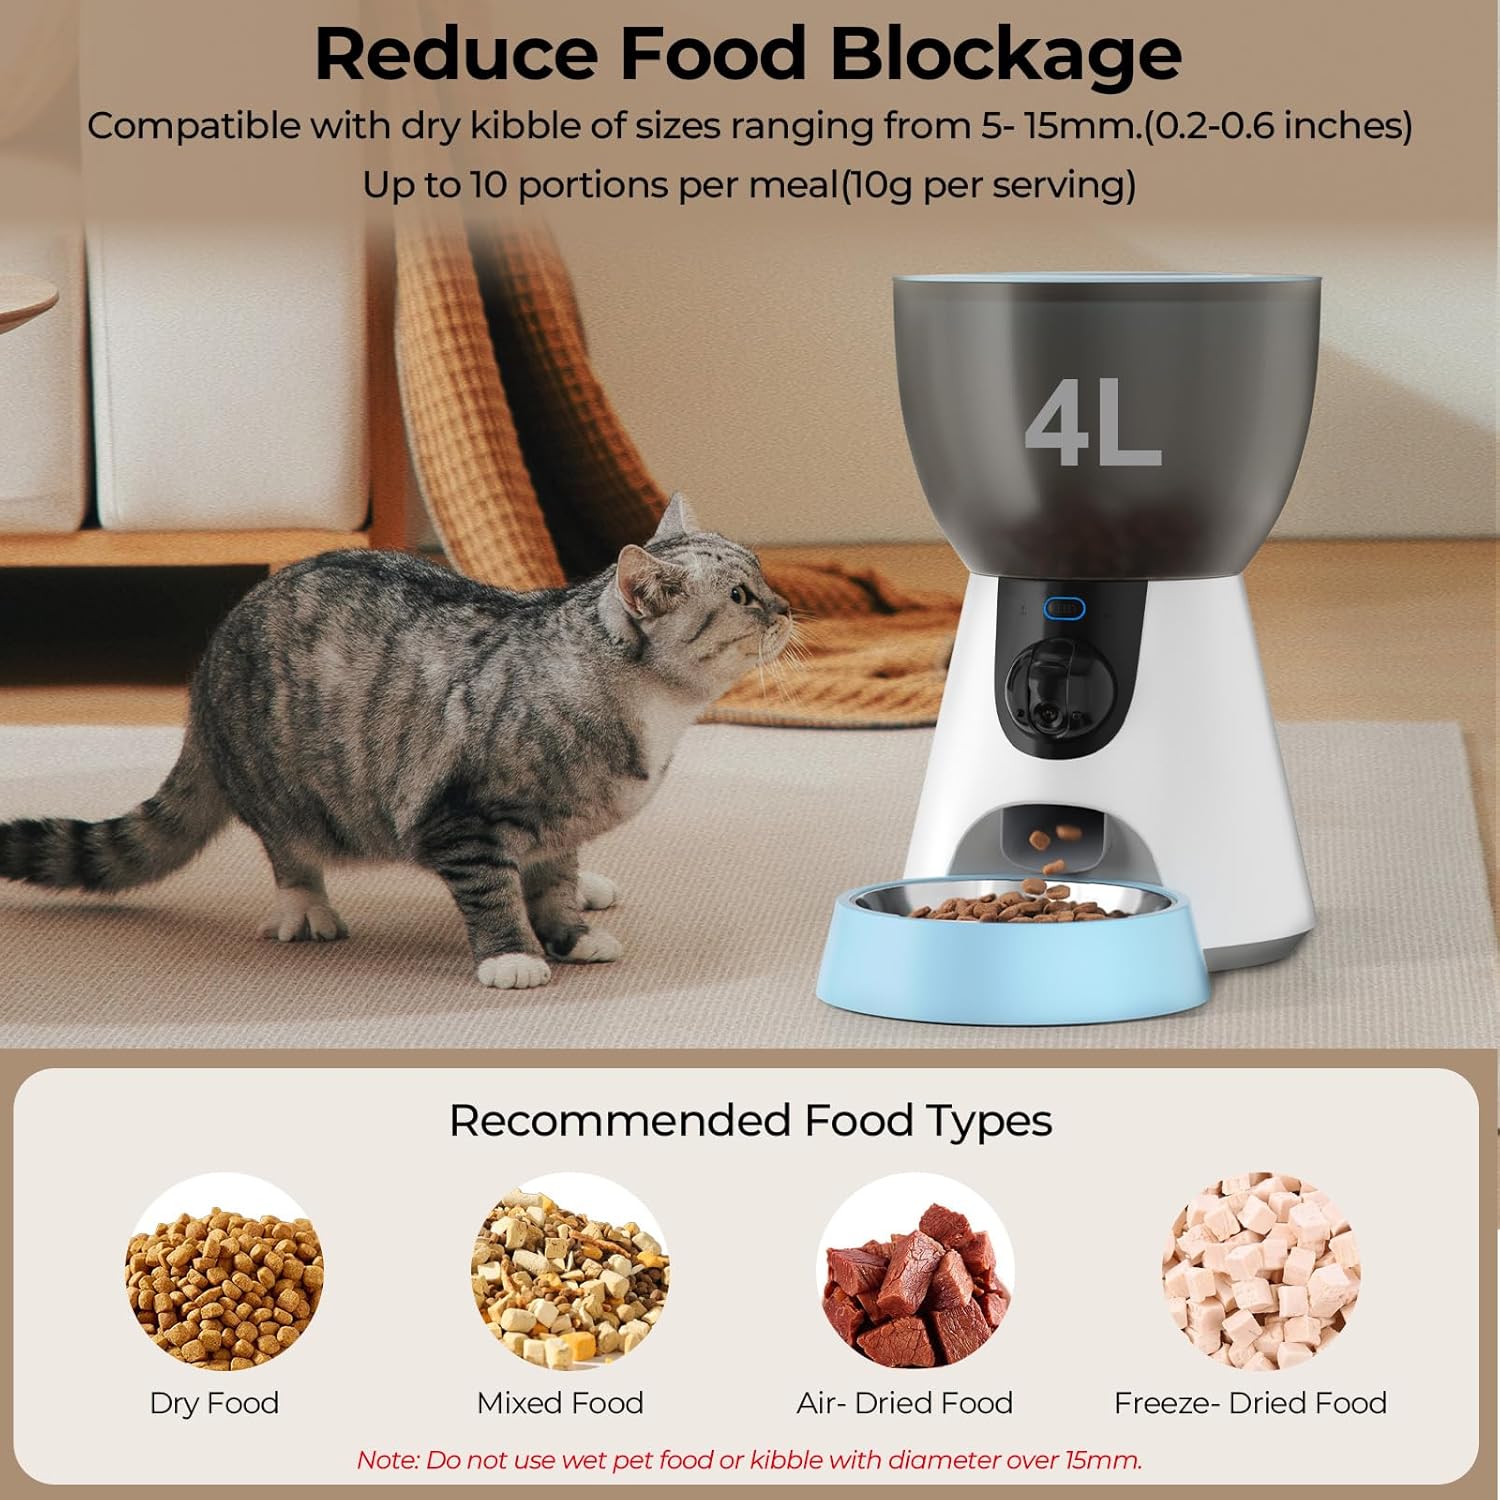
Image: Illustration of the feeder's dual power options: AC adapter and D-sized batteries for uninterrupted service.
3. App Installation and Wi-Fi Connection
- Download the "Smart Life" app from your smartphone's app store (iOS or Android) or scan the QR code provided in the manual.
- Register or log in to your Smart Life account.
- Ensure your phone is connected to a 2.4GHz or 5GHz Wi-Fi network. The feeder is compatible with both.
- Add the device:
- Open the app and tap "+" to add a device.
- Select "Small Home Appliances" then "Pet Feeder (Wi-Fi)".
- Follow the on-screen instructions to put the feeder into pairing mode (usually indicated by a blinking light). You may need to press and hold the reset button (often located near the camera or under the lid) using the provided cleaning brush/reset pin.
- Enter your Wi-Fi network password when prompted.
- Wait for the feeder to connect to the network. Once connected, the indicator light will become solid.

Image: The feeder highlighting its compatibility with both 2.4GHz and 5GHz Wi-Fi networks for flexible connectivity.
Operating Instructions
1. Filling the Food Reservoir
Open the top lid and pour dry kibble into the reservoir. The feeder has a 4-liter capacity. Ensure the kibble size is between 2mm and 15mm to prevent blockages. Close the lid securely to maintain freshness and prevent pets from accessing the food.

Image: The feeder with a 4-liter capacity, illustrating recommended dry kibble types and sizes to prevent food blockages.
2. Setting a Feeding Schedule (via App)
Use the Smart Life app to customize your pet's feeding plan:
- Open the app and select your pet feeder device.
- Navigate to the "Feeding Plan" or "Schedule" section.
- Add new feeding times. You can set up to 10 meals per day.
- For each meal, specify the time and the number of portions (1 portion = approximately 10g).
- Save your settings. The feeder will automatically dispense food according to the schedule.

Image: A smartphone screen displaying the app interface for setting up a customized feeding plan, showing various meal times and portion sizes.
3. Manual Feeding
To dispense food manually, press the manual feed button on the feeder or use the "Feed Now" option in the app. Each press or tap will dispense one portion.
4. Camera and Two-Way Audio
- Live View: Access the live video feed from the feeder's camera through the app to monitor your pet. The camera offers a 160-degree wide-angle view and infrared night vision.
- Two-Way Audio: Use the microphone and speaker functions in the app to communicate with your pet remotely.
- Privacy: The camera can be physically turned off or covered for privacy if desired.
- Motion Detection: The app can send notifications for detected motion, allowing you to monitor your pet's activity.

Image: The feeder highlighting its 1304P HD wide-angle camera with a 160-degree view and a switch to turn off the camera for privacy.

Image: An illustration showing the two-way voice feature, enabling remote interaction with your pet through the feeder.

Image: A visual representation of the feeder's infrared night vision capability, ensuring clear visibility in low-light conditions.
5. Recording Voice Messages
You can record a 10-second voice message through the app. This message will play automatically during each scheduled feeding to call your pet to eat.
Maintenance and Cleaning
- Food Bowl: The stainless steel food bowl is removable and can be washed by hand with mild soap and water. Rinse thoroughly and dry completely before reinserting.
- Food Reservoir: Periodically empty the food reservoir and wipe it clean with a dry or slightly damp cloth. Ensure it is completely dry before refilling with kibble.
- Main Unit: Wipe the exterior of the feeder with a soft, dry cloth. Do not use abrasive cleaners or immerse the main unit in water.
- Silica Gel: Replace the silica gel packet every few months or as needed to maintain food freshness.
- Kibble Check: Regularly check the food chute for any blockages, especially if using kibble at the larger end of the recommended size range.
Troubleshooting
| Problem | Possible Cause | Solution |
|---|---|---|
| Feeder not dispensing food. |
|
|
| Cannot connect to Wi-Fi. |
|
|
| Camera not working. |
|
|
| Voice message not playing. |
|
|
Product Specifications
| Feature | Detail |
|---|---|
| Model Number | PET0412-UK |
| Brand | Ownpets |
| Capacity | 4 Liters |
| Dimensions (L x W x H) | 43.1 x 23.5 x 19.6 cm (17 x 9.25 x 7.7 inches) |
| Weight | 1.84 kg (4.06 lbs) |
| Power Supply | 5V/2A AC Adapter (included), 4 x D-sized batteries (not included) |
| Connectivity | Wi-Fi (2.4GHz & 5GHz compatible) |
| Camera | 1304P HD, 160° Wide Angle, Infrared Night Vision |
| Audio | Two-way voice, 10-second voice recording |
| Recommended Kibble Size | 2mm - 15mm (dry food only) |
| Number of Meals | Up to 10 meals per day |
| Portion Size | 1-10 portions per meal (approx. 10g per portion) |
| Material | Food-grade plastic, Stainless steel bowl |
| Care Instructions | Hand wash only for removable parts |
Warranty Information
This product comes with a standard manufacturer's warranty. Please refer to the warranty card included in your package or contact customer support for specific details regarding warranty duration and coverage. The warranty typically covers defects in materials and workmanship under normal use.
Customer Support
If you encounter any issues or have questions regarding your Ownpets Automatic Pet Feeder, please contact our customer support team. Contact information can typically be found on the product packaging, the official Ownpets website, or within the Smart Life application.
For online resources, visit: www.ownpets.com (Note: This is a placeholder URL, please refer to actual product documentation for correct support links).