1. Introduction
This instruction manual provides essential information for the proper installation, operation, and maintenance of your AlveyTech 12-Button 5-Pin Replacement Remote Hand Control for Pride VivaLift Lift Chairs. Please read this manual thoroughly before use to ensure safe and effective operation.
This remote is designed specifically for later version VivaLift 2 models and is a direct replacement for the original hand control (Part Number CTL2104324).
2. Product Overview and Key Features
The AlveyTech 12-Button 5-Pin Replacement Remote Hand Control is an ergonomic and user-friendly device designed to restore full functionality to your compatible Pride VivaLift lift chair. It features a robust design and intuitive button layout for easy control of various chair functions.

Image 2.1: Front view of the AlveyTech 12-Button 5-Pin Replacement Remote Hand Control, showing all buttons and the USB port at the top.
Key Features:
- 12-Button Configuration: Provides comprehensive control over all chair movements.
- 5-Pin Connector: Ensures a secure and reliable connection for plug-and-play installation.
- Integrated USB Port: Conveniently located for charging mobile devices.
- Ergonomic Design: Comfortable to hold and operate.

Image 2.2: Visual representation of the remote's key features: 5-pin connector, USB port, and 12 buttons.

Image 2.3: A close-up view of the USB port located at the top of the remote, highlighting its accessibility for charging devices.

Image 2.4: A detailed view of the 5-pin connector, emphasizing its design for secure attachment to the lift chair.
3. Compatibility
This AlveyTech 12-Button 5-Pin Replacement Remote Hand Control (CTL2104324) is specifically designed for later version Pride VivaLift 2 models. It is crucial to verify your existing hand control's button configuration and model version before purchase to ensure compatibility.
Compatible Models (Later Version VivaLift 2):
- Pride VivaLift Atlas 2
- Pride VivaLift Elegance 2
- Pride VivaLift Escape 2
- Pride VivaLift Legacy 2
- Pride VivaLift Metro 2
- Pride VivaLift Tranquil 2
- Pride VivaLift Urbana 2
Important Note: This hand control is not compatible with Ultra, Radiant, Standard VivaLift models, or early version VivaLift 2 models. Standard and early version 2 models typically use a 10-button controller, while later version 2 models use a 12-button controller.

Image 3.1: Illustration of several Pride VivaLift 2 lift chairs, indicating compatibility with the 12-button remote for later versions.

Image 3.2: A visual comparison between the correct 12-button hand control (left, marked with a green check) and an incompatible 10-button hand control (right, marked with a red cross). Users should verify their existing remote's button count.
4. Setup and Installation
The AlveyTech 12-Button 5-Pin Replacement Remote Hand Control is designed for simple plug-and-play installation. No complex wiring or tools are required.
- Locate the Existing Connector: Identify the 5-pin connector from your lift chair's control box or motor. This is typically located near the chair's base.
- Disconnect Old Remote (if applicable): If replacing an existing remote, carefully unplug its 5-pin connector from the chair.
- Connect New Remote: Align the 5-pin connector of the new AlveyTech remote with the corresponding port on your lift chair. Gently push until it clicks securely into place. Ensure the connection is firm.
- Test Functionality: Once connected, test all buttons on the remote to ensure proper operation of your lift chair's functions.
Ensure the power to the lift chair is disconnected before performing any installation or disconnection procedures to prevent accidental operation or electrical hazards.
5. Operating Instructions
The 12-button layout provides intuitive control over your lift chair's various positions. Refer to the image below for button identification and their corresponding functions.

Image 5.1: The AlveyTech 12-button remote, clearly labeling each button's function for controlling the lift chair's headrest, lumbar, back, legrest, and memory settings.
Button Functions:
- HEADREST Buttons: Adjust the headrest position up or down.
- LUMBAR Buttons: Adjust the lumbar support position in or out.
- BACK Buttons: Recline or bring the backrest forward.
- LEGREST Buttons: Extend or retract the legrest.
- Up/Down Arrow Buttons (Center): Control the overall lift and recline function of the chair. The up arrow lifts the chair, and the down arrow reclines it.
- M1 / M2 Buttons: These are memory preset buttons. To set a memory position, adjust the chair to your desired position, then press and hold either M1 or M2 until the chair briefly moves or beeps, indicating the position is saved. To recall a saved position, simply press the corresponding M1 or M2 button.
USB Charging Port:
The integrated USB port at the top of the remote allows you to charge compatible mobile devices or other small electronics while using your lift chair. Simply connect your device's USB charging cable to the port.
6. Troubleshooting
If your lift chair is not functioning correctly after replacing the hand control, consider the following:
- Verify Connection: Ensure the 5-pin connector is fully and securely plugged into the chair's control system.
- Power Supply: Check that the lift chair is properly plugged into a working power outlet and that the power supply is active.
- Other Components: If the new hand control does not resolve the issue, it is likely that another component of the lift chair system, such as the control box or the motor, may require inspection or replacement.
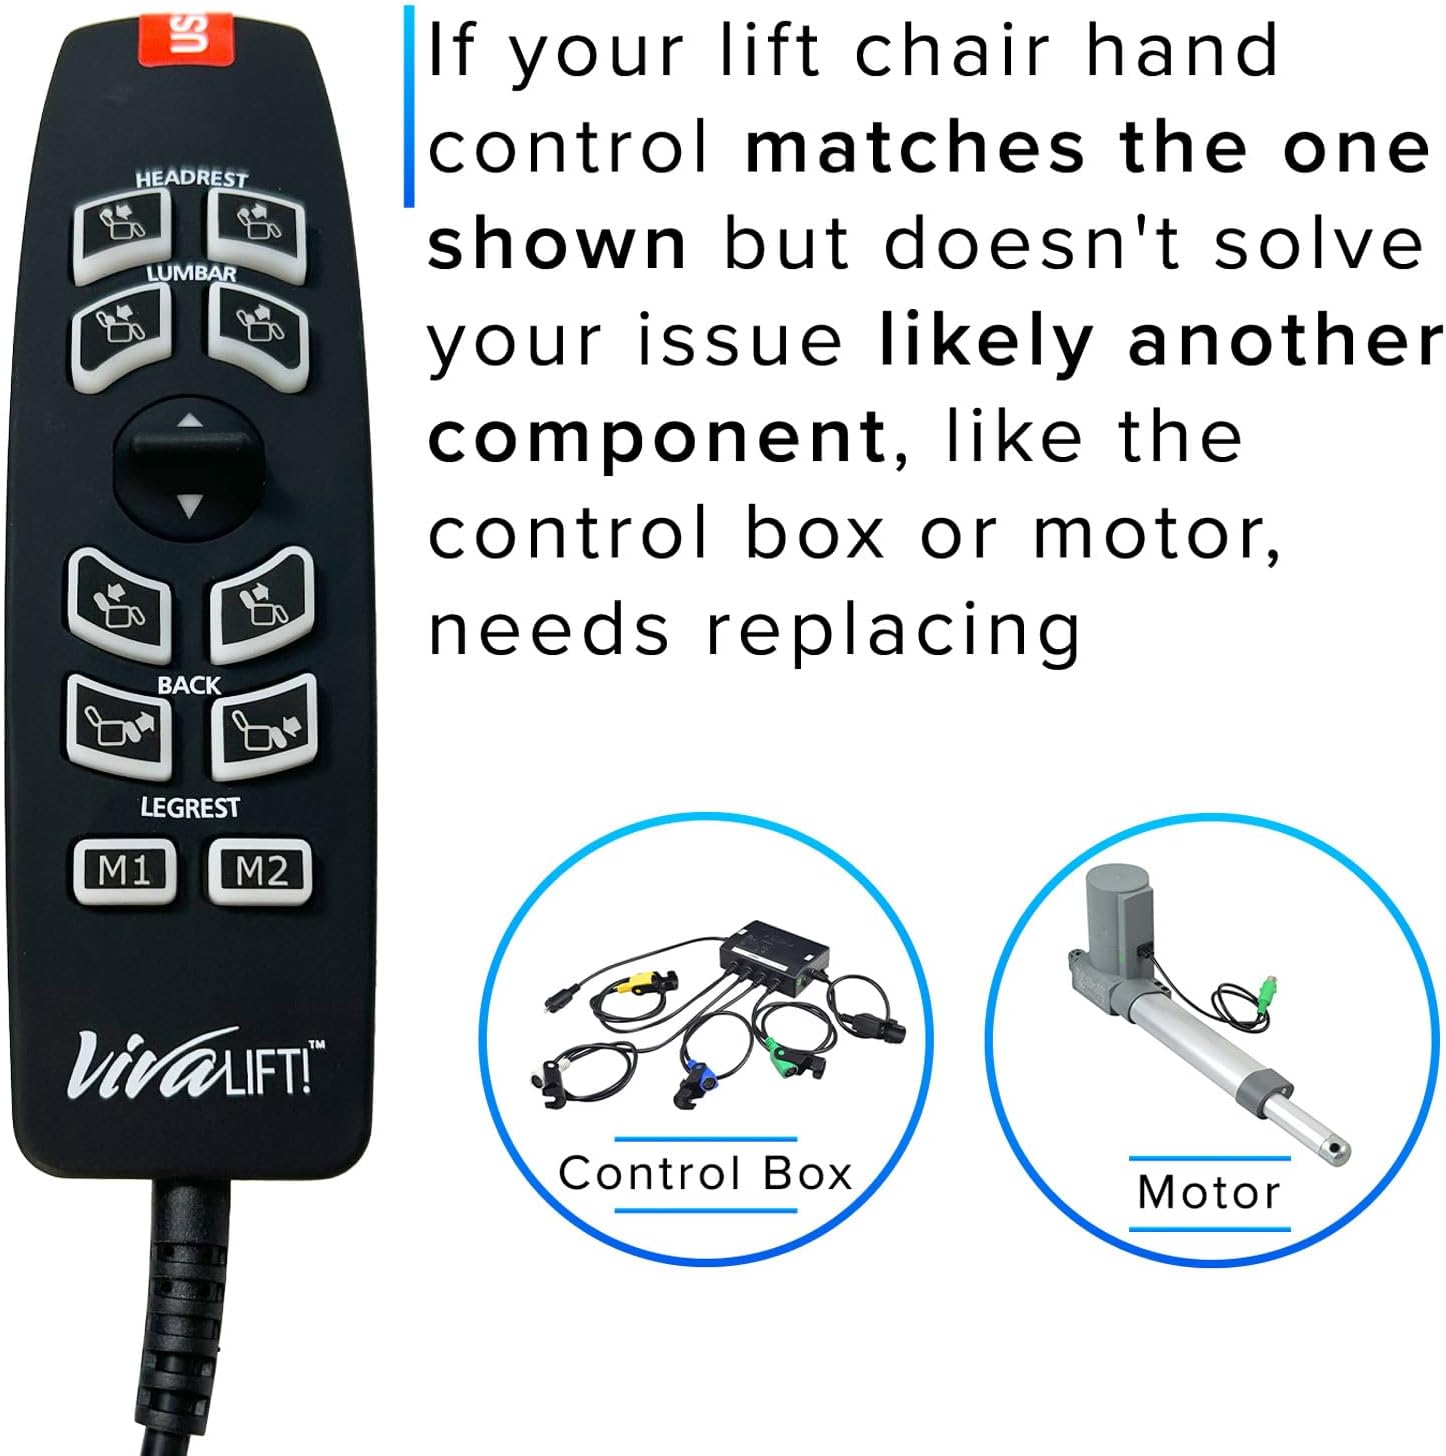
Image 6.1: An illustration depicting the hand control, control box, and motor, indicating that if the remote replacement doesn't fix the issue, the control box or motor might need attention.
7. Specifications

Image 7.1: The back of the remote control, displaying manufacturing details, model number (HW110L), and electrical input specifications.
| Feature | Detail |
|---|---|
| Brand | AlveyTech |
| Manufacturer | Pride Mobility |
| Model Name | Hand Control |
| Part Number | CTL2104324 (also P49-0121) |
| Number of Buttons | 12 |
| Connector Type | 5-Pin Quick Connect |
| Special Features | Ergonomic, Integrated USB Port |
| Material Type | Plastic |
| Color | Black |
| Product Dimensions | 15 x 20 x 5 cm (approx.) |
| Item Weight | 185.97 g (0.41 lbs) |
| Batteries Required | No |
8. Maintenance
To ensure the longevity and proper functioning of your hand control, follow these simple maintenance guidelines:
- Cleaning: Wipe the surface of the remote with a soft, damp cloth. Avoid using abrasive cleaners or solvents, as these can damage the plastic and button labels.
- Storage: When not in use, store the remote in a safe place where it will not be subjected to excessive force or extreme temperatures.
- Cable Care: Avoid bending or kinking the cable excessively, as this can damage the internal wiring.
9. Warranty and Support
For warranty information or technical support regarding your AlveyTech 12-Button 5-Pin Replacement Remote Hand Control, please refer to the documentation provided with your purchase or contact AlveyTech customer service. Keep your purchase receipt as proof of purchase for any warranty claims.