Important Safety Information
Please read this manual thoroughly before assembly and use. Keep this manual for future reference. Adult supervision is required at all times when the product is in use.
- Age Recommendation: Suitable for children over 18 months old.
- Weight Capacity: Do not exceed 55 lbs (25 kg).
- Assembly: Adult assembly is required. Ensure all parts are securely fastened before use.
- Usage Environment: Use on flat, smooth surfaces. Avoid slopes, stairs, public roads, or near water.
- Protective Gear: Always ensure the child wears appropriate protective gear, such as a helmet, when riding.
- Battery Safety: Only use the provided 6V 4AH battery and charger. Do not mix old and new batteries. Do not mix alkaline, standard (carbon-zinc), or rechargeable (nickel-cadmium) batteries. Rechargeable batteries are to be removed from the toy before being charged. Rechargeable batteries are only to be charged under adult supervision. Non-rechargeable batteries are not to be recharged. Exhausted batteries are to be removed from the toy. The supply terminals are not to be short-circuited.
- Choking Hazard: Contains small parts. Keep away from children under 3 years during assembly.
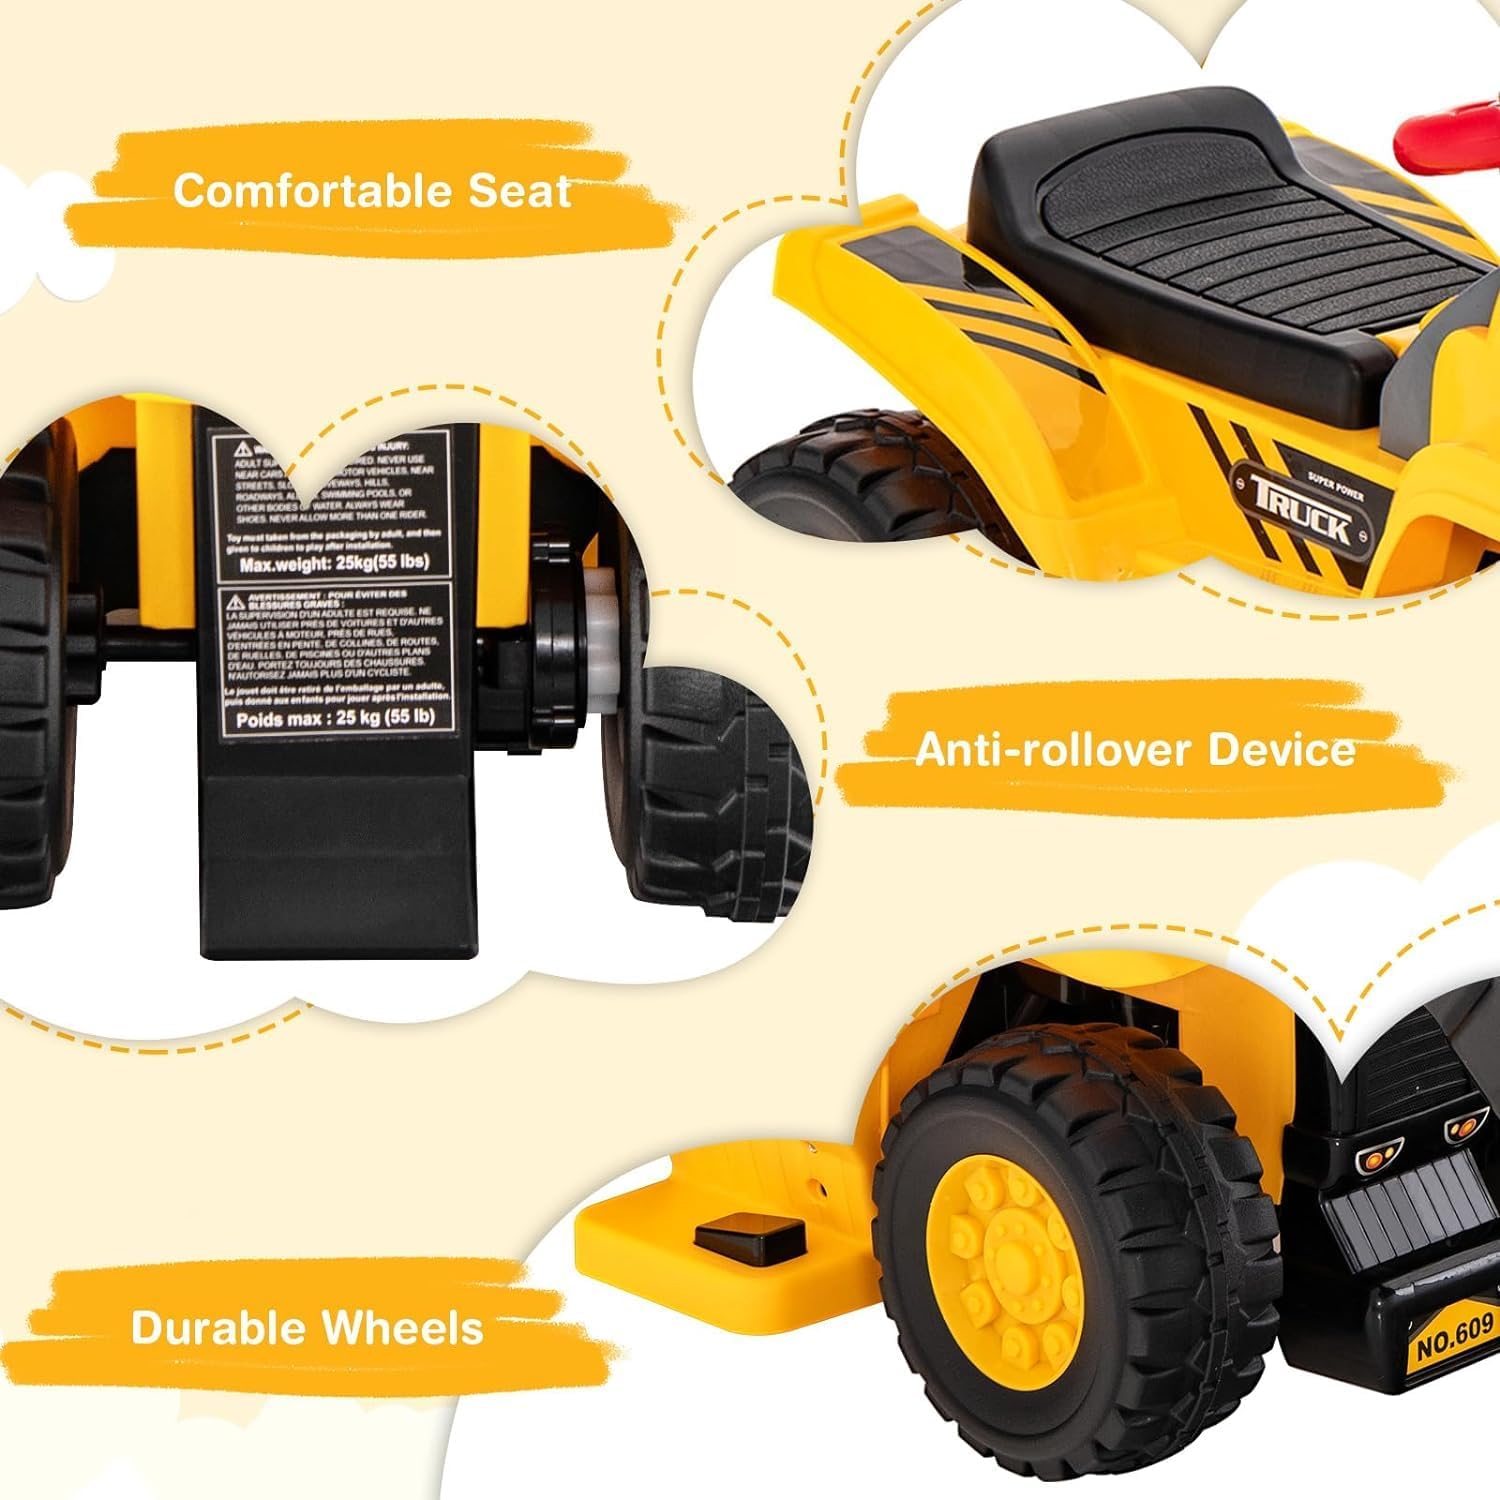
- Anti-rollover Device: The product is designed with an anti-rollover feature for enhanced safety.
Package Contents
Please check to ensure all items are present and undamaged before proceeding with assembly.
- 1 x Kids Ride On Bulldozer Toy
- 3 x Balls
- 1 x Charger
Assembly Instructions
Follow these steps for proper assembly. Adult assembly is required.
- Attach the Wheels: Securely attach all four wheels to the main body of the excavator. Ensure they are firmly in place to prevent detachment during use.
- Install the Steering Wheel: Place the steering wheel onto its designated post and fasten it according to the instructions provided in the separate assembly guide (if applicable).
- Connect the Bucket Assembly: Attach the front bucket and its control handles to the main body. Ensure the levers for arm height and bucket angle adjustment are functional and secure.

Figure 1: Flexible Arm & Bucket. The image illustrates how to adjust the arm height and bucket angle using the red control handles. - Secure the Seat: Place the seat onto the main body. Ensure it is properly aligned and secured. The seat also features a hidden storage compartment.
- Attach the Basketball Hoop (Optional): If included, attach the folding basketball hoop to its designated position, typically at the rear of the seat.

Figure 2: Interesting Riding Experience. This image highlights the folding basketball hoop and the convenient hidden storage space beneath the seat, shown with three balls. - Battery Installation and Initial Charge: Locate the battery compartment, typically under the seat. Connect the 6V 4AH battery. Before first use, fully charge the battery using the provided charger. Refer to the "Charging the Battery" section for details.
Product Features
- 2-in-1 Design: Functions as a push car for toddlers learning to maneuver, and an electric ride-on for active play.
- Manual Controllable Backhoe Digger: The front loader can be manually operated to scoop and dump, simulating real excavator actions.
- Interactive Sounds: Features horn sound, dump truck sound, and starting sound for a realistic play experience.

Figure 3: Various Sound Effects. The dashboard buttons activate different sounds like horn, starting, and dump truck noises. - Basketball Hoop & Balls: Includes a folding basketball hoop and 3 balls for additional play.
- Under-Seat Storage: A convenient compartment under the seat for storing toys or snacks.
- Durable Construction: Made from PP and HDPE materials with 4 durable wheels for smooth movement and an anti-rollover design for safety.
- Easy Operation: Equipped with a steering wheel, forward/backward button, and foot pedal for simple control.

Figure 4: Easy to Operate. This image details the steering wheel, forward/backward button, and foot pedal for intuitive control.
Operating Instructions
- Starting the Vehicle: Ensure the battery is charged and connected. Press the power button (if available) or the foot pedal to activate the electric motor.
- Moving Forward/Backward: Use the forward/backward button or switch to select the desired direction. Press the foot pedal to move. Release the pedal to stop.
- Steering: Turn the steering wheel to change direction. Note that the steering wheel primarily controls the front wheels for directional movement.
- Operating the Excavator Bucket: Use the red control handles located near the steering wheel to manually adjust the arm height and bucket angle. This allows for scooping and dumping actions.
- Sound Effects: Press the various buttons on the dashboard to activate horn, starting, or dump truck sounds.
- Basketball Play: Unfold the basketball hoop and use the included balls for shooting practice.
Maintenance
- Cleaning: Wipe the vehicle with a damp cloth. Do not use harsh chemicals or abrasive cleaners. Avoid spraying water directly onto electrical components.
- Battery Care:
- Charging: Connect the charger to the charging port (usually located near the battery compartment) and plug it into a standard wall outlet. Charge for 8-12 hours for a full charge. Do not overcharge.
- Storage: If storing for an extended period, fully charge the battery and disconnect it from the vehicle. Recharge every 3 months to prolong battery life.
- Storage: Store the excavator in a dry, cool place away from direct sunlight and moisture.
- Inspection: Regularly check all screws, nuts, and moving parts to ensure they are secure and functioning correctly.
Troubleshooting
| Problem | Possible Cause | Solution |
|---|---|---|
| Vehicle does not move. | Battery is low or not connected. | Charge the battery. Ensure battery connections are secure. |
| Sounds are not working. | Batteries for sound effects are depleted or incorrectly installed. | Replace sound effect batteries (if separate) or check installation. |
| Bucket mechanism is stiff or not moving smoothly. | Mechanism might be jammed or require lubrication. | Check for obstructions. Apply a small amount of silicone lubricant to moving joints if necessary. |
| Vehicle moves slowly. | Low battery charge or overloaded. | Fully charge the battery. Ensure child's weight is within the 55 lbs limit. |
Specifications
| Feature | Detail |
|---|---|
| Model Number | B0D7MD4QWC |
| Product Dimensions | 34" x 14" x 17" (L x W x H)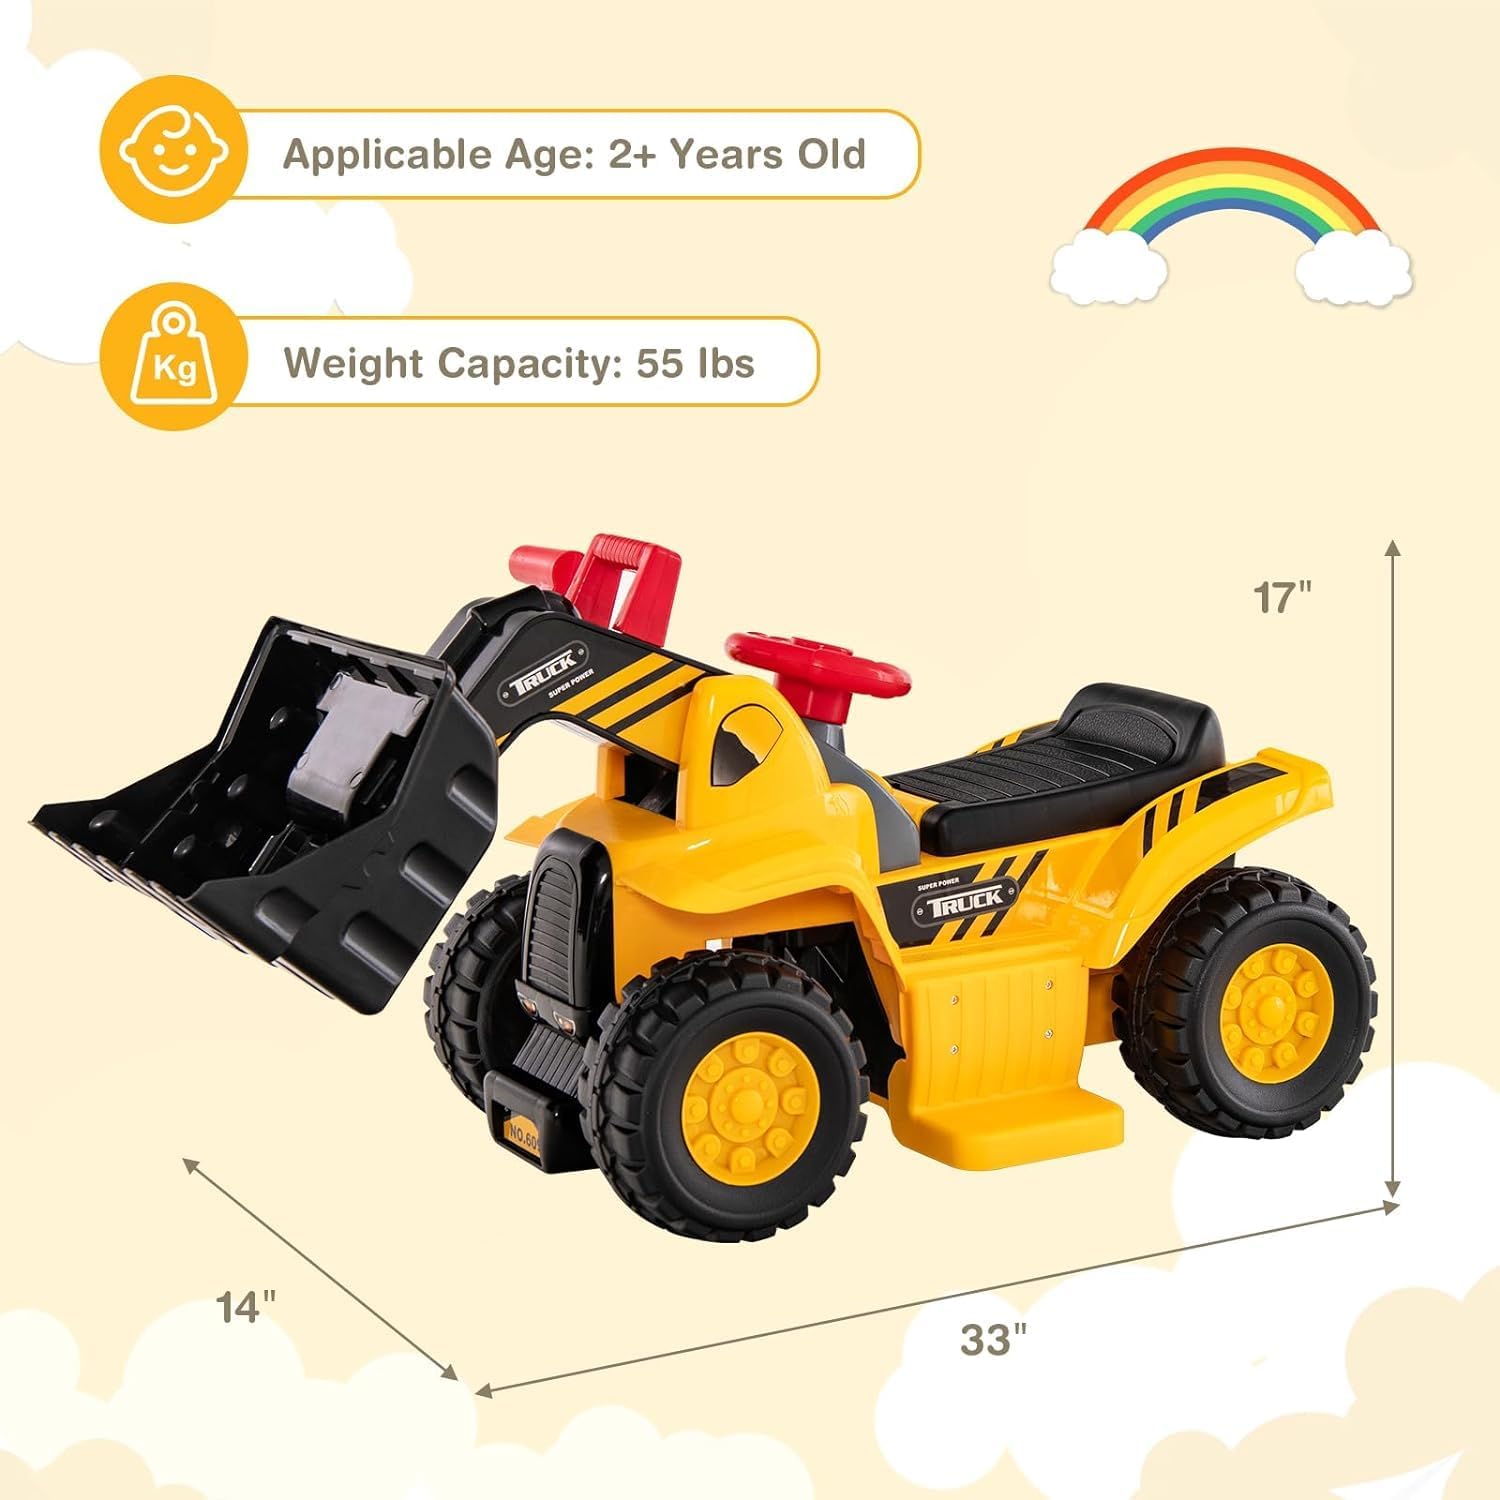 |
| Item Weight | 7.5 lbs |
| Battery | 6V 4AH |
| Weight Capacity | 55 lbs |
| Recommended Age | 18 months - 6 years |
| Material | PP, HDPE |
| Certifications | ASTM, CPSIA |
Warranty and Support
For warranty information or product support, please contact Costzon customer service through the retailer where the product was purchased. Please have your model number (B0D7MD4QWC) and purchase date available.


