1. Product Overview
The Daytona Mio MiVue M802WD is a motorcycle-specific drive recorder designed for reliable recording with front and rear 2-megapixel Full HD cameras. It offers convenient operation via a smartphone app for video confirmation and settings adjustments.
Key features include:
- Front and Rear Full HD Cameras: Equipped with high-sensitivity CMOS image sensors for clear recording even at night.
- SuperMP4 / High-Speed Data Storage: Records data every second, ensuring reliable saving even if power is cut, preventing file corruption.
- H.264 Codec & microSDXC 256GB Support: Enables high-quality, long-duration recording without overwriting, optimizing file size.
- 2x Speed Wi-Fi: Faster data transfer to smartphones for quick video review.
- Automatic Impact Recording: G-sensor detects impacts and automatically saves footage to a dedicated folder, preventing overwriting. Manual recording is also available via a control switch.
- Built-in GPS: Records location, date/time, and speed. Supports 5 types of GPS signals (GPS, GLONASS, GALILEO, BDS, Michibiki) for improved accuracy.
- Compact & Durable Design: Dustproof and waterproof (main unit: IP65, cameras/remote/GPS antenna: IP67) for use in various weather conditions.
- National LED Signal Support: Compatible with LED traffic lights across Japan.
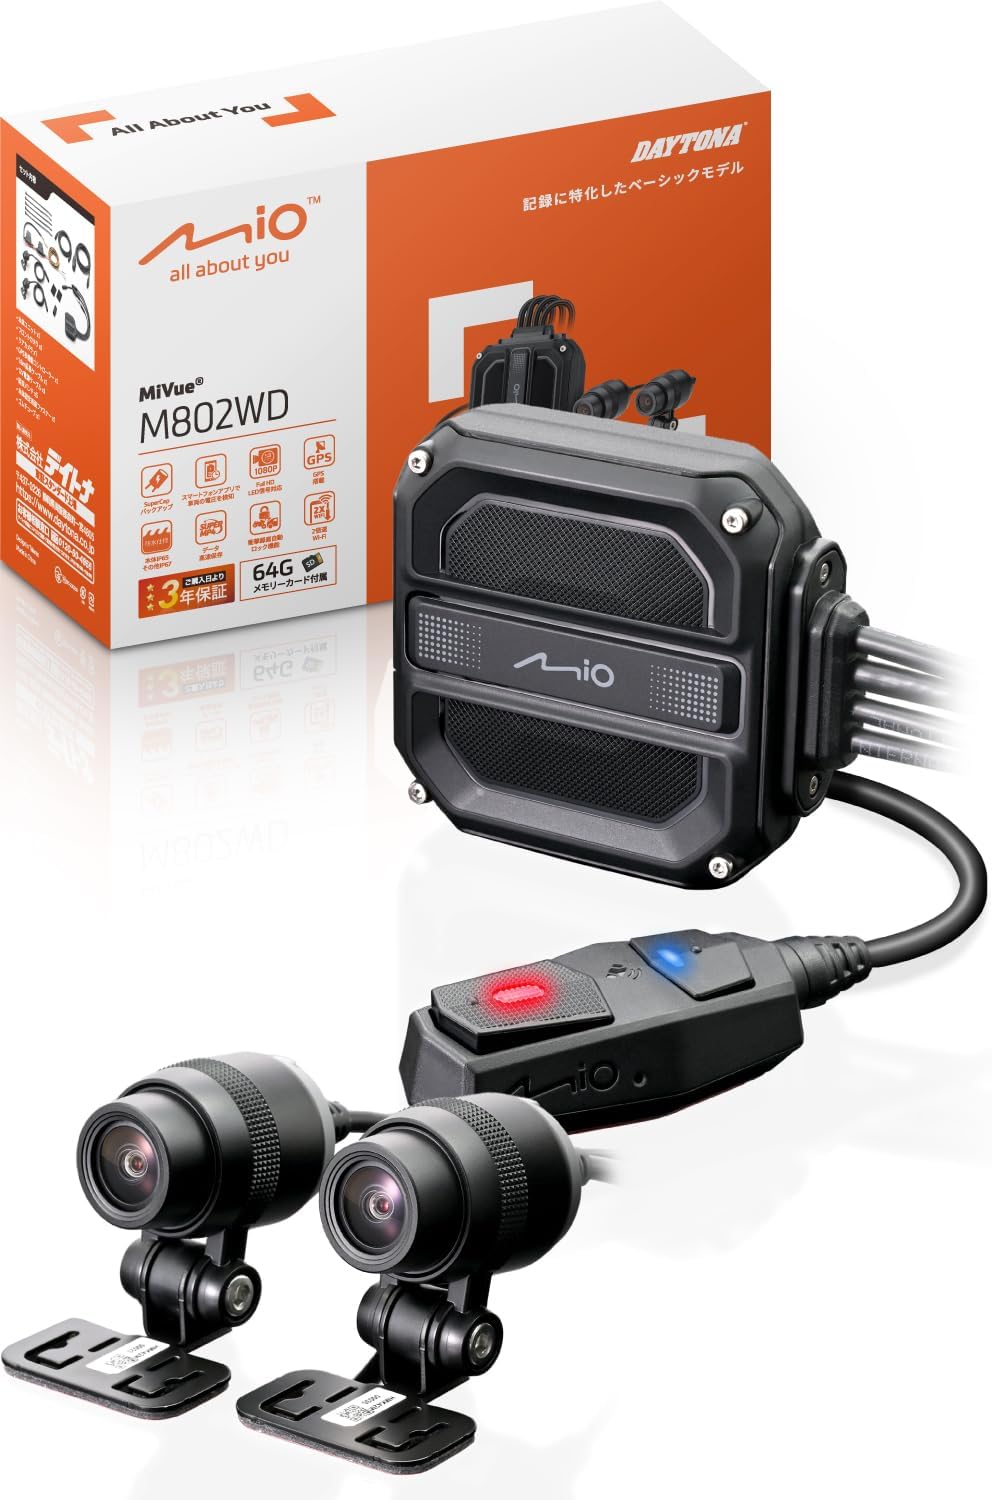
Image 1.1: Daytona Mio MiVue M802WD Motorcycle Dash Cam components, including the main unit, front and rear cameras, and remote control.
2. Setup and Installation
2.1 Safety Precautions
- Ensure the device is installed in a location that does not obstruct driving or visibility, complying with road transport vehicle safety standards.
- Consult a professional if you are unsure about the installation process.
2.2 Component Identification
Before installation, identify all components:
- Main Unit
- Front Camera
- Rear Camera
- Remote Control Switch with GPS Antenna
- Power Cable
- Camera Cables
- Mounting Brackets and Adhesive Pads
- microSD Card (64GB included)
2.3 Installation Steps
- Mount the Main Unit: Find a secure, dry location on your motorcycle, typically under the seat or within a fairing, to mount the main unit. Ensure it is protected from direct exposure to elements.
- Install Cameras: Attach the front and rear cameras to suitable locations on your motorcycle using the provided mounting brackets and adhesive pads. Ensure a clear, unobstructed view for both cameras. The cameras are IP67 rated for dust and water resistance.
- Connect Cables: Route the camera cables from the cameras to the main unit. Connect the power cable to the main unit and to a suitable 12V power source on your motorcycle (e.g., ACC power).
- Mount Remote Control Switch: Install the remote control switch on your handlebar for easy access. This switch also houses the GPS antenna. Ensure it has a clear view of the sky for optimal GPS signal reception. The remote control is IP67 rated.
- Insert microSD Card: Open the main unit's cover and insert the provided 64GB microSD card into the designated slot. Secure the cover.
- Initial Power-On and App Connection: Turn on your motorcycle's ignition. The dash cam should power on. Download the Mio MiVue Pro app on your smartphone (available on iOS and Android). Connect your smartphone to the dash cam via Wi-Fi to verify camera angles and adjust settings.

Image 2.1: Example of main unit installation on a motorcycle, typically under the seat.

Image 2.2: Example of front camera installation on a motorcycle, showing various mounting positions.

Image 2.3: Example of rear camera installation on a motorcycle, showing various mounting positions.
3. Operating Instructions
3.1 Automatic Recording
Once installed and powered, the MiVue M802WD will automatically begin recording when your motorcycle's ignition is turned on. Recording will stop when the ignition is turned off.
3.2 Impact Detection and Emergency Recording
The built-in G-sensor detects impacts. If an impact exceeding a preset value is detected, the device automatically saves the recording as an emergency file in a dedicated folder, preventing it from being overwritten by continuous recording. This emergency recording includes footage from 20 seconds before and 20 seconds after the impact.

Image 3.1: Illustration of automatic recording upon impact detection, saving footage before and after the event.
3.3 Manual Emergency Recording
In emergencies or when you wish to record a specific moment, press the control switch on your handlebar. This will save the current footage as an emergency file, protecting it from being overwritten.

Image 3.2: A gloved hand pressing the control switch on a motorcycle handlebar to initiate manual recording.
3.4 Using the MiVue Pro Smartphone App
The MiVue Pro app (available for iOS and Android) allows you to:
- View Live Footage: Check camera angles and live video feed.
- Review Recordings: Access and play back recorded videos.
- Download Files: Transfer recorded videos to your smartphone at approximately twice the speed of previous models.
- Adjust Settings: Modify various dash cam settings.
- Check Battery Voltage: Monitor your vehicle's battery status.
- Firmware Updates: Update the dash cam's firmware wirelessly.

Image 3.3: A smartphone displaying the vehicle's battery voltage via the MiVue Pro app.
3.5 GPS Functionality
The built-in GPS records your driving location, date, time, and speed. Through the MiVue Pro app, you can view your route on Google Maps simultaneously with video playback and even upload videos to YouTube.
4. Maintenance
4.1 microSD Card Management
- Regularly format the microSD card using the MiVue Pro app to ensure optimal performance and prevent recording errors.
- Replace the microSD card if you experience frequent recording issues or if the card is old.
4.2 Cleaning
- Wipe the camera lenses periodically with a soft, clean cloth to ensure clear video quality.
- Keep the main unit and remote control free from excessive dirt and debris.
4.3 Firmware Updates
Check for firmware updates regularly via the MiVue Pro app to ensure your device has the latest features and bug fixes.
5. Troubleshooting
| Problem | Possible Cause | Solution |
|---|---|---|
| Device does not power on. | No power supply or incorrect wiring. | Check power cable connections and ensure the motorcycle's ignition is on. |
| Recording stops unexpectedly. | microSD card error or full. | Format the microSD card via the app or replace it. |
| Poor video quality. | Dirty lens or low light conditions. | Clean camera lenses. Ensure sufficient lighting for optimal night recording. |
| Wi-Fi connection issues. | Interference or distance from smartphone. | Ensure your smartphone is close to the main unit. Avoid strong electromagnetic interference. |
| GPS signal not acquired. | Obstructed view of the sky for the GPS antenna. | Ensure the remote control switch (with built-in GPS antenna) has a clear view of the sky. Allow time for initial GPS lock. |
| LED traffic lights appear to flash in recordings. | Normal behavior due to LED light frequency. | This is a characteristic of LED traffic lights. Judge the signal status from surrounding vehicles and context. |
6. Specifications
| Feature | Detail |
|---|---|
| Brand | Daytona |
| Model Name | M802WD |
| Product Model Number | 47750 |
| Product Dimensions (Main Unit) | 2.26 x 6.4 x 6.58 cm |
| Item Weight | 294 g |
| Camera Position | Front, Rear |
| Video Capture Resolution | Full HD 1080p |
| Frame Rate | 58fps |
| Special Features | G-sensor, App control, Automatic incident detection, Compact design, Built-in GPS |
| Dustproof/Waterproof Rating | Main Unit: IP65, Cameras/Remote/GPS Antenna: IP67 |
| Included Components | Warranty card, microSD 64GB |
| Mounting Type | Adhesive |
| Control Method | App |
| Compatible Vehicle Type | Motorcycle |
7. Warranty and Support
7.1 Warranty Information
This product comes with a 3-year warranty from the date of delivery. A delivery note or proof of purchase is required for warranty claims. The warranty is limited to use within Japan.
7.2 Customer Support
For technical assistance, troubleshooting not covered in this manual, or warranty claims, please contact Daytona customer support. Refer to the warranty card or Daytona's official website for contact details.


