XikeStor SKS3200-4E2X
XikeStor 6-Port 2.5G Web Managed Ethernet Switch User Manual
Model: SKS3200-4E2X (6 Port | 4x2.5G Port | 2x10G SFP+)
1. Product Overview
The XikeStor 6-Port 2.5G Web Managed Ethernet Switch is a high-performance networking device designed for versatile and high-speed connectivity. It features four 2.5G RJ45 ports that adapt to 100M/1G/2.5G speeds and two 10G SFP+ ports supporting 1G/2.5G/10G, compatible with various modules, DAC, and AOC cables. With a 60Gbps backplane bandwidth, this switch is engineered to meet diverse networking demands, from home offices to small businesses.
This managed switch offers comprehensive web management capabilities, including essential L2 functions such as VLAN configuration (up to 32 VLANs), QoS data prioritization, static and LACP link aggregation, loop settings, IGMP snooping, and bandwidth control. Its robust, fanless aluminum alloy casing ensures efficient heat dissipation and silent operation, making it suitable for desktop use or wall mounting. The switch also includes enhanced protection features like 6KV lightning protection and 8KV electrostatic protection for network stability.

Figure 1.1: XikeStor 2.5G Easy Smart Managed Switch with 10G SFP+ Uplink.

Figure 1.2: Overview of key features including Easy Smart Managed, 2.5G RJ45 ports, 10G SFP+ ports, and Fanless Design.

Figure 1.3: Illustration of the switch's 60Gbps switching capacity, 2.5Gbps RJ45 ports, and 10Gbps SFP+ ports.
2. Package Contents
Verify that all items are present in the package before proceeding with installation.
- Ethernet Switch (1 unit)
- User Manual (1 copy)
- Power Adapter (1 unit)
- Warranty Card (1 copy)

Figure 2.1: Contents included in the XikeStor switch package.
3. Physical Description and Interfaces
The XikeStor switch features a compact design with a durable aluminum alloy casing for efficient heat dissipation and silent operation. It can be placed on a desktop or mounted on a wall.

Figure 3.1: Front view of the XikeStor switch showing ports and indicators.
3.1. Ports and Indicators
- DC 12V Power Input: Connects to the included power adapter.
- PWR LED: Indicates power status. Green when power is on.
- RJ45 Ports (1-4): Four 2.5G RJ45 ports that auto-negotiate to 100Mbps, 1Gbps, or 2.5Gbps. Each port has an LED indicator: Green for 2.5Gbps, Yellow for 100Mbps/1Gbps.
- SFP+ Ports (5-6): Two 10G SFP+ ports supporting 1Gbps, 2.5Gbps, or 10Gbps. Compatible with various SFP+ modules (not included). Each port has an LED indicator: Green when a device is connected.
3.2. Reset Button
A concealed reset button is located on the device. To perform a factory reset, press and hold the reset button for more than 6 seconds. All indicator lights will flash, confirming a successful reset.

Figure 3.2: Details of the switch's robust design, including heat vents, reset button, and visual status indicators.
3.3. Dimensions
The compact dimensions of the switch allow for flexible placement in various environments.

Figure 3.3: Product dimensions: 110mm (L) x 94mm (W) x 30.7mm (H).
4. Setup
4.1. Initial Connection
- Connect the included power adapter to the DC 12V input port on the switch and plug it into a power outlet. The PWR LED will illuminate.
- Connect your network devices (e.g., computers, NAS, routers) to the RJ45 ports (1-4) using Ethernet cables. The corresponding port LEDs will light up, indicating a successful connection.
- For 10G connectivity, insert compatible SFP+ modules (not included) into the SFP+ ports (5-6) and connect your fiber optic or DAC cables.
4.2. Web Management Access
The XikeStor switch features a web-based management interface for configuration and monitoring.
- Change Your PC's IP Address: Before accessing the switch, change your computer's IP address to be in the same subnet as the switch. For example, set your PC's IP address to 192.168.10.X (where X is any number between 2 and 254, excluding 12). Set the subnet mask to 255.255.255.0.
- Access the Web Interface: Open a web browser (e.g., Chrome, Firefox) and enter the default IP address of the switch: 192.168.10.12.
- Login: You will be prompted for a username and password. The default credentials are:
- Username: admin
- Password: admin (These are typically found on a label on the back of the product.)
- Save Configuration: After making any changes to the settings, it is crucial to click the "Save" button under the System Manage section. Failure to save will result in the switch reverting to factory settings upon power off or firmware upgrade.

Figure 4.1: Screenshot of the XikeStor web management interface, highlighting the login details and save configuration option.
5. Operating Instructions
Once connected and accessible via the web interface, you can configure various network settings to optimize your network performance.
5.1. Key Management Functions
- VLAN Configuration: Create and manage Virtual Local Area Networks to segment your network for improved security and performance. The switch supports up to 32 VLANs.
- QoS (Quality of Service): Prioritize network traffic to ensure critical applications (e.g., VoIP, video streaming) receive sufficient bandwidth.
- Link Aggregation (LACP): Combine multiple physical links between the switch and another device (e.g., NAS, server) to increase bandwidth and provide redundancy. Both static and LACP modes are supported.
- Loop Settings: Configure loop prevention mechanisms to avoid network loops that can cause broadcast storms and network instability.
- IGMP Snooping: Optimize multicast traffic delivery, preventing unnecessary flooding of multicast packets to all ports.
- Bandwidth Control: Manage and limit bandwidth usage for specific ports or devices.
- Jumbo Frame: Support for larger Ethernet frames (up to 16KB) to improve data transfer efficiency for high-throughput applications.
- DHCP Snooping: Enhance network security by filtering untrusted DHCP messages.
- Storm Control: Prevent network performance degradation caused by broadcast, multicast, or unknown unicast storms.
5.2. Network Topology Examples
The XikeStor switch is versatile and can be integrated into various network setups, from simple home networks to more complex studio or small business environments.

Figure 5.1: Example of multi-device network connectivity, showing the switch connecting PCs, printers, NAS, IPTV, and other devices.
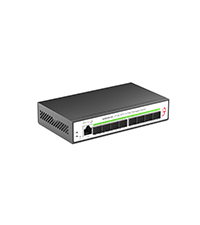
Figure 5.2: A typical 2.5G LAN setup case, suitable for home or studio use, demonstrating how the switch integrates with a router, NAS, and other devices.
6. Maintenance
6.1. Cleaning
To ensure optimal performance and longevity, keep the switch clean. Use a soft, dry cloth to wipe the exterior. Do not use liquid cleaners or aerosols.
6.2. Firmware Updates
Periodically check the official XikeStor website for firmware updates. Firmware updates can provide new features, performance improvements, and bug fixes. Follow the instructions provided with the firmware update package carefully. Always back up your configuration before performing a firmware update.
6.3. Factory Reset
If you encounter persistent issues or forget your login credentials, you can perform a factory reset. As mentioned in Section 3.2, press and hold the concealed reset button for more than 6 seconds until all indicator lights flash. This will restore the switch to its default factory settings, including the IP address (192.168.10.12) and login credentials (admin/admin).
7. Troubleshooting
This section provides solutions to common issues you might encounter with your XikeStor switch.
- No Power:
- Ensure the power adapter is securely connected to the switch and a working power outlet.
- Check if the PWR LED is illuminated. If not, try a different power outlet or adapter.
- No Network Connection on a Port:
- Verify that the Ethernet cable is properly connected to both the switch port and the device.
- Check the corresponding port LED. If it's off, try a different cable or port.
- Ensure the connected device is powered on and its network adapter is enabled.
- Cannot Access Web Management Interface:
- Confirm your computer's IP address is in the same subnet as the switch (e.g., 192.168.10.X).
- Double-check the switch's IP address (default is 192.168.10.12).
- Clear your browser's cache or try a different browser.
- If you changed the switch's IP address and forgot it, or forgot the login credentials, perform a factory reset (see Section 6.3).
- Slow Network Speed:
- Ensure you are using appropriate cables for the desired speed (e.g., Cat5e for 2.5G, Cat6/6a for 10G).
- Check the port LED color to confirm the link speed (Green for 2.5G, Yellow for 1G/100M on RJ45).
- Verify that your connected devices support the desired speeds.
- Check for any bandwidth control or QoS settings that might be limiting speed in the web interface.
8. Specifications
| Feature | Detail |
|---|---|
| Model Number | SKS3200-4E2X (6 Port | 4x2.5G Port | 2x10G SFP+) |
| Number of Ports | 6 (4x 2.5G RJ45, 2x 10G SFP+) |
| Switch Type | 2.5G Web Managed Switch |
| Data Transfer Rate | 2.5 Gigabits Per Second (RJ45), 10 Gigabits Per Second (SFP+) |
| Backplane Bandwidth | 60Gbps |
| Case Material | Aluminum Alloy |
| Cooling | Fanless Design |
| Product Dimensions | 4.53"L x 3.74"W x 1.18"H (110mm x 94mm x 30.7mm) |
| Item Weight | 1.08 pounds |
| Voltage | 12 Volts |
| Current Rating | 1 Amps |
| Maximum Power Consumption | 12 Watts |
| Operating Temperature | Up to 50 Degrees Celsius |
| Protection | 6KV Lightning Protection, 8KV Electrostatic Protection |
| Management | Web Managed (L2 functions: VLAN, QoS, LACP, IGMP, etc.) |
9. Warranty and Support
9.1. Warranty Information
Your XikeStor switch comes with a warranty. Please refer to the included Warranty Card for detailed terms and conditions, including warranty period and coverage.
9.2. Technical Support
For technical assistance, firmware updates, or further troubleshooting, please visit the official XikeStor website or contact their customer support. Contact information may be available on the Warranty Card or the product packaging.

Figure 9.1: Information regarding XikeStor technical support resources.