Introduction
This instruction manual provides essential information for the safe and efficient installation, operation, maintenance, and troubleshooting of your DDORUU 470179 Electronic Thermostat Circuit Board. This circuit board is designed as a replacement part for various Pentair MiniMax and PowerMax pool and spa heater models. Please read this manual thoroughly before attempting any installation or operation.
Compatibility
The DDORUU 470179 Electronic Thermostat Circuit Board is compatible with the following pool and spa heater models:
- MiniMax Series: MiniMax Plus, MiniMax CH 150 IID, MiniMax with CSD-1 Control, MiniMax Low Nox
- PowerMax Series: PowerMax Models 150, 200, 250, 300, 350, and 400
Ensure your heater model is listed above for proper compatibility.
Safety Information
WARNING: Electrical shock hazard. Installation and service must be performed by a qualified professional. Disconnect all power to the heater before servicing.
- Always disconnect power to the heater at the circuit breaker before beginning any installation, maintenance, or repair.
- Wear appropriate personal protective equipment (PPE), including safety glasses and gloves.
- Ensure all wiring connections are secure and comply with local electrical codes.
- Do not operate the heater if any components are damaged or missing.
- Keep children and pets away from the heater and its components during operation and maintenance.
Setup and Installation
This section outlines the general steps for replacing the electronic thermostat circuit board. Refer to your specific heater's service manual for detailed, model-specific instructions.
Tools Required:
- Screwdriver set (Phillips and flathead)
- Wire strippers/cutters
- Multimeter (for testing)
- Needle-nose pliers
Installation Steps:
- Disconnect Power: Turn off the main power supply to the pool/spa heater at the circuit breaker. Verify power is off using a multimeter.
- Access the Control Panel: Open the heater's control panel cover. This usually involves removing a few screws.
- Document Existing Connections: Before disconnecting any wires, take clear photos of all existing connections on the old circuit board. Note the position and color of each wire.
- Disconnect Wires: Carefully disconnect all wires and ribbon cables from the old circuit board. Pay attention to any clips or locking mechanisms.
- Remove Old Circuit Board: Unscrew and remove the old circuit board from its mounting points.
- Install New Circuit Board: Position the new DDORUU 470179 circuit board in the heater's control panel. Secure it with the screws removed earlier.
- Connect Wires: Using your photos as a guide, carefully reconnect all wires and ribbon cables to the corresponding terminals on the new circuit board. Ensure all connections are firm and correct.
- Close Control Panel: Once all connections are secure, close the control panel cover and fasten any screws.
- Restore Power: Turn on the main power supply to the pool/spa heater at the circuit breaker.
- Initial Test: Follow the operating instructions to test the heater's functionality.
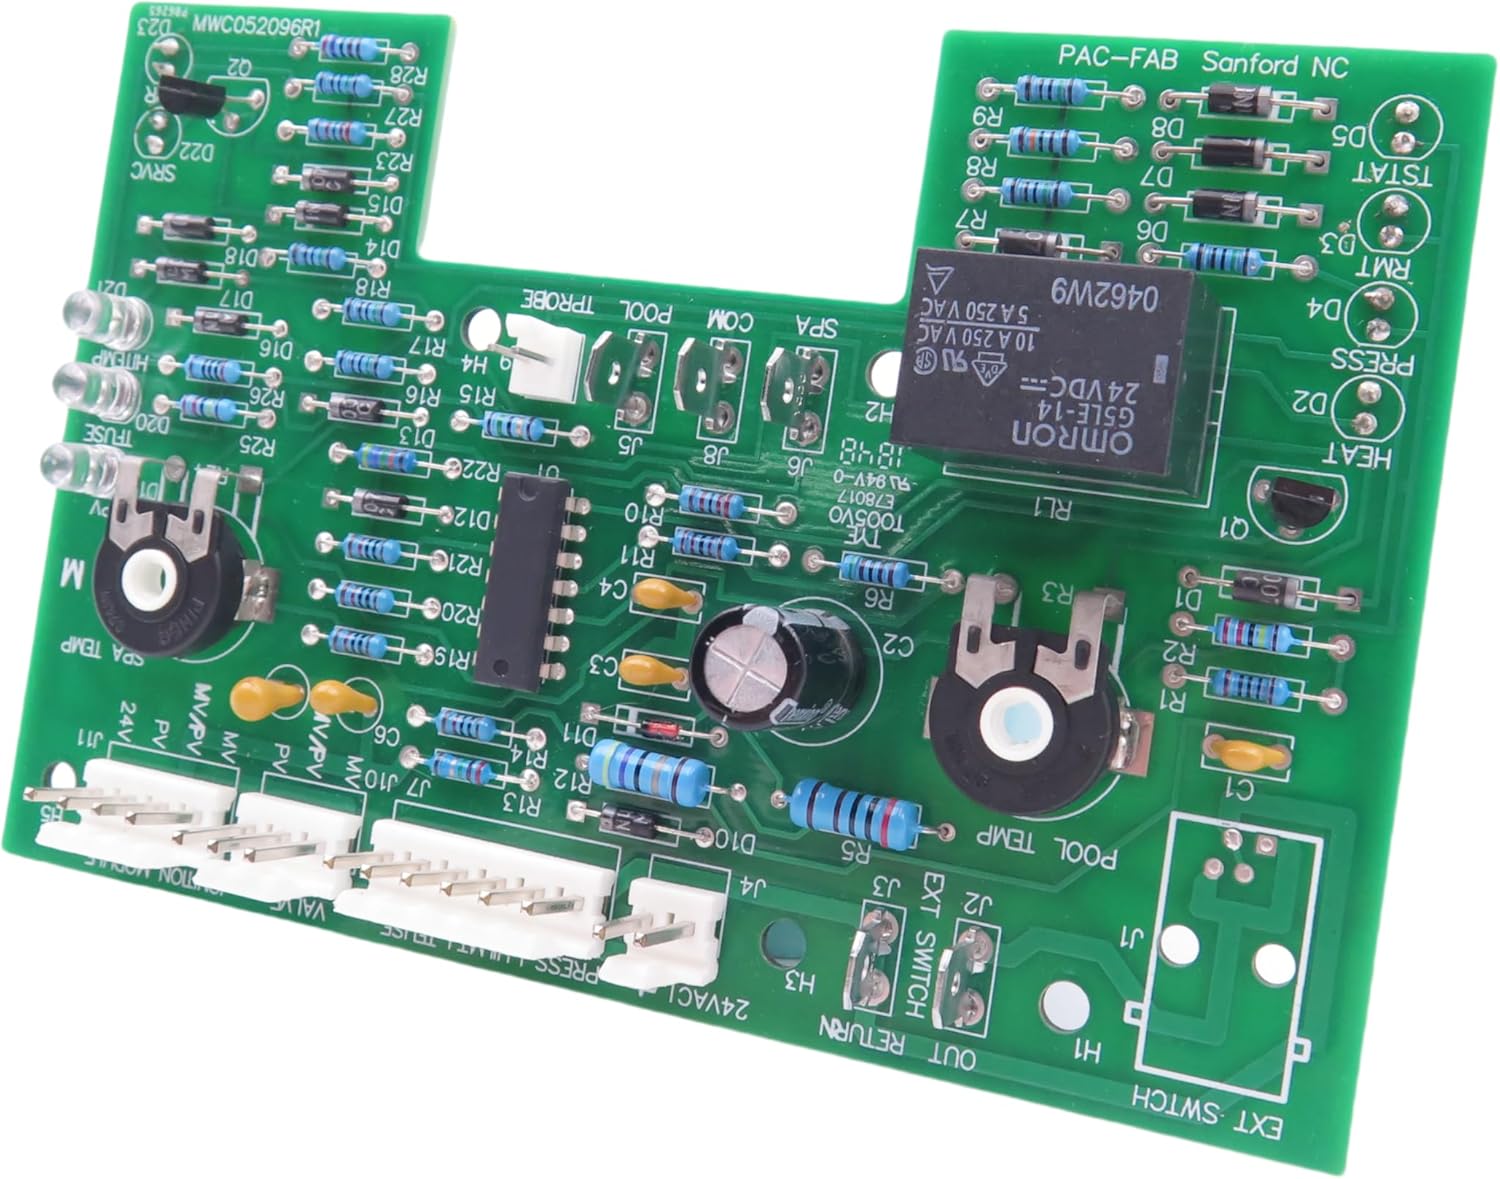
Figure 1: Top view of the DDORUU 470179 Electronic Thermostat Circuit Board, showing various components and connectors.

Figure 2: Angled view of the circuit board, highlighting the ribbon cable connection for the control panel overlay.
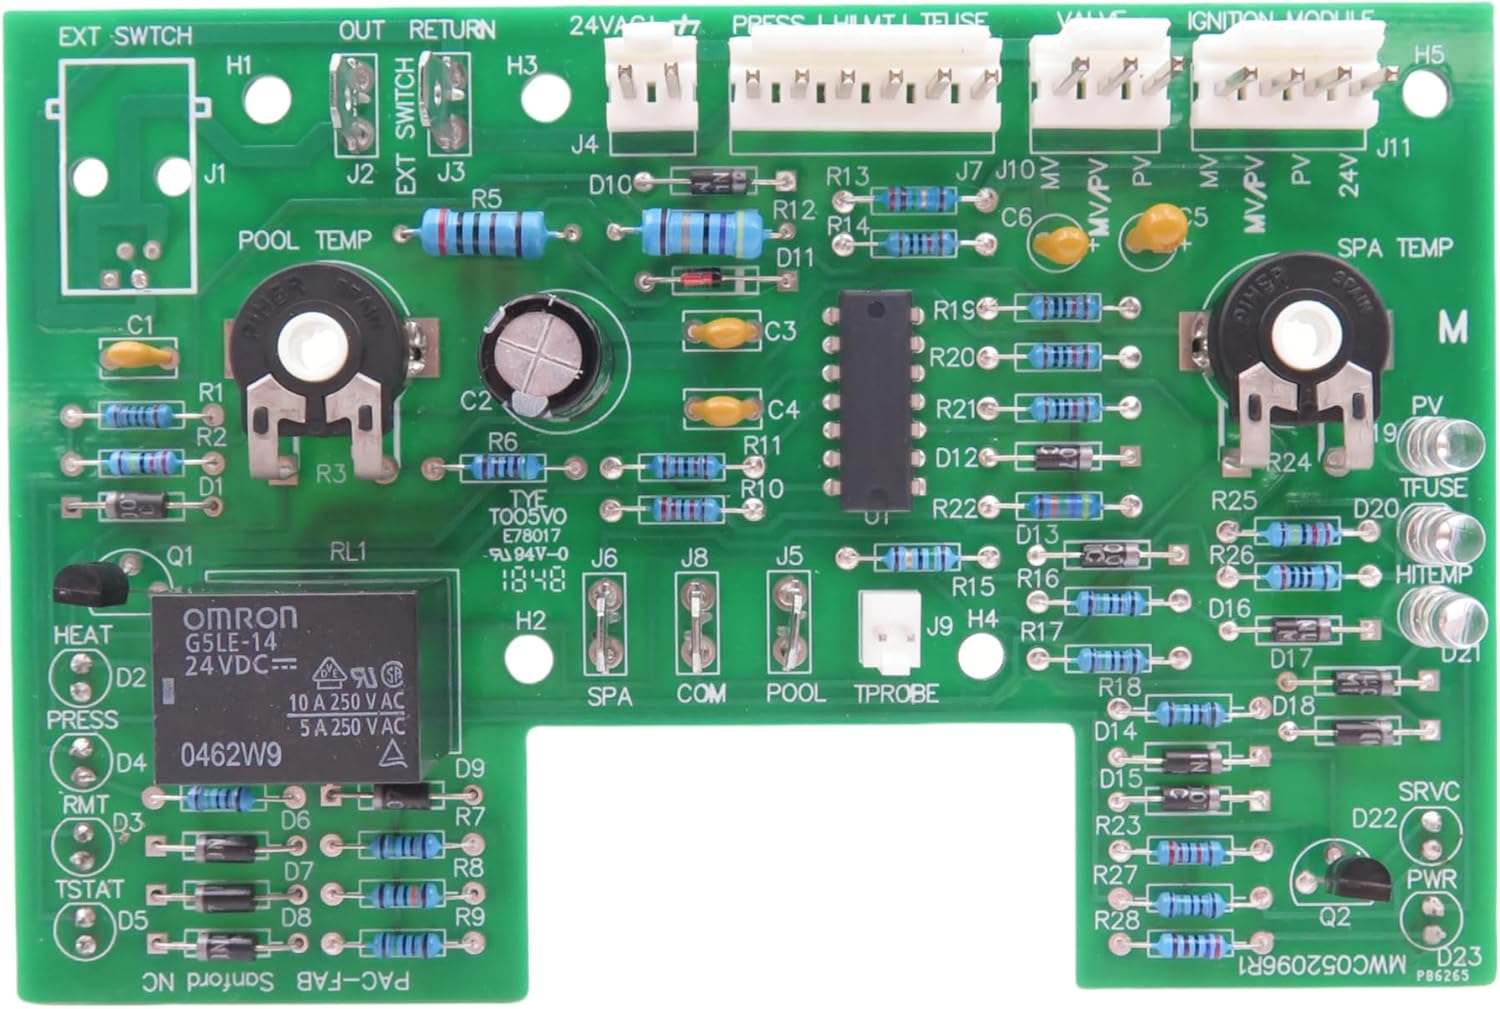
Figure 3: The circuit board shown with the control panel overlay, indicating how the two components connect.
Video: Control Board Kit Unboxing and Display
This video provides an unboxing and visual display of the 42002-0007S Control Board Kit, showing its components and general appearance. Note: The video title mentions 42002-0007S, which is a similar control board kit.
Video: Pentair Mastertemp Control Board Overview
This video offers an overview of a Pentair Mastertemp control board, which is compatible with the DDORUU 470179. It may provide insights into the general layout and connection points relevant to your installation.
Video: Open Box Video
An open box video showcasing the components of a control board kit, similar to the DDORUU 470179. This can help familiarize you with the parts before installation.
Video: Pool Heater Control Board Kit Overview
A quick overview of a pool heater control board kit, which may offer additional visual guidance for identifying components and understanding the assembly process.
Operating Instructions
After successful installation of the DDORUU 470179 Electronic Thermostat Circuit Board, operate your pool/spa heater according to the original manufacturer's instructions for your specific model. The new circuit board restores the heater's original functionality.
- Power On: Ensure the heater has power and the circuit breaker is on.
- Select Mode: Use the control panel buttons (e.g., "Pool/Spa," "Heater On/Off") to select the desired heating mode.
- Set Temperature: Adjust the temperature using the "Temp Up" and "Temp Down" buttons.
- Monitor Operation: Observe the display for temperature readings and operational status.
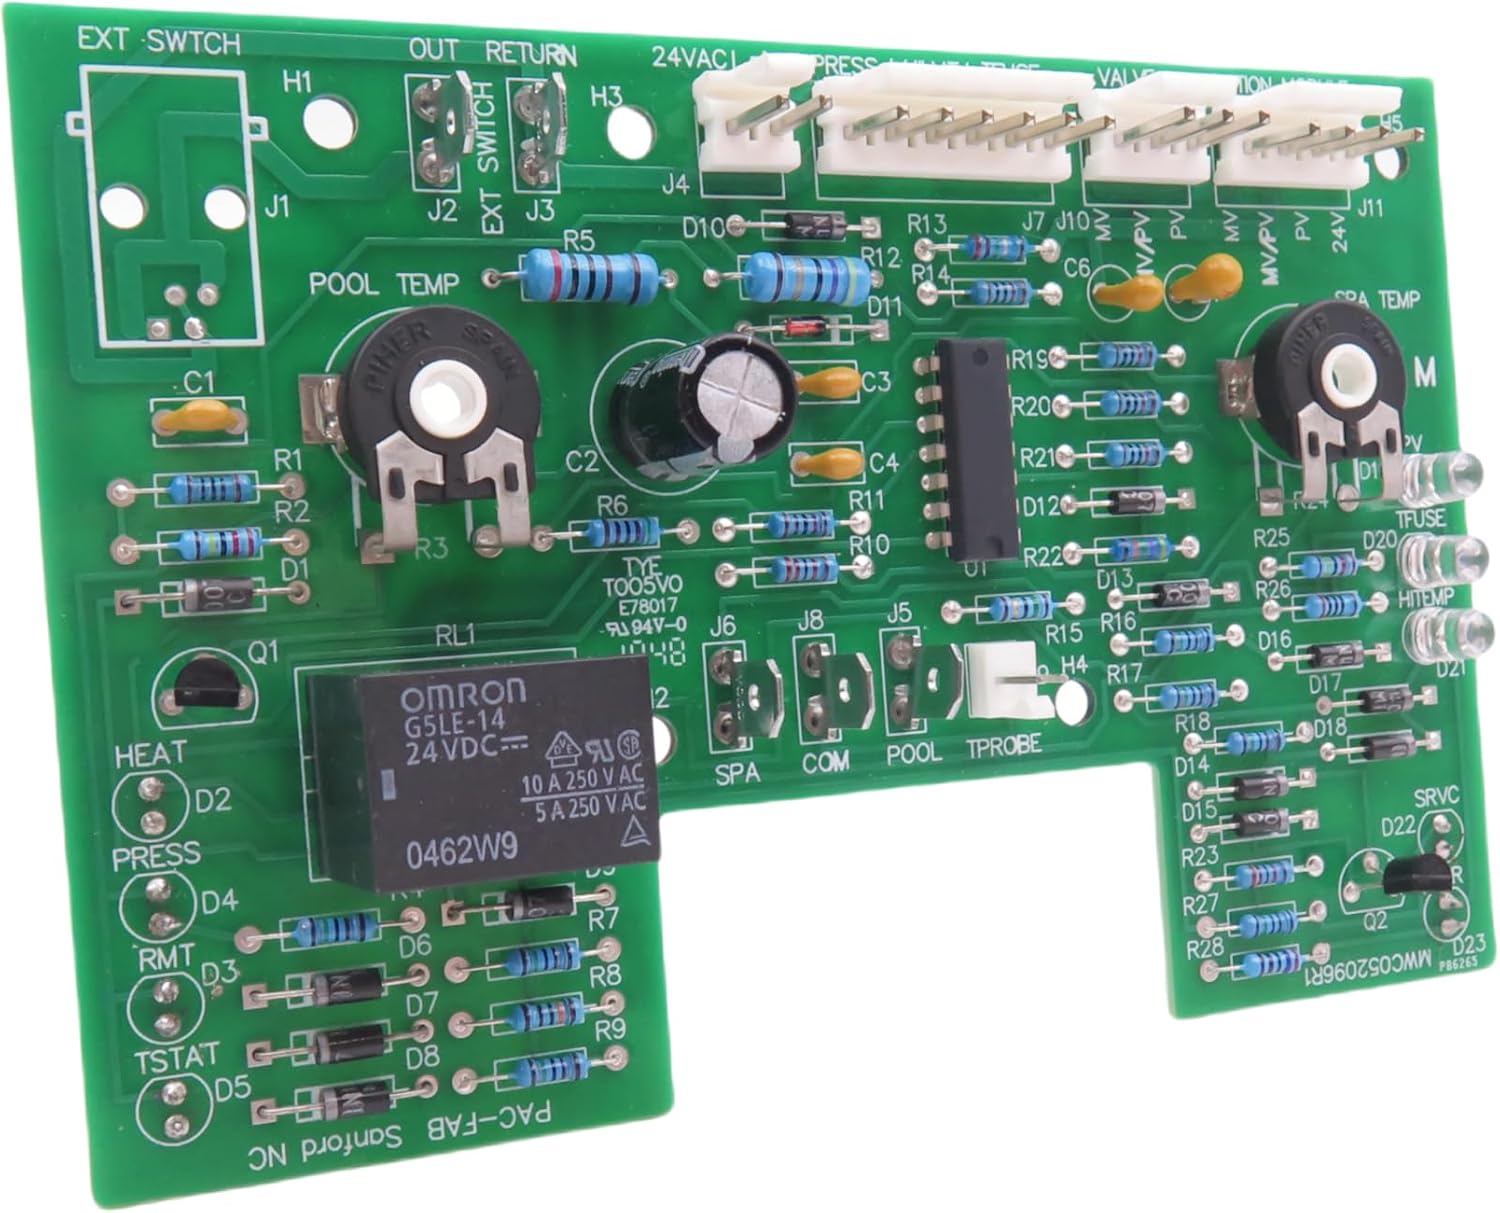
Figure 4: The control panel overlay, showing buttons for temperature adjustment, mode selection (Pool/Spa), and heater on/off. This is the user interface for operating the heater.
Maintenance
Regular maintenance ensures the longevity and optimal performance of your pool/spa heater and its components, including the circuit board.
- Regular Inspections: Periodically inspect the circuit board and connections for any signs of wear, corrosion, or damage.
- Keep Dry: Ensure the control panel area remains dry and free from moisture to prevent damage to electronic components.
- Cleanliness: Keep the heater's exterior and control panel clean. Use a soft, dry cloth to wipe away dust and debris. Avoid using harsh chemicals or abrasive cleaners.
- Professional Servicing: It is recommended to have your pool/spa heater professionally serviced annually to ensure all components, including the circuit board, are functioning correctly.
Troubleshooting
If your pool/spa heater is not functioning as expected after replacing the circuit board, consider the following common issues:
| Problem | Possible Cause | Solution |
|---|---|---|
| Heater not turning on | No power, loose connections, incorrect wiring. | Check circuit breaker. Verify all connections on the circuit board are secure. Re-check wiring against diagrams. |
| Incorrect temperature readings | Faulty temperature sensor (thermistor probe). | Inspect the thermistor probe for damage. Replace if necessary. |
| Heater runs continuously or not at all | Circuit board malfunction (less likely with new board), sensor issue. | Ensure temperature settings are correct. Check sensor connections. If issues persist, consult a professional. |
| Display not working | Loose ribbon cable, damaged display. | Check the ribbon cable connection between the circuit board and the display overlay. |

Figure 5: Close-up view of the circuit board, showing various electronic components. This can be useful for visual inspection during troubleshooting.
Video: Replacement for 470180 Thermistor Probe
This video demonstrates a replacement thermistor probe, which is a common component that can cause temperature reading issues if faulty. The DDORUU 470179 circuit board works with such probes.
Specifications
- Product: 470179 Electronic Thermostat Circuit Board
- Material: High-quality, moisture, rust, high temperature, and corrosion-resistant materials.
- Dimensions: 5.5 x 3.47 x 0.5 inches
- Item Weight: 4.2 ounces
- Manufacturer: DDORUU
- Model Number: 470179
- Compatibility: Pentair MiniMax (Plus, CH 150 IID, with CSD-1 Control, Low Nox) and PowerMax (Models 150, 200, 250, 300, 350, 400) pool and spa heaters.

Figure 6: Back view of the circuit board, showing the solder points and traces. This side typically faces inward during installation.
Warranty and Support
DDORUU offers free returns and exchanges within half a year to address any after-sales problems. If you encounter any issues, damage, or receive inappropriate products, please contact DDORUU directly for comprehensive after-sales service. They are committed to resolving any problems you may experience.
For further assistance, refer to the original heater installation and user's guide provided by Pentair for your specific model.