1. Important Safety Information
Please read this instruction manual thoroughly before operating the wheelfun F09-H RC Helicopter. Failure to follow these instructions may result in injury or damage to the product.
- Age Recommendation: This product is recommended for users 21 years and up. Adult supervision is required for younger users.
- Flight Environment: Operate the helicopter in open, clear areas, away from people, animals, buildings, and power lines. Avoid flying in strong winds or adverse weather conditions.
- Battery Safety: Use only the specified battery and charger. Do not overcharge or short-circuit the battery. Keep batteries away from heat sources and flammable materials. Discontinue use if the battery shows signs of damage or swelling.
- Rotor Blades: The rotor blades spin at high speeds and can cause injury. Keep hands, face, and loose clothing away from the rotating blades.
- Water Exposure: This helicopter is not waterproof. Avoid contact with water or moisture.
2. Package Contents
Verify that all items listed below are included in your package. If any items are missing or damaged, please contact customer support.
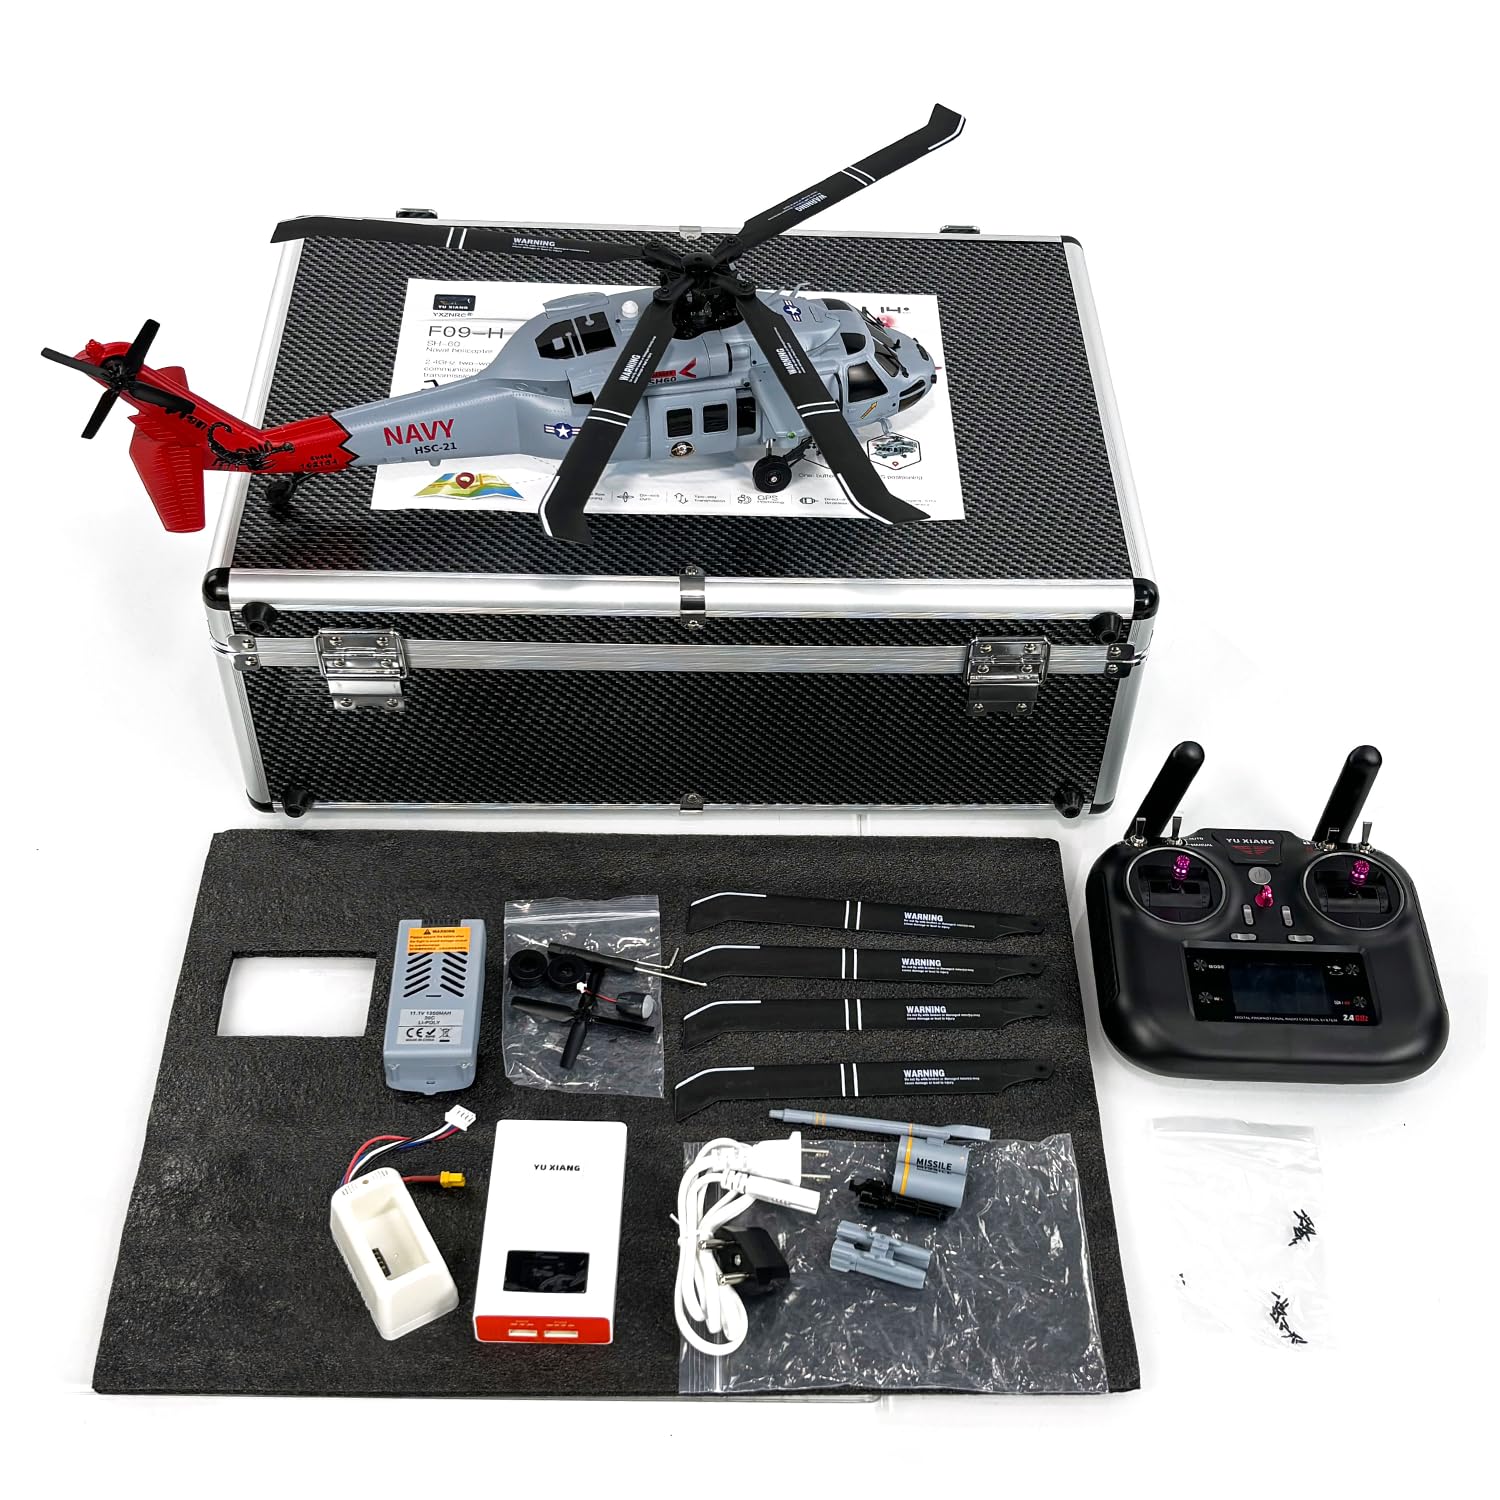
Image: The wheelfun F09-H RC Helicopter and its accessories neatly packed in a durable carrying case.
- 1/47 Scale RC Helicopter (F09-H)
- Carrying Case
- Remote Controller
- 11.1V 1350mAh Li Poly Intelligent Battery (for Helicopter)
- Charger
- Charging Cable
- Main Blade (x4)
- Tail Rotor Blade (x1)
- Missiles (decorative)
- Pipeline (decorative)
- Screwdriver
- Hexagon Wrench
- Instruction Manual
Note: 1.5V AA batteries (x4) for the transmitter are not included and must be purchased separately.
3. Product Overview
3.1 Helicopter Components

Image: A diagram illustrating the key components of the F09-H helicopter. Note: This image is a small thumbnail and may require zooming for detail.
The F09-H helicopter is designed with a highly realistic appearance and robust construction. Key features include:
- Fuselage: Constructed using a hot runner injection molding process for flexibility and impact resistance.
- Rotor Blades: Aerodynamically designed, made from a nylon and carbon fiber composite for strength, toughness, and durability.
- Tail Rotor: Four-blade design for enhanced flight efficiency and reduced noise.
- Tail-lock Motor: Specially designed 1104 3900KV brushless motor for heat resistance, quick response, and durability.
- Servos: 4.3g metal digital servos providing high torque, quick response, and high precision.
- Movable Parts: Features movable cabin doors, realistic landing gear, and weapon mounts for enhanced realism.
3.2 Remote Control Overview

Image: The 8-channel remote controller for the F09-H helicopter. Note: This image is a small thumbnail and may require zooming for detail.
The 8-channel remote controller operates on a 2.4GHz two-way communication protocol, offering precise control and real-time feedback.
- Display Screen: High-definition screen provides real-time data on battery status, speed, altitude, distance, and orientation.
- Control Sticks: Standard two-stick configuration for throttle, rudder, aileron, and elevator control.
- Auxiliary Buttons/Switches: Various buttons and switches for activating flight modes, GPS functions, and other features.

Image: Close-up of the remote control's high-definition display screen, showing various flight parameters. Note: This image is a small thumbnail and may require zooming for detail.
4. Setup
4.1 Charging the Helicopter Battery
The helicopter is powered by an 11.1V 1350mAh Li Poly intelligent battery. Ensure it is fully charged before first use.
- Connect the charger to a power source.
- Connect the helicopter battery to the dedicated charging dock.
- Connect the charging dock to the charger using the charging cable.
- Monitor the charging indicator on the charger. Charging typically takes about 75 minutes.
- Disconnect the battery once fully charged. Do not leave unattended during charging.

Image: The 11.1V 1350mAh Li Poly intelligent battery and its compatible charger. Note: This image is a small thumbnail and may require zooming for detail.

Image: The dedicated charging dock for the helicopter battery. Note: This image is a small thumbnail and may require zooming for detail.
4.2 Installing Remote Control Batteries
The remote controller requires 4x 1.5V AA batteries (not included).
- Open the battery compartment on the back of the remote controller.
- Insert four AA batteries, ensuring correct polarity (+/-).
- Close the battery compartment securely.
4.3 Installing the Helicopter Battery
- Locate the battery compartment on the helicopter.
- Carefully insert the charged 11.1V 1350mAh battery into the compartment.
- Connect the battery connector to the helicopter's power port. Ensure a secure connection.
- Close the battery compartment.
4.4 Blade Inspection
The main and tail rotor blades are typically pre-installed. Before each flight, inspect all blades for any signs of damage, cracks, or looseness. Replace damaged blades immediately using the provided spares and screwdriver/hexagon wrench.
4.5 Binding the Helicopter and Remote Control
To establish communication between the helicopter and the remote control:
- Place the helicopter on a flat, level surface.
- Turn on the helicopter's power switch. The indicator lights will flash.
- Turn on the remote controller.
- Move the throttle stick (left stick) to its lowest position, then push it all the way up, and then back down to the lowest position.
- The helicopter's indicator lights will become solid, indicating successful binding.
- Wait for the GPS module to acquire satellites (if flying outdoors). The GPS indicator will change once locked.
5. Operating Instructions
5.1 Pre-Flight Checklist
- Ensure helicopter battery is fully charged.
- Ensure remote control batteries are installed and have sufficient power.
- Inspect all blades for damage.
- Verify the helicopter and remote control are bound.
- Check the flight environment for obstacles and clear space.
- For outdoor flight, ensure GPS signal is acquired.
5.2 Basic Flight Controls
Familiarize yourself with the remote control sticks:
- Left Stick (Throttle/Rudder):
- Up/Down: Controls throttle (ascend/descend).
- Left/Right: Controls rudder (yaw left/right).
- Right Stick (Aileron/Elevator):
- Up/Down: Controls elevator (pitch forward/backward).
- Left/Right: Controls aileron (roll left/right).
5.3 Take-off and Landing
- Take-off: After binding and GPS lock (if applicable), slowly push the left stick (throttle) upwards. The helicopter will ascend. Maintain a steady ascent.
- Landing: Slowly pull the left stick (throttle) downwards. The helicopter will descend. Gently bring it down to a flat surface. Cut throttle completely once landed.
5.4 Advanced Flight Features
The F09-H helicopter includes several advanced features for enhanced flight experience:

Image: A visual representation of different flight modes and intelligent functions. Note: This image is a small thumbnail and may require zooming for detail.
- GPS Positioning: Utilizes a GPS module for stable hovering and precise positioning, especially outdoors. Ensure GPS lock before using GPS-dependent features.
- Return to Home (RTH): The helicopter can automatically return to its take-off point. This feature is activated via a dedicated button on the remote control.
- Low Battery Return: If the helicopter's battery level drops critically low, it will automatically initiate a return to home or land safely.
- Loss of Signal Return: In case of signal loss between the remote control and helicopter, the aircraft will automatically return to its take-off point.
- One Key Return: A simplified RTH function activated with a single button press.
- Circle Flight: The helicopter can automatically fly in a circular path around a designated point.
- Route Flight: Plan a flight path on a connected app (if available) or through the remote, and the helicopter will follow it autonomously.
- Electronic Fence: Set virtual boundaries to prevent the helicopter from flying outside a defined area.
- Headless Mode: In this mode, the helicopter's orientation is relative to the pilot, making it easier to control regardless of its actual front direction.
- Altitude Hold: The helicopter maintains a stable altitude, allowing the pilot to focus on directional control.
- Optical Flow Positioning: For indoor flight or areas with weak GPS, this system uses a downward-facing camera to maintain position stability.

Image: A close-up of the GPS module integrated into the F09-H helicopter for precise positioning. Note: This image is a small thumbnail and may require zooming for detail.
6. Maintenance
6.1 Cleaning
Regular cleaning helps maintain the helicopter's performance and appearance.
- Use a soft, dry cloth to wipe down the fuselage and blades after each flight.
- Remove any dust, dirt, or debris from motors and moving parts.
- Do not use water or chemical cleaners, as they can damage electronic components.
6.2 Battery Care and Storage
Proper battery care extends its lifespan and ensures safety.
- Always fully charge the battery before use.
- Do not completely discharge the battery. Stop flying when the low battery warning is issued.
- For long-term storage, charge the battery to approximately 50-60% capacity.
- Store batteries in a cool, dry place, away from direct sunlight and extreme temperatures.
- Remove batteries from the remote control if not in use for extended periods.
6.3 Blade Inspection and Replacement
Regularly check the main and tail rotor blades for any signs of wear, cracks, or deformation. Damaged blades can affect flight stability and safety.
- If a blade is damaged, use the provided screwdriver and hexagon wrench to carefully remove it.
- Install a new blade, ensuring it is securely fastened but not overtightened.
- Always replace blades with genuine wheelfun F09-H spare parts.
7. Troubleshooting
This section addresses common issues you might encounter with your F09-H RC Helicopter.
| Problem | Possible Cause | Solution |
|---|---|---|
| Helicopter does not respond to remote control. | Not bound; Remote control batteries low/dead; Helicopter battery low/dead; Interference. | Re-bind the helicopter and remote control; Replace remote control batteries; Charge helicopter battery; Move to an area with less interference. |
| Helicopter cannot take off or lacks power. | Helicopter battery low; Damaged blades; Motor issue. | Charge helicopter battery fully; Inspect and replace damaged blades; Contact support if motor issue is suspected. |
| Short flight time. | Battery not fully charged; Battery aging; Overuse of high-power maneuvers. | Ensure battery is fully charged; Consider replacing old batteries; Fly more conservatively. |
| Helicopter drifts during hover. | Not calibrated; Wind interference; Uneven take-off surface. | Perform gyroscope calibration (refer to remote control manual for specific steps); Fly in calmer conditions; Take off from a level surface. |
| GPS features not working. | No GPS signal lock; Flying indoors. | Ensure flight is outdoors in an open area; Wait for GPS indicator to show lock; GPS features are not available indoors. |
8. Specifications
Detailed specifications for the wheelfun F09-H RC Helicopter:
| Feature | Detail |
|---|---|
| Model | F09-H |
| Scale | 1/47 |
| Material | Plastic, Carbon Fiber, Metal |
| Helicopter Size | Approx. 42 x 42.5 x 12 cm (16.5 x 16.7 x 4.7 inches) |
| Helicopter Net Weight | Approx. 0.5 kg (1.1 pounds) |
| Flight Time | Approx. 9-12 minutes |
| Charging Time | Approx. 75 minutes |
| Remote Control Distance | Approx. 350 meters |
| Helicopter Battery | 11.1V 1350mAh, Li Poly Intelligent Battery |
| Remote Control Battery | 4x 1.5V AA Batteries (not included) |
| Manufacturer Recommended Age | 21 years and up |
| Product Dimensions (Box) | 20 x 14.8 x 8 inches |
9. Warranty and Support
wheelfun is committed to providing quality products and customer satisfaction.
9.1 Damage Out of Box
We use solid packaging for all items. If your item arrives damaged, please contact us immediately. We can resend a free replacement part to address any damage out of the box.
9.2 Maintenance Services
We have a professional after-sales team and a technical maintenance team. Our technicians can provide guidance in English through video or text for repairs and troubleshooting.
9.3 Contact Information
For further assistance, technical support, or warranty inquiries, please contact wheelfun customer service through the retailer's platform or visit the official wheelfun store page.