Foot2go PFS-165
Automatic Chicken Coop Door User Manual
Brand: Foot2go | Model: PFS-165
Product Overview
The Foot2go Automatic Chicken Coop Door is designed for effortless and safe poultry management. It features multiple operating modes, robust construction, and convenient remote control capabilities to ensure the well-being of your flock.
Key Features:
- Solar Automatic Operation: Equipped with a built-in 3500mAh high-capacity battery and a solar panel for automatic charging. USB-C charging is available for cloudy days, ensuring continuous operation.
- Light Sensor & Timer Modes: Automatically opens and closes based on preset times or natural light conditions, providing flexible management options.
- Anti-Pinch Protection: A highly sensitive sensor detects obstacles during closing, reversing the door and pausing for 10 seconds to prevent injury to chickens or other animals.
- Long-Range Remote Control: Control the door from up to 393 feet away, allowing for convenient manual operation and status checks.
- Durable & Weather-Resistant: Constructed from sturdy aluminum alloy with an IPX5 waterproof rating, designed to withstand harsh weather conditions from 5℉ to 140℉.
- Easy Installation: Simple setup with included screws, taking only a few minutes.

Figure 1: Overview of the Foot2go Automatic Chicken Coop Door system, including the main unit, solar panel, remote control, and USB-C charging cable.
Setup and Installation
Follow these steps for proper installation of your automatic chicken coop door.
- Confirm Door Size and Mark Position: Measure the dimensions of the chicken coop door unit (9.6 inches high x 8.3 inches wide) and mark the desired opening on your coop. Ensure sufficient space for the door to slide freely.
- Prepare the Opening: Carefully saw or cut out the marked opening in your chicken coop. Ensure the edges are smooth to prevent obstruction.
- Secure the Door Unit: Place the chicken coop door unit over the prepared opening. Use the included screws to firmly attach the unit to the coop structure. Ensure it is level and securely mounted.
- Install Solar Charger and Set Time: Mount the solar panel in a location that receives maximum direct sunlight throughout the day. Connect the solar panel cable to the main unit. Power on the unit and set the current time according to the instructions in the Operating section.

Figure 2: Installation steps for the Foot2go Automatic Chicken Coop Door, including dimensions of the main unit (9.6in x 8.3in x 13in) and solar panel (9.3in x 6.7in).
Initial Setup of Remote Control:
Before first use, open the battery cover of the remote control and remove the insulation tab to activate the batteries.
Video 1: Demonstrates the initial setup of the remote control, including removing the battery insulation tab, and shows the door operating with various modes and safety features.
Operating Modes
The Foot2go chicken coop door offers five distinct operating modes to suit your needs:
- 1. Light Sensor Mode: The door opens and closes automatically based on ambient light levels.
- 2. Timer Mode: Set specific times for the door to open and close.
- 3. Light Sensor and Timer Control: A hybrid mode combining both light sensor and timer functionalities for precise control.
- 4. Remote Control: Manually open or close the door using the provided remote control from a distance of up to 393 feet.
- 5. Manual Control: Directly operate the door using the buttons on the main unit.
Use the 'M' button on the unit to switch between modes. Refer to the display for current time, mode, and open/close settings.

Figure 3: Visual representation of the five available operating modes for the chicken coop door.
Checking Door Status Remotely:
After activating the remote control, briefly press the status check button (eye icon). When the chicken coop door is fully open, the indicator light on the remote's 'open' button will illuminate. When the door is fully closed, the indicator light on the 'close' button will turn on. This allows you to confirm the door's status without being physically present at the coop.

Figure 4: How to check the door status remotely using the remote control's indicator lights.
Remote One-Click Alarm:
In case of a perceived threat or to deter predators, you can activate an alarm remotely. After activating the remote control, press the Alarm button (bell icon) to trigger the alarm remotely.

Figure 5: Using the remote control's one-click alarm feature.
Power Supply
The chicken coop door is designed for reliable operation with multiple power options:
- Solar Charging: The included 7W solar panel charges the built-in 3500mAh battery efficiently during sunny conditions.
- USB Charging: For periods of prolonged cloudy weather or low sunlight, the unit can be charged via a USB-C cable (included).
- Internal Battery: A 3500mAh high-capacity battery ensures consistent and reliable operation, even without direct sunlight or external power.
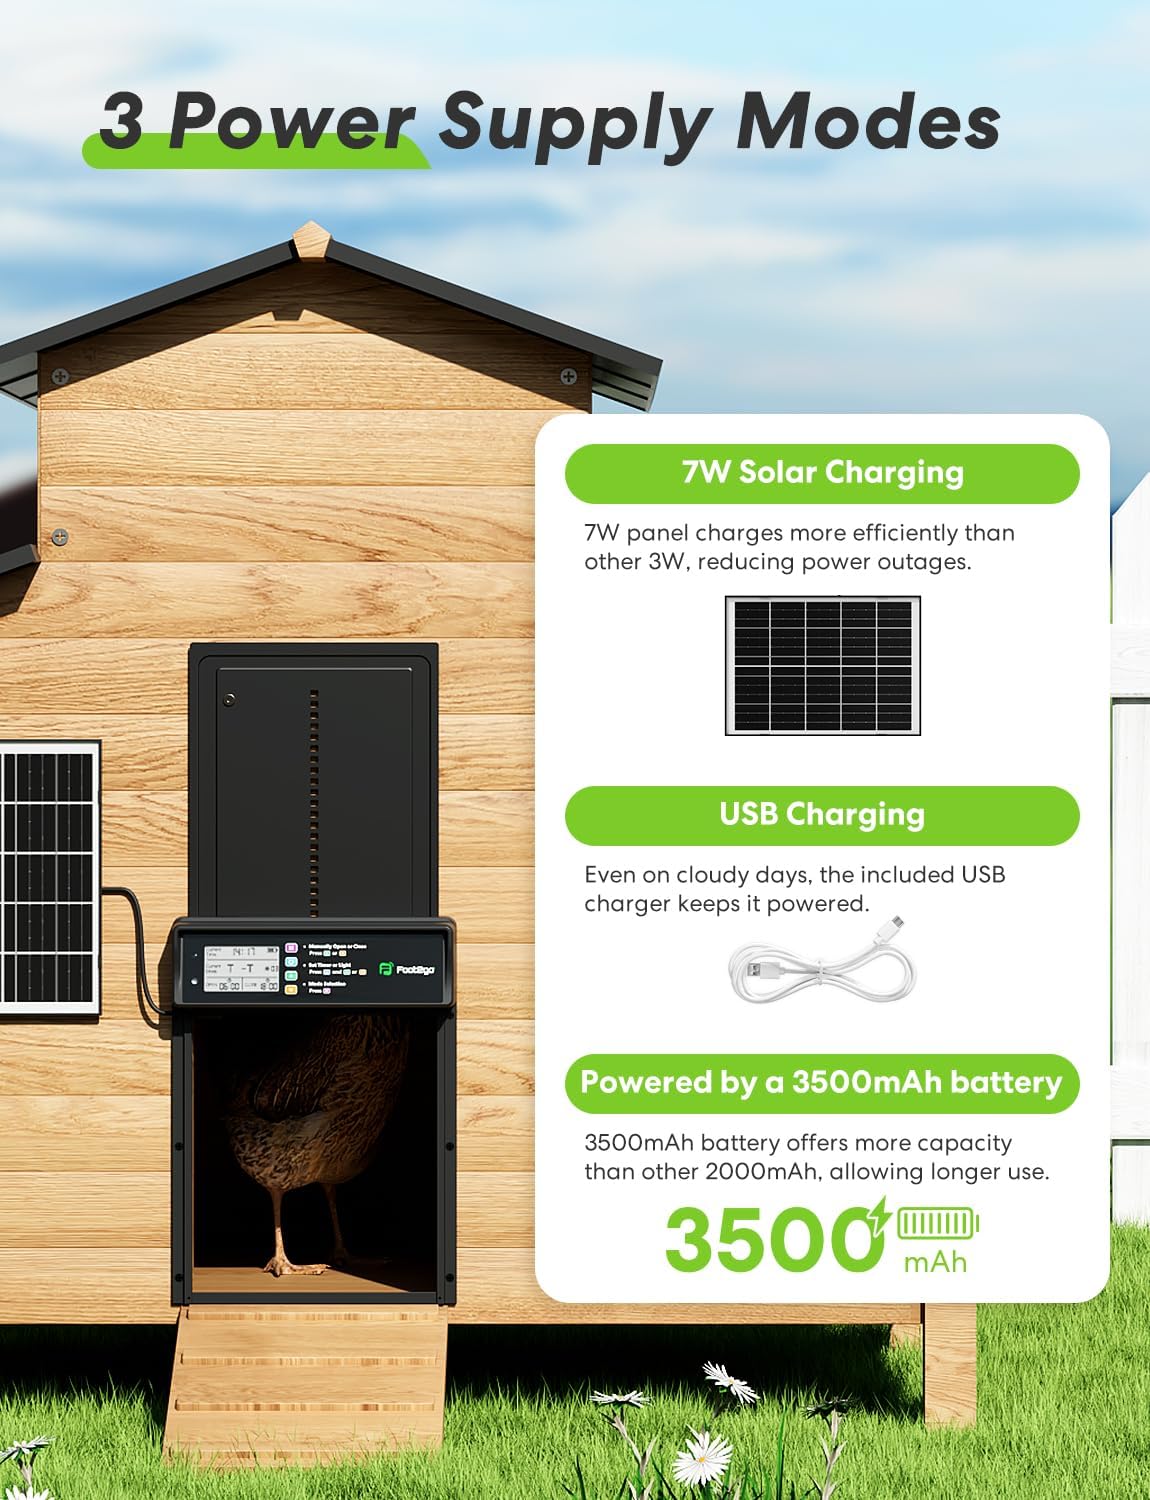
Figure 6: Illustration of the three power supply options for the chicken coop door.
Maintenance
Regular maintenance ensures the longevity and optimal performance of your chicken coop door.
- Cleaning: Periodically wipe down the door unit and solar panel with a damp cloth to remove dirt, dust, or debris that may accumulate. Ensure the solar panel is clean for efficient charging.
- Obstruction Check: Regularly inspect the door's path for any obstructions (e.g., bedding, dirt, ice) that could impede its movement or interfere with the anti-pinch sensor.
- Battery Monitoring: While the solar panel provides continuous charging, monitor the battery indicator on the display, especially during prolonged cloudy periods, and use USB-C charging if the battery level is low.
- Weather Protection: Although designed to be weather-resistant, ensure the unit is securely mounted and not exposed to excessive direct water spray or prolonged submersion.
Troubleshooting
| Problem | Possible Cause | Solution |
|---|---|---|
| Door not opening/closing. | Low battery; Obstruction in path; Incorrect mode setting. | Charge battery via solar or USB-C; Clear any obstructions; Verify operating mode (Timer, Light Sensor, etc.). |
| Remote control not working. | Remote battery low/dead; Remote out of range; Insulation tab not removed. | Replace remote batteries; Move closer to the unit (within 393 ft); Ensure insulation tab is removed. |
| Door reverses during closing. | Anti-pinch sensor activated by an object. | Ensure the path is clear. This is a safety feature working as intended. |
| Time/settings reset daily. | Internal clock issue (less common, but reported by some users). | Ensure consistent power supply. If problem persists, contact customer support. |
Specifications
| Brand | Foot2go |
| Model Number | PFS-165 |
| Material | Aluminum Alloy |
| Door Opening Dimensions | 9.6 inches (Height) x 8.3 inches (Width) |
| Overall Product Dimensions (LxWxH) | 9.4 x 1.8 x 13 inches |
| Item Weight | 3.5 pounds |
| Battery Capacity | 3500mAh |
| Solar Panel Power | 7W |
| Remote Control Range | Up to 393 feet (120 meters) |
| Waterproof Rating | IPX5 |
| Operating Temperature | 5℉ to 140℉ (-15℃ to 60℃) |
| Included Components | Chicken Coop Door, Remote, Screws, Solar Panel, USB-C Charge Cable |
Warranty and Support
For warranty information, technical support, or any inquiries regarding your Foot2go Automatic Chicken Coop Door, please contact Foot2go customer service. Refer to the product packaging or the official Foot2go website for the most up-to-date contact details.
Please retain your purchase receipt for warranty claims.
Ask a question about this manual
Ask about setup, troubleshooting, compatibility, parts, safety, or missing instructions. Manuals+ will review the question and use this page’s manual context to help answer it.