1. Introduction
This manual provides detailed instructions for the CARONSORT CD Player with Speakers, Model Y-CD-Q146. This versatile audio device combines a CD player with Bluetooth connectivity, FM radio, USB playback, and auxiliary input/output options. Please read this manual thoroughly before using the product to ensure proper operation and to maximize your listening experience.
2. Package Contents
Verify that all items listed below are included in your package:
- CARONSORT CD Player (Model Y-CD-Q146)
- 5V-2A USB Power Adapter
- USB Type-C Charging Cable (1.5 meters)
- 3.5mm Male-to-Male Audio Cable
- Remote Control (2x AAA batteries not included)
- User Manual

Image: All items included in the CARONSORT CD Player package, neatly arranged.
3. Product Overview
3.1 Front and Top View

Image: Front and top view of the CARONSORT CD Player, displaying the CD compartment, control knobs, and integrated speakers.
- CD Compartment: Top-loading design for inserting CDs.
- Tone Arm: Functions as a mode selector and play/pause control for CD playback.
- Volume Knob: Rotary control for adjusting audio volume.
- Control Buttons: Play/Pause, Skip Forward, Skip Backward, Mode selection.
- Integrated Speakers: Front-facing speakers for audio output.
3.2 Speaker Configuration
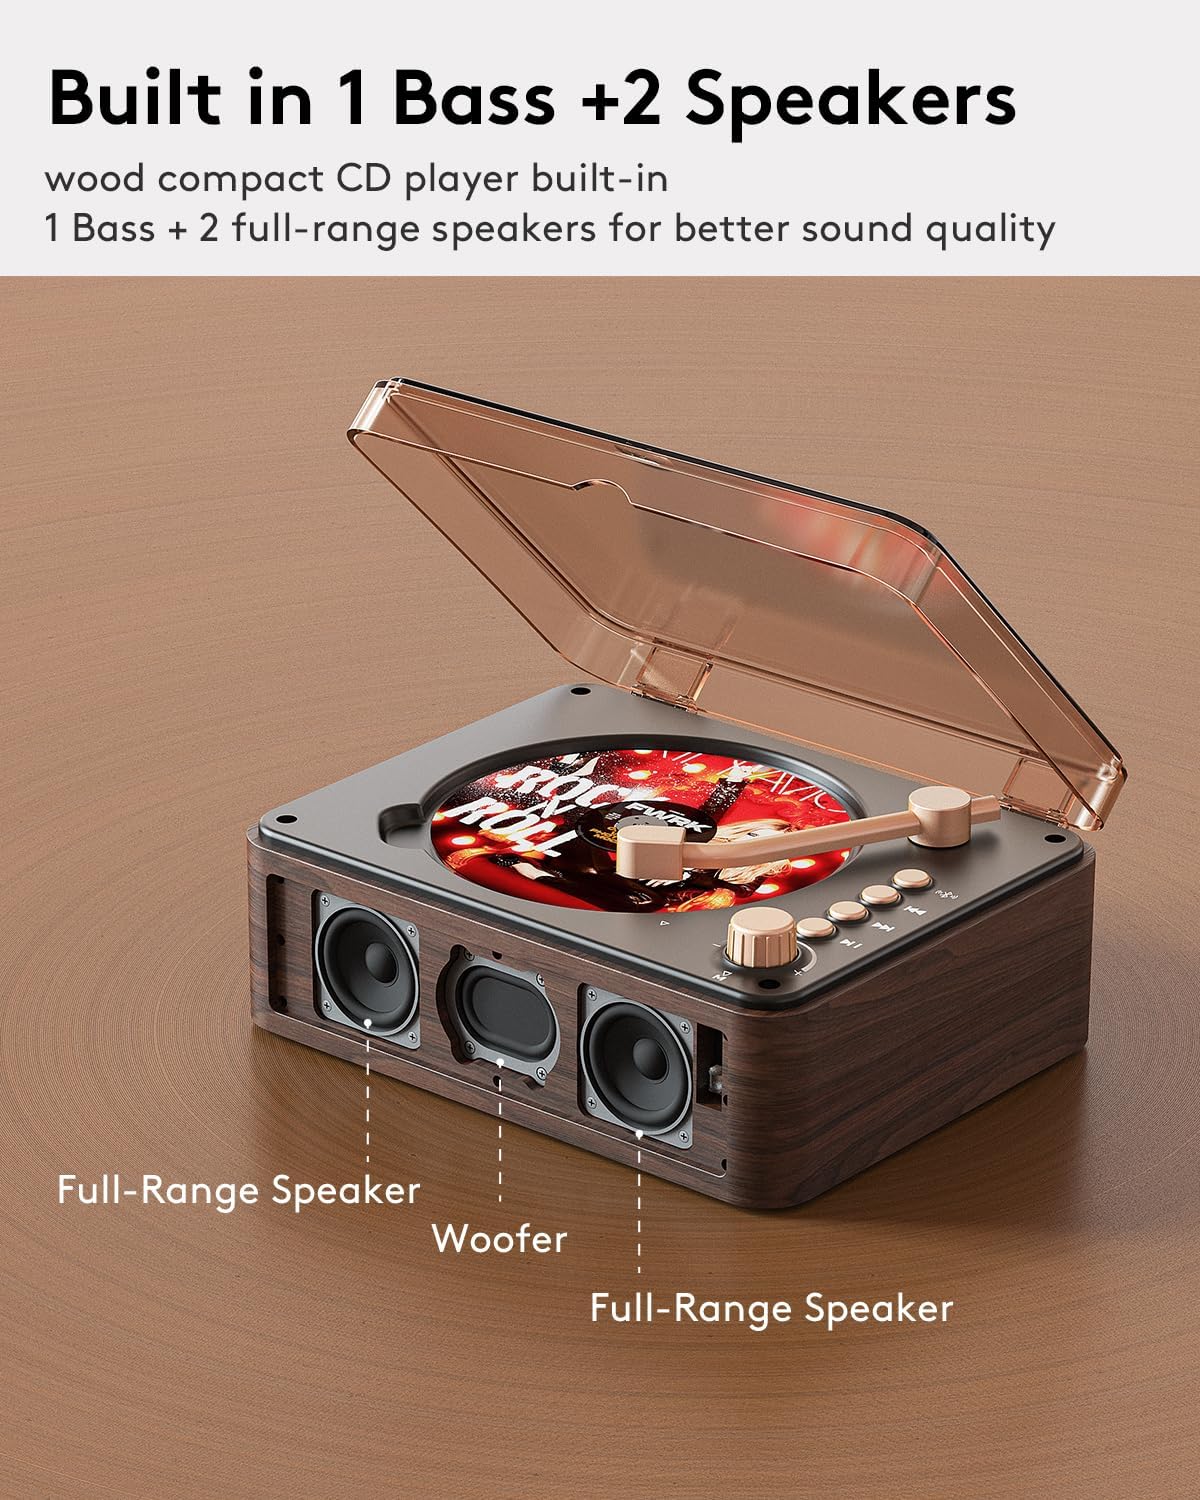
Image: Internal view highlighting the speaker setup: two full-range speakers and a central woofer for enhanced bass.
The unit features a 2.1 speaker system with two full-range speakers and one dedicated woofer for improved bass response. Bass boost functionality can be controlled via the remote.
3.3 Rear Ports and Controls
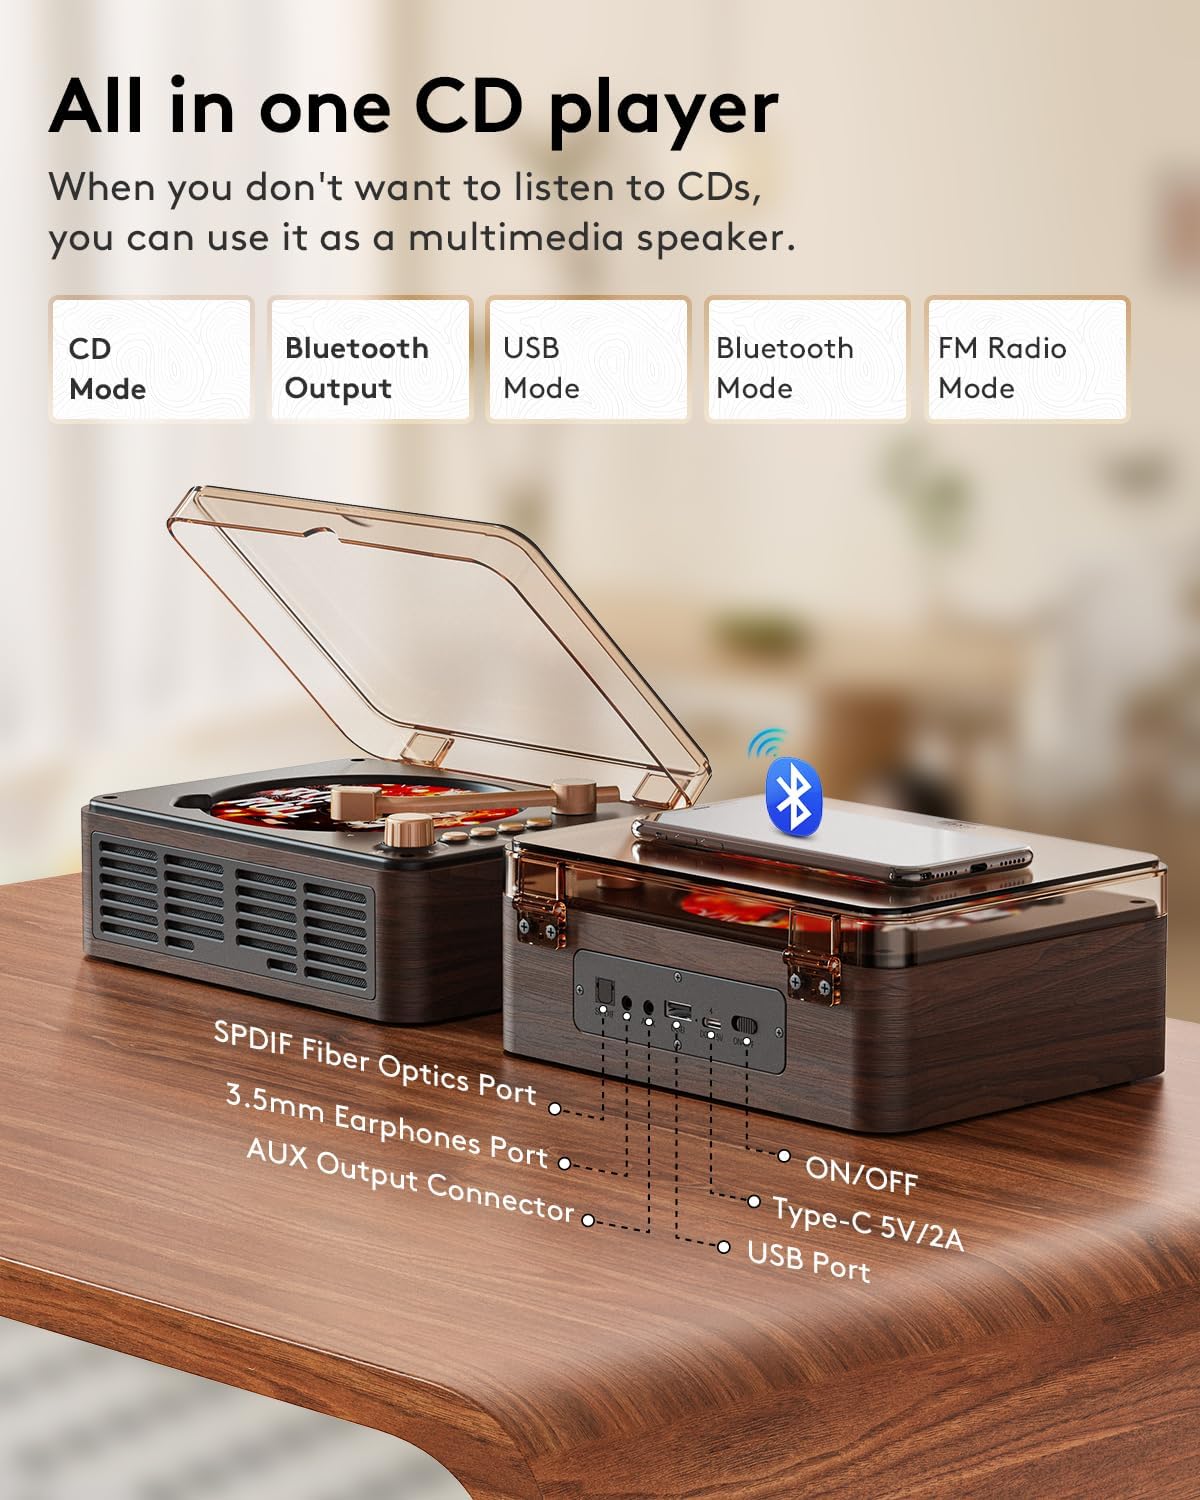
Image: Detailed view of the rear panel, indicating the locations of the SPDIF Fiber Optics Port, 3.5mm Earphones Port, AUX Output Connector, Type-C 5V/2A power input, USB Port, and the ON/OFF switch.
- SPDIF Fiber Optics Port: Digital audio output.
- 3.5mm Earphones Port: For connecting headphones.
- AUX Output Connector: For connecting to external speakers or amplifiers.
- Type-C 5V/2A: Power input port.
- USB Port: For playing MP3/WMA files from USB storage devices.
- ON/OFF Switch: Main power switch for the unit.
4. Setup
4.1 Power Connection
- Connect the provided USB Type-C charging cable to the "Type-C 5V/2A" port on the rear of the CD player.
- Plug the other end of the USB cable into the 5V-2A USB power adapter.
- Insert the power adapter into a standard wall outlet.

Image: The USB power adapter connected to a wall socket, ready to power the device.
4.2 Powering On/Off
- Locate the ON/OFF switch on the rear panel of the unit.
- Slide the switch to the "ON" position to power on the device.
- Slide the switch to the "OFF" position to power off the device.

Image: A close-up of the power toggle switch, indicating its function for turning the unit on or off.
5. Operating Instructions
5.1 CD Playback Mode
- Open the top cover of the CD player.
- Carefully place a CD (CD, CD-R, CD-RM, CD-G, MP3, WMA, WAV formats supported) onto the spindle, ensuring it is seated correctly.
- Close the top cover.
- Move the tone arm over the CD. This action initiates CD mode and playback.
- Use the Play/Pause, Skip Forward, and Skip Backward buttons on the unit or remote control to manage playback.
- Adjust the volume using the rotary knob or the remote control.

Image: A hand demonstrating the correct way to place a compact disc onto the player's central spindle.

Image: The tone arm is shown in position over a CD, signifying that the player is in CD playback mode.
5.2 Bluetooth Input Mode (Using as a Bluetooth Speaker)
- Press the "Mode" button on the unit or remote control until "Bluetooth Input" or a similar indicator is displayed/announced.
- On your external Bluetooth device (e.g., smartphone, tablet), enable Bluetooth and search for available devices.
- Select "CARONSORT Y-CD-Q146" (or similar name) from the list to pair.
- Once paired, audio from your external device will play through the CD player's speakers.
5.3 Bluetooth Output Mode (Transmitter)
This feature allows the CD player to transmit audio (from CD, USB, AUX, or FM radio) to external Bluetooth headphones or speakers.
- Ensure your Bluetooth headphones or speaker are in pairing mode.
- Press the "Mode" button on the unit or remote control until "Bluetooth Output" or a similar indicator is displayed/announced. The CD player will automatically search for nearby Bluetooth receiving devices.
- Once connected, audio from the CD player will be transmitted to your external Bluetooth device.

Image: The CD player wirelessly transmitting audio via Bluetooth to a pair of over-ear headphones and in-ear earbuds.
5.4 FM Radio Mode
- Press the "Mode" button until "FM Radio" is selected.
- Use the Skip Forward/Backward buttons to manually tune to a station or press and hold to auto-scan for the next available station.
- The FM radio frequency range is 76.0MHz-108.0MHz.
5.5 USB Playback Mode
- Insert a USB flash drive (FAT/FAT32 format, up to 128GB) into the USB port on the rear panel.
- Press the "Mode" button until "USB" is selected.
- The player will automatically detect and begin playing compatible MP3 or WMA audio files.
- Use the Play/Pause, Skip Forward, and Skip Backward buttons to control playback.
5.6 AUX Input/Output
- AUX Input: Connect an external audio source (e.g., MP3 player) to the 3.5mm AUX input port using a 3.5mm audio cable. Select AUX mode to play audio through the CD player's speakers.
- AUX Output: Connect the 3.5mm AUX output port to external speakers or an amplifier using a 3.5mm audio cable to route the CD player's audio through a different sound system.
5.7 Remote Control
The included remote control provides full functionality for operating the CD player from a distance. Insert 2x AAA batteries (not included) into the remote before use.
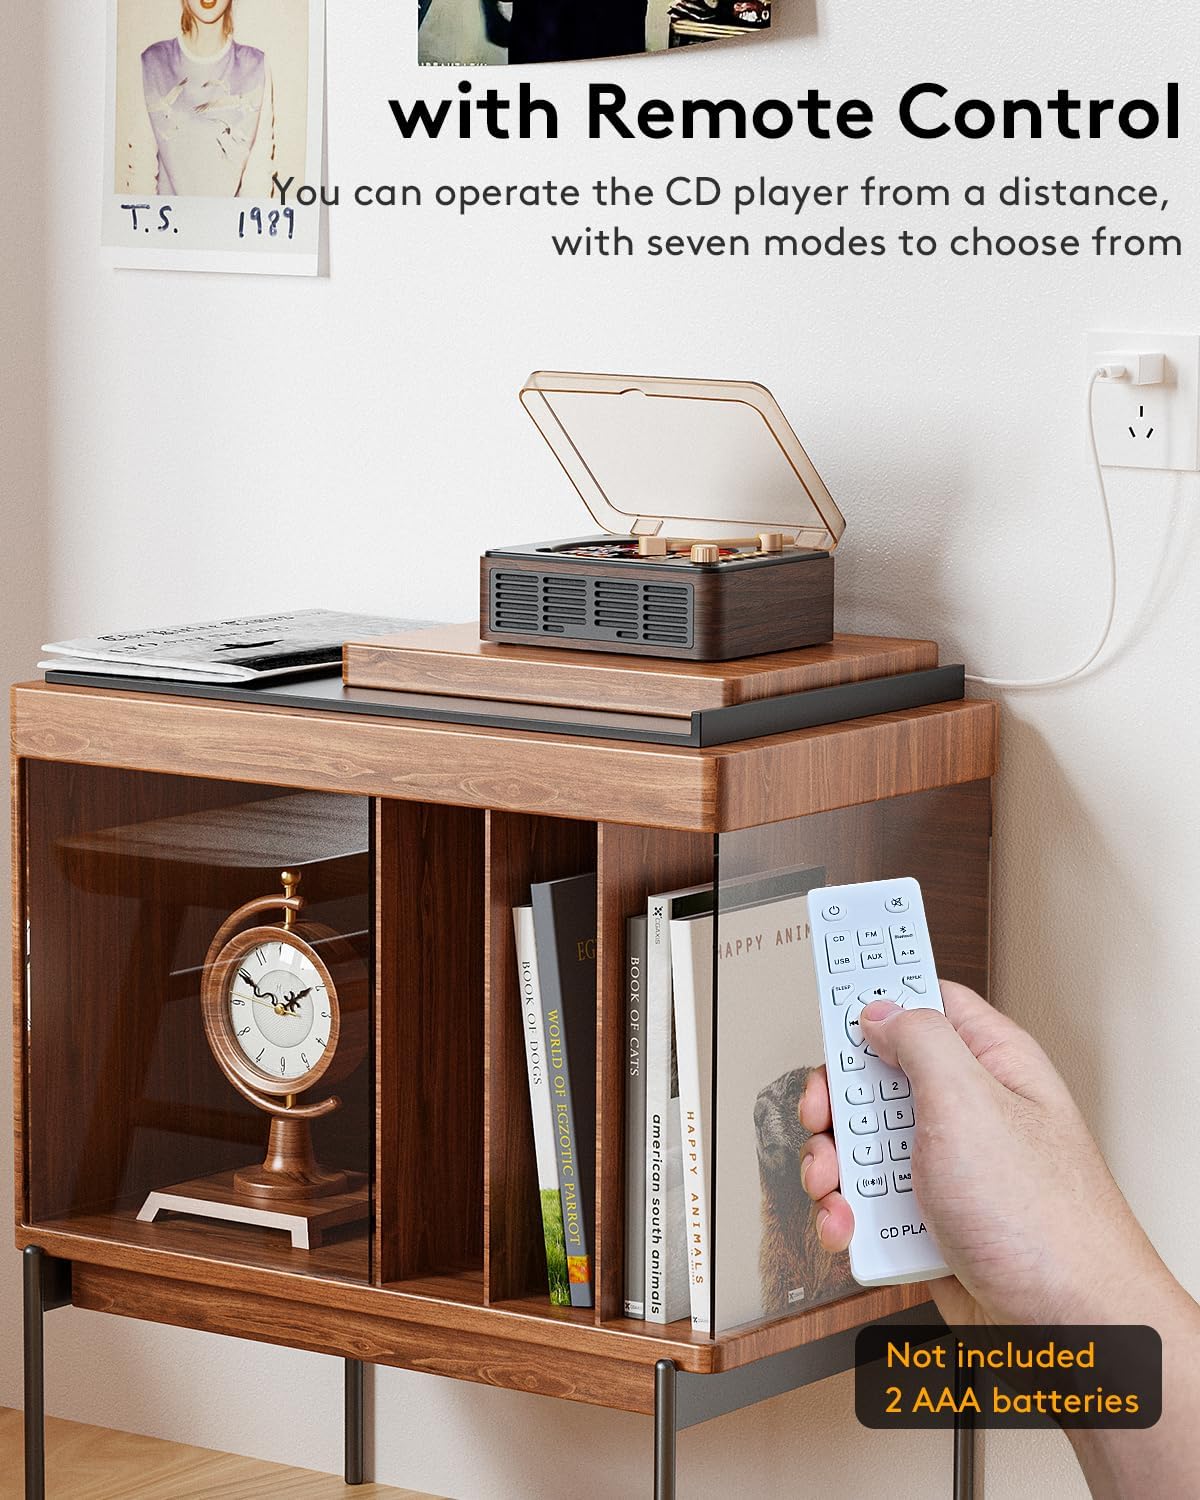
Image: A hand holding the white remote control, showing its various buttons for controlling the CD player's functions.
- Power: Turn the unit on or off.
- Mode: Switch between CD, Bluetooth Input, Bluetooth Output, FM Radio, and USB modes.
- Volume +/-: Adjust the volume level.
- Play/Pause, Skip Forward/Backward: Control media playback.
- Bass +/-: Adjust bass levels.
- Number Buttons: For direct track selection (CD/USB) or radio station input.
6. Maintenance
- Cleaning the Unit: Use a soft, dry cloth to wipe the exterior of the CD player. Do not use liquid cleaners or abrasive materials.
- Cleaning CDs: Handle CDs by their edges. If a CD is dirty, gently wipe it with a soft, lint-free cloth from the center outwards.
- Storage: When not in use for extended periods, store the CD player in a dry, dust-free environment.
- Avoid Liquids: Keep the unit away from water and other liquids to prevent damage.
7. Troubleshooting
| Problem | Possible Cause | Solution |
|---|---|---|
| No power | Power cable not connected; ON/OFF switch is off. | Ensure power cable is securely connected and the ON/OFF switch is in the "ON" position. |
| CD not playing | CD inserted incorrectly; CD is dirty or scratched; incorrect mode selected; tone arm not positioned. | Re-insert CD correctly; clean or replace CD; select CD mode; ensure tone arm is over the CD. |
| No sound | Volume too low; incorrect mode selected; headphones/external speakers connected. | Increase volume; select correct mode; disconnect headphones/external speakers if sound is desired from internal speakers. |
| Bluetooth pairing failure | Device too far; incorrect Bluetooth mode; device not in pairing mode. | Move devices closer; ensure CD player is in correct Bluetooth mode (Input/Output); ensure external device is in pairing mode. |
| Poor FM radio reception | Weak signal in the area. | Reposition the unit for better reception. Note that the built-in antenna may have limitations in certain areas. |
| USB not recognized | Incorrect USB format; unsupported file types; USB drive capacity too large. | Ensure USB is FAT/FAT32 format; use MP3/WMA files; ensure capacity is 128GB or less. |
8. Specifications
| Feature | Detail |
|---|---|
| Model Number | Y-CD-Q146 |
| Product Dimensions (L x W x H) | 7.87 x 6.1 x 3.15 inches |
| Item Weight | 1.98 pounds |
| Connectivity Technology | Auxiliary, Bluetooth, USB |
| Color | Walnut-Brown |
| Speaker Type | Stereo (2.1 system with bass boost) |
| Supported CD Formats | CD, CD-R, CD-RM, CD-G, MP3, WMA, WAV |
| USB Support | Up to 128GB, FAT/FAT32 format (MP3/WMA files) |
| FM Radio Frequency | 76.0MHz-108.0MHz |
| Power Input | Type-C 5V/2A |
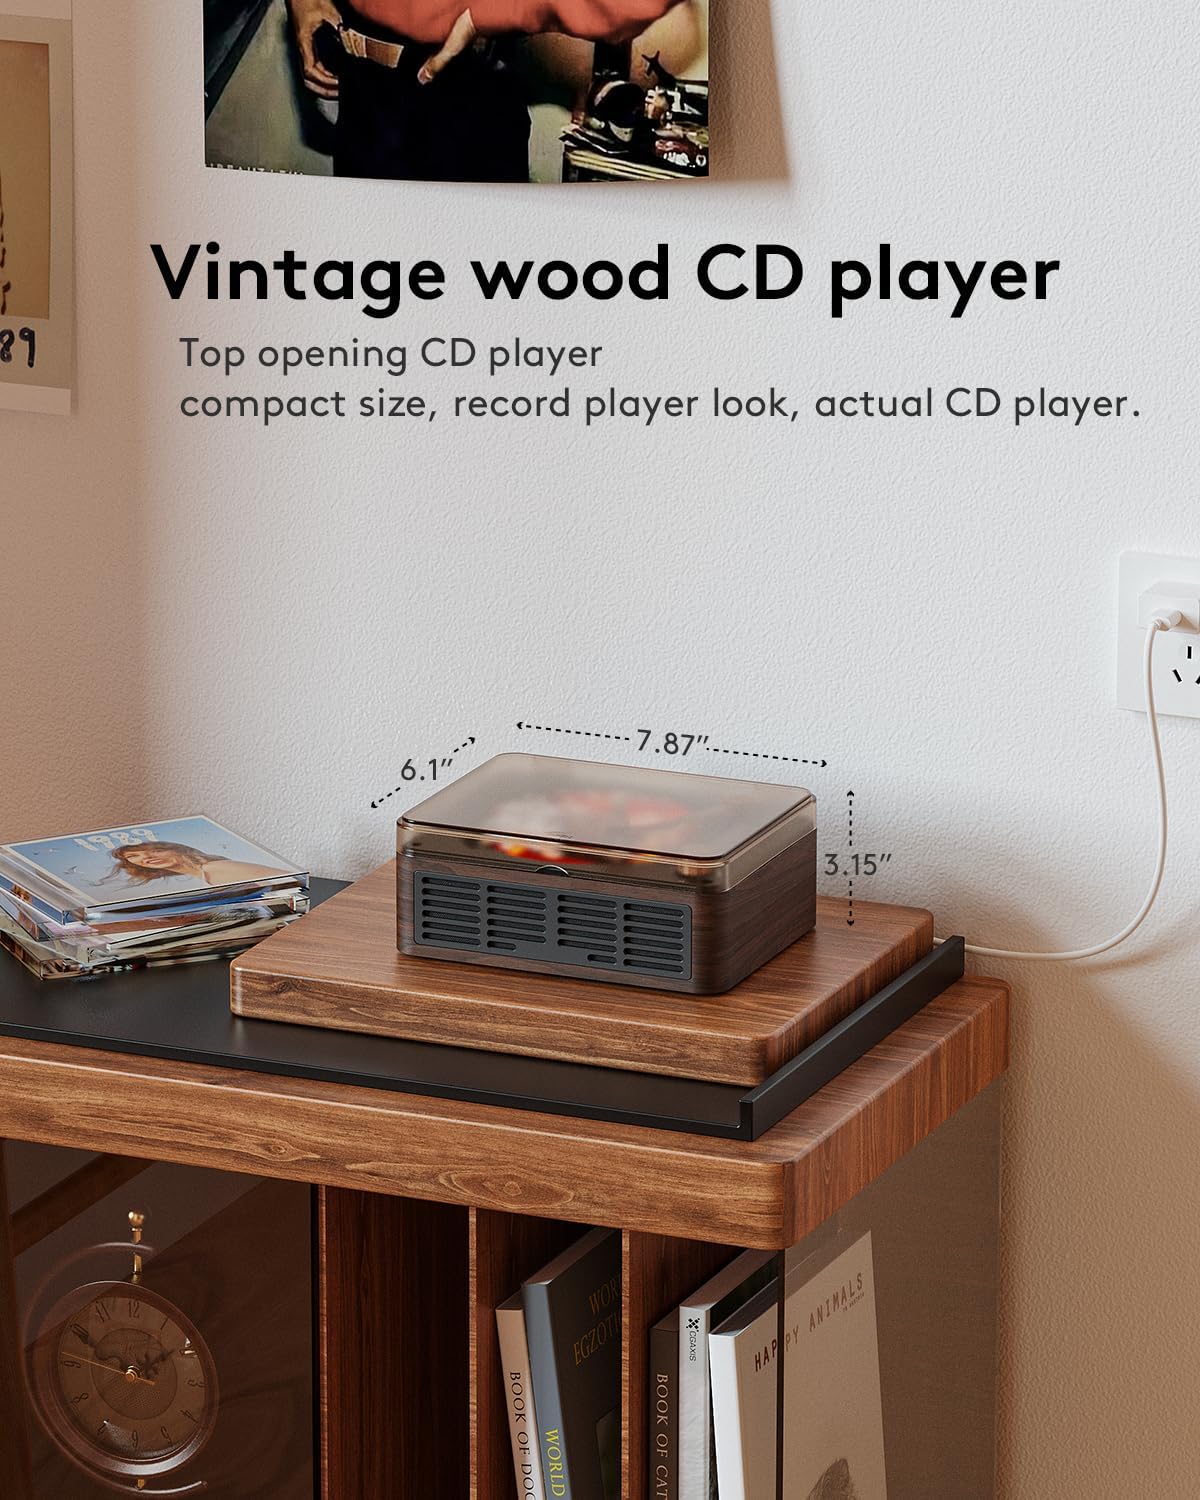
Image: The CARONSORT CD Player with its physical dimensions clearly marked for reference.
9. Warranty and Support
The CARONSORT CD Player (Model Y-CD-Q146) comes with a 1-year warranty from the date of purchase, covering manufacturing defects.
For any product-related questions, technical support, or warranty claims, please contact CARONSORT customer service. You can typically find contact information on the product packaging or through the retailer where the product was purchased. We aim to respond to inquiries within 24 hours.


