Air King 50 CFM & 100 CFM Snap-In Bathroom Exhaust Fans
Air King Bathroom Exhaust Fans User Manual
Models: 50 CFM & 100 CFM Snap-In Bathroom Exhaust Fans
Introduction
This manual provides comprehensive instructions for the installation, operation, and maintenance of your Air King 50 CFM and 100 CFM Snap-In Bathroom Exhaust Fans. Please read this manual thoroughly before installation and use to ensure safe and efficient operation of your new ventilation system.

Image: Air King 50 CFM and 100 CFM Bathroom Exhaust Fans.
This image displays both the 50 CFM and 100 CFM Air King bathroom exhaust fans, showcasing their matching white grills and durable plastic housings designed for snap-in installation.
Safety Information
Always follow basic safety precautions when installing or servicing electrical appliances. Failure to do so may result in fire, electric shock, or injury to persons.
- Disconnect power at the service panel before wiring.
- All wiring must comply with local electrical codes and standards.
- Do not install in a cooking area.
- Ensure proper grounding.
- Wear safety glasses and gloves during installation.
Package Contents
Verify that all components are present before beginning installation:
- Air King 50 CFM Bathroom Exhaust Fan (1 unit)
- Air King 100 CFM Bathroom Exhaust Fan (1 unit)
- White Grills (2 units)
- 4-inch Duct Collars (2 units)
- Backdraft Dampers (2 units)
- Installation Hardware (screws, wire nuts)
Setup and Installation
The Air King Snap-In Bathroom Exhaust Fans are designed for quick and easy installation. Follow these steps for proper setup:
- Prepare the Opening: Ensure the ceiling opening is appropriately sized for the fan housing. The snap-in system requires access to ceiling joists for secure mounting.
- Mount the Housing:

Image: Snap-In Mounting System Installation Steps.
This image illustrates the three key steps for installing the Air King exhaust fan: nailing the mounting bracket to a ceiling joist, snapping the fan housing securely into the bracket, and connecting the electrical wiring.
The snap-in mounting system allows for installation directly to ceiling joists. Nail the mounting bracket securely to a joist. Then, simply snap the fan housing into the bracket. This design eliminates the need for attic access in many cases.
- Connect Ductwork: Attach a 4-inch duct to the fan's duct collar. Ensure the backdraft damper is properly seated to prevent air from flowing back into the room when the fan is off. Secure the duct with appropriate clamps (not included).
- Electrical Wiring: With power disconnected at the service panel, connect the fan's wiring to your household electrical supply according to local codes. The fan requires a standard 120V AC connection. Ensure all connections are secure and insulated.
- Install the Grille: Once the fan is wired and secured, attach the white plastic grille. The grille typically snaps or clips into place, covering the fan housing and providing a finished look.
Operating Instructions
Your Air King bathroom exhaust fan is designed for simple operation. Once installed and wired, it can be controlled via a standard wall switch (not included).
- Turning On/Off: Flip the connected wall switch to the "ON" position to activate the fan. Flip it to the "OFF" position to turn the fan off.
- Optimal Use: For best results in moisture removal and air circulation, operate the fan during and after showering or bathing for at least 15-20 minutes.
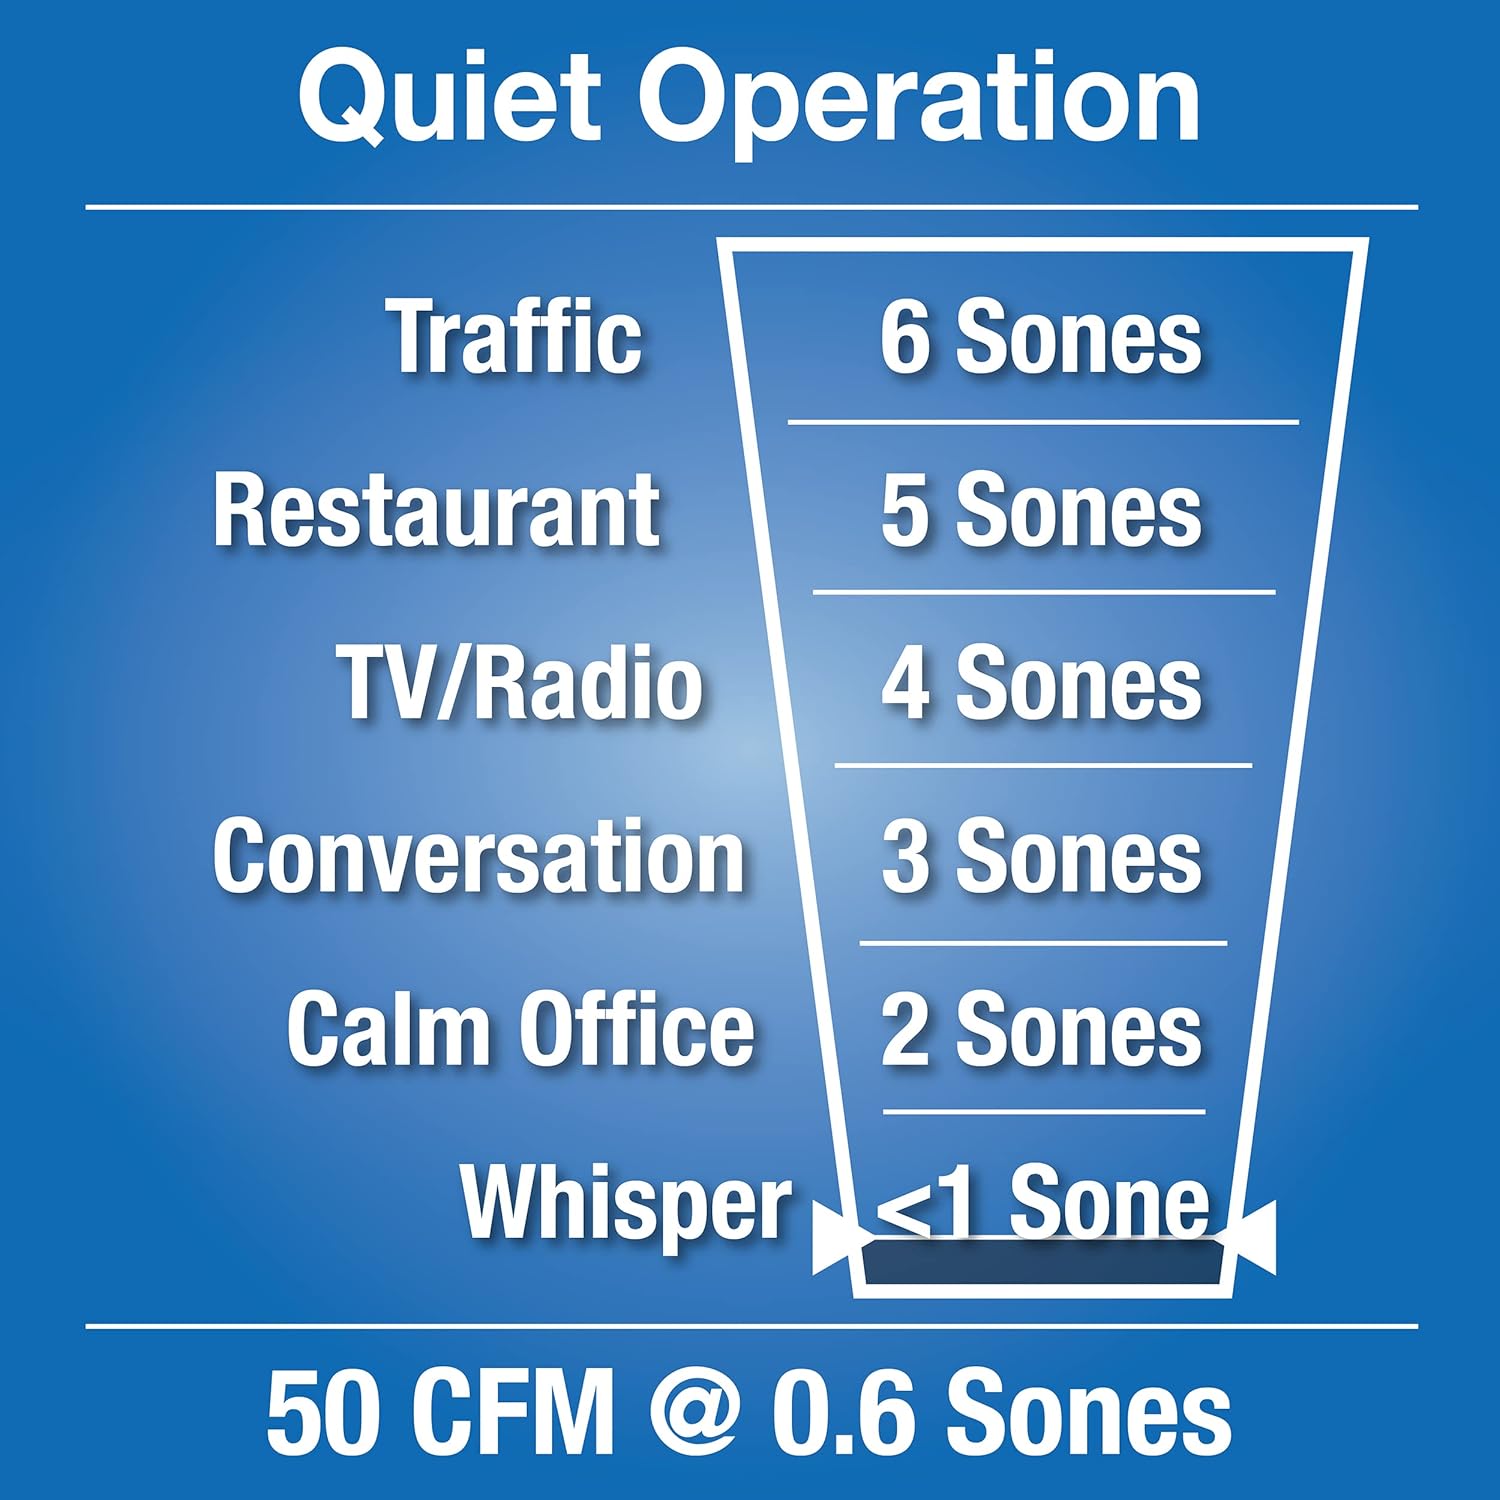
Image: Quiet Operation Sound Level Comparison.
This chart visually compares the sound level of the 50 CFM fan (0.6 Sones) to common environmental sounds like traffic, restaurant noise, conversation, and a whisper, highlighting its quiet operation.

Image: Understanding Sone Levels for Bath Fans.
This image defines 'Sone' as a unit of perceived loudness and provides a scale comparing the sound level of a typical bath fan (3.5 Sones) to other everyday sounds, helping users understand the fan's operational noise.
Maintenance
Regular maintenance ensures optimal performance and longevity of your exhaust fan.
- Grille Cleaning: Periodically remove the grille and wash it with mild soap and water. Rinse thoroughly and allow it to dry completely before reattaching.
- Fan Housing Cleaning: With power disconnected, use a soft cloth or vacuum cleaner to remove dust and debris from the fan blades and interior of the housing. Do not use abrasive cleaners or solvents.
- Motor Lubrication: The fan motor is permanently lubricated and requires no additional oiling.
Troubleshooting
If you experience issues with your exhaust fan, refer to the following common problems and solutions:
| Problem | Possible Cause | Solution |
|---|---|---|
| Fan does not operate. | No power, loose wiring, faulty switch. | Check circuit breaker/fuse. Verify all electrical connections are secure. Test wall switch. |
| Fan is noisy. | Loose mounting, debris in fan, damaged fan blade, improper ductwork. | Ensure fan housing is securely mounted. Disconnect power and clean fan blades. Check ductwork for obstructions or kinks. |
| Poor ventilation. | Blocked duct, undersized fan for room, backdraft damper stuck. | Check ductwork for obstructions. Ensure fan CFM matches room size. Inspect backdraft damper for free movement. |
Specifications
Technical specifications for the Air King 50 CFM and 100 CFM Bathroom Exhaust Fans:
| Feature | 50 CFM Model | 100 CFM Model |
|---|---|---|
| Air Movement (CFM) | 50 | 100 |
| Sound Level (Sones) | 0.5 (ENERGY STAR certified) | 3.5 |
| Housing Material | Durable Plastic | |
| Grille Color | White | |
| Duct Size | 4 inches | |
| Mounting Type | Snap-In Ceiling Mount | |
| Recommended Room Size | Up to 50 sq ft | Up to 125 sq ft |
| Certification | ENERGY STAR | N/A |

Image: Low Profile Grill Blends Into Ceiling.
This image shows the sleek, low-profile white grill of the Air King exhaust fan installed in a bathroom ceiling, demonstrating how it seamlessly integrates with the room's aesthetics.
Warranty and Support
Air King products are manufactured to high-quality standards. For specific warranty details and customer support, please refer to the warranty card included with your product or visit the official Air King website.
For technical assistance or replacement parts, contact Air King Customer Service:
- Website: www.airkinglimited.com
- Phone: Refer to product packaging or website for current contact numbers.
Ask a question about this manual
Ask about setup, troubleshooting, compatibility, parts, safety, or missing instructions. Manuals+ will review the question and use this page’s manual context to help answer it.