Introduction
Thank you for purchasing the AODK L-Shaped Gaming Desk. This manual provides essential information for the safe and efficient assembly, operation, and maintenance of your new desk. Please read these instructions carefully before beginning assembly and retain them for future reference.

Safety Information
- Always assemble the desk on a soft, clean surface to prevent scratches.
- Ensure all screws and fasteners are securely tightened before use. Periodically check and re-tighten as necessary.
- Do not exceed the maximum weight capacity of 50 kg (110 lbs) for the desktop.
- Keep small parts and packaging materials away from children to prevent choking hazards.
- Avoid placing hot items directly on the desk surface without protection.
- Do not stand or sit on the desk.
- Use only the provided power adapter for the LED lights and power outlets.
- If any parts are missing or damaged, do not proceed with assembly. Contact customer support immediately.
Package Contents
Before assembly, verify that all components listed below are present and undamaged. If anything is missing, please contact customer support.
| Part | Description | Quantity |
|---|---|---|
| Desktop Panels | L-shaped main desktop surfaces | Various |
| Steel Frame Components | Legs, support bars, cross braces | Various |
| Monitor Stands | Elevated platforms for monitors | 2 |
| Storage Shelves | Mesh or solid shelves for storage | Various |
| Power Strip Unit | Integrated AC outlets and USB ports | 1 |
| LED Light Strips | RGB lighting for desktop | Various |
| Assembly Hardware | Screws, bolts, Allen wrench, adjustable feet | Various |
| Instruction Manual | This document | 1 |
Assembly Instructions
Assembly typically requires two or more people due to the size and weight of the components. Follow the numbered steps carefully. Do not fully tighten screws until all parts are loosely assembled.
Step 1: Unpack and Identify Parts
Carefully unpack all components and lay them out on a soft, clean surface. Compare them with the package contents list to ensure everything is present.
Step 2: Assemble the Frame
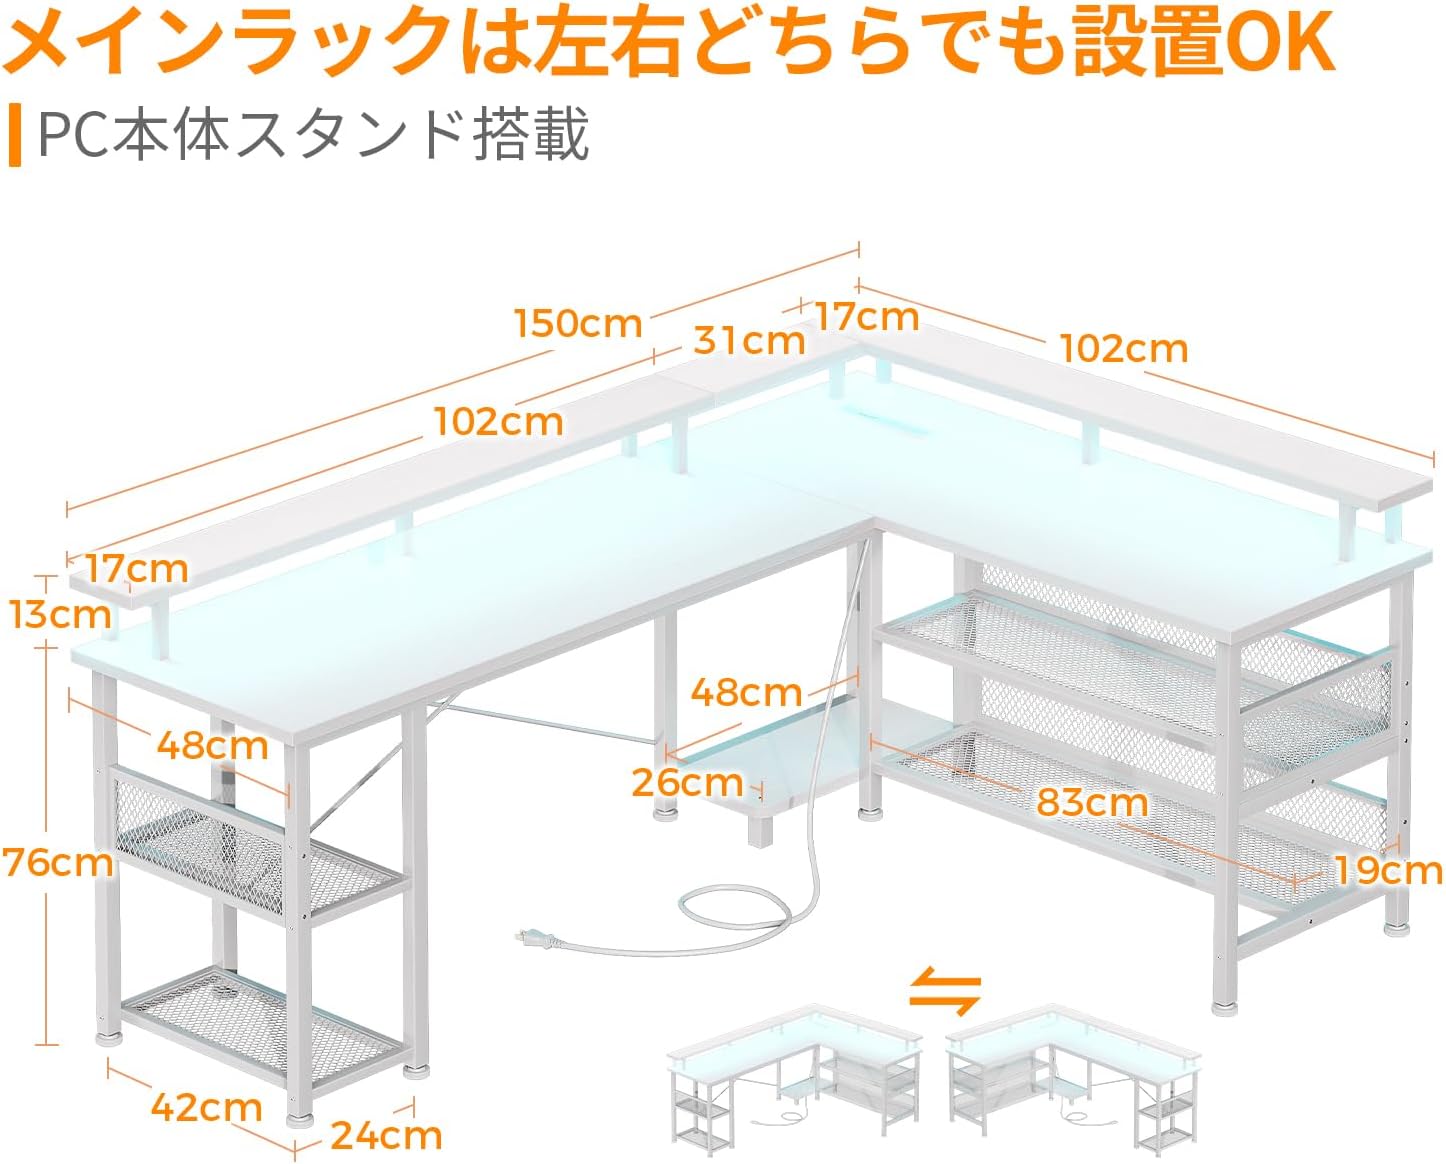
Attach the main support legs to the horizontal frame bars using the provided screws. Ensure the frame is stable. The L-shaped configuration can be reversed (left or right orientation) during this step, depending on your preference.
Step 3: Attach Desktop Panels
Carefully place the desktop panels onto the assembled frame. Align the pre-drilled holes and secure the panels with the appropriate screws. Ensure the panels are flush and stable.
Step 4: Install Monitor Stands
Attach the two monitor stands to the designated areas on the desktop. These stands are designed to elevate your monitors for improved ergonomics, helping to reduce strain on your neck and shoulders.

Step 5: Install Storage Shelves
Mount the storage shelves to the frame as indicated in the detailed assembly diagram (refer to the included paper manual). The height of some shelves may be adjustable to accommodate different items, such as a PC tower, providing ample storage space.

Step 6: Connect Power Strip and LED Lights
Integrate the power strip unit into its designated slot. Attach the LED light strips to the underside of the monitor stands or desktop edges as desired. Connect the LED lights and power strip to the main power source.

Step 7: Final Tightening and Leveling
Once all components are in place, fully tighten all screws. Adjust the leveling feet at the bottom of the desk legs to ensure the desk is stable and level on uneven floors.
Operating Instructions
Using the Integrated Power Outlets and USB Ports
The desk is equipped with 2 AC power outlets (100-240V/15A) and 2 USB ports (5V-2A) for convenient charging of your devices. Simply plug your devices into the appropriate ports. Ensure the desk is connected to a wall outlet.
Controlling the LED Lights
The integrated RGB LED lights offer 10 lighting modes and 10 color adjustment modes. Use the control button (usually located near the power strip) to cycle through the modes and colors. The lights have a memory function that retains the last selected mode when turned off and on again, allowing you to create an immersive atmosphere.

Maintenance
- Cleaning: Wipe the desk surface with a soft, damp cloth. Avoid abrasive cleaners or harsh chemicals that may damage the melamine finish.
- Spills: Immediately wipe up any spills to prevent water damage or staining. The high-strength melamine laminated board is resistant to dirt, scratches, heat, and moisture.
- Fasteners: Periodically check all screws and bolts to ensure they remain tight. Re-tighten if necessary to maintain stability.
- Electrical Components: Ensure the power cord and connections for the LED lights and outlets are not pinched or damaged. Disconnect power before cleaning electrical components.
Troubleshooting
| Problem | Possible Cause | Solution |
|---|---|---|
| Desk is wobbly/unstable | Screws are loose; uneven floor | Tighten all assembly screws. Adjust the leveling feet on the bottom of the legs to compensate for uneven surfaces. |
| LED lights not working | Power not connected; faulty connection; damaged LED strip | Ensure the desk's power cord is plugged into a working wall outlet. Check all LED connections. If still not working, contact customer support. |
| Power outlets/USB ports not working | Desk not powered; circuit breaker tripped; faulty unit | Verify the desk is plugged in. Check your home's circuit breaker. Test with another device. If issue persists, contact customer support. |
| Parts do not align during assembly | Incorrect orientation; screws overtightened prematurely | Loosen all screws, re-align parts, then gradually tighten. Ensure correct orientation of L-shaped sections as shown in the assembly diagrams. |
Specifications
- Model: OKTB02013301002JP
- Brand: AODK
- Dimensions (D x W x H): 102 cm x 150 cm x 76 cm (40.2 in x 59.1 in x 29.9 in)
- Weight: 24.7 kg (54.5 lbs)
- Shape: L-shaped
- Color: White
- Desktop Material: High-strength melamine laminated board
- Base Material: Metal (Steel frame)
- Finish: Powder coating (base material)
- Weight Capacity (Desktop): 50 kg (110 lbs)
- Electrical Features: 2x AC outlets (100-240V/15A), 2x USB ports (5V-2A)
- Lighting: RGB LED lights with 10 lighting modes and 10 color adjustment modes, memory function
- Additional Features: Monitor stand, Storage shelves, Adjustable leveling feet, Reversible L-shaped configuration
- GTIN: 850064516760
Warranty and Support
For warranty information, missing parts, or technical support, please contact AODK customer service. Refer to your purchase documentation or the retailer's website for specific contact details.
