JDOUNFMO TC5-L Temperature Controller Instruction Manual
Model: TC5-L (96mm x 96mm)
1. Product Overview
The JDOUNFMO TC5-L is a versatile PID temperature controller designed for precise temperature regulation in various industrial and scientific applications. It features universal input compatibility for RTD and thermocouple sensors, dual output options (electromagnetic relay and SSR), and a clear 8-segment 4-digital display for easy monitoring. This manual provides essential information for the safe and effective use of your TC5-L temperature controller.
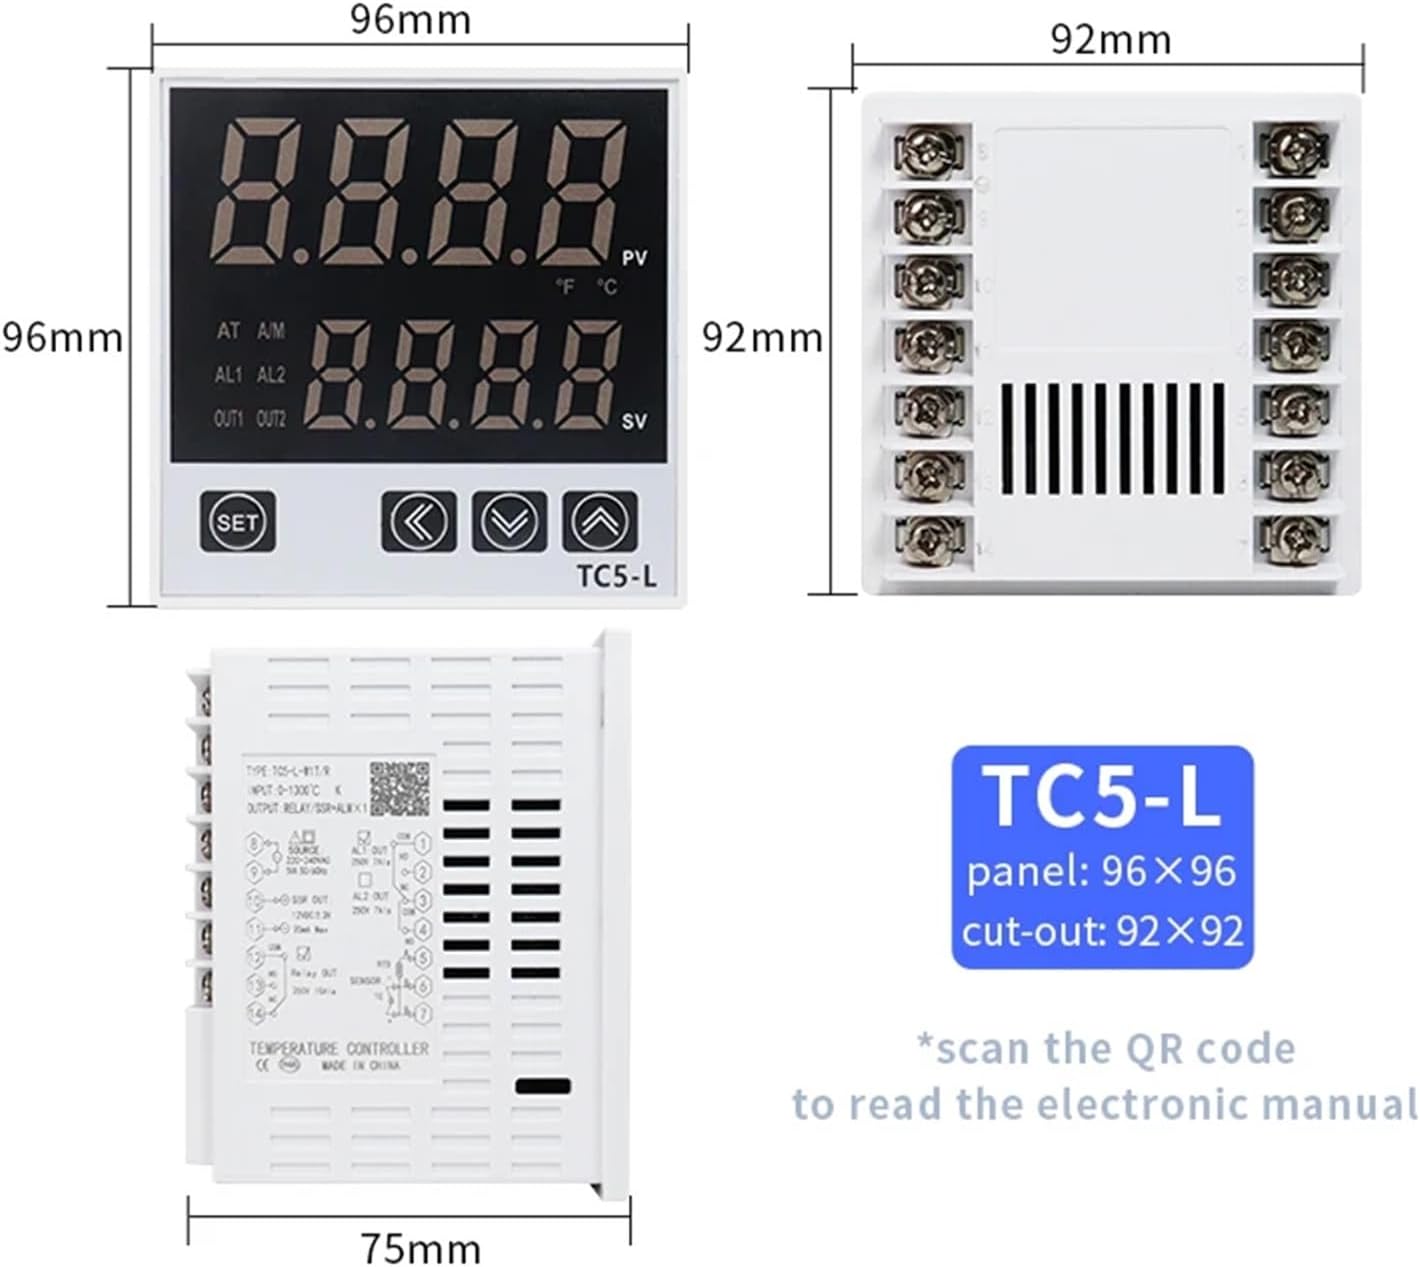
Figure 1: Front view of the TC5-L Temperature Controller, showing the display, control buttons, and overall dimensions of 96mm x 96mm for the panel and 92mm x 92mm for the cut-out.
2. Specifications
Parameter
Value
Model Series
TC5 series
Supply Voltage
220-240VAC 50/60Hz
Measurement Precision
0.5%FS
Temperature Measurement Range
0-1300°C (32-2372°F)
Input Types
K, E, J, B, S, N, R, T (Thermocouple); PT100, CU50 (RTD)
Output Types
Electromagnetic Relay + SSR
Control Method
ON/OFF Position control, PID control
Sampling Period
100ms
Indication Method
8-segment 4-digital display and LED indication
Insulation Resistance
Min. 100MΩ (500VDC)
Power Consumption
Max. 8VA
Relay Output
Contact output 250VAC 5A 1NO1NC
SSR Output
12VDC ±2V Below 20mA
Dielectric Strength
2000VAC 50/60Hz for 1min (between all terminals and case)
Memory Retention
Approx. 10 years (non-volatile semiconductor memory type)
Ambient Temperature
Operating: -5°C to 40°C; Storage: -10°C to 50°C
Ambient Humidity
Operating: 35% to 85% RH; Storage: 35% to 85% RH
Alarm Quantity
1 piece
Dimensions (TC5-L)
Panel: 96mm x 96mm; Cut-out: 92mm x 92mm
Item Weight
50 Grams (1.76 ounces)
3. Product Features
Intelligent PID Control: Provides accurate and stable real-time temperature monitoring and control.
Universal Input: Compatible with a wide range of thermocouple (K, E, J, B, S, N, R, T) and RTD (PT100, CU50) sensors.
Dual Output: Features both electromagnetic relay and SSR (Solid State Relay) outputs for flexible control applications.
Clear Digital Display: 8-segment 4-digital display for easy reading of measured value (PV) and set value (SV).
Alarm Function: Includes one alarm output for critical temperature conditions.
Durable Construction: Built with quality components including a silver dot relay, aluminum-copper transformer, and high-precision chip for reliable performance.
Figure 2: The TC5-L controller highlighting its intelligent PID control capabilities for accurate and stable temperature management.
Figure 3: Internal view of the TC5-L controller, showcasing the silver dot relay, aluminum-copper transformer, and high-precision chip, indicating quality workmanship.
4. Setup and Wiring
Proper installation and wiring are crucial for the safe and correct operation of the TC5-L temperature controller. Ensure all power is disconnected before proceeding with any wiring.
4.1 Panel Mounting
Cut a panel opening of 92mm x 92mm.
Insert the TC5-L controller into the opening.
Secure the controller using the provided mounting brackets from the rear.
4.2 Wiring Diagram
Refer to the wiring diagram below for connecting power, sensor, and output devices. Incorrect wiring can damage the unit or connected equipment.
Figure 4: Detailed wiring diagram for the TC5-L controller, showing connections for power (220-240VAC), sensor inputs (RTD/TC), and output terminals (Relay, SSR, Alarm).
Key Wiring Connections:
Power Supply (Source): Connect 220-240VAC to terminals 8 and 9.
SSR Output: Connect to terminals 10 and 11 (12VDC ±3V, 20mA Max).
Relay Output: Connect to terminals 12 (COM), 13 (NO), and 14 (NC) (250V 10A).
Alarm Output (AL1): Connect to terminals 1 (NO), 2 (NC), and 3 (COM) (250V 7A).
Sensor Input:
RTD (PT100/CU50): Connect to terminals 5, 6, and 7.
Thermocouple (TC): Connect to terminals 6 (+) and 7 (-).
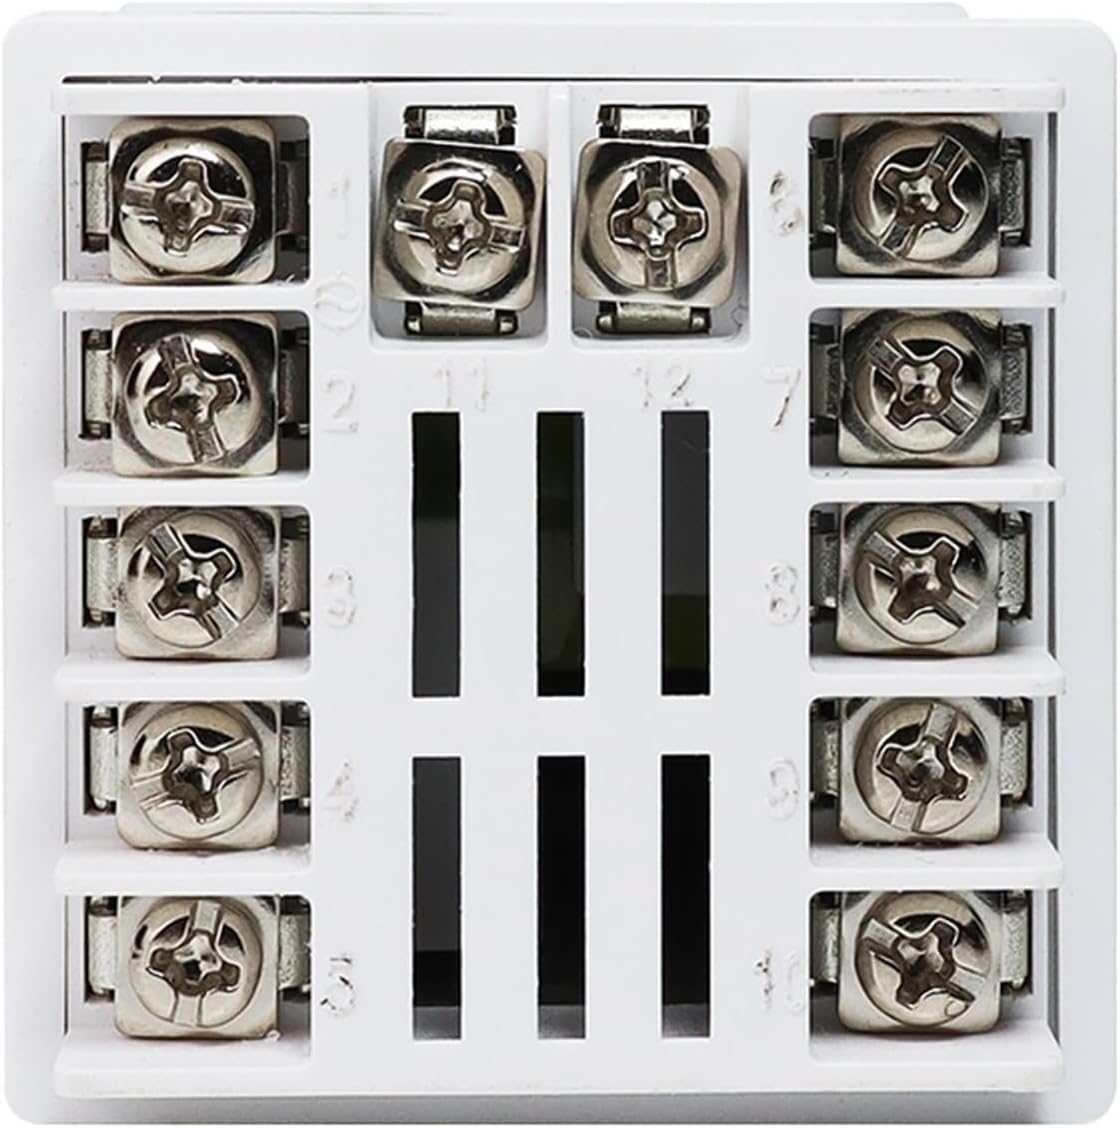
Figure 5: Close-up view of the screw terminal block on the rear of the TC5-L controller, showing numbered terminals for wiring connections.
5. Operating Instructions
This section outlines the basic operation and parameter settings for the TC5-L temperature controller.
Figure 6: Front panel layout and button functions, illustrating the measured value (PV), set value (SV), and control buttons (SET, Left, Increase, Reduce).
5.1 Front Panel Controls
PV Display: Shows the current measured temperature value.
SV Display: Shows the set temperature value.
SET Key: Used to enter parameter setting mode and confirm selections.
Left Key (<): Used to move the cursor or select digits during parameter setting.
Increase Key (∧): Used to increase the value of a parameter.
Reduce Key (∨): Used to decrease the value of a parameter.
Indicator Lights: LEDs for AT (Auto-tuning), A/M (Auto/Manual), AL1/AL2 (Alarms), OUT1/OUT2 (Outputs).
5.2 Basic Temperature Setting
Press the SET key once. The SV display will start flashing.
Use the ∧ (Increase) and ∨ (Reduce) keys to adjust the desired set temperature. Use the < (Left) key to move between digits for faster adjustment.
Press the SET key again to confirm the new set value and exit the setting mode.
5.3 Advanced Parameter Settings
To access advanced parameters (e.g., input type, control mode, alarm settings, PID parameters), press and hold the SET key for several seconds until the parameter code appears on the PV display. Use the ∧ and ∨ keys to navigate through parameters and adjust their values. Refer to the full electronic manual (scan QR code on product label) for a complete list of parameters and their functions.
6. Maintenance
The JDOUNFMO TC5-L temperature controller is designed for reliable operation with minimal maintenance. Follow these guidelines to ensure its longevity:
Cleaning: Periodically wipe the front panel with a soft, dry cloth. Do not use abrasive cleaners or solvents. Ensure the device is powered off before cleaning.
Environmental Conditions: Operate the controller within the specified ambient temperature and humidity ranges to prevent damage. Avoid exposure to direct sunlight, excessive dust, moisture, or corrosive gases.
Connections: Periodically check all wiring connections to ensure they are secure and free from corrosion. Loose connections can lead to erratic behavior or damage.
Ventilation: Ensure adequate ventilation around the unit to prevent overheating, especially if mounted in an enclosure.
7. Troubleshooting
If you encounter issues with your TC5-L temperature controller, refer to the following common problems and solutions:
Problem
Possible Cause
Solution
No display/Power off
No power supply; Incorrect wiring
Check power connections (terminals 8 & 9); Verify voltage supply (220-240VAC).
PV display shows "HHHH" or "LLLL"
Sensor open circuit; Sensor short circuit; Incorrect sensor type setting
Check sensor wiring; Replace faulty sensor; Verify input type setting in parameters.
Output not activating
Set value not reached; Output mode incorrect; Faulty output wiring/device
Adjust set value; Check control mode (ON/OFF, PID); Verify output wiring and connected load.
If the problem persists after attempting these solutions, please contact JDOUNFMO customer support for further assistance.
8. Warranty and Support
JDOUNFMO products are manufactured to high-quality standards. For warranty information, technical support, or service inquiries, please refer to the contact information provided with your purchase or visit the official JDOUNFMO website. Please have your product model (TC5-L) and purchase details ready when contacting support.
For an electronic version of the manual with more detailed parameter settings, please scan the QR code typically found on the product label or packaging.
Ask a question about this manual
Ask about setup, troubleshooting, compatibility, parts, safety, or missing instructions. Manuals+ will review the question and use this page’s manual context to help answer it.