Giantex GT10702US-WH-BC
Giantex Computer Desk with Power Outlet User Manual
Model: GT10702US-WH-BC
Introduction
Thank you for choosing the Giantex Computer Desk with Power Outlet. This modern office desk is designed to enhance your workspace with its integrated power hub, ample storage, and durable construction. This manual provides essential information for assembly, operation, maintenance, and troubleshooting to ensure you get the most out of your new desk.
Safety Information
Please read all safety warnings and instructions carefully before assembly and use. Keep this manual for future reference.
- For optimal safety, ensure the desk is not overloaded, exceeding the maximum weight capacity of 275 lbs (125 kg).
- Always use appropriate anchoring techniques to prevent tipping or falling, especially if children are present in the vicinity.
- Regularly inspect the desk for any signs of instability or wear, and maintain it according to the manufacturer's instructions.
- Do not place hot items directly on the desk surface without protection.
- Ensure all electrical connections for the power outlet are secure and comply with local electrical codes. Do not exceed the rated electrical capacity (AC Outlet: 125V/12A; USB-A + USB-C: 5V 3.1A Max 15.5W).
- Keep liquids away from the power outlet to prevent electrical hazards.
Product Overview
The Giantex Computer Desk is designed for functionality and modern aesthetics, featuring a spacious desktop, integrated power solutions, and ample storage.
Key Features:
- Integrated Power Management: Built-in power strip with 2 AC outlets, 1 USB-A port, and 1 Type-C port for convenient device charging.
- Ample Storage Solutions: Features a spacious pull-out keyboard tray and three large drawers for organizing office supplies and documents.
- User-friendly Design: Includes smooth metal slides for drawers, a minimalist handle-less design, and protective non-slip foot pads.
- Enhanced Durability and Stability: Constructed with engineered wood, MDF, and metal, featuring reinforced crossbars for a stable working environment.
- Versatile and Modern Design: Suitable for various settings including bedrooms, living rooms, and home offices.
Components Diagram:


Setup and Assembly
Assembly of the Giantex Computer Desk requires careful attention to detail. It is recommended to have two people for assembly. Please ensure all parts are present before beginning.
Package Contents:
- 1 x Computer Desk (disassembled components)
- 1 x Instructions (this manual)
- Hardware pack (screws, dowels, cam locks, etc.)
Tools Required (Not Included):
- Phillips head screwdriver
- Hammer (optional, for dowels)
Assembly Steps:
- Unpack and Identify Parts: Carefully unpack all components and hardware. Lay them out on a clean, soft surface (e.g., a blanket or cardboard) to prevent scratches. Refer to the parts list in the included instruction sheet to identify each piece.
- Assemble Side Panels: Attach the base and top support rails to the side panels using the provided screws and dowels. Ensure all connections are snug.
- Install Drawer Slides: Secure the drawer slides to the inner sides of the desk frame and to the drawer boxes according to the markings. Ensure they are level and aligned.
- Construct Drawers: Assemble the drawer boxes by connecting the front, back, and side panels. Insert the drawer bottoms into the grooves.
- Attach Back Panel: Secure the back panel to the main desk structure. This adds stability and rigidity.
- Install Keyboard Tray: Mount the keyboard tray slides to the designated area under the desktop, then attach the keyboard tray.
- Integrate Power Outlet: Carefully place the power outlet unit into its designated cutout on the desktop. Ensure it is flush and secure. Connect the power cord.
- Insert Drawers: Slide the assembled drawers onto their respective slides. Test for smooth operation.
- Final Checks: Verify that all screws are tightened, and the desk is stable. Attach the non-slip foot pads to the bottom of the desk legs.
Note: For detailed, step-by-step diagrams, please refer to the separate assembly instruction sheet included in your package.
Operating Instructions
Using the Integrated Power Outlet:
- Plug the desk's main power cord into a standard wall outlet.
- The integrated power strip provides 2 AC outlets, 1 USB-A port, and 1 Type-C port.
- Connect your devices (laptops, smartphones, tablets, etc.) to the appropriate ports for charging or power.
- Ensure that the total power draw of connected devices does not exceed the maximum capacity: AC Outlet: 125V/12A; USB-A + USB-C: 5V 3.1A Max 15.5W.
Using the Keyboard Tray:
- The keyboard tray is designed to slide in and out smoothly. Gently pull the tray forward to extend it for use.
- Push the tray back into the desk when not in use to save space and maintain a tidy desktop.
- The tray is suitable for most standard keyboards and mice.
Using the Drawers:
- The three large drawers operate on smooth metal slides.
- To open, gently pull the top edge of the drawer front. To close, push firmly until it is fully recessed.
- Organize your office supplies, documents, and personal items within the drawers to keep your desktop clear.
Maintenance
Proper care and maintenance will extend the life and appearance of your Giantex Computer Desk.
- Cleaning: Wipe surfaces with a soft, damp cloth. Avoid harsh chemicals, abrasive cleaners, or excessive moisture, which can damage the finish. For spills, wipe immediately.
- Dusting: Regularly dust the desk with a dry, soft cloth to prevent buildup.
- Hardware Check: Periodically check all screws and fasteners to ensure they are tight. Retighten if necessary to maintain stability.
- Drawer Slides: If drawer operation becomes stiff, a small amount of silicone-based lubricant can be applied to the metal slides.
- Avoid Direct Sunlight: Prolonged exposure to direct sunlight can cause fading or discoloration of the wood finish.
- Heat Protection: Always use coasters or protective pads under hot items (e.g., coffee cups, hot plates) to prevent heat damage to the desktop.
Troubleshooting
| Problem | Possible Cause | Solution |
|---|---|---|
| Desk wobbles or is unstable. | Loose fasteners; uneven floor; incorrect assembly. | Check and tighten all screws and bolts. Ensure the desk is on a level surface; adjust foot pads if necessary. Review assembly instructions. |
| Drawers stick or do not slide smoothly. | Misaligned drawer slides; debris in slides; overloaded drawer. | Ensure drawer slides are correctly aligned and free of obstructions. Do not overload drawers. Apply a small amount of silicone lubricant to the slides. |
| Power outlets are not working. | Desk power cord not plugged in; wall outlet not active; circuit breaker tripped; faulty power strip. | Ensure the desk's power cord is securely plugged into a working wall outlet. Check your home's circuit breaker. Test the wall outlet with another device. If issues persist, contact customer support. |
| Keyboard tray is difficult to pull out/push in. | Misaligned slides; obstruction; excessive weight. | Check for any obstructions. Ensure the tray is properly seated on its slides. Do not place excessive weight on the tray. |
Specifications
| Attribute | Detail |
|---|---|
| Brand | Giantex |
| Model Number | GT10702US-WH-BC |
| Color | Natural |
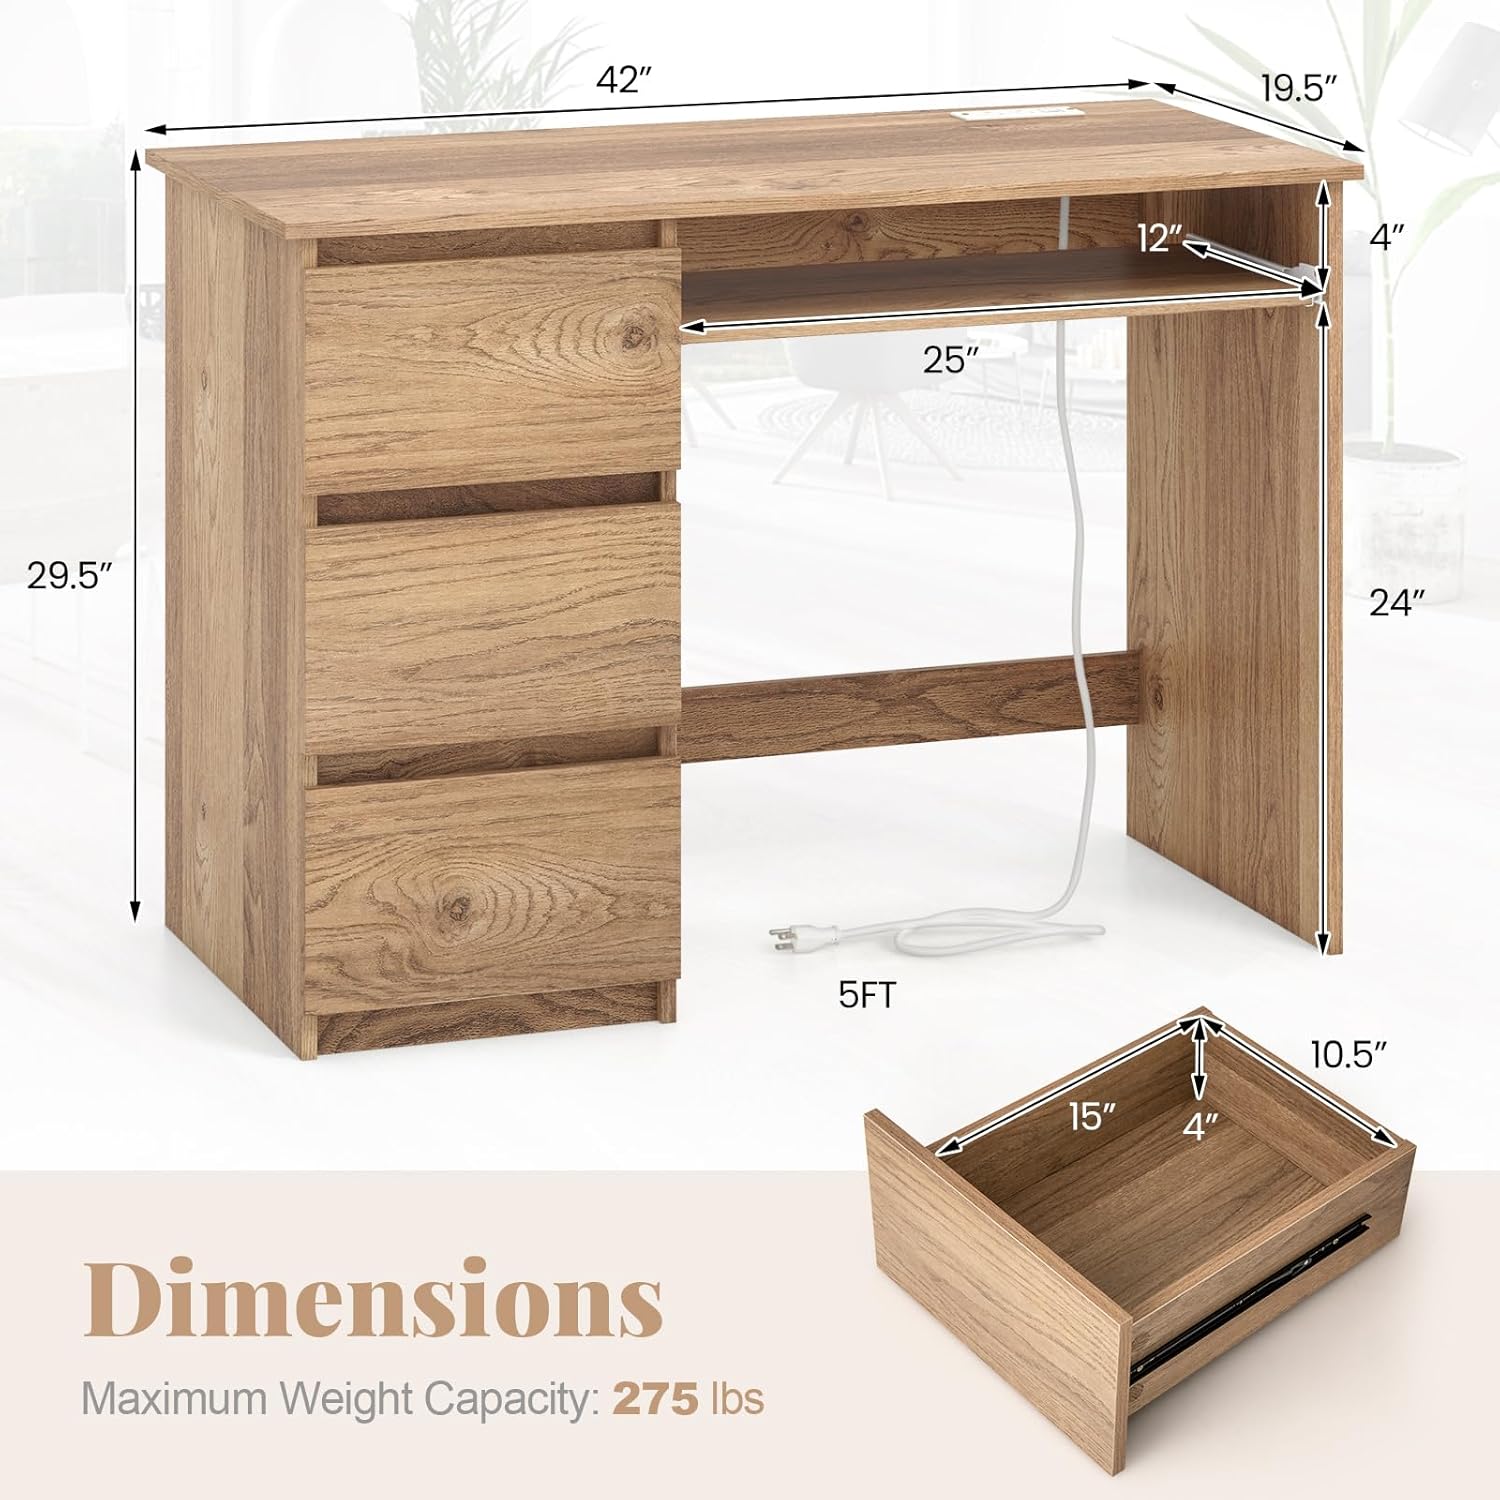
| Overall Dimensions (L x W x H) | 42" x 19.5" x 29.5" (106.7 cm x 49.5 cm x 74.9 cm) |
| Interior of Drawer (L x W x H) | 15" x 10.5" x 4" |
| Dimensions of Keyboard Tray (L x W) | 25" x 12" |
| Material | Engineered Wood, MDF, Metal |
| Net Weight | 73 lbs (33.1 kg) |
| Maximum Weight Capacity | 275 lbs (125 kg) |
| Weight Capacity of Tabletop | 155 lbs |
| Power Cord Length | 5 ft |
| AC Outlet Rating | 125V/12A |
| USB-A + USB-C Rating | 5V 3.1A Max 15.5W |
Warranty and Support
Giantex is committed to providing high-quality products. For warranty information, product support, or to purchase replacement parts, please contact Giantex customer service directly. Please have your model number (GT10702US-WH-BC) and purchase date available when contacting support.
Visit the official Giantex website or refer to your purchase documentation for the most up-to-date contact information.
Ask a question about this manual
Ask about setup, troubleshooting, compatibility, parts, safety, or missing instructions. Manuals+ will review the question and use this page’s manual context to help answer it.