1. Introduction
This manual provides essential instructions for the safe and effective use of your Forsensal FS11301 4-in-1 Multi-Gas Detector with Pump. This device is designed to monitor concentrations of Carbon Monoxide (CO), Combustible Gases (EX), Oxygen (O2), and Hydrogen Sulfide (H2S). Please read this manual thoroughly before operating the device to ensure proper function and personal safety.

Figure 1: Forsensal FS11301 Multi-Gas Detector with Pump. This image shows the main view of the gas detector, highlighting its compact and robust design.
2. Package Contents
Verify that all items listed below are present in your package:
- Forsensal 4 Gas Monitor Multi Gas Detector (Pump Suction model)
- Natural Diffusion Cap
- Calibration Cap
- Calibration Certificate
- Hose
- USB-C Cable
- Charger
- User Manual (this document)

Figure 2: Included Components. This image displays the gas detector along with its accessories: natural diffusion cap, calibration cap, hose, USB-C cable, charger, calibration certificate, and user manual.
3. Product Features
The Forsensal FS11301 Multi-Gas Detector offers several key features for reliable gas monitoring:
- 4-in-1 Gas Monitoring: Simultaneously detects Carbon Monoxide (CO), Combustible Gases (EX), Oxygen (O2), and Hydrogen Sulfide (H2S).
- Integrated Pump: Allows for active sampling of gas from remote or confined spaces.
- High Sensitivity: Rapid response time (less than 30 seconds) to gas presence.
- Multiple Alarms: Provides audible, visual (warning lights), and vibration alarms when gas levels exceed set thresholds. The audible alarm can be muted.
- Large LCD Display: Clear display of real-time gas concentrations, device status, and menu options.
- Rechargeable Battery: Equipped with a 3000mAh Lithium battery, offering over 8 hours of standby time.
- Durable Construction: Made from high-strength engineering plastics and composite anti-slip rubber, providing waterproof, dust-proof, and explosion-proof properties.
- Portable Design: Features a sturdy back clip for easy carrying and attachment to clothing or equipment.
- Data Logging: Ability to view historical records and concentration curves for monitored gases.

Figure 3: 4-in-1 Gas Monitoring. This image illustrates the four gases detected by the monitor: EX (0-100%LEL), O2 (0-30%VOL), CO (0-1000PPM), and H2S (0-100PPM).

Figure 4: Easy to Carry and Sturdy. This image shows the device's robust construction, including high-strength engineering plastics and composite anti-slip rubber, along with its sturdy back clip for portability. It also highlights its waterproof, dust-proof, and explosion-proof features.
4. Setup
4.1 Charging the Device
Before first use, fully charge the gas detector using the provided USB-C cable and charger. The charging port is located at the bottom of the device. A full charge ensures optimal battery life for extended operation.
4.2 Initial Activation and Calibration
Your gas detector comes pre-inspected and certified. A Calibration Certificate is included in the box. The initial password for accessing certain settings is "4321". The device is ready for use directly after unboxing and charging.
4.3 Switching Between Pump Suction and Natural Diffusion Modes
The device can be converted from pump suction mode to natural diffusion mode. Follow these steps:
- Ensure the device is powered off.
- Locate the four screws on the back of the device.
- Use a Phillips screwdriver to remove these four screws.
- Carefully remove the pump suction module.
- Attach the natural diffusion cap to the front cover plate.
- Reinsert and tighten the four screws on the back to secure the cap.
- The detector is now set to natural diffusion mode.
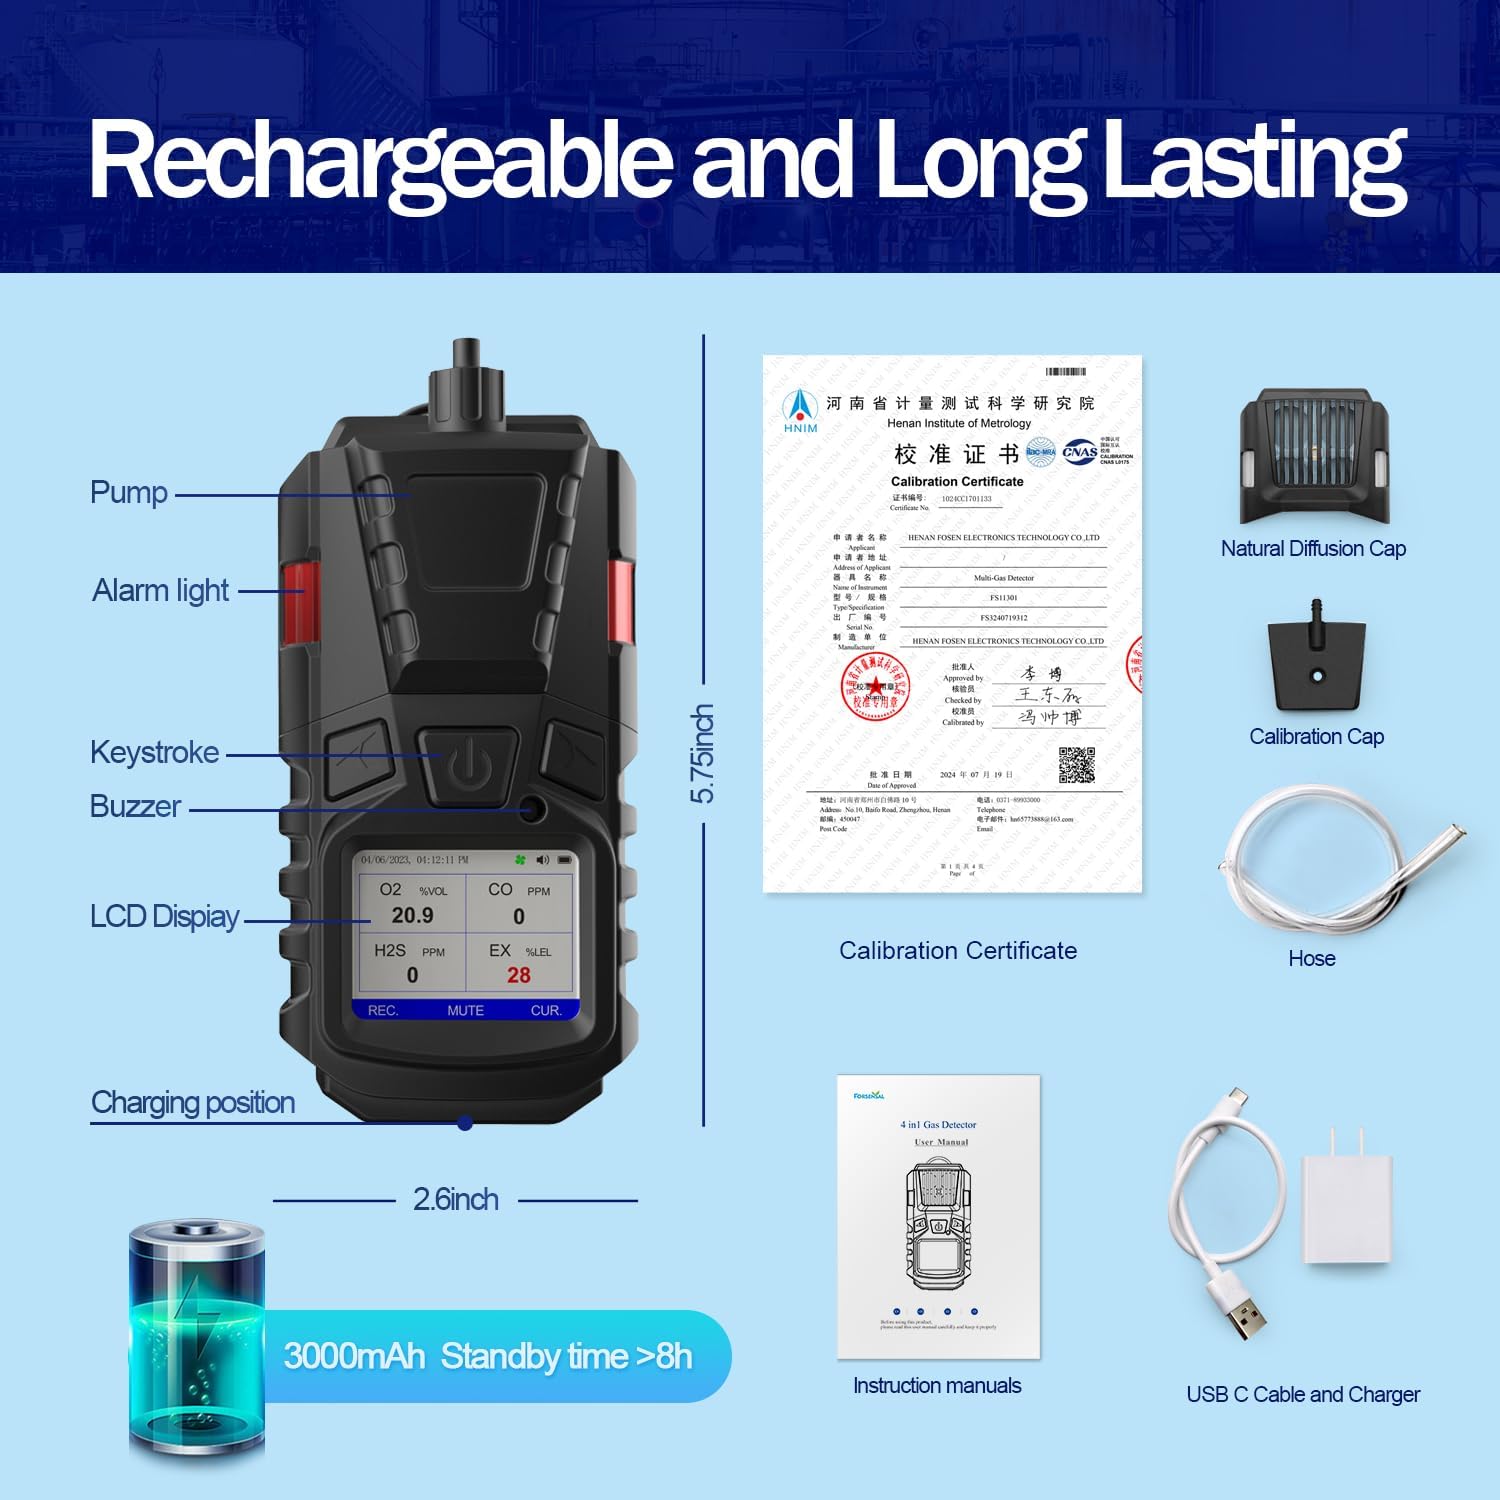
Figure 5: How to Natural Diffusion. This step-by-step visual guide demonstrates how to switch the gas detector from pump suction mode to natural diffusion mode by removing the pump module and attaching the natural diffusion cap.
5. Operation
5.1 Power On/Off
To power on the device, press and hold the power button until the display illuminates. To power off, press and hold the power button again until the device shuts down.
5.2 Menu Navigation
The device features an intuitive menu system accessible via the navigation buttons. Key menu options include:
- Channel Setting: Configure specific parameters for each gas channel.
- Alarm Setting: Adjust low and high alarm thresholds for each gas (e.g., O2 LOW 19.5%VOL, HIGH 23.5%VOL; CO 50ppm, 150ppm).
- Calibration: Access calibration functions (requires password).
- Time Settings: Set the local date and time for accurate data logging.
- Device Information: View device details and firmware version.

Figure 6: Functional and Easy to Use. This image shows the device's LCD screen displaying various menu options such as Settings, Alarm Setting, View Records, and View Curve, demonstrating its user-friendly interface.
5.3 Alarm Functionality
When gas concentrations exceed the set alarm limits, the device will activate audible, visual (flashing warning lights), and vibration alarms. To temporarily silence the audible alarm, press the MUTE button.

Figure 7: Excellent Sensitivity and Alarm System. This image highlights the device's warning lights, beep alarm, and vibration alarm, indicating its rapid response to unsafe air quality conditions.
5.4 Viewing Records and Curves
Navigate to the 'View Records' or 'View Curve' options in the menu to review historical gas concentration data. This feature allows for tracking gas levels over time for each monitored gas type.
6. Calibration
The device is factory calibrated and includes a calibration certificate. For continued accuracy, regular calibration is recommended. Access the calibration menu via the device settings. The initial password for calibration is "4321". Refer to the calibration certificate for specific details and recommended intervals.
7. Maintenance
To ensure the longevity and accuracy of your gas detector:
- Keep the device clean and free from dust and debris. Use a soft, dry cloth for cleaning.
- Avoid exposing the device to extreme temperatures or harsh chemicals.
- Store the device in a cool, dry place when not in use.
- Regularly inspect the housing for any signs of damage.
- Ensure the gas inlet and outlet ports are unobstructed.
8. Troubleshooting
If you encounter issues with your Forsensal FS11301, consider the following:
- Device not powering on: Ensure the battery is fully charged. Connect to the charger and attempt to power on again.
- Inaccurate readings or constant alarms: Verify that the device has been recently calibrated. Ensure the gas inlet is clear and not obstructed. If issues persist, contact customer support.
- Pump not functioning: Check for any blockages in the hose or pump inlet. Ensure the pump suction module is correctly installed if in pump mode.
- Unable to access settings: Ensure you are using the correct password (initial password is "4321").
For persistent problems not resolved by these steps, please refer to the warranty and support section.
9. Specifications
| Parameter | Value |
|---|---|
| Brand | Forsensal |
| Model Number | FS11301 |
| Style | Pump Suction (convertible to Natural Diffusion) |
| Power Source | Battery Powered |
| Color | Black |
| Product Dimensions | 2.36"D x 2.6"W x 5.75"H |
| Item Weight | 11.2 ounces |
| Alarm Type | Audible, Visual, Vibration |
| Operating Humidity | <95% |
| Upper Temperature Rating | 131 Degrees Fahrenheit |
| Sensor Type | Electrochemical |
| Material | Composite anti-slip rubber, engineering plastics |
| Battery Type | 1 Lithium Ion battery (included) |
| Battery Capacity | 3000mAh |
| Standby Time | >8 hours |
9.1 Detection Air Volume Range
| Type of Air | Measuring Range | Low Alarm Point | High Alarm Point | Resolution |
|---|---|---|---|---|
| EX | (0~100)%LEL | 20%LEL | 50%LEL | 1%LEL |
| H2S | (0~100)ppm | 10ppm | 35ppm | 1ppm |
| CO | (0~1000)ppm | 50ppm | 150ppm | 1ppm |
| O2 | (0~30)%vol | 19.5%vol | 23.5%vol | 0.1%vol |

Figure 8: Technical Parameters. This image displays a table detailing the detection air volume range, measuring range, low and high alarm points, and resolution for EX, H2S, CO, and O2 gases.
10. Safety Information
Always adhere to local safety regulations and guidelines when using gas detection equipment. This device is intended as a personal safety tool and should not replace proper safety procedures or professional judgment. Ensure the device is regularly maintained and calibrated for accurate readings. Do not attempt to repair or modify the device yourself.

Figure 9: Wide Range of Applications. This image illustrates various industries where the gas detector can be used, including petroleum, chemical, gas transportation, coal mining, bio-medicine, and agriculture, emphasizing its versatility in hazardous environments.
11. Warranty and Support
The Forsensal FS11301 Multi-Gas Detector comes with a 1-year quality guarantee. If you have any questions, require technical assistance, or need to claim warranty service, please contact the seller or Forsensal customer support directly. Please have your model number (FS11301) and purchase information ready when contacting support.