1. Important Safety Instructions
Please read all instructions carefully before using the appliance and keep them for future reference. Failure to follow these instructions may result in electric shock, fire, or serious injury.
1.1 General Safety
- This appliance is intended for household use only.
- Do not allow children to play with the appliance. Supervise children when the dishwasher is in operation.
- Do not open the door during operation, as hot water may spray out.
- Use only detergents and rinse aids specifically designed for dishwashers.
- Sharp items should be loaded with points down to prevent injury.
1.2 Electrical Safety
- Ensure the appliance is properly grounded.
- Do not immerse the power cord, plug, or appliance in water or other liquids.
- Unplug the appliance from the power outlet before cleaning or maintenance.
- Do not operate the dishwasher if the power cord or plug is damaged.
1.3 Installation Safety
- Install the dishwasher on a stable, level surface.
- Ensure all water connections are secure to prevent leaks.
- Do not install the appliance near heat sources.
2. Product Overview
The COMFEE' TD602E-W is a compact countertop dishwasher designed for efficiency and convenience in smaller spaces.

Front view of the COMFEE' TD602E-W Compact Dishwasher.
2.1 Components Included

Illustration of items included in the product packaging.
- The Dishwasher Unit
- Instruction Manual
- Inlet Hose (x1)
- Cutlery Basket (x1)
- Cutlery Holder (x1)
2.2 Control Panel
The dishwasher features an intuitive LED display and button controls for easy program selection and monitoring.
- LED Display: Shows remaining time and program status.
- Program Buttons: For selecting wash cycles.
- Indicators: Lights for rinse aid and regenerating salt levels.
2.3 Internal Features

Flexible racking systems for various dish types.
- Flexible Racking: Accommodates up to 6 place settings and dishes with a diameter of up to 250 mm.
- Tiltable Cup Holder: For securing glasses and cups.
- Versatile Cup Shelves: Provides additional space for smaller items.
- Removable Cutlery Basket: For organizing forks, knives, and spoons.
- Foldable Tines: Allows for flexible loading of larger items.
3. Installation
Proper installation is crucial for the safe and efficient operation of your dishwasher.
3.1 Placement

Examples of flexible installation in a dining room or next to a sink.
- The dishwasher is designed for countertop installation.
- Ensure there is sufficient space around the appliance for ventilation and door opening.
- Place the dishwasher on a flat, stable surface.
3.2 Water Connection

Connection options: under the counter or directly to a tap.
- Inlet Hose: Connect the supplied inlet hose (1.8m length) to a cold water supply with a 3/4 inch threaded connector. If connecting directly to a tap, a suitable valve adapter may be required.
- Drain Hose: Connect the drain hose (1.7m length) to a drain outlet. This can be a dedicated drain pipe or directly into a sink. Ensure the drain hose is not kinked or blocked.
3.3 Electrical Connection
- The dishwasher operates on 220V. Ensure your electrical supply matches this requirement.
- Plug the appliance into a properly grounded electrical outlet.
- Do not use extension cords or adapters.
4. Operating Instructions
Follow these steps for effective and efficient dishwashing.
4.1 Loading the Dishwasher

Example of loading 6 place settings for optimal cleaning.
- Scrape off large food particles from dishes before loading.
- Place dishes so that water can reach all surfaces. Avoid overcrowding.
- Load cutlery into the removable basket with handles down for most items, but knives and other sharp utensils with points down for safety.
- Ensure spray arms can rotate freely.
4.2 Adding Detergent and Rinse Aid

Location of the rinse aid dispenser.
- Fill the detergent dispenser with the recommended amount of dishwasher detergent.
- Fill the rinse aid dispenser when the indicator light illuminates. Rinse aid helps with drying and prevents spots.
- Add regenerating salt to the salt dispenser as indicated by the control panel light. This helps soften water and improve cleaning performance.
4.3 Selecting a Wash Program
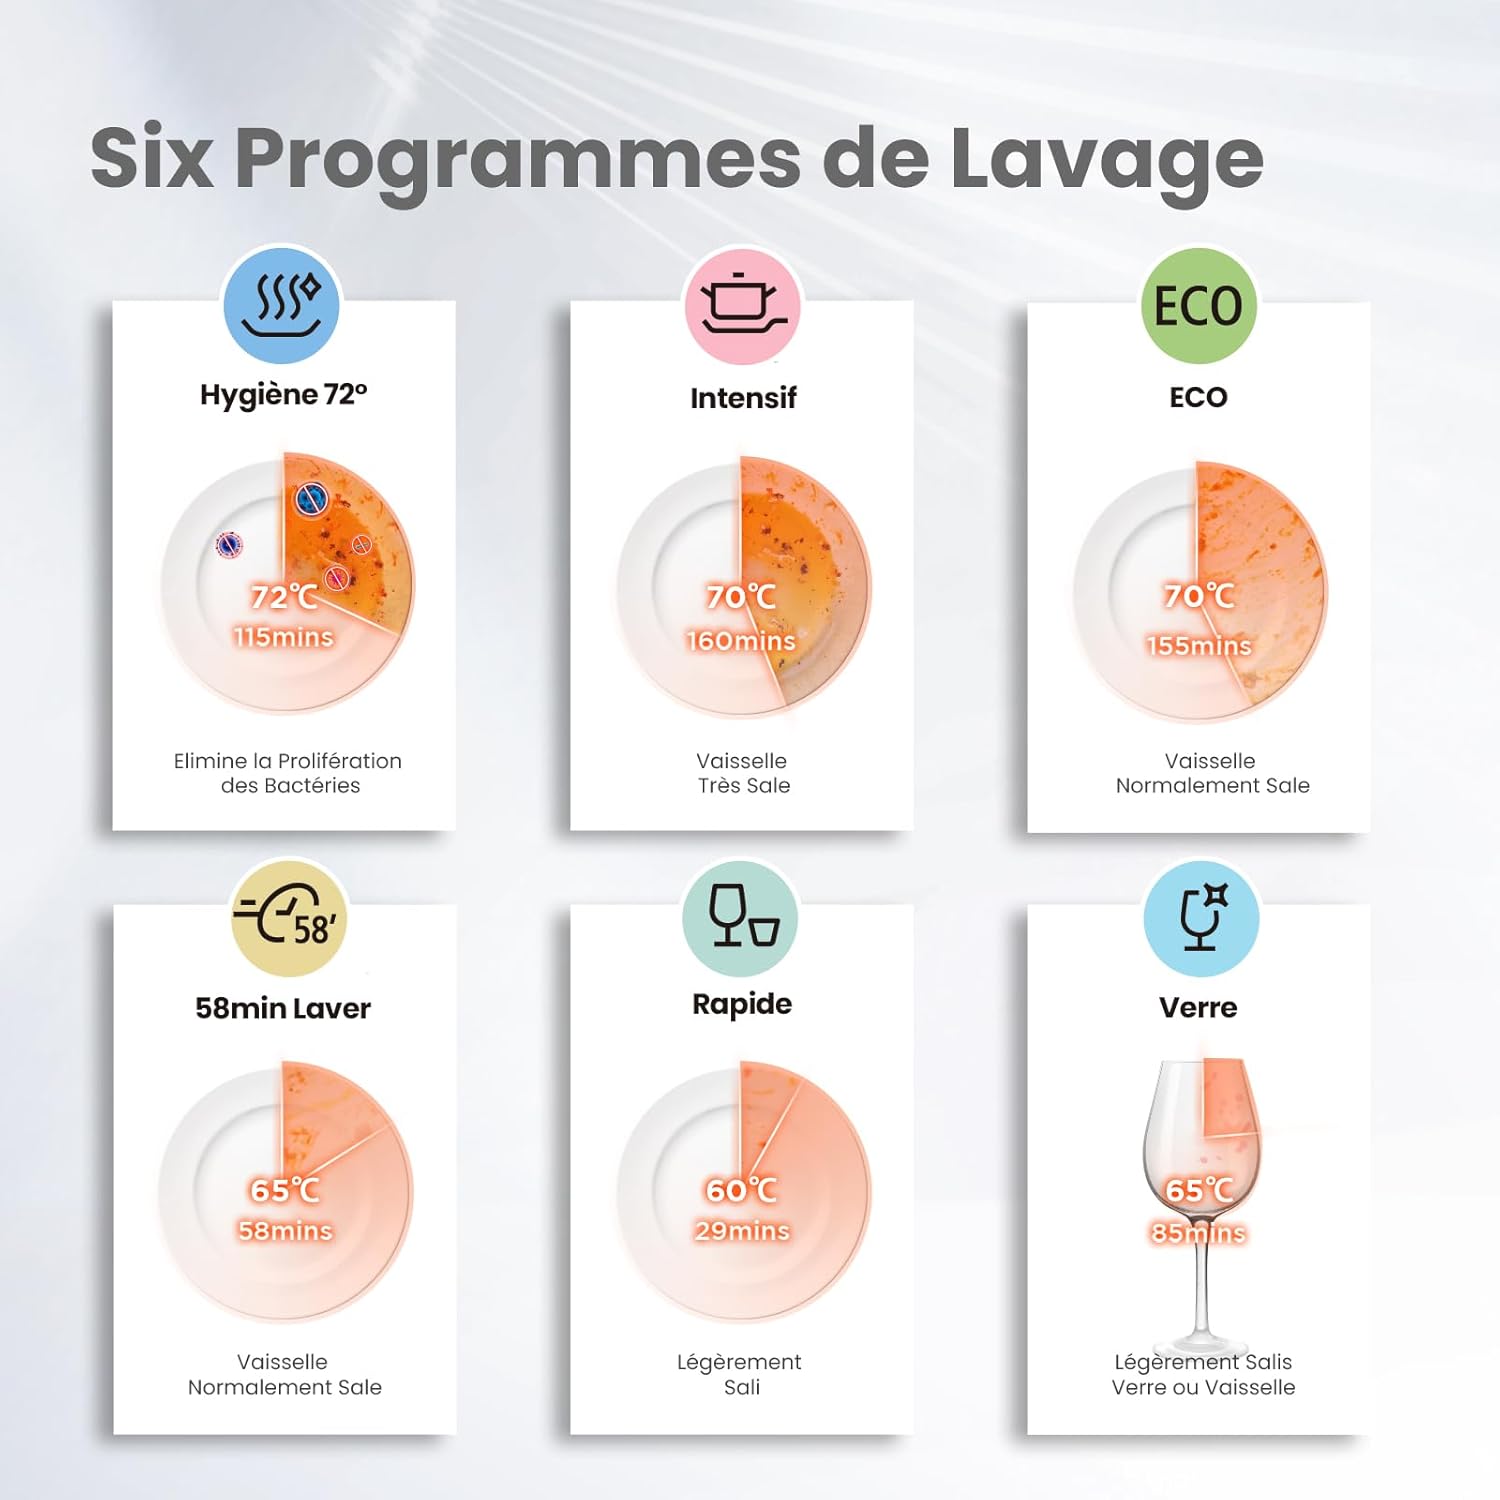
Overview of the six available wash programs.
Choose the appropriate program based on the soil level of your dishes:
- Hygiene 72°C (115 min): For heavily soiled dishes requiring maximum sanitization. Eliminates bacteria proliferation.
- Intensive 70°C (160 min): For very dirty dishes with dried-on food.
- ECO 70°C (155 min): For normally dirty dishes, optimized for reduced water and energy consumption. Consumes only 6.5L of water and 0.61 kWh of electricity per cycle.
- 58min Wash 65°C (58 min): For normally dirty dishes when a faster cycle is desired.
- Rapid 60°C (29 min): For lightly soiled dishes that do not require drying.
- Glass 65°C (85 min): For lightly soiled glass or delicate dishes.
4.4 Delayed Start Function
The delayed start function allows you to postpone the start of a wash cycle from 1 to 24 hours. This is useful for taking advantage of off-peak electricity rates or for having dishes ready at a specific time.
- Press the Delay button repeatedly to set the desired delay time.
- Press the Start/Pause button to confirm the delay and begin the countdown.
4.5 Starting and Stopping a Cycle
- Close the dishwasher door securely.
- Press the Start/Pause button to begin the selected program.
- To pause a cycle, open the door slightly or press the Start/Pause button. Close the door and press Start/Pause again to resume.
- To cancel a cycle, press and hold the Start/Pause button for a few seconds.
5. Maintenance and Care
Regular maintenance ensures optimal performance and extends the lifespan of your dishwasher.
5.1 Cleaning Filters

The dishwasher's filter system.
- The filter system should be cleaned regularly to prevent blockages and ensure effective cleaning.
- Twist and remove the cylindrical filter.
- Remove the fine filter and coarse filter.
- Rinse all filter components under running water to remove food particles.
- Reassemble the filters and place them back into the dishwasher, ensuring they are securely locked.
5.2 Cleaning Spray Arms

The lower spray arm of the dishwasher.
- Check the spray arm nozzles for any blockages from food particles.
- If necessary, remove the spray arm and clean the nozzles with a thin wire or toothpick.
- Ensure the spray arm rotates freely after cleaning.
5.3 Exterior and Interior Cleaning
- Wipe the exterior of the dishwasher with a damp cloth and mild detergent.
- Clean the door seal regularly to remove food residue and prevent odors.
- Run a dishwasher cleaning cycle periodically using a specialized dishwasher cleaner.
5.4 Adding Regenerating Salt
The dishwasher features an indicator to remind you when to refill the regenerating salt. This is essential for water softening, especially in hard water areas, to prevent limescale buildup and improve wash results.
- Locate the salt dispenser, usually at the bottom of the dishwasher tub.
- Unscrew the cap and fill the dispenser with dishwasher salt using the provided funnel (if applicable).
- Replace the cap securely.
6. Troubleshooting
Before contacting customer service, please refer to the following table for common issues and their solutions.
| Problem | Possible Cause | Solution |
|---|---|---|
| Dishwasher does not start | Power cord not plugged in; Door not closed properly; Fuse blown. | Check power connection; Ensure door is latched; Check household fuse/circuit breaker. |
| Dishes are not clean | Improper loading; Insufficient detergent; Clogged spray arms or filters; Incorrect program selected. | Reload dishes correctly; Add more detergent; Clean spray arms and filters; Select a more intensive program. |
| White spots on dishes | Lack of rinse aid; Hard water; Insufficient regenerating salt. | Refill rinse aid dispenser; Check water hardness settings; Refill regenerating salt. |
| Dishwasher leaks | Loose hose connections; Damaged door seal; Too much detergent. | Check and tighten hose connections; Inspect and clean door seal; Use correct amount of detergent. |
| Unpleasant odor | Food residue in filters or drain; Infrequent cleaning. | Clean filters and drain area; Run a hot wash cycle with a dishwasher cleaner. |
7. Technical Specifications

Product dimensions diagram.
| Feature | Specification |
|---|---|
| Model Name | TD602E-W |
| Form Factor | Countertop |
| Dimensions (W x D x H) | 50 x 55 x 43.8 cm |
| Weight | 21.5 kg |
| Place Settings Capacity | 6 |
| Water Consumption (ECO cycle) | 6.5 Liters |
| Energy Consumption (ECO cycle) | 0.61 kWh |
| Noise Level | 47 dB |
| Voltage | 220 V |
| Display Type | LED |
| Number of Wash Programs | 6 |
| Delayed Start | 1-24 hours |
| Color | White |
| Material | Metal |
| Inlet Hose Length | 1.8 m |
| Drain Hose Length | 1.7 m |
| Country of Origin | China |
8. Warranty and Support
Your COMFEE' TD602E-W dishwasher comes with a 1-year manufacturer's warranty from the date of purchase.
This warranty covers defects in materials and workmanship under normal household use. It does not cover damage resulting from misuse, accident, alteration, neglect, or unauthorized repair.
For warranty claims, technical support, or spare parts, please contact COMFEE' customer service through their official website or the retailer where the product was purchased. Please have your proof of purchase and model number ready.


