OFOAEEA LJ-20-B3
OFOAEEA 3-Prong Replacement Plug Instruction Manual
Model: LJ-20-B3
1. Product Overview
The OFOAEEA 3-Prong Replacement Plug is designed for repairing or replacing worn or damaged ends of extension cords and other electrical appliances. This 15-Amp, 110-125V, 2-pole, 3-wire grounding type plug (NEMA 5-15P) is suitable for various applications in industrial, home, office, and garden settings. It features a durable construction with a built-in crimp card to prevent wire pull-out, ensuring safety and longevity.

Image 1.1: OFOAEEA 3-Prong Replacement Plugs and included screwdriver.
2. Package Contents
- 3 x OFOAEEA 3-Prong Replacement Plugs (Black)
- 1 x Screwdriver
3. Specifications
| Specification | Value |
|---|---|
| Model Number | LJ-20-B3 |
| Number of Poles | 2 |
| Number of Wires | 3 |
| Plug Format | Type B (NEMA 5-15P) |
| Amperage | 15 Amps |
| Voltage | 110-125 Volts |
| Material | ABS Plastic, Metal |
| Compatibility | SJT, SJTW, SVT 14/16/18 AWG wire (Not compatible with 12 AWG wire) |
| Item Weight | 3.2 ounces (per pack) |

Image 3.1: Dimensions of the OFOAEEA 3-Prong Replacement Plug.
4. Safety Information
Always prioritize safety when working with electrical components. Improper installation can lead to electrical shock, fire, or damage to property. If you are unsure about any step, consult a qualified electrician.
- Disconnect Power: Always ensure the power source is disconnected before beginning any electrical work.
- Correct Wire Gauge: Use only compatible wire gauges (SJT, SJTW, SVT 14/16/18 AWG). Do not use with 12 AWG wire.
- Proper Grounding: Ensure all three wires (hot, neutral, ground) are correctly connected to their respective terminals.
- Secure Connections: Tighten all screws firmly to prevent loose connections, which can cause overheating.
- Inspect for Damage: Before and after installation, inspect the plug and cord for any signs of damage.

Image 4.1: Key safety and durability features of the OFOAEEA Replacement Plug.
5. Installation Instructions
Follow these steps carefully to install the replacement plug:
- Unscrew the Screw: Use the provided screwdriver to loosen the screw on the plug housing.
- Disassemble the Plug: Carefully separate the plug housing from the internal terminal assembly.
- Pass the Wire: Thread the end of your extension cord or appliance wire through the plug housing.
- Connect Wires: Strip the wire ends and connect them to the corresponding terminals on the internal assembly. The typical color code for 3-wire systems in the US is:
- Hot: Black wire
- Neutral: White wire
- Ground: Green or bare copper wire
- Reassemble the Plug: Carefully align the internal terminal assembly with the plug housing and push them together.
- Secure the Housing: Tighten the screw on the plug housing to secure the assembly.
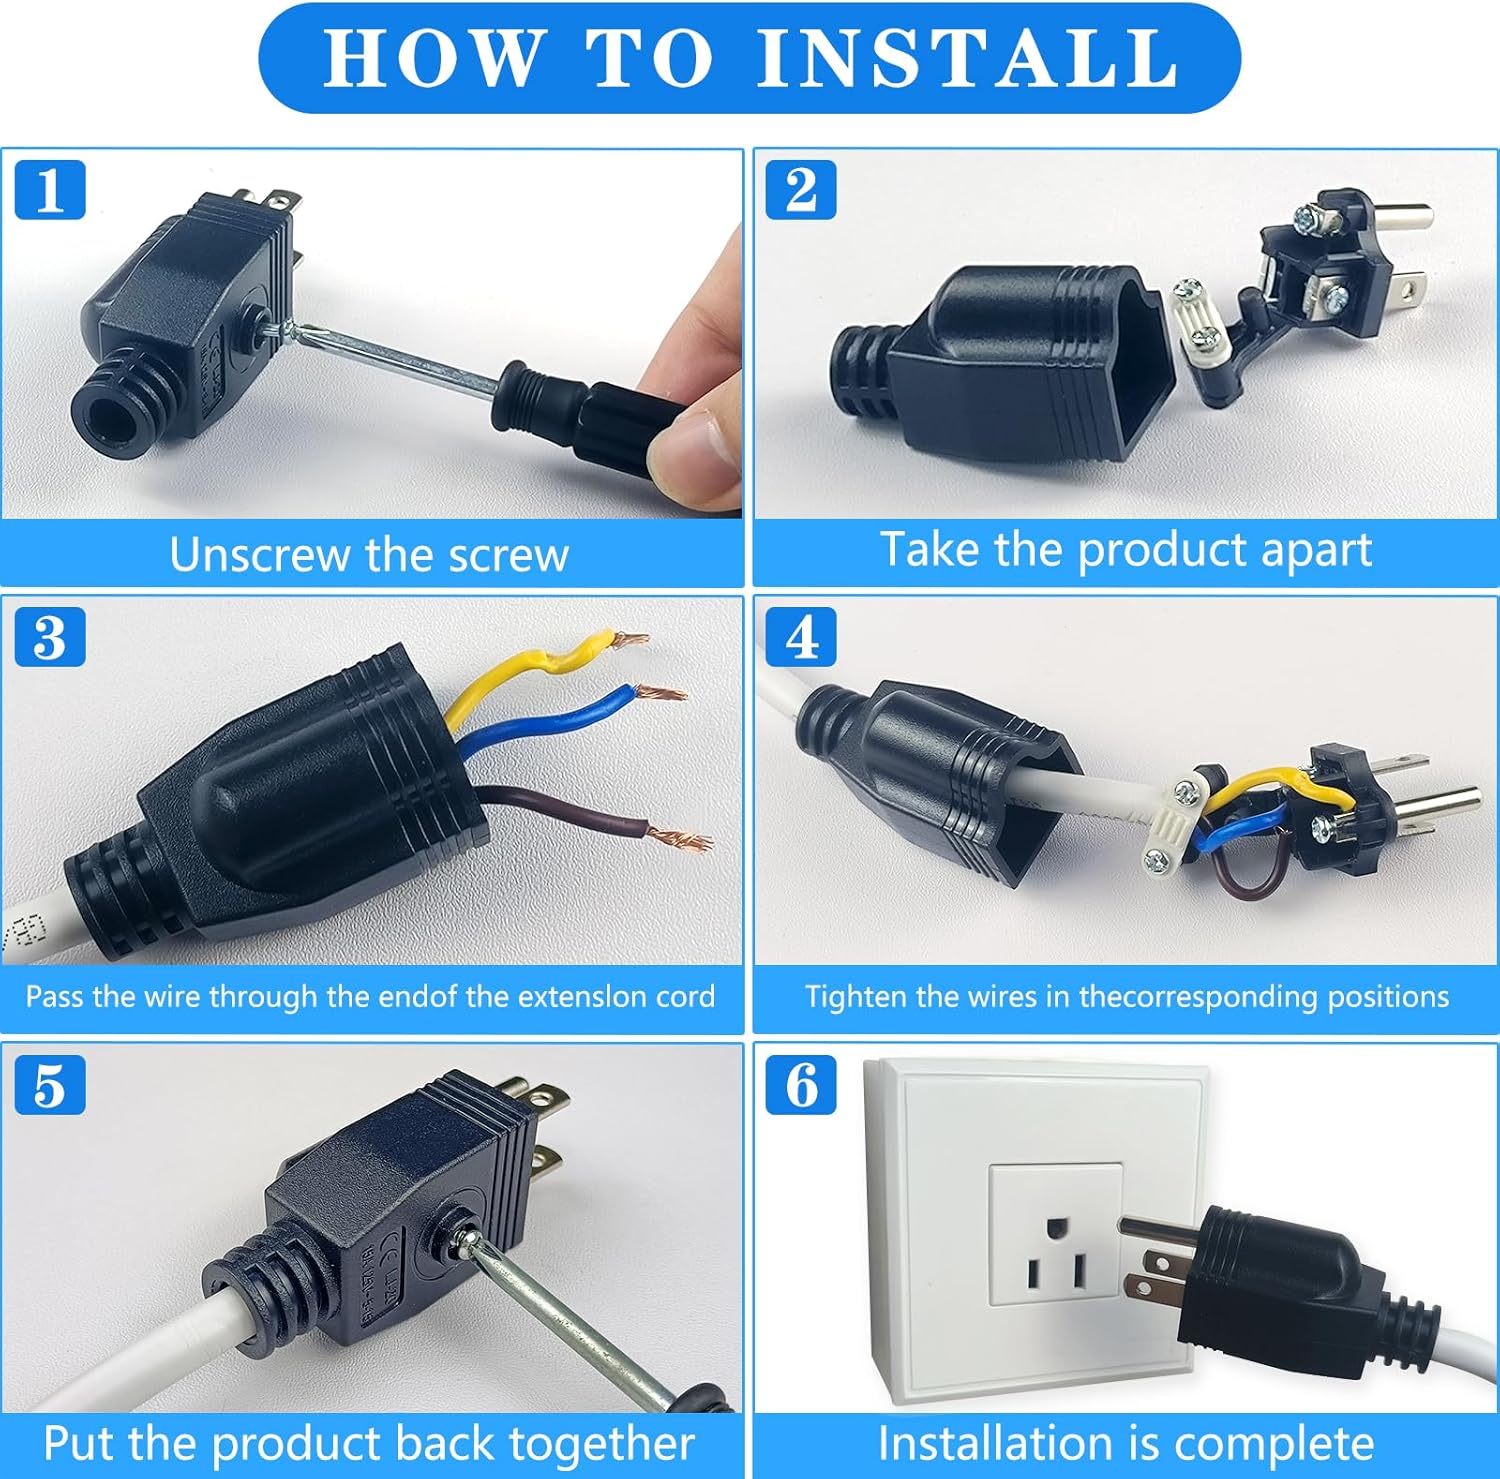
Image 5.1: Step-by-step installation guide for the replacement plug.

Image 5.2: Internal wiring diagram for the 3-prong plug.
Installation Video Guide
Video 5.1: A visual demonstration of the installation process for the NEMA 5-15P Electrical Replacement Plug End.
6. Operating Instructions
Once properly installed, the OFOAEEA 3-Prong Replacement Plug functions as a standard electrical plug. Simply insert the plug into a compatible 3-prong wall outlet or extension cord receptacle. Ensure the appliance connected to the plug is within the specified amperage and voltage limits (15A, 110-125V).

Image 6.1: Example of the replacement plugs in use with household appliances.

Image 6.2: Example of the replacement plug in use with an industrial spotlight.
7. Maintenance
Regular maintenance helps ensure the longevity and safe operation of your replacement plug:
- Periodic Inspection: Periodically check the plug and the connected cord for any signs of wear, fraying, cracks, or discoloration.
- Cleanliness: Keep the plug free from dust, dirt, and moisture. Use a dry cloth for cleaning.
- Secure Connections: If the plug feels loose or if there are signs of intermittent power, disconnect it from the power source and re-check the internal wire connections for tightness.
- Storage: Store unused plugs in a dry, cool place away from direct sunlight and extreme temperatures.
8. Troubleshooting
If you encounter issues with your replacement plug, consider the following:
- No Power:
- Check if the wall outlet is functional by plugging in another device.
- Ensure the plug is fully inserted into the outlet.
- Verify that the internal wire connections are secure and correctly wired (hot, neutral, ground).
- Inspect the cord for any breaks or damage.
- Overheating:
- Disconnect immediately. Overheating can indicate loose connections or an overloaded circuit.
- Ensure the appliance's power requirements do not exceed the plug's 15A rating.
- Re-check all wire connections for tightness.
- Loose Fit in Outlet:
- If the plug feels excessively loose in the outlet, the outlet itself may be worn and require replacement by a qualified electrician.
9. Warranty and Support
For warranty information or technical support, please refer to the product packaging or contact OFOAEEA customer service directly. Contact details can typically be found on the manufacturer's official website or through your point of purchase.