1. Introduction
This manual provides detailed instructions for the safe and efficient operation, setup, and maintenance of your HENGCMM 350mm Manual Creasing Machine. Please read this manual thoroughly before using the machine to ensure proper function and to prevent damage or injury. This machine is designed to create clean, precise creases on various paper types for professional-looking finishes on book covers, invitations, menus, and more.
2. Product Overview and Features
The HENGCMM 350mm Manual Creasing Machine is constructed with an all-metal body for durability and precision. It features a steel blade and alloy mold designed for long-lasting performance, capable of over 100,000 uses. Key features include:
- Durable Construction: All-metal structure with a steel blade for superior crack resistance compared to plastic alternatives.
- High Precision Creasing: Creates clear and beautiful crease lines without burrs or cracks, even on coated, special, or photo paper.
- Magnetic Positioning: Features a magnetic positioning stopper for convenient and accurate paper alignment, with preset standard book line crease positions.
- Efficient Design: Special crease structure with spring reset for effortless operation.
- Versatile Application: Ideal for creasing small batches and various types of folding products, including card covers, glossy covers, book covers, thick covers, menus, and invitations.
2.1 Components Diagram
Familiarize yourself with the main components of your creasing machine:

Figure 1: Overview of the creasing machine components. Key parts include the mobile paper stopper, creasing handle, cover, paper feed opening, scale, and panel.
2.2 Indentation Quality
The machine is designed to produce high-quality indentations on various paper types. Observe the difference between the front and reverse sides of a creased paper:

Figure 2: Example of the clean indentation effect achieved by the machine on both sides of the paper.
3. Setup
Before operating the machine, ensure it is properly set up on a stable, flat surface.
- Unpacking: Carefully remove the creasing machine from its packaging. Inspect for any signs of damage during transit.
- Placement: Place the machine on a sturdy, level workbench or table. Ensure there is sufficient space around the machine for safe operation and paper handling.
- Adjusting the Positioning Stopper:
The machine includes a magnetic positioning stopper for precise paper alignment. This stopper can be adjusted along the scale to match your desired crease position.

Figure 3: The magnetic positioning stopper, featuring a polished chrome-plated metal plate and large screws for secure fixation. The bottom magnet ensures stability. The spacing for flipbook lines is an industry standard 8mm.
To adjust, loosen the large screw on the stopper, slide it to the desired measurement on the scale, and then tighten the screw to secure it. The scale is clear and eye-catching, with a minimum spacing of 1mm.
- Checking Stability: Verify that the machine rests firmly on its non-slip base. The base support adopts eight feet rubber pads for stability and wear resistance.
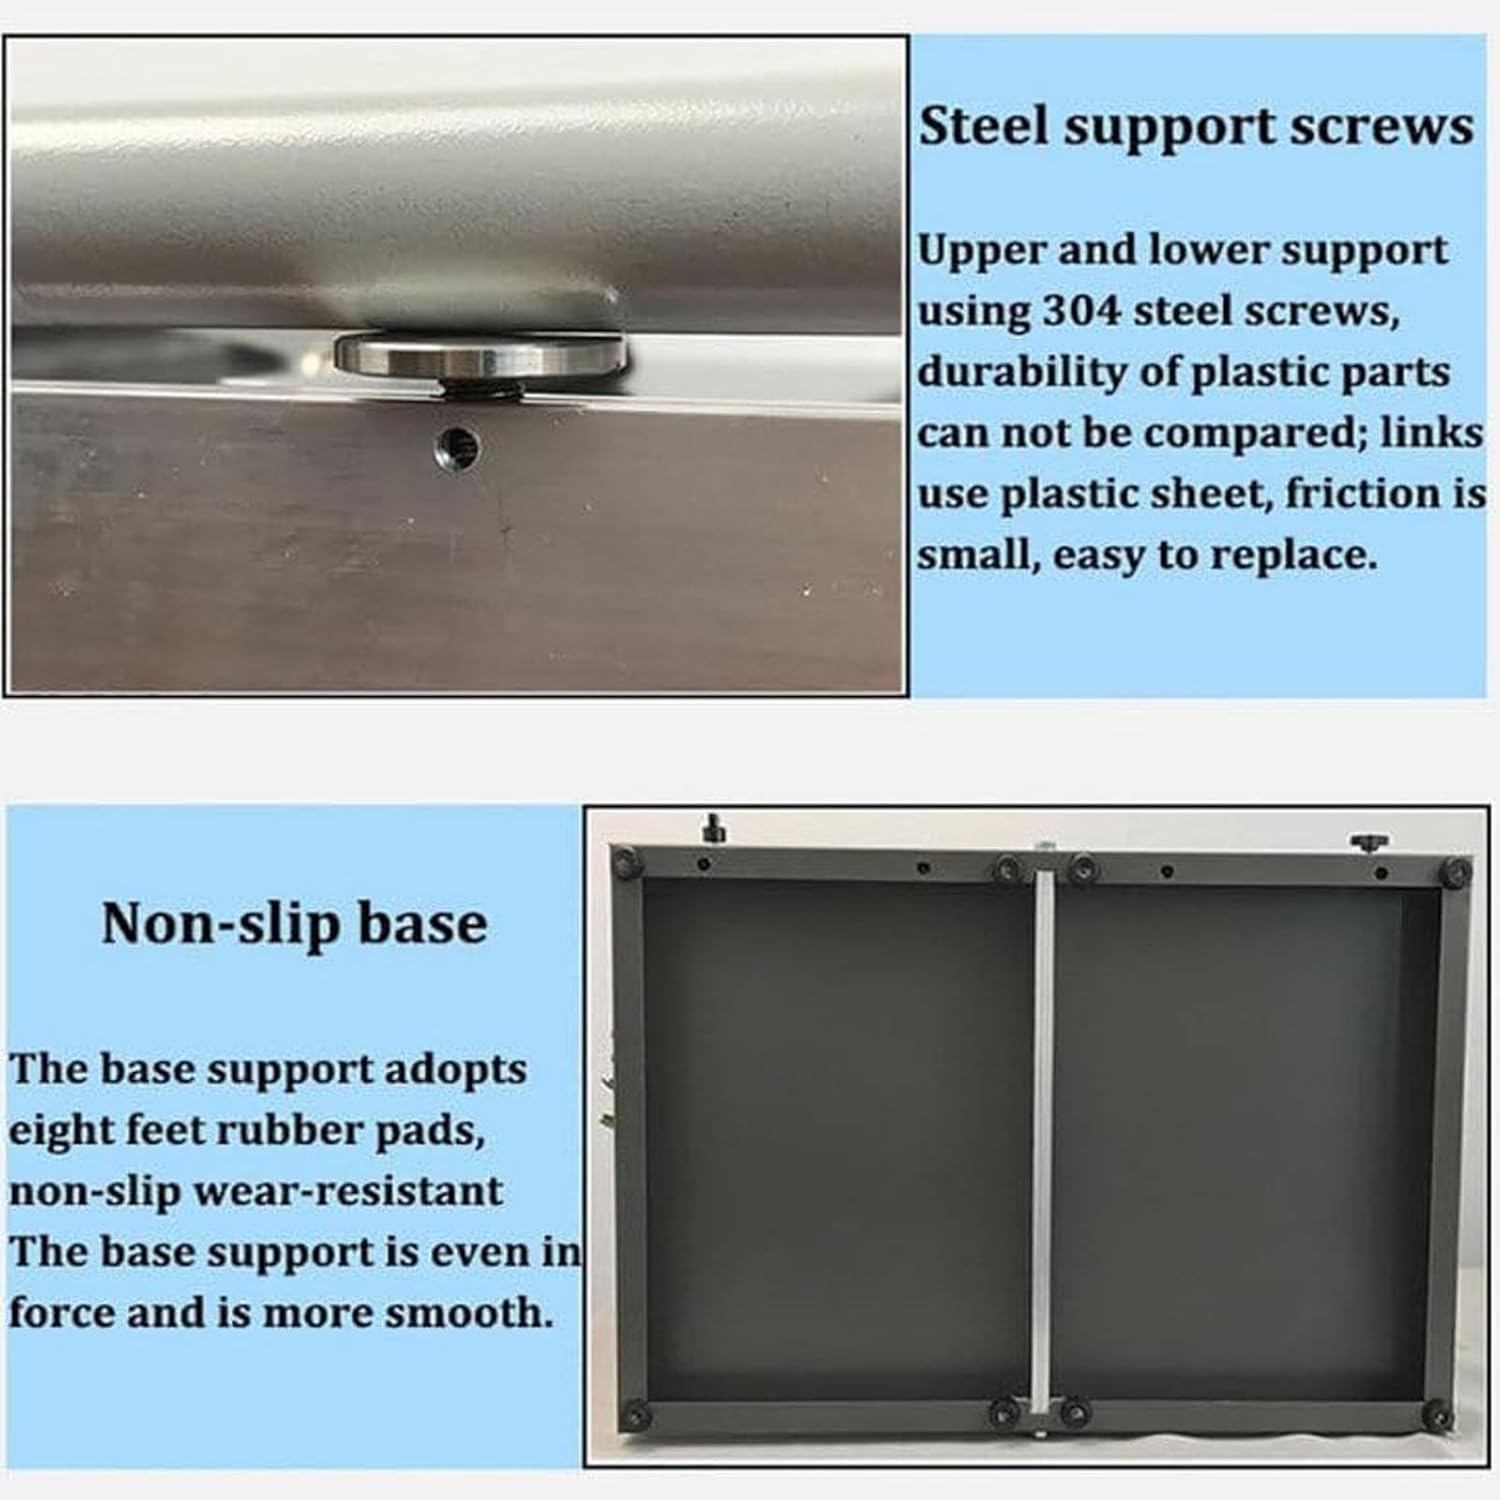
Figure 4: Details of the steel support screws (upper and lower, 304 stainless steel) and the non-slip base with eight rubber pads for even force distribution and stability.
4. Operating Instructions
Follow these steps to operate your HENGCMM Manual Creasing Machine:
- Prepare Paper: Ensure your paper is flat and free from wrinkles or tears. The machine can handle paper from 60-500 grams.
- Set Crease Position: Adjust the mobile paper stopper (Figure 1) to the desired creasing length using the integrated scale. For standard book lines, preset positions are available.
- Insert Paper: Carefully slide the paper into the paper feed opening (Figure 1) until it rests against the positioning stopper. Ensure the paper is aligned straight.
- Engage Creasing Handle: Hold the creasing handle (Figure 1) firmly. Apply even downward pressure to engage the upper mold opening tool with the lower mold opening tool.
- Crease Paper: Press the handle down completely to create the crease. The spring-reset mechanism will assist in returning the handle to its original position.
- Remove Paper: Gently remove the creased paper. Inspect the crease for quality.
- Repeat: For multiple creases or documents, repeat steps 2-6.
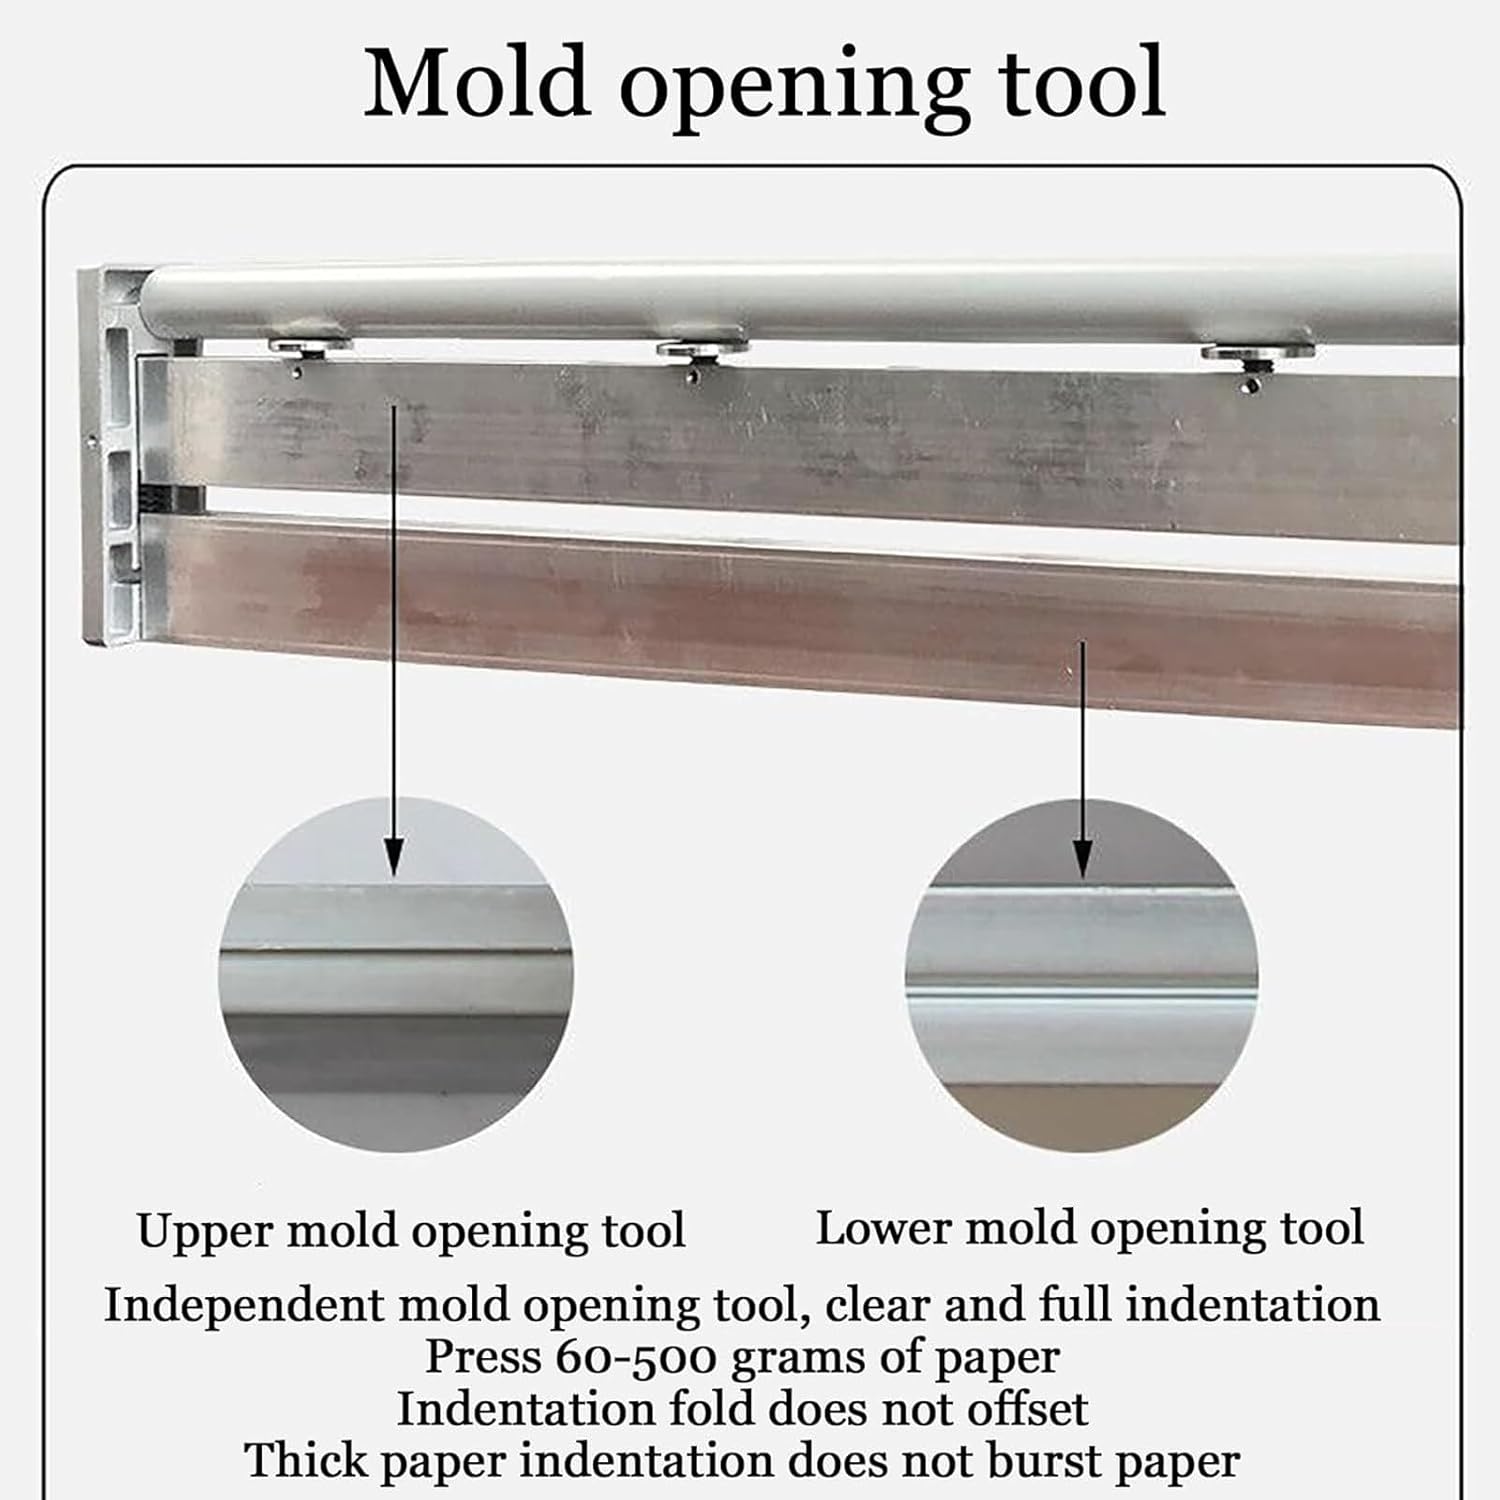
Figure 5: The independent mold opening tool, comprising upper and lower components, designed for clear and full indentations on paper ranging from 60 to 500 grams. This design prevents indentation offset and paper bursting.
5. Maintenance
Regular maintenance ensures the longevity and optimal performance of your creasing machine.
- Cleaning: Periodically wipe down the machine's surfaces with a soft, dry cloth to remove dust and paper debris. Avoid using abrasive cleaners or solvents.
- Blade Inspection: Inspect the creasing blade and mold for any signs of wear or damage. While designed for durability, extreme use may require eventual replacement.
- Lubrication: Moving parts, such as the creasing handle mechanism, may benefit from light lubrication with a silicone-based lubricant if movement becomes stiff. Apply sparingly.
- Storage: When not in use, store the machine in a clean, dry environment away from direct sunlight and extreme temperatures.
6. Troubleshooting
Here are some common issues and their potential solutions:
- Issue: Creases are uneven or not straight.
Solution: Ensure the paper is properly aligned against the positioning stopper. Check that the stopper is securely tightened and has not shifted. Verify the paper is inserted straight into the feed opening.
- Issue: Paper is tearing or bursting during creasing.
Solution: This can occur if the paper is too thick or if excessive force is applied. Ensure your paper weight is within the recommended 60-500 grams. Apply firm but controlled pressure. Inspect the creasing blade for any damage or dullness.
- Issue: Crease is too shallow or not visible.
Solution: Ensure sufficient downward pressure is applied to the creasing handle. Check that the paper is correctly positioned between the upper and lower mold opening tools. Verify the paper is not too thin for the machine's standard crease depth (0.8mm).
- Issue: Machine components feel stiff or difficult to move.
Solution: Apply a small amount of silicone-based lubricant to the moving parts of the creasing handle mechanism. Ensure no debris is obstructing movement.
7. Specifications
| Feature | Specification |
|---|---|
| Creasing Length | 350mm |
| Creasing Depth | 0.8mm |
| Creasing Method | Manual |
| Product Weight | 5.7kg (12.57 lbs) |
| Machine Size (L x W x H) | 600 x 390 x 130 mm (23.6 x 15.4 x 5.1 inches) |
| Recommended Paper Weight | 60-500 grams |
| Manufacturer | HENGCMM |
| ASIN | B0D6RJSPB4 |
Note: Dimensions and weight are approximate and may vary slightly.

Figure 6: Physical dimensions of the HENGCMM 350mm Manual Creasing Machine.
8. Warranty and Support
Your HENGCMM Manual Creasing Machine is designed for reliable performance. While specific warranty details are not provided in this manual, we recommend retaining your purchase receipt for any warranty claims.
For any questions, concerns, or technical support regarding your product, please do not hesitate to contact the seller or manufacturer directly. Contact information is typically available through your purchase platform or on the product packaging.
"If you have any questions after receiving the package, please feel free to contact us."