Introduction
This manual provides detailed instructions for the safe and effective use of your Gocheer 48PSI Mini Airbrush Compressor Kit. Please read this manual thoroughly before operation and retain it for future reference.
Package Contents
Verify that all items listed below are included in your package. If any items are missing or damaged, please contact customer support.
- Main Unit (with 0.3mm nozzle installed) x 1
- Replacement Nozzles (0.2mm / 0.5mm) x 1 each
- Replacement Needles (0.2mm / 0.5mm) x 1 each
- Nozzle Caps x 2
- Airbrush Holder x 1
- Cleaning Pin Set x 1
- Cleaning Brush x 1
- Adjustment Wrench x 1
- Paint Cups (12cc / 40cc) x 1 each
- Oil-Water Separator x 1
- Rechargeable Compressor & Power Adapter x 1
- Japanese Instruction Manual x 1 (Electronic data available upon request if English version is included)


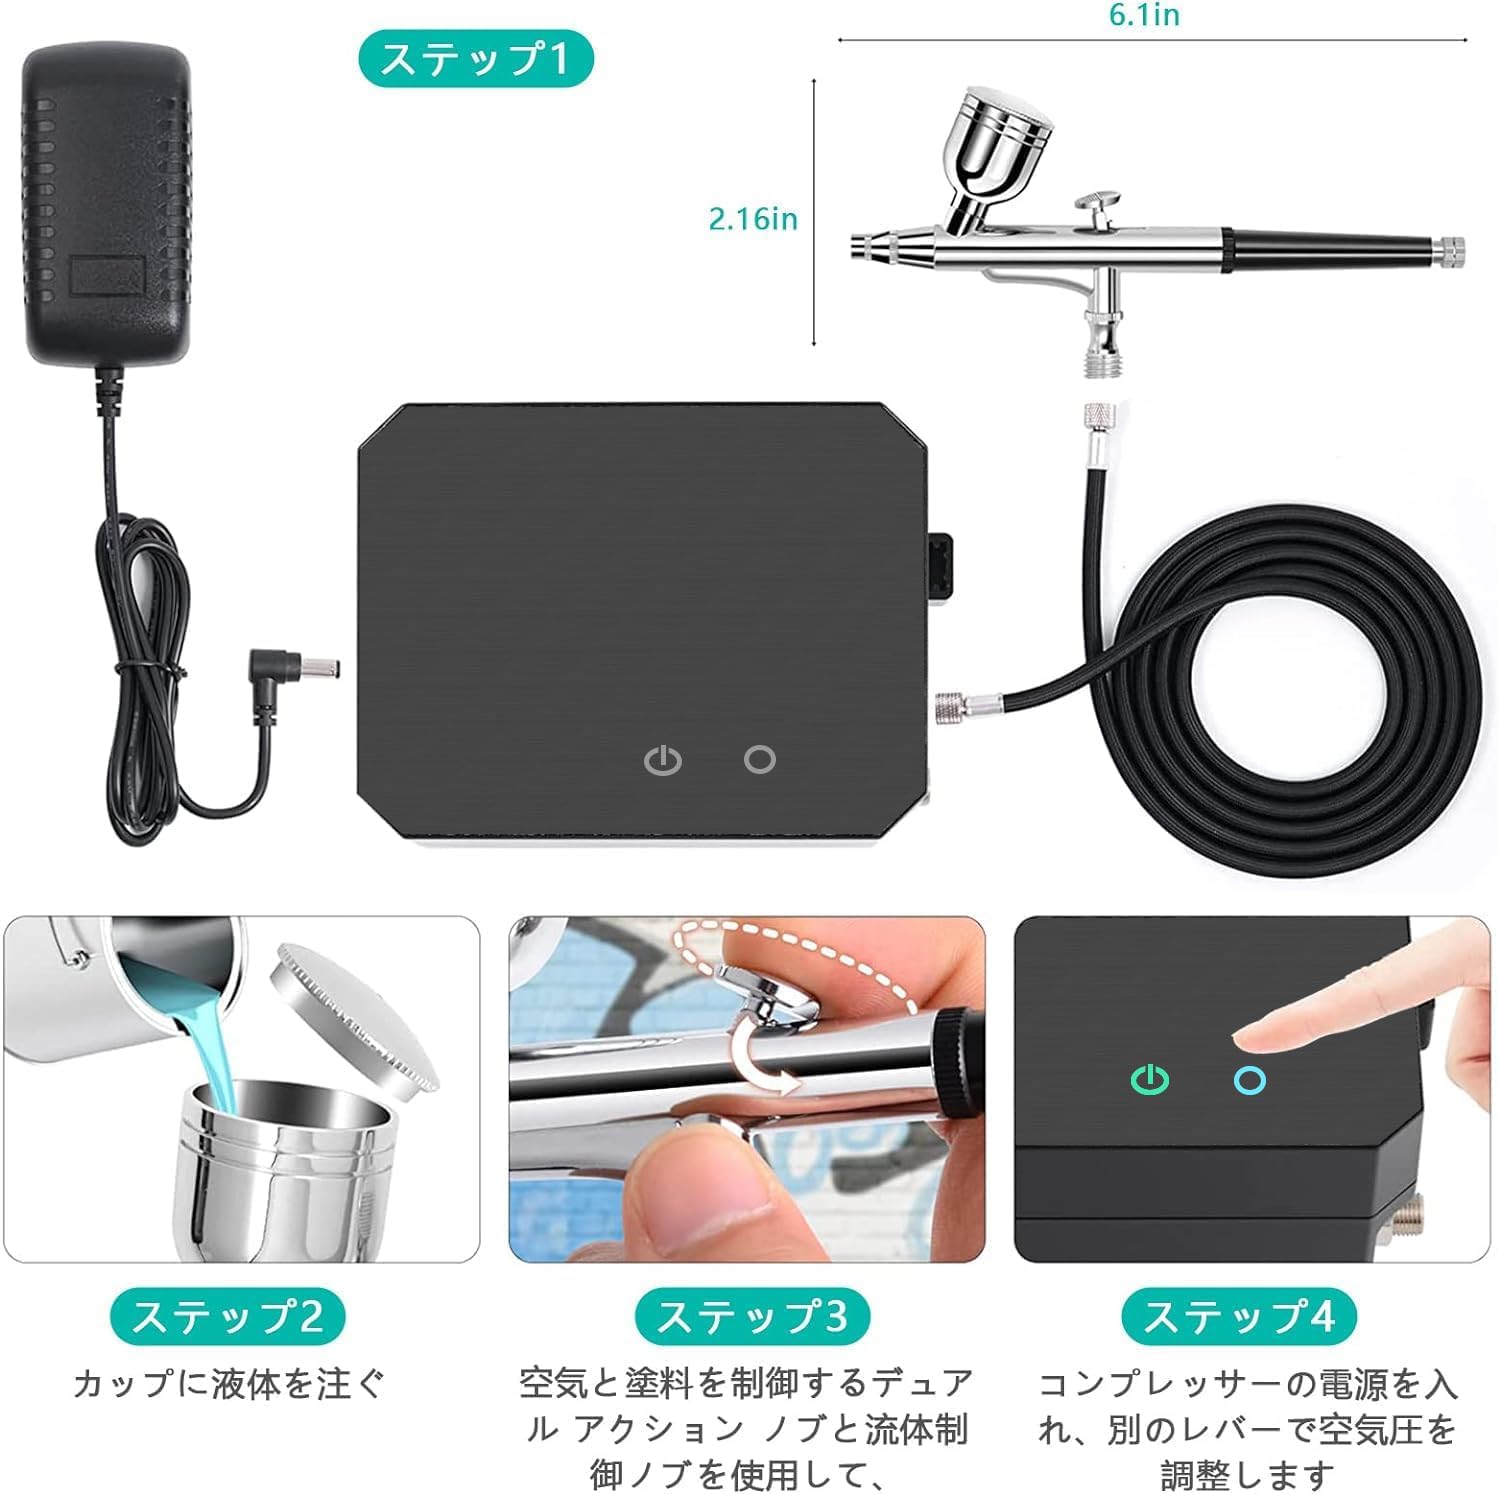
Setup Instructions
1. Connecting the Airbrush and Compressor
- Connect the air hose to the compressor's air outlet.
- Attach the other end of the air hose to the airbrush. Ensure all connections are secure to prevent air leaks.
- Connect the power adapter to the compressor and plug it into an electrical outlet.

2. Filling the Paint Cup
- Ensure the paint cup is clean and dry.
- Pour your desired paint or liquid into the paint cup. Do not overfill.
- Attach the paint cup securely to the airbrush.
3. Attaching the Oil-Water Separator
The included oil-water separator can be attached to the bottom of the airbrush to prevent moisture from affecting your paint application, especially in humid conditions. This helps prevent nozzle rust and paint bubbling.
4. Video Guide: Airbrush Installation
Operating Instructions
1. Powering On and Adjusting Pressure
- Turn on the compressor using the power switch.
- The Gocheer airbrush compressor features 3 pressure modes, supporting up to 48PSI. Adjust the air pressure according to your project requirements.
- 0.2mm Nozzle: Ideal for fine lines, detailed model painting, beauty applications, and nail art.
- 0.3mm Nozzle (Standard): Suitable for general model painting, makeup, and DIY projects. Easy to handle for beginners.
- 0.5mm Nozzle: Recommended for background painting, large area base coats, and spraying larger surfaces like T-shirts or shoes.
2. Dual-Action Function
The airbrush features a dual-action trigger for precise control over both air and paint flow. Pressing down on the trigger controls the air, and pulling back controls the paint. This allows for excellent atomization and control, reducing overspray and uneven application.

3. General Operation Video
Maintenance and Cleaning
Regular cleaning is essential for optimal performance and longevity of your airbrush kit. The tool-free removable nozzle simplifies the cleaning process.
1. Basic Cleaning Steps
- Empty any remaining paint from the cup.
- Add a small amount of appropriate cleaning solution (e.g., water for water-based paints, thinner for solvent-based paints) to the paint cup.
- Spray the cleaning solution through the airbrush until it runs clear.
- Disassemble the nozzle and needle components.
- Use the provided cleaning brushes and pins to thoroughly clean all paint residue from the nozzle, needle, and paint cup.
- Wipe all components dry before reassembly.

Troubleshooting
If you encounter issues with your Gocheer airbrush kit, refer to the following common problems and solutions:
- No Air Flow:
- Check if the compressor is powered on and connected correctly.
- Ensure the air hose is securely attached to both the compressor and the airbrush.
- Verify that the airbrush trigger is fully depressed.
- No Paint Flow or Intermittent Flow:
- Check if the paint cup contains enough paint.
- Ensure the paint is properly thinned for airbrush use.
- Clean the nozzle and needle thoroughly, as clogs are a common cause.
- Inspect the needle for bends or damage.
- Inconsistent Spray Pattern:
- Adjust the air pressure setting on the compressor.
- Ensure the paint consistency is uniform.
- Check for partial clogs in the nozzle or air cap.
- Compressor Not Turning On:
- Verify the power adapter is securely plugged into both the compressor and the wall outlet.
- Check if the power switch on the compressor is in the 'ON' position.
Product Specifications
| Feature | Specification |
|---|---|
| Brand | Gocheer |
| Model Name | GAH-JP-QB101BMC-517 |
| Maximum Operating Pressure | 48 PSI |
| Voltage | 12 Volts (DC) |
| Power Source | Corded Electric |
| Noise Level | 1 Decibel (Quiet Operation) |
| Recommended Use | Spray painting; Do not exceed 20 minutes of continuous use. |
| Color | Black |
| Package Dimensions | 21.3 x 18.4 x 7.4 cm |
| Item Weight | 970 g |
Warranty and Support
Gocheer products come with a 1-year quality warranty. In the event of any malfunction under normal use, we offer exchange or repair services. A Japanese instruction manual is included. If you have any questions about operation, please feel free to contact us via your purchase history page. We aim to respond within 24 hours.
Note: This product is manufactured in the same batch as overseas products, so an English version of the manual may occasionally be included. If you prefer the Japanese version, please contact us for an electronic copy.


