1. Introduction
Thank you for choosing the Gimify Mini Hat Press Machine HP-02. This manual provides essential information for the safe and efficient operation of your device. Please read it thoroughly before use and retain it for future reference. This machine is designed for applying heat transfers to various curved surfaces, primarily hats and caps.
2. Safety Instructions
WARNING: Failure to follow these safety instructions may result in fire, electric shock, or injury.
- Always place the machine on a stable, heat-resistant surface.
- Do not touch the hot plate during or immediately after operation. Use the insulated resting base provided.
- Keep out of reach of children and pets.
- Ensure the power cord is not damaged and is properly connected to a grounded outlet.
- Do not immerse the machine in water or any other liquid.
- Unplug the machine when not in use and before cleaning.
- The machine features a 10-minute auto shut-off function for safety. However, always manually power off and unplug when finished.
- Do not touch other powered metal objects when the heat press machine is connected to the power.
- Use only accessories and attachments specified by the manufacturer.

Image Description: An exploded view of the Gimify Mini Hat Press Machine, highlighting its components: Control Button/Indicator, Ergonomic Handle, Thermal-Protective Coating, Pro Curved Heat Plate, and Safety Insulation Base. A warning sign at the bottom advises against touching other powered metal objects when the machine is connected to power.
3. Package Contents
Verify that all items listed below are included in your package. If any items are missing or damaged, please contact customer support.
- Gimify Mini Hat Heat Press Machine
- Safety Base (Insulated Resting Base)
- Curved Press Base
- Round Press Base (unfilled)
- Heat-Resistant Tape
- Anti-scald Hand Glove
- User Manual (this document)

Image Description: A complete set of the Gimify Mini Hat Press Machine and its accessories. This includes the main heat press unit, a safety base, a curved press base, a round press base (unfilled), heat-resistant tape, and a protective glove.
4. Product Features
- Adjustable Temperature Settings: Three distinct heat levels (Low, Medium, High) for various materials.
- Curved Heat Plate: A 6.3" x 3.4" ceramic-coated heat plate designed to ensure even heating on curved surfaces without creating creases.
- Dual Press Bases: Includes both a curved base and a rounded base to accommodate different types of caps and other items.
- Safety Auto-Off: Automatically shuts off after 10 minutes of inactivity for enhanced safety.
- Ergonomic Design: Features an ergonomic grip for comfortable and secure handling during operation.
- Insulated Safety Base: Provides a secure resting place for the hot machine to prevent accidental burns.

Image Description: A close-up view demonstrating the curved heat plate of the Gimify Mini Hat Press Machine being used to apply a design onto a white baseball cap. The image highlights the plate's ability to conform to the hat's curvature for even heat distribution.
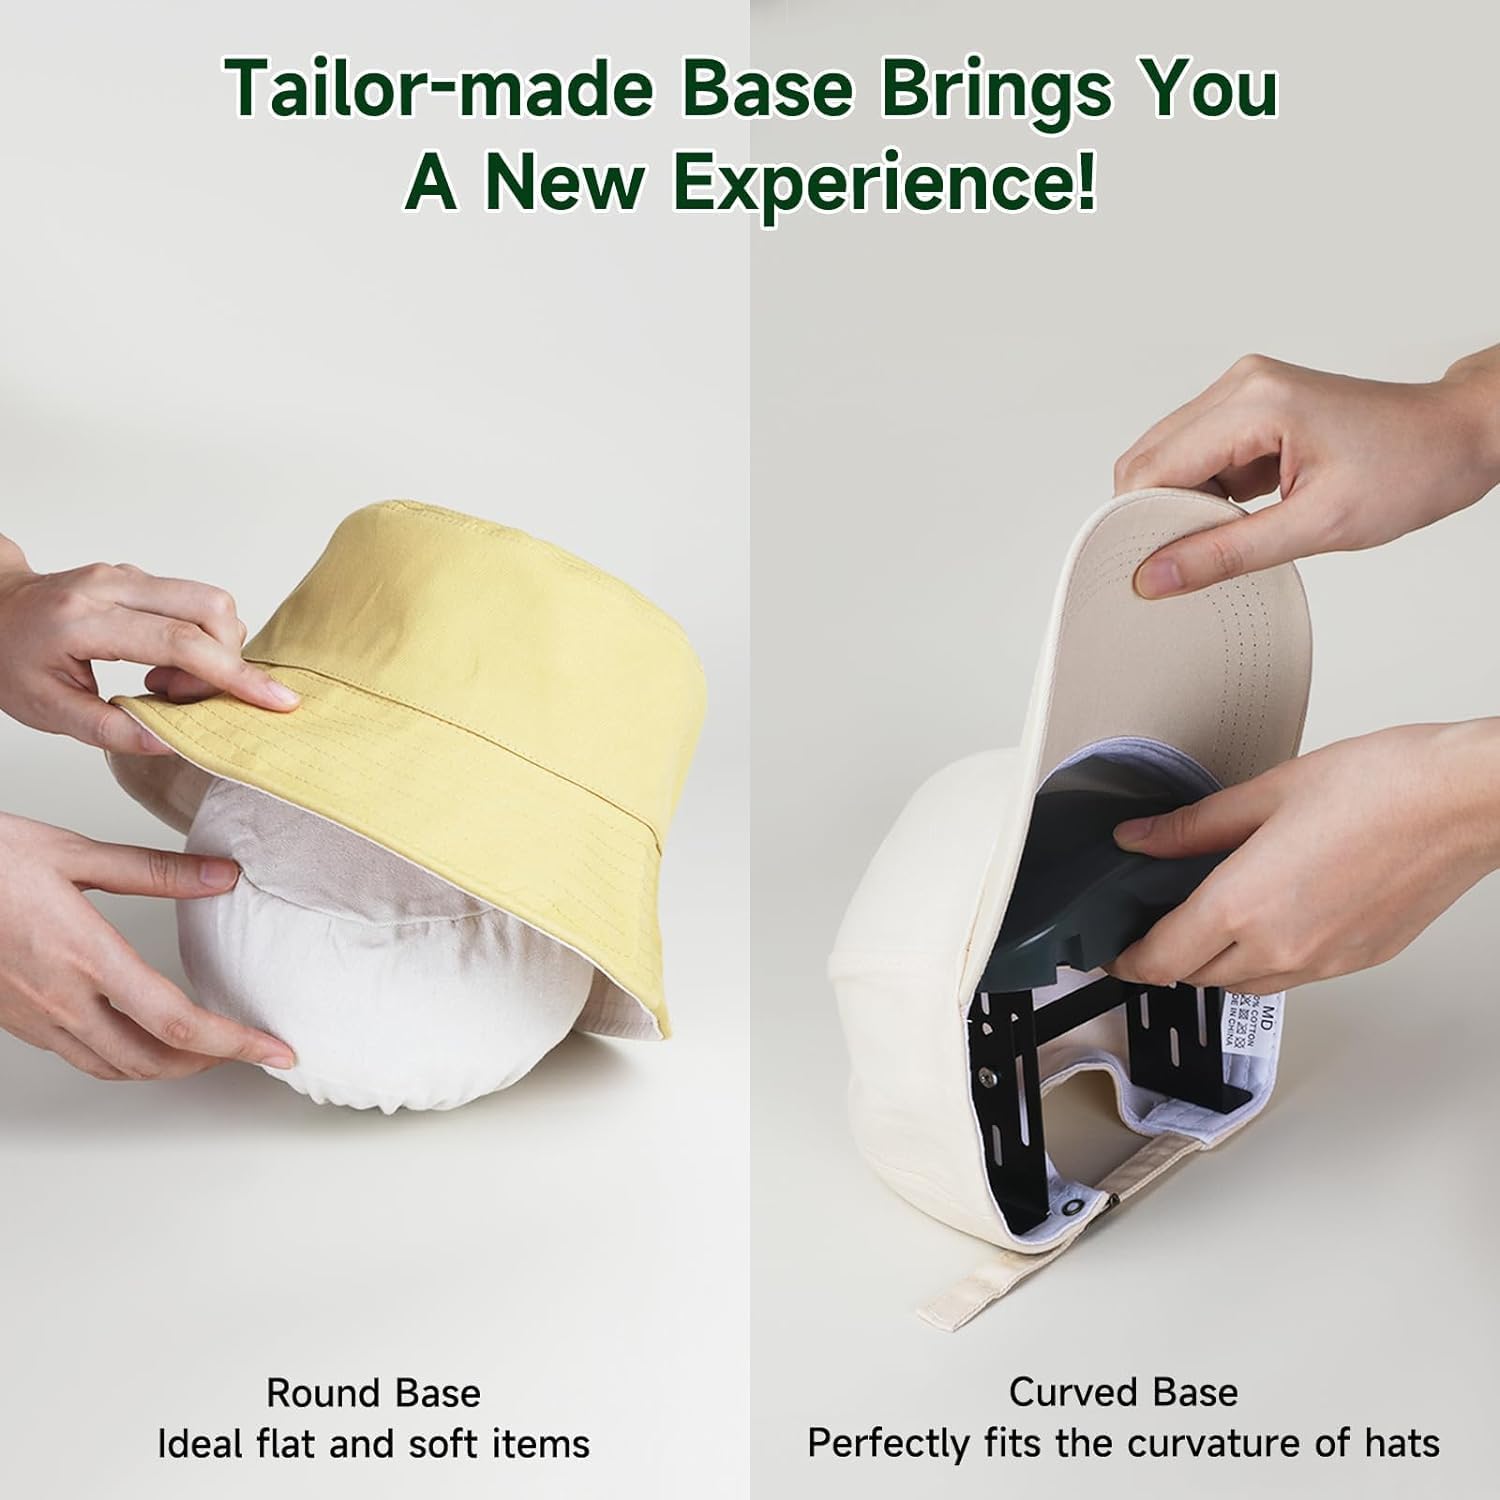
Image Description: This image illustrates the two types of press bases included with the machine. On the left, a round base is shown with a bucket hat, labeled "Round Base: Ideal for flat and soft items." On the right, a curved base is inserted into a baseball cap, labeled "Curved Base: Perfectly fits the curvature of hats."
5. Setup
- Unpack: Carefully remove all components from the packaging.
- Inspect: Check for any signs of damage. If damaged, do not use and contact customer support.
- Placement: Place the Gimify Mini Hat Press Machine on a flat, stable, and heat-resistant surface. Ensure adequate clearance around the machine.
- Base Selection: Choose the appropriate press base (curved or round) for your item. For hats, the curved base is generally recommended. Insert the chosen base into the hat or item to be pressed.
- Power Connection: Plug the power cord into a standard grounded electrical outlet.
6. Operating Instructions
6.1 Power On/Off and Temperature Selection
- Power On: Press and hold the power button (located on the handle) for 3 seconds to turn the machine on. The indicator light will illuminate.
- Select Temperature: Lightly press the power button to cycle through the three heat levels:
- Green Light: Low Temperature (284°F / 140°C) - Suitable for engraving films.
- Blue Light: Medium Temperature (320°F / 160°C) - Suitable for heat transfer films.
- Red Light: High Temperature (374°F / 190°C) - Suitable for high-temperature consumables.
- Preheating: Place the machine on its safety base. Allow approximately two minutes for the machine to preheat to the selected temperature. You will hear a beep, and the indicator light will change from flashing to constant when preheating is complete.
- Power Off: Press and hold the power button for 3 seconds to turn the machine off.
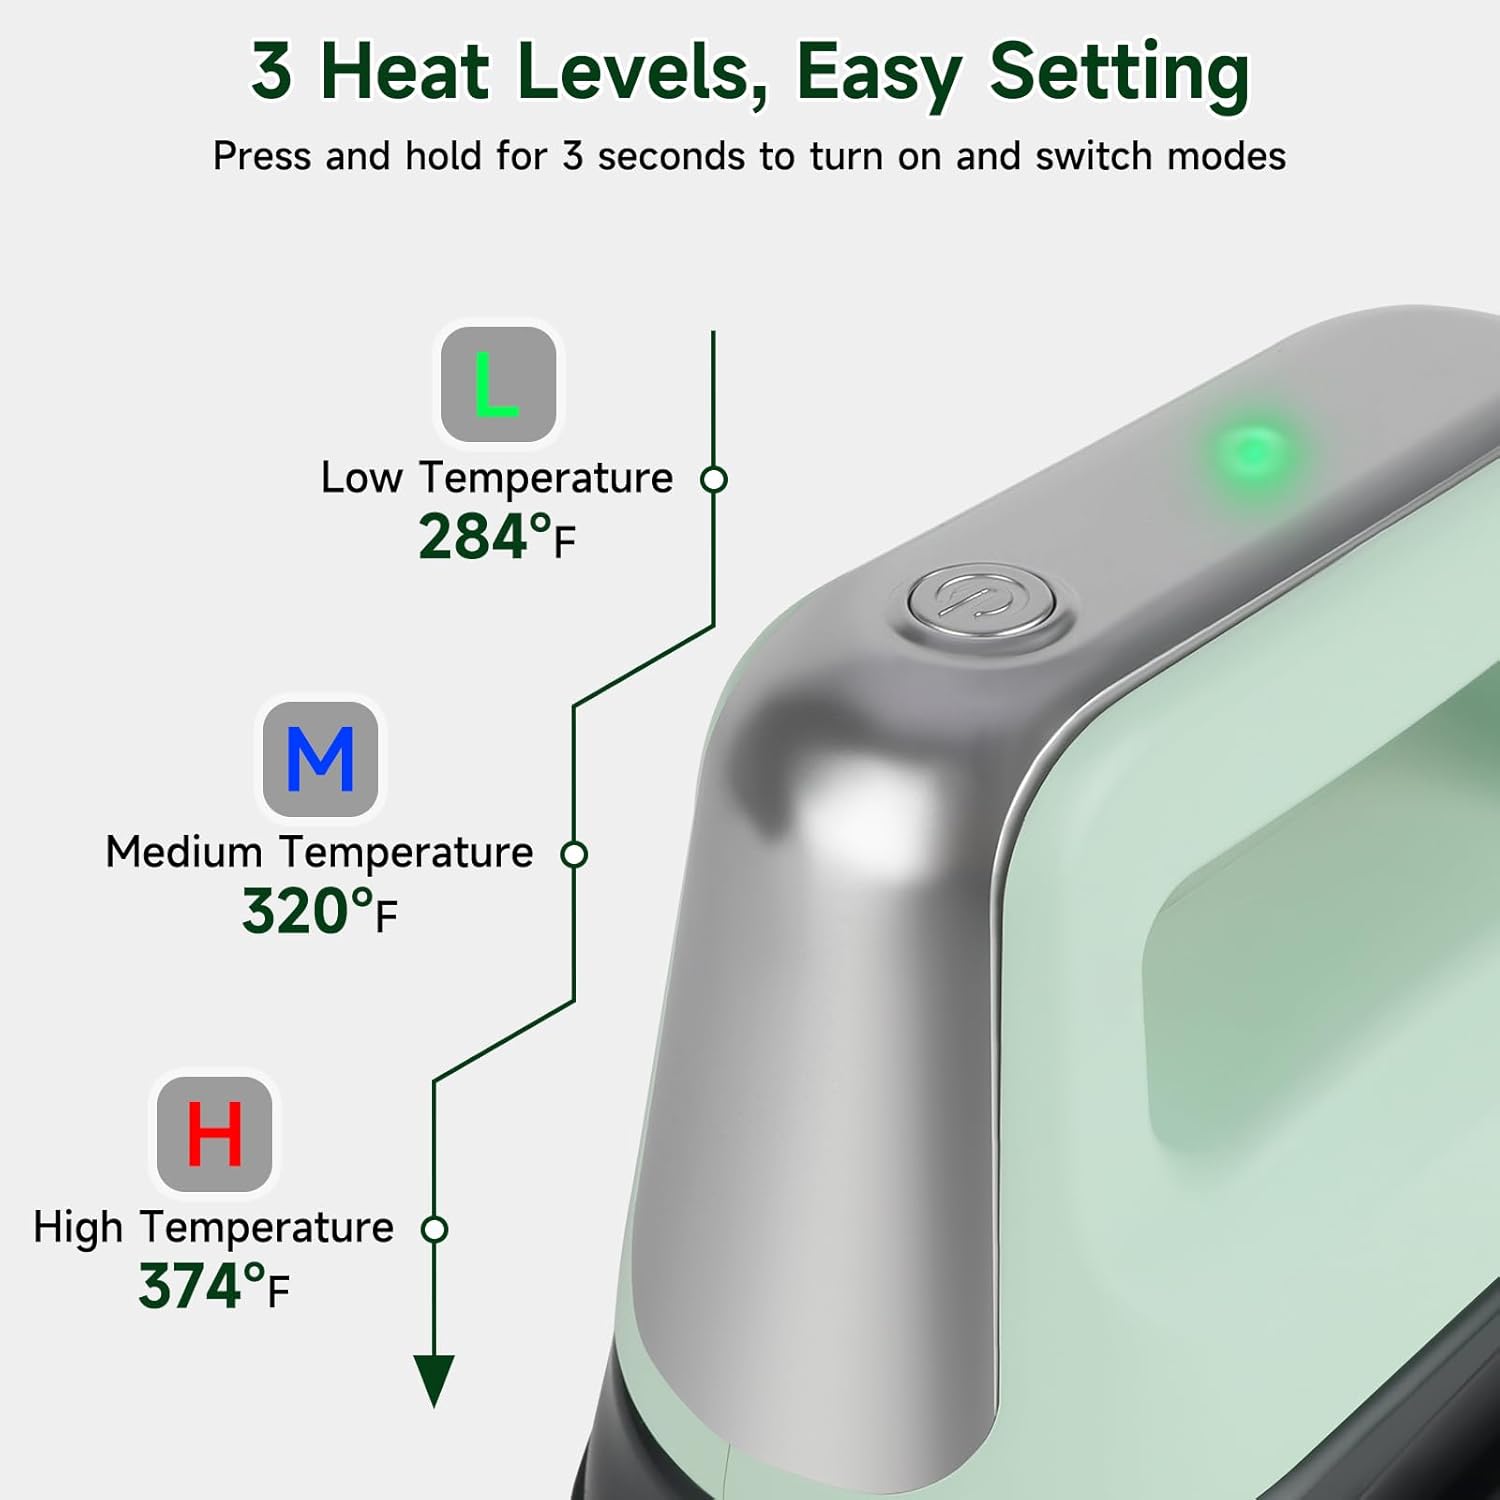
Image Description: A detailed diagram illustrating the three adjustable heat levels of the Gimify Mini Hat Press Machine. It shows the power button and indicator light, with lines pointing to "L" (Low Temperature, 284°F, Green), "M" (Medium Temperature, 320°F, Blue), and "H" (High Temperature, 374°F, Red), indicating how to select each setting.
6.2 Applying Heat Transfers
- Prepare Item: Place your hat or item onto the chosen press base. Ensure the surface is smooth and free of wrinkles.
- Position Design: Place your heat transfer design onto the item. It is recommended to fix the pattern with the supplied heat-resistant tape to prevent shifting during pressing.
- Pressing: Once the machine has preheated (indicator light is constant), firmly press the heated plate onto the design. Apply even pressure and move the machine slowly across the entire design area. Refer to your transfer material's specific instructions for recommended pressing time and pressure.
- Cool Down: After pressing, immediately place the hot machine back onto its insulated safety base. Allow the item and design to cool according to the transfer material's instructions before peeling (if applicable).
- Repeat: For larger designs or items, you may need to press in sections, ensuring overlapping passes for complete coverage.

Image Description: A hand pressing the power button on the Gimify Mini Hat Press Machine to activate it.

Image Description: A hand inserting the curved press base into a baseball cap, preparing it for heat transfer application.

Image Description: The Gimify Mini Hat Press Machine being used to press a design onto a hat, demonstrating the application process.

Image Description: A finished white baseball cap displaying a successfully applied heat transfer design.
7. Maintenance
- Cleaning: Ensure the machine is unplugged and completely cool before cleaning. Wipe the heat plate with a soft, damp cloth. Do not use abrasive cleaners or solvents.
- Storage: Store the machine in a dry, cool place, away from direct sunlight and moisture. Always place it on its safety base when storing.
- Cord Care: Do not wrap the power cord tightly around the machine. Store it loosely to prevent damage.
8. Troubleshooting
| Problem | Possible Cause | Solution |
|---|---|---|
| Machine does not power on. | Not plugged in; power button not held long enough; power outlet issue. | Ensure power cord is securely plugged in. Press and hold the power button for 3 seconds. Test the outlet with another device. |
| Heat plate not heating up. | Machine not powered on; incorrect temperature setting; internal malfunction. | Ensure machine is powered on and indicator light is constant. Select desired temperature. If problem persists, contact customer support. |
| Design not adhering properly. | Insufficient heat; insufficient pressure; incorrect pressing time; wrong material settings. | Increase temperature setting. Apply more firm, even pressure. Adjust pressing time according to transfer material instructions. Ensure material is compatible with selected temperature. |
| Machine automatically shuts off during use. | 10-minute auto shut-off activated due to inactivity. | This is a safety feature. Power the machine back on by holding the power button for 3 seconds. |
9. Specifications
- Model Number: HP-02
- Brand: Gimify
- Heat Plate Dimensions: 6.3" x 3.4" (16.0 cm x 8.6 cm)
- Product Dimensions: 6.29" L x 3.42" W x 5.31" H (16.0 cm L x 8.7 cm W x 13.5 cm H)
- Item Weight: 3.12 pounds (1.42 kg)
- Temperature Settings:
- Low: 284°F (140°C)
- Medium: 320°F (160°C)
- High: 374°F (190°C)
- Auto Shut-off: 10 minutes of inactivity
- Manufacturer: Gimify
- Date First Available: June 11, 2024

Image Description: An image displaying the dimensions of the Gimify Mini Hat Press Machine, showing its length (6.29 inches), width (3.42 inches), and height (5.31 inches). Below the machine, icons represent the included accessories: Hat Heat Press, Safety Base, Curved Press Base, Round Press Base (unfilled), Anti-scald Hand Sock (glove), and Heat-Resistant Tape.
10. Warranty and Support
For warranty information or technical support, please contact Gimify customer service. Refer to your purchase documentation for specific warranty terms and contact details.
Online Support: Visit the official Gimify website for FAQs and support resources.