1. Introduction
This manual provides instructions for the WESTSHINE 8-Channel 5M-N Hybrid Digital Video Recorder (DVR). This device is designed for home and business surveillance, supporting various camera types including AHD, TVI, CVI, CVBS, and IP cameras. It features H.265+ video compression, motion detection, and remote viewing capabilities.

Image: The WESTSHINE 8-Channel 5M-N Hybrid DVR unit, a white rectangular device.
2. Package Contents
Please verify that all items are present in your package:
- WESTSHINE 8-Channel 5M-N Hybrid DVR Unit
- Power Adapter
- USB Mouse
- User Manual (this document)
- Note: Security cameras and hard disk drive are not included and are sold separately.
3. Product Overview
3.1 Front Panel
The front panel of the DVR typically features indicator lights for power, hard drive activity, and network status. Specific models may vary.
3.2 Rear Panel Connections
The rear panel provides all necessary ports for connecting cameras, display, network, and power.

Image: Diagram showing the rear panel of the DVR with labeled ports including Video In (BNC), Audio In/Out (RCA), HDMI, VGA, USB, LAN (Ethernet), and DC 12V power input. Dimensions are also indicated: 7.83 inches width, 1.85 inches height.
- Video In (BNC): 8 channels for analog cameras (AHD/TVI/CVI/CVBS).
- Audio In/Out (RCA): For audio input from microphones and audio output to speakers.
- HDMI Output: Connects to an HD monitor or TV for video display.
- VGA Output: Connects to a VGA monitor or TV for video display.
- USB 2.0 Ports: Two ports for connecting the USB mouse, external storage, or for system upgrades.
- LAN (Ethernet) Port: Connects to your network router for remote access and IP camera connections.
- DC 12V Power Input: Connects to the included power adapter.
4. Setup
4.1 Hard Disk Drive Installation (Optional)
A hard disk drive (HDD) is required for recording and playback. The DVR supports SATA HDDs from 500GB to 14TB. It is recommended to use surveillance-grade hard drives for optimal performance and longevity.
- Unscrew and remove the top cover of the DVR unit.
- Connect the SATA data cable and power cable from the DVR to the HDD.
- Secure the HDD to the bottom of the DVR chassis using the provided screws.
- Replace the top cover and secure it with screws.
4.2 Initial Connections
Follow these steps to connect your DVR system:
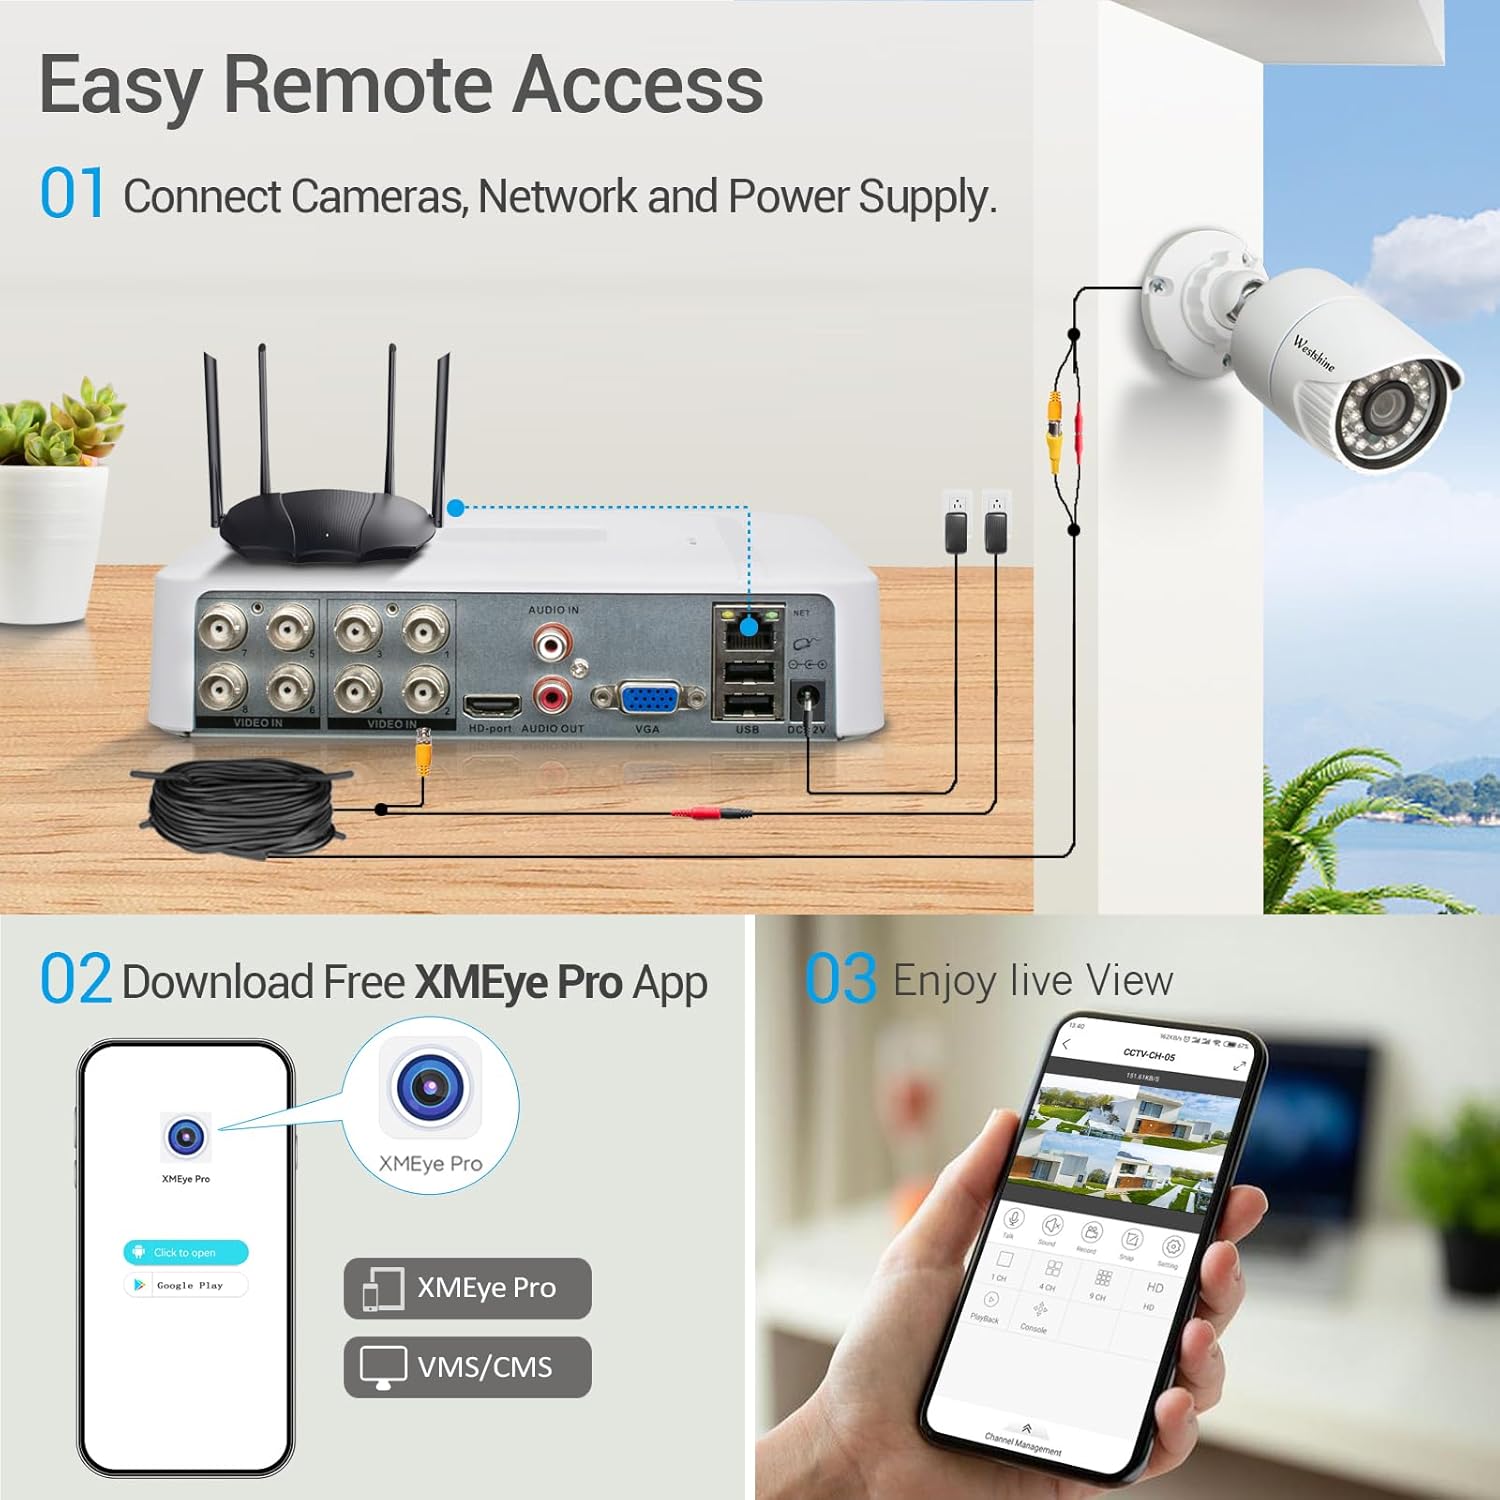
Image: Step-by-step diagram illustrating the physical connections: 1. Connect cameras to the DVR's video input ports. 2. Connect the DVR's LAN port to a router. 3. Connect the power adapter to the DVR. 4. Connect a monitor via HDMI or VGA. 5. Connect the USB mouse.
- Connect Cameras: Connect your analog (AHD/TVI/CVI/CVBS) cameras to the BNC video input ports on the rear panel. For IP cameras, ensure they are on the same network as the DVR.
- Connect Display: Connect a monitor or TV to the DVR using either the HDMI or VGA output port.
- Connect USB Mouse: Plug the USB mouse into one of the USB ports on the rear panel.
- Connect Network: Connect an Ethernet cable from the DVR's LAN port to your network router.
- Connect Power: Plug the DC 12V power adapter into the DVR's power input and then into a power outlet. The DVR will power on automatically.
4.3 First-Time Setup Wizard
Upon first boot, the DVR will guide you through a setup wizard to configure basic settings such as language, date/time, network settings, and hard drive formatting (if an HDD is installed).
4.4 Remote Access Setup (XMEye Pro App)
To view your surveillance system remotely on a smartphone or tablet:

Image: A person using a smartphone to view live camera feeds, with a laptop and tablet also showing the surveillance interface. The image highlights the availability of the XMEye Pro app on Google Play and the App Store.
- Download App: Download the "XMEye Pro" app from the Google Play Store (for Android) or Apple App Store (for iOS).
- Register Account: Open the app and register a new account if you don't have one.
- Add Device: Log in and select "Add Device". You can scan the QR code displayed on your DVR's monitor (found in the network settings or P2P menu) or manually enter the device's serial number.
- Live View: Once added, you can access live video feeds and playback recordings from your connected cameras.
For PC/Mac viewing, download the VMS Client software from the WESTSHINE support website.
5. Operation
5.1 Live Viewing
After setup, the DVR will display live feeds from connected cameras on the monitor. Use the USB mouse to navigate the on-screen menu.

Image: A monitor displaying a grid of live camera feeds from a WESTSHINE DVR, showing various outdoor and indoor scenes.
5.2 Recording Modes
The DVR supports multiple recording modes:

Image: Visual representation of continuous recording, motion-triggered recording (showing a person breaking in), and scheduled recording with a timeline.
- Continuous Recording: Records 24/7.
- Scheduled Recording: Records during specific time periods.
- Motion Detection Recording: Records only when motion is detected.
- Alarm Recording: Records when an alarm event is triggered.
Configure recording schedules and settings through the DVR's main menu.
5.3 Motion Detection and Alerts
The DVR can be configured to detect motion and send alerts.

Image: A smartphone screen showing a motion detection alert from the XMEye Pro app, with options for email notification, FTP upload, and app push notifications.
- Setup Motion Zones: Define specific areas within the camera's view for motion detection.
- Sensitivity Adjustment: Adjust the sensitivity level to minimize false alarms.
- Alert Methods: Receive instant email alerts, app push notifications, or upload footage via FTP when motion is detected.
5.4 Intelligent Detection (Human/Face/Vehicle)
This DVR features advanced detection capabilities to distinguish between humans, faces, and vehicles, enhancing security accuracy.
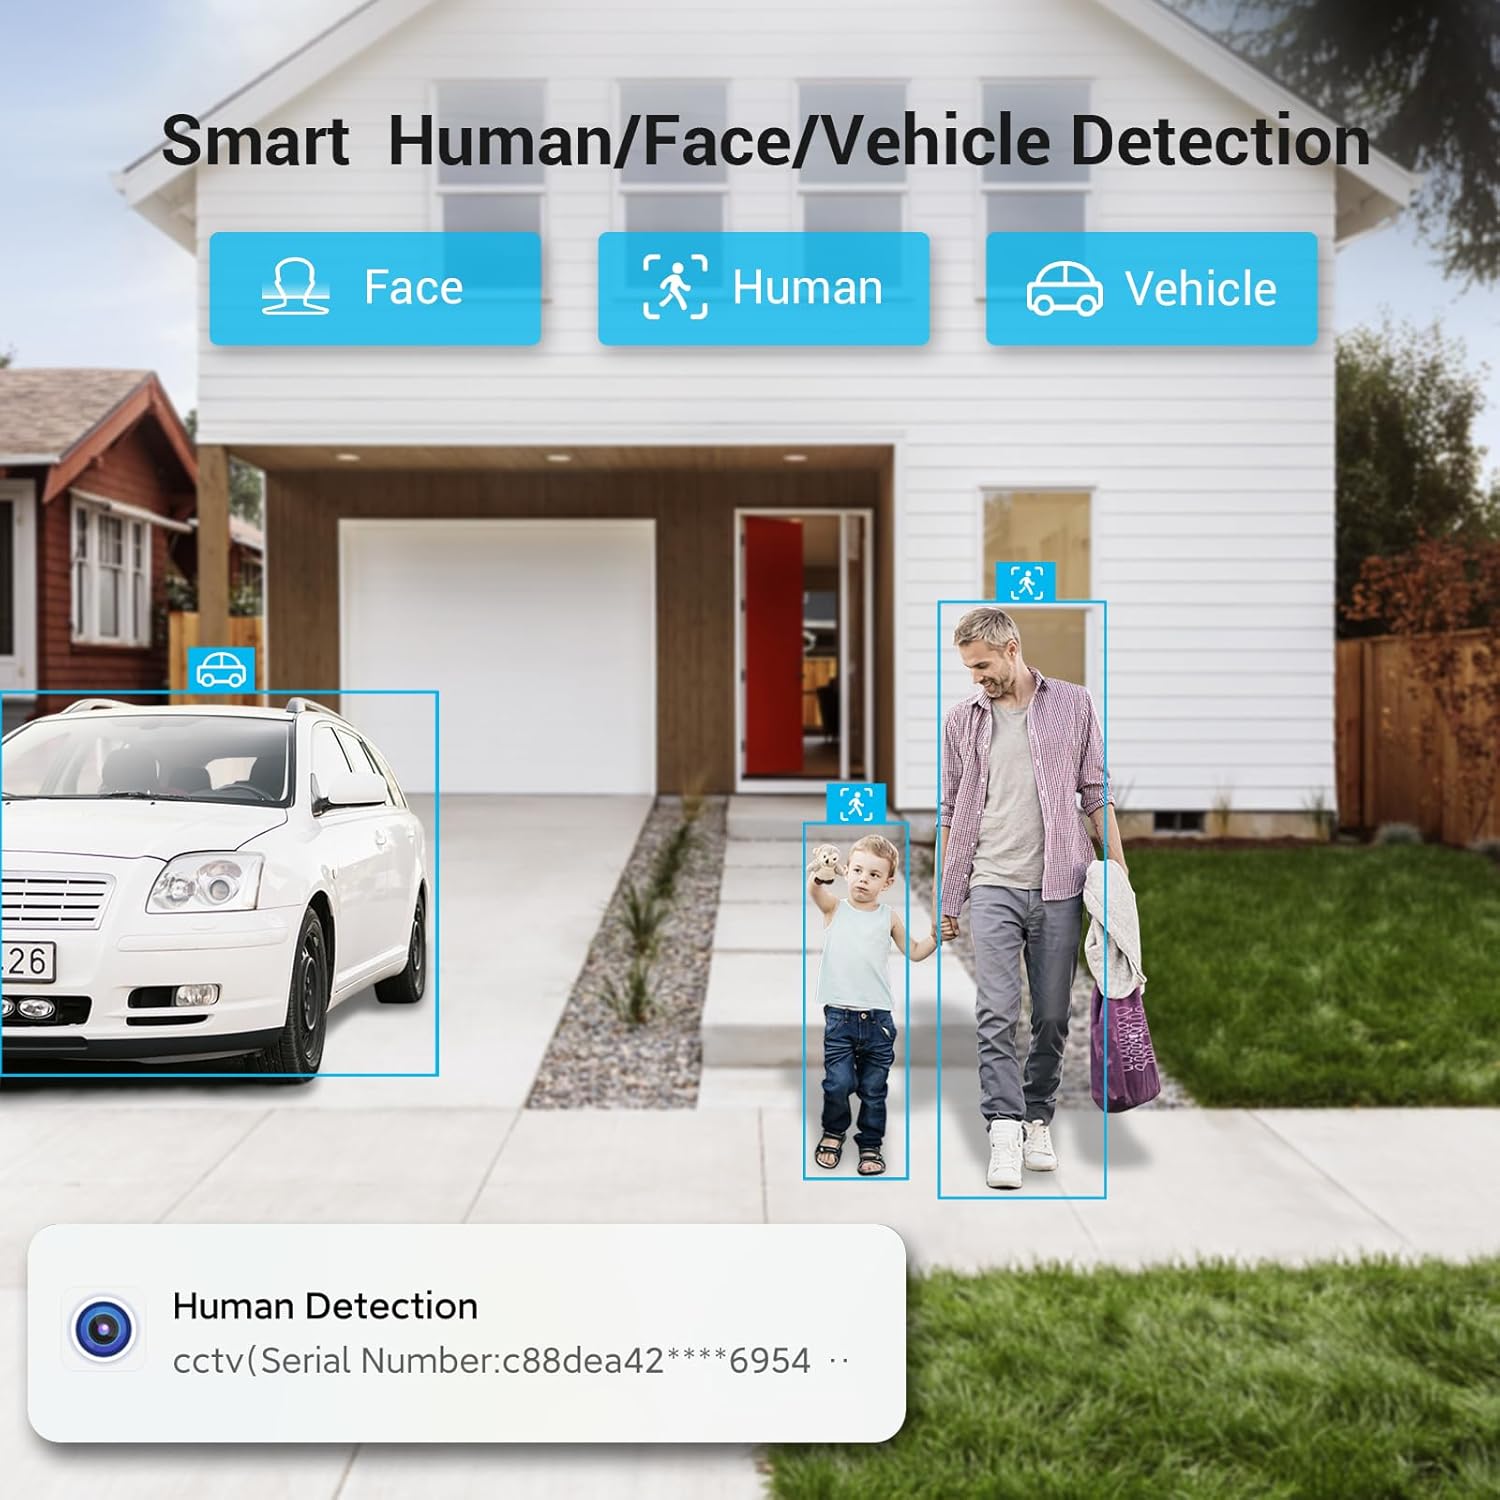
Image: A surveillance view of a driveway and sidewalk, with bounding boxes highlighting detected humans and vehicles, labeled "Human Detection" and "Vehicle Detection".
These features can be configured in the DVR's AI or Smart Detection settings.
5.5 Channel Connection Modes
The DVR supports flexible channel configurations to accommodate various camera types.
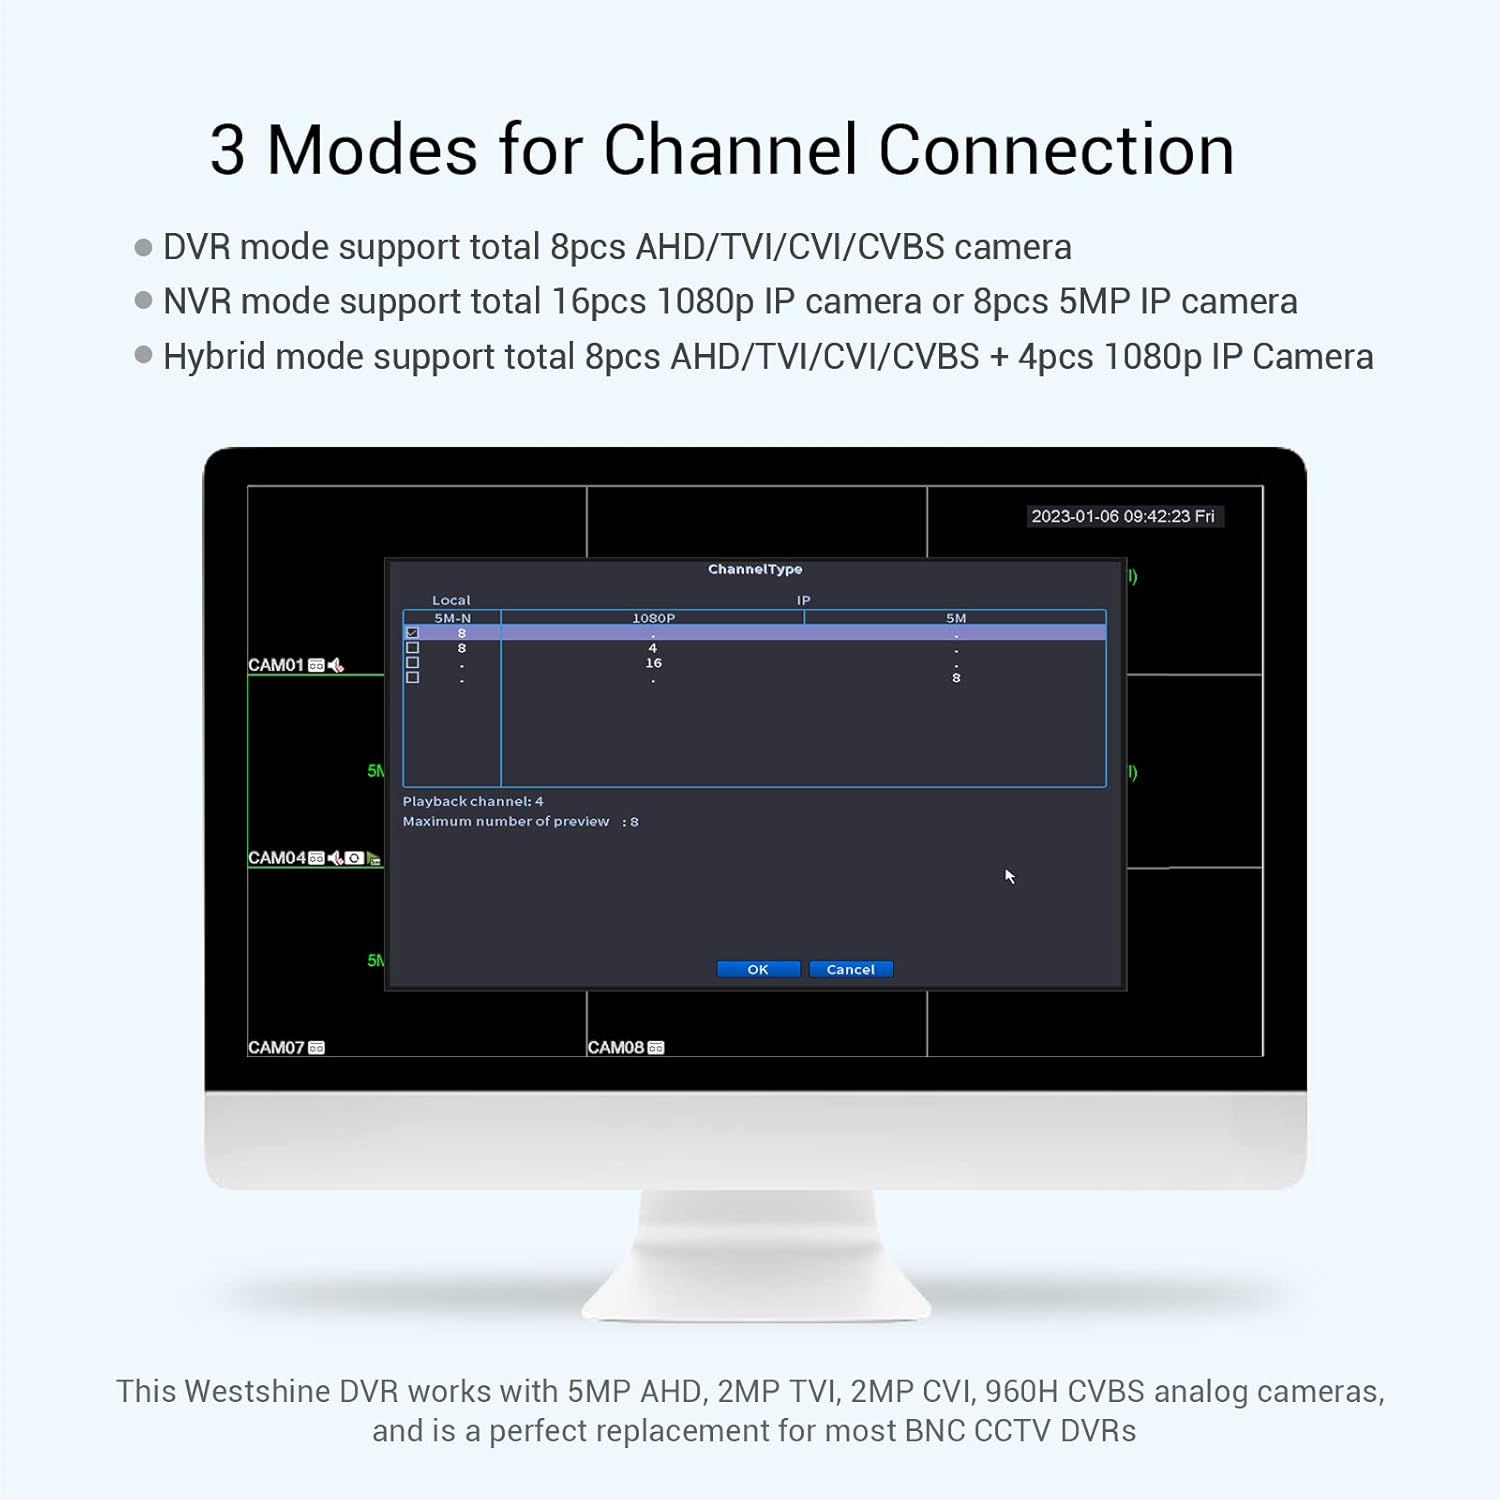
Image: A screenshot of the DVR's on-screen interface, displaying options for "Channel Type" configuration, allowing users to select between DVR mode (analog cameras), NVR mode (IP cameras), or Hybrid mode.
- DVR Mode: Supports up to 8 AHD/TVI/CVI/CVBS analog cameras.
- NVR Mode: Supports up to 16 1080P IP cameras or 8 5MP IP cameras.
- Hybrid Mode: Supports a combination of analog and IP cameras, e.g., 8 AHD/TVI/CVI/CVBS cameras + 4 1080P IP cameras.
Adjust these settings in the DVR's system configuration menu to match your camera setup.
6. Maintenance
6.1 General Care
- Keep the DVR in a cool, dry, and well-ventilated area.
- Avoid exposing the unit to direct sunlight, high temperatures, or excessive humidity.
- Clean the exterior with a soft, dry cloth. Do not use liquid cleaners.
- Ensure proper airflow around the unit to prevent overheating.
6.2 Hard Drive Management
Regularly check the hard drive status through the DVR's menu. If the hard drive becomes full, the DVR will typically overwrite the oldest footage. You can configure this behavior in the recording settings.

Image: A comparison graphic showing H.265+ compression uses 25% of storage and bandwidth compared to H.264, with a maximum capacity of 14TB. A hard disk drive is shown as sold separately.
The H.265+ compression technology helps maximize storage efficiency, allowing for more footage to be stored on the same hard drive capacity.
6.3 Firmware Updates
Periodically check the WESTSHINE support website for firmware updates. Updating firmware can improve performance, add new features, and fix bugs.
7. Troubleshooting
| Problem | Possible Cause | Solution |
|---|---|---|
| No video output on monitor. | Loose cable connection, incorrect input source on monitor, DVR not powered on. | Check HDMI/VGA cable connections. Ensure monitor is set to correct input. Verify DVR power adapter is connected and unit is on. |
| Cameras not displaying video. | Camera power issue, loose BNC cable, incompatible camera type, IP camera network issue. | Check camera power supply. Secure BNC connections. Ensure camera type is compatible with DVR channel settings. Verify IP camera network configuration. |
| Remote viewing not working. | Network connection issue, incorrect app settings, P2P service offline. | Ensure DVR is connected to the internet. Check network settings on DVR (DHCP/Static IP). Verify device is added correctly in XMEye Pro app. Restart DVR and router. |
| No recording or playback. | No hard drive installed, hard drive not formatted, recording schedule not set. | Install and format a surveillance-grade hard drive. Configure recording schedules in the DVR menu. |
| Motion detection alerts not received. | Motion detection not enabled, incorrect alert settings, network issues. | Enable motion detection for relevant channels. Configure email/app push settings. Check network connectivity. |
8. Specifications
| Model Number | 1b8f8293-f568-4ae7-a1ee-7b4b45897508 |
| Video Input | 8-Channel AHD Cameras + 4-Channel IP Cameras (Hybrid 5-in-1) |
| Supported Camera Types | 720P/1080P/12.5fps 5MP AHD, 720P/1080P TVI, CVI, 960H CVBS analog, 2MP/5MP IP cameras |
| Video Compression | H.265+ |
| Video Output | HDMI, VGA |
| Audio Input/Output | RCA ports |
| USB Interface | 2 x USB 2.0 |
| Network Interface | RJ45 Ethernet Port |
| Hard Drive Support | 1 x SATA (500GB to 14TB, surveillance-grade recommended) |
| Remote Access | XMEye Pro App (Android/iOS), VMS Client (Windows/Mac), Web Browser (Chrome/Firefox/Edge) |
| Dimensions (L x W x H) | Approx. 7.83 x 9.06 x 1.85 inches (based on image and package dimensions) |
| Item Weight | 1.9 pounds |
| Power Supply | DC 12V (adapter included) |
9. Warranty & Support
WESTSHINE is dedicated to providing reliable products and after-sales service. For technical support, warranty information, or further assistance, please refer to the following resources:
- Online Support: Visit the official WESTSHINE website for FAQs, troubleshooting guides, and firmware downloads.
- Contact Support: Refer to the contact information provided on the WESTSHINE website or within the XMEye Pro app for direct assistance.

Image: A QR code labeled "Get Support". Scan this code with your smartphone to access WESTSHINE support resources.
Additional support link: WESTSHINE Support Resources