Ampeak PWUS01K2
Ampeak Pure Sine Wave Inverter 1000W User Manual
Model: PWUS01K2
1. Introduction
Thank you for choosing the Ampeak Pure Sine Wave Inverter 1000W. This inverter is designed to convert DC 12V battery power to AC 120V household power, providing reliable electricity for various applications, including power outages, outdoor activities, and vehicle use. This manual provides essential information for safe and efficient operation, setup, and maintenance of your inverter.

Image: Ampeak Pure Sine Wave Inverter 1000W, showing the main unit, connection cables, and a wrench.
2. Safety Information
Your safety is paramount. Please read and understand all safety instructions before operating the inverter. Failure to follow these instructions may result in electric shock, fire, or serious injury.
- ETL Certified: This inverter is ETL certified, meeting high safety standards.
- 17-Point Safety System: Equipped with comprehensive protection against over-voltage, under-voltage, overload, over-temperature, short circuit, and more.
- Professional Spark Protection: Features a circuit that instantly cuts off output in case of improper connections or short circuits to prevent sparks.
- Pure Sine Wave Output: Mimics household electricity, making it safe for delicate electronics.
- Ensure proper ventilation around the inverter to prevent overheating.
- Do not expose the inverter to water, rain, or excessive moisture.
- Keep out of reach of children.
- Connect the inverter only to a 12V DC power source.
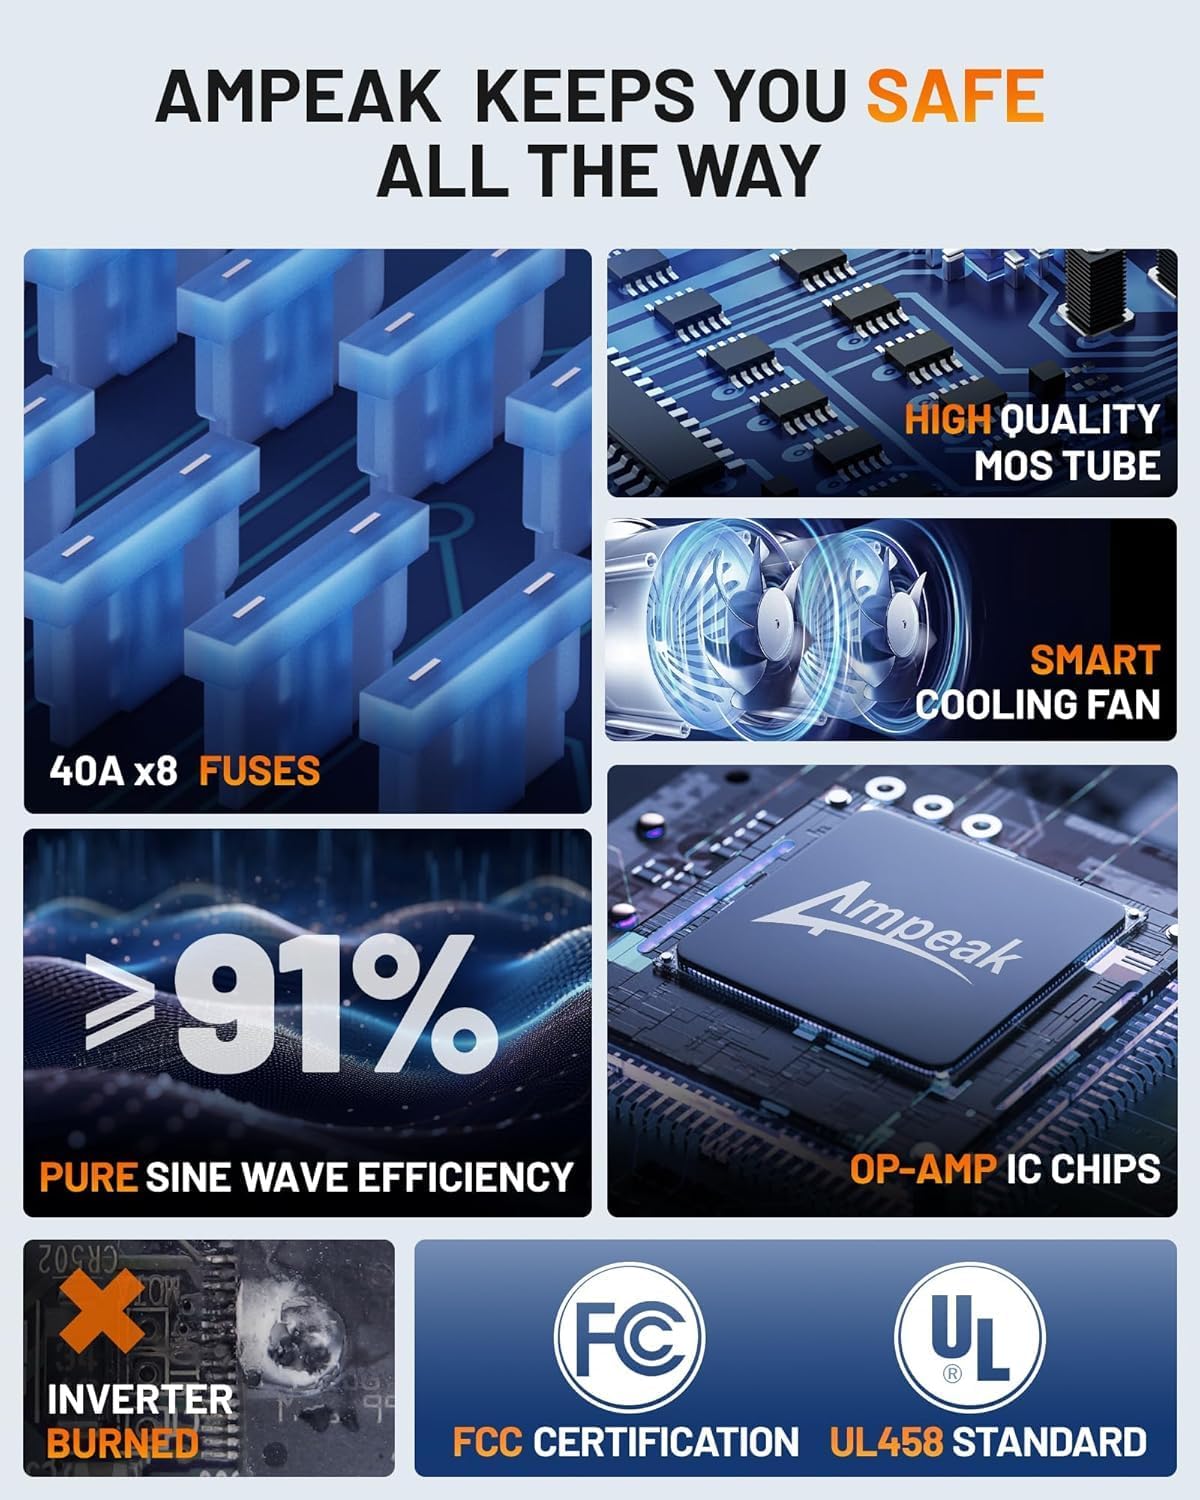
Image: Diagram illustrating Ampeak's safety features, including 40A x8 fuses, high-quality MOS tube, smart cooling fan, >91% pure sine wave efficiency, and OP-AMP IC chips, along with FCC and UL458 certifications.
3. Product Overview
3.1 Components
- Main Inverter Unit: Converts DC to AC power.
- AC Outlets (3): Standard 120V AC outlets for powering devices.
- USB Ports (2): 2.4A USB ports for charging mobile devices.
- LCD Display: Shows input/output voltage, current, power, and status.
- Power Switch: On/Off control for the inverter.
- Cooling Fan: Automatically activates to dissipate heat.
- Battery Cables: For connecting to a 12V battery.
- Remote Control: For convenient power control from a distance.
3.2 Features
- Precision LCD Display: Provides real-time information on input/output voltage, current, and power for seamless data management.
- Enhanced Voltage Stability: Upgraded output voltage of 115V ± 5V for reliable power.
- Ultra-Quiet Fan Upgrade: Efficiently dissipates heat with minimal noise.
- Smart Fan Activation: Fan activates only when internal temperature reaches 50°C or upon power cancellation, optimizing noise and energy.
- Strong Compatibility: Compatible with various battery types including LI, SLD, GEL, FLD, and AGM.

Image: Close-up of the Ampeak Inverter's intuitive LCD display, showing input voltage, wattage, output voltage, current, and frequency.

Image: Visual representation of the inverter's features including 5 AWG TC cables, AC and USB outputs, 20 FT remote controls, and the LCD display screen.
4. Setup
Follow these steps to properly set up your Ampeak Pure Sine Wave Inverter:
- Choose a Location: Place the inverter in a dry, well-ventilated area, away from direct sunlight, heat sources, and flammable materials. Ensure there is enough space for proper airflow around the cooling fan.
- Connect to Battery:
- Ensure the inverter's power switch is in the "OFF" position.
- Connect the red (positive) battery cable to the positive (+) terminal of the inverter.
- Connect the black (negative) battery cable to the negative (-) terminal of the inverter.
- Connect the other end of the red cable to the positive (+) terminal of your 12V battery.
- Connect the other end of the black cable to the negative (-) terminal of your 12V battery.
- Ensure all connections are tight and secure to prevent loose connections and overheating.
- Mounting (Optional): The inverter features mounting screws for fixed installations, such as in a cabin or vehicle.

Image: Diagram showing a 12V battery setup with the inverter connected to power a CPAP machine, fridge, and WiFi router.

Image: Diagram illustrating a solar panel powered setup, including solar panels, charge controller, 12V battery, inverter, and connected appliances like a coffee maker, microwave oven, and car fridge.
5. Operation
Once the inverter is properly connected to a 12V battery, you can begin using it to power your AC and USB devices.
- Powering On: Flip the power switch on the inverter to the "ON" position. The LCD display will illuminate, showing the current input voltage and other operational data.
- Connecting AC Devices: Plug your 120V AC devices into the three standard AC outlets on the inverter. Ensure the total wattage of your devices does not exceed the inverter's continuous power rating (1000W).
- Connecting USB Devices: Plug your USB-powered devices into the two 2.4A USB ports for charging.
- Monitoring Performance: Regularly check the LCD display for input/output voltage, current, and power to ensure stable operation.
- Smart Fan Operation: The cooling fan will automatically activate when the internal temperature reaches 50°C or when the inverter is under significant load, ensuring optimal cooling and quiet operation.
- Powering Off: When finished, turn off all connected devices, then flip the inverter's power switch to the "OFF" position.
5.1 Typical Power Usage Examples
The Ampeak 1000W inverter can power a variety of devices. Here are some examples based on a 12V 100Ah battery and 91% inverter conversion efficiency:
| Device | Wattage | Approx. Run Time (100Ah Battery) |
|---|---|---|
| Fridge | 100W | 9 Hours |
| Laptop | 60W | 15 Hours |
| Coffee Maker | 500W | 1.8 Hours |
| Lights | 20W | 45 Hours |
| 50-inch TV | 150W | 6 Hours |
| Printer | 200W | 4.5 Hours |
| Security Monitoring | 300W | 3 Hours |
| POS System | 50W | 18 Hours |
| Audio System | 300W | 3 Hours |
| Fans | 100W | 9.1 Hours |
| Microwaves | 600W | 1.5 Hours |
| CPAP Machine | 100W | 9.1 Hours |

Image: Illustrates the inverter's compatibility with various battery types (LI, SLD, GEL, FLD, AGM) and provides examples of devices it can power with estimated run times.

Image: Shows various scenarios where the Ampeak inverter can be used, including for homeowners, outdoors, camping, and on a yacht, highlighting its efficient power conversion.
6. Maintenance
Regular maintenance ensures the longevity and optimal performance of your Ampeak inverter.
- Cleaning: Keep the inverter clean and free from dust and debris. Use a dry cloth to wipe the exterior. Do not use liquid cleaners.
- Ventilation: Ensure the cooling vents are not blocked. Blocked vents can lead to overheating and reduced performance.
- Connections: Periodically check all cable connections to the inverter and battery. Ensure they are tight and free from corrosion. Loose connections can cause voltage drops and overheating.
- Storage: If storing the inverter for an extended period, disconnect it from the battery and store it in a cool, dry place.
7. Troubleshooting
If you encounter issues with your inverter, refer to the table below for common problems and solutions.
| Problem | Possible Cause | Solution |
|---|---|---|
| No output voltage / Inverter not turning on | Low battery voltage, loose connections, blown fuse, faulty power switch. | Check battery voltage (must be 12V). Tighten all connections. Check and replace fuses if necessary. Ensure power switch is ON. |
| Overload alarm / Inverter shuts down | Connected load exceeds inverter's wattage rating. | Reduce the total wattage of connected devices. Disconnect some appliances. |
| Over-temperature alarm / Inverter shuts down | Poor ventilation, blocked fan, high ambient temperature. | Ensure adequate ventilation. Clear any obstructions from the fan. Move inverter to a cooler environment. |
| Short circuit protection activated | Short circuit in connected device or wiring. | Disconnect all devices. Check devices and wiring for short circuits. Reconnect one by one. |
8. Specifications
| Feature | Detail |
|---|---|
| Brand | Ampeak |
| Model | 1000W Power Inverter (PWUS01K2) |
| Wattage | 1000 watts |
| Input Voltage | DC 12V |
| Output Voltage | AC 120V (115V ± 5V) |
| USB Ports | 2 x 2.4A |
| AC Outlets | 3 |
| Item Weight | 6.93 pounds |
| Product Dimensions | 9.65 x 6.5 x 3.94 inches |
| Certifications | ETL Certified |
| Power Source | Battery Powered |
| Recommended Uses | Vehicle, Home Backup, Outdoor Activities |
9. Warranty and Support
Ampeak stands behind the quality of its products.
- Warranty: This product comes with 18 Months Support. Please refer to the official Ampeak website or your purchase documentation for detailed warranty terms and conditions.
- User Guide (PDF): A comprehensive user guide in PDF format is available for download: Download User Guide PDF.
- Customer Support: For any questions, technical assistance, or warranty claims, please contact Ampeak customer support through their official channels.