Introduction
This manual provides detailed instructions for the safe and efficient use of your NEEWER Basic 74-inch Video Tripod with Fluid Head, Model TP37. Please read this manual thoroughly before operation and retain it for future reference. The NEEWER Basic series focuses on essential functions and robust design, ensuring stability and smooth operation for various video and photography needs.
What's in the Box
- NEEWER Basic 74-inch Video Tripod with Fluid Head
- Quick Release Plate
- Detachable Handle
- L-shaped Hex Key
- Carrying Bag
Setup
1. Unpacking and Unfolding
Remove the tripod from its carrying bag. Place the tripod on a flat, stable surface. Gently spread the tripod legs until the mid-level spreader is fully extended and locked into position. Ensure all leg locks are secure.

Image: The NEEWER Basic 74-inch Video Tripod shown in its folded state and progressively extended to its maximum height, illustrating its three-section height adjustment capability.
Video: A person demonstrating the quick and easy setup of the NEEWER Basic 74-inch Video Tripod, including unfolding the legs and securing the mid-level spreader.
2. Adjusting Leg Height
The tripod features 3-section legs with plastic buckles for quick height adjustment. Flip open the plastic buckles on each leg section to extend or retract the legs. Once the desired height is achieved (from 33"/84.5cm to 74"/187cm), firmly close the buckles to lock the legs in place.
3. Attaching the Fluid Head
The fluid head is pre-attached to the tripod. Ensure it is securely fastened before mounting any equipment.
4. Mounting Your Camera
Locate the quick release plate on the fluid head. Press the side button to detach the quick release plate from the clamp base.

Image: Detailed view of the quick release plate and its locking mechanism, showing how to attach and detach a camera quickly and securely.
Attach your camera (DSLR, camcorder, mirrorless camera, etc.) to the quick release plate using the appropriate 1/4" or 3/8" mounting screw. Use the included L-shaped hex key for tool-free setup. Ensure the camera is firmly secured to the plate.

Image: Close-up of the quick release plate, highlighting the 1/4" and 3/8" mounting screws for various camera types and the non-slip rubber pads.
Slide the quick release plate with your mounted camera back onto the fluid head's clamp base until it clicks into place. Verify it is securely locked by gently attempting to lift the camera.
Video: A demonstration of how to quickly attach and detach the camera using the quick release knob and plate system.
Operating Instructions
1. Pan and Tilt Adjustments
The fluid head allows for smooth 360° panning and -70°/+90° tilting. Loosen the pan adjustment knob to rotate the camera horizontally. Loosen the tilt adjustment knob to adjust the camera's vertical angle. Tighten the knobs to lock the desired position.
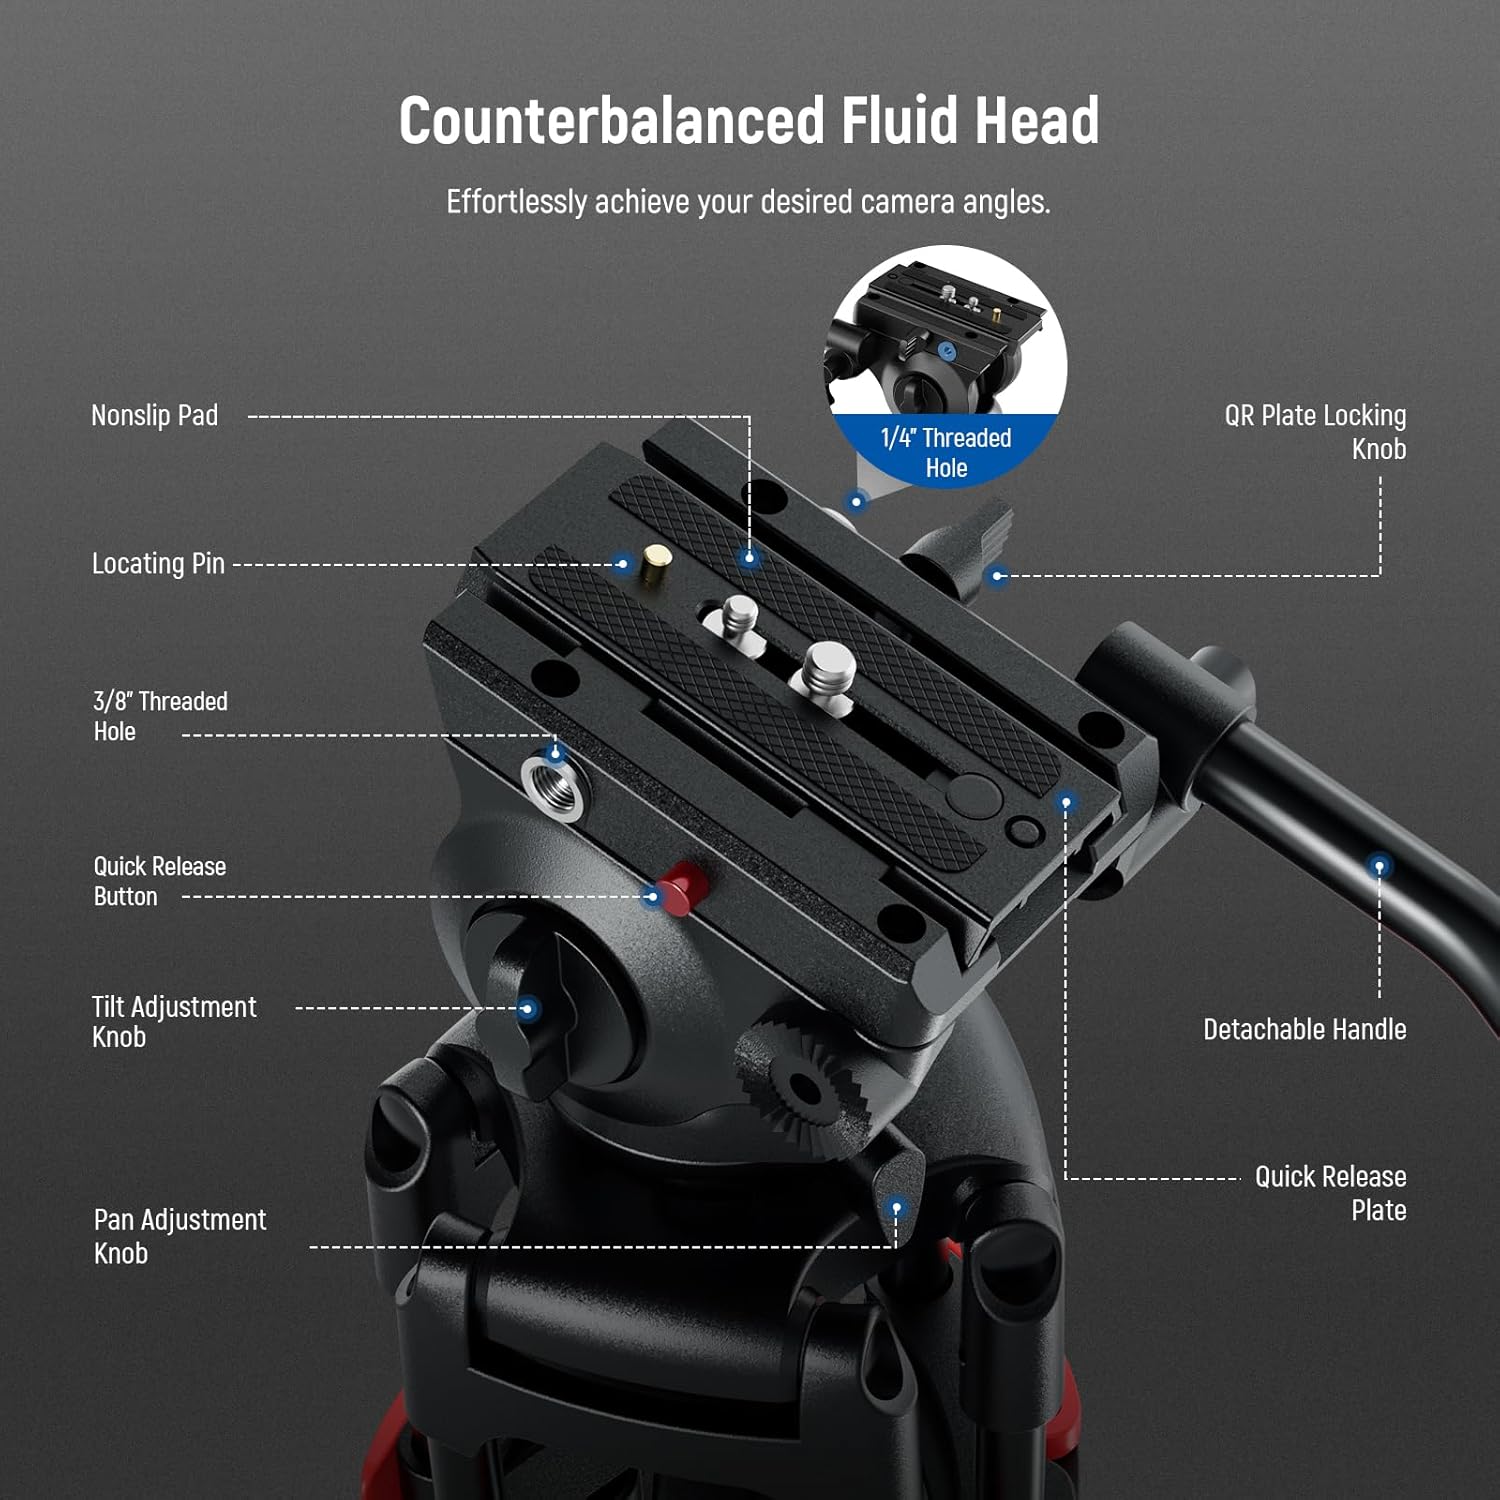
Image: Diagram illustrating the 360° panning and -70°/+90° tilting capabilities of the fluid head, along with the location of the pan and tilt adjustment knobs and the integrated bubble level.
2. Using the Bubble Level
Utilize the integrated bubble level on the fluid head for quick and accurate horizontal alignment of your camera.
3. Detachable Handle
The fluid head includes a detachable handle for enhanced control during panning and tilting. It can be repositioned to suit your dominant hand or removed for compact storage.
Maintenance
To ensure the longevity and optimal performance of your tripod, follow these maintenance guidelines:
- Cleaning: Wipe down the tripod with a soft, dry cloth after each use to remove dust and dirt. For stubborn grime, use a slightly damp cloth and mild soap, then dry thoroughly.
- Lubrication: Periodically check the moving parts, especially the leg locks and fluid head mechanisms. Apply a small amount of silicone-based lubricant if movement becomes stiff. Avoid oil-based lubricants as they can attract dust.
- Storage: Store the tripod in its included carrying bag in a cool, dry place away from direct sunlight and extreme temperatures.
- Inspection: Regularly inspect all screws, knobs, and leg locks for tightness. Tighten any loose components using the provided hex key or appropriate tools.
Troubleshooting
- Issue: Tripod feels unstable.
- Solution: Ensure all leg sections are fully extended and their plastic buckles are securely closed. Verify that the mid-level spreader is properly locked. Check that the camera is firmly mounted to the quick release plate and the plate is locked onto the fluid head.
- Issue: Pan or tilt movement is not smooth.
- Solution: Loosen the pan and/or tilt adjustment knobs slightly. If the issue persists, the fluid head may require lubrication (refer to the Maintenance section) or adjustment. Ensure no debris is obstructing the movement.
- Issue: Quick release plate is difficult to attach/detach.
- Solution: Ensure the quick release button is fully pressed when attempting to detach the plate. When attaching, make sure the plate is correctly aligned with the clamp base before pushing it in until it clicks.
Specifications
| Feature | Detail |
|---|---|
| Model Number | TP37 |
| Maximum Height | 74 inches (187 cm) |
| Minimum Height | 33 inches (84.5 cm) |
| Load Bearing Capacity | Up to 17.6 lbs (8 kg) |
| Pan Range | 360° |
| Tilt Range | -70° to +90° |
| Leg Sections | 3 |
| Material | Metal |
| Item Weight | 9.44 lbs (4.28 kg) |
| Product Dimensions | 6.3 x 6.3 x 74 inches (16 x 16 x 187 cm) |
Warranty and Support
For warranty information and customer support, please refer to the documentation included with your product or visit the official NEEWER website. Keep your purchase receipt as proof of purchase for any warranty claims.


