1. Introduction
The Generic HW-QB6 Wall Stud Finder Sensor is a versatile 5-in-1 electronic detector designed to accurately locate wood or metal studs, metal objects, and live AC wires behind walls. Equipped with an LCD display, it provides clear indications for edge, center, depth, and signal strength, enhancing safety and efficiency for various home improvement and construction tasks.

Image: Front view of the Generic HW-QB6 Wall Stud Finder Sensor, showing its white casing and green LCD screen.
2. Product Features
- Multiple Detection Modes: Includes 1/2" Stud Scan (up to 13mm deep), 1" Stud Scan (up to 25mm deep), 1 1/2" Stud Scan (up to 38mm deep), Metal Mode (up to 80mm for magnetic, 60mm for non-magnetic), and AC Mode (up to 51mm for live unshielded AC wires).
- LCD Display: Features a green backlit LCD for clear visibility, displaying signal strength, battery level, detection mode, and center indication.
- Metal Depth Indicator: Provides an indication of the depth of detected metal objects.
- Low Voltage Indicator: Alerts the user when battery power is low.
- Automatic Shutdown: Conserves battery life by automatically shutting down after three minutes of inactivity.
- Durable Construction: Made from electronic components housed in a sturdy plastic casing.
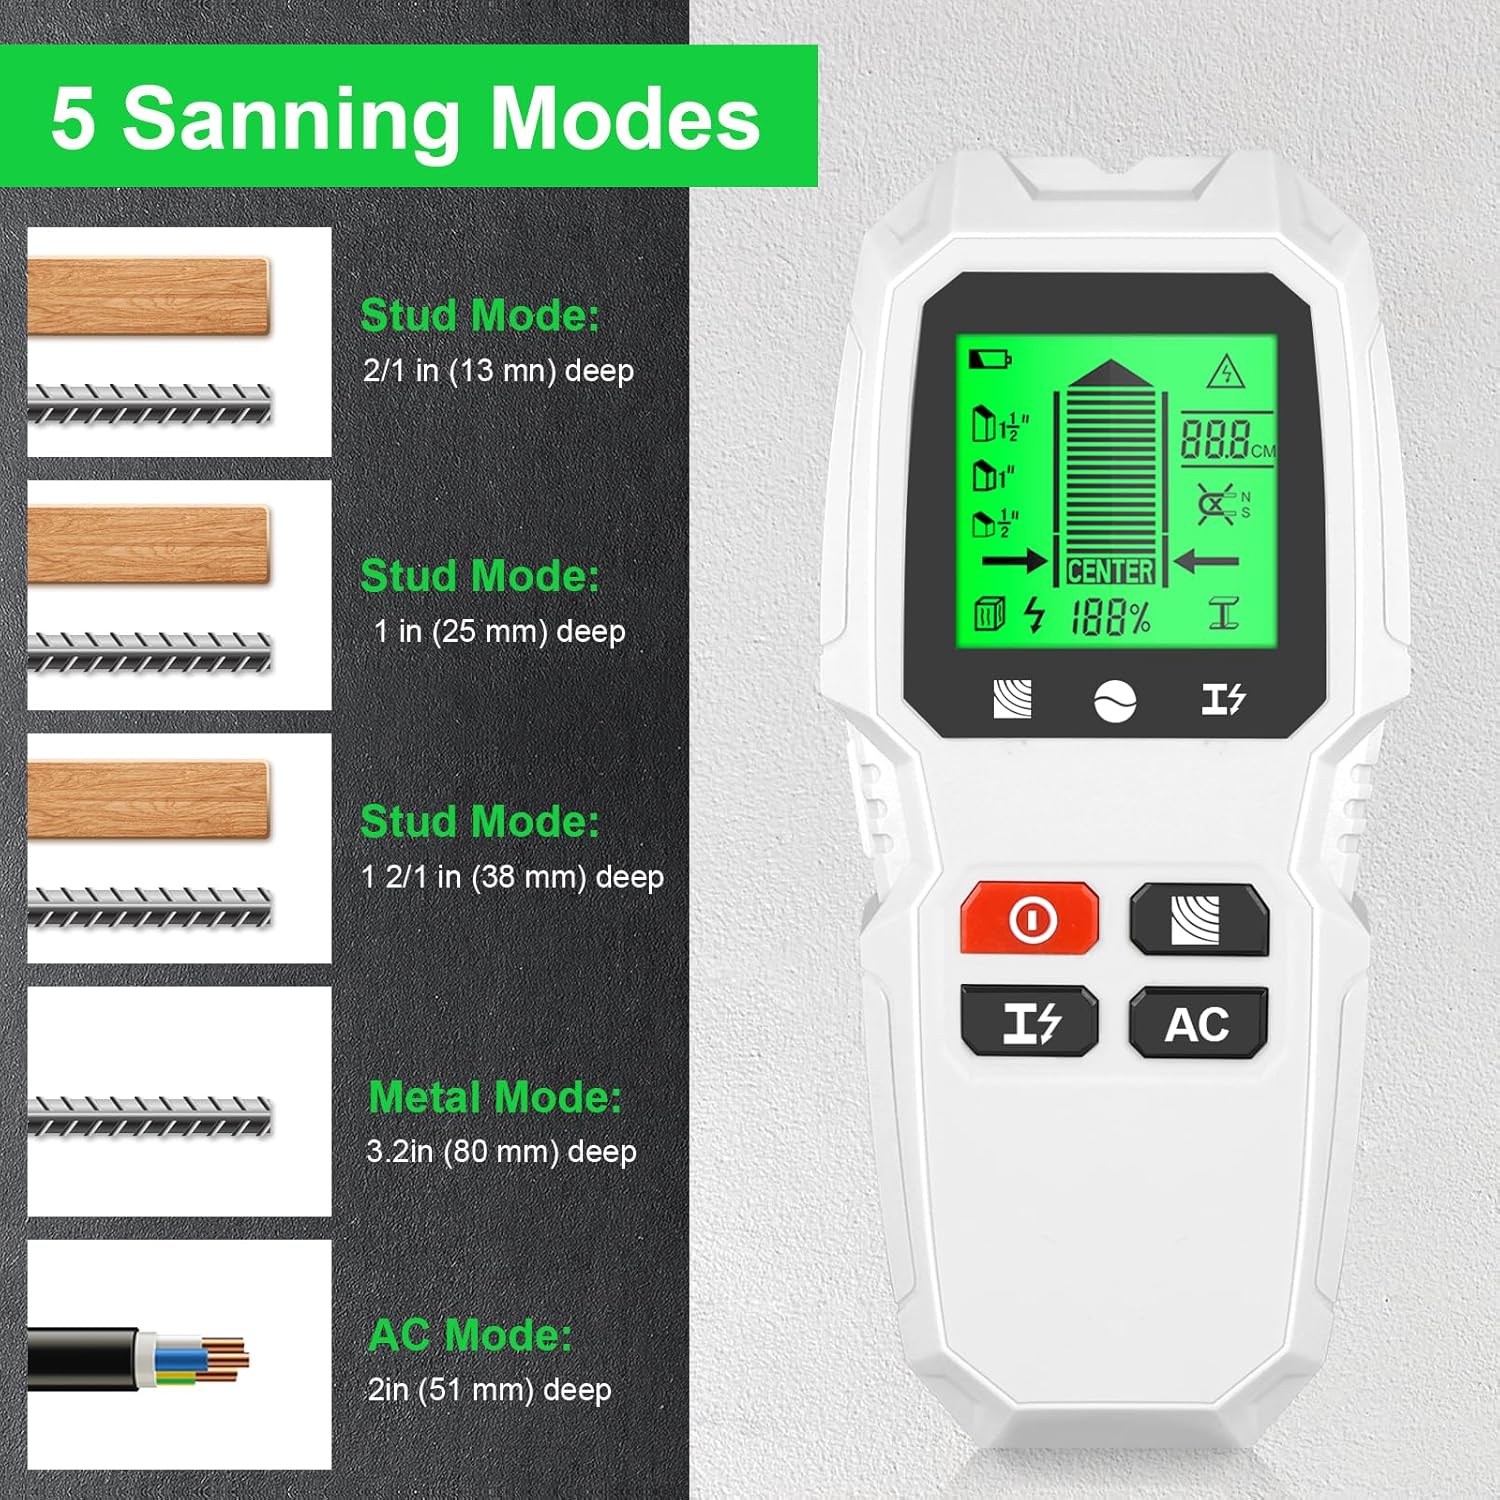
Image: Diagram illustrating the five scanning modes of the HW-QB6: 1/2", 1", 1 1/2" Stud Scan, Metal Mode, and AC Mode, with their respective detection depths.
3. Safety Information
- Always exercise caution when drilling or cutting into walls.
- The AC mode detects live unshielded AC wires. Shielded wires or wires in conduit may not be detected.
- Do not rely solely on the detector for safety. Always turn off power to the area before drilling or cutting if live wires are suspected.
- This stud finder is designed for use on dry interior walls only.
- Sensing depth and accuracy can vary due to moisture content of materials, wall texture, and paint. Freshly painted walls may require one week or longer to dry for accurate readings.
- This stud finder is not designed to scan materials such as ceramic floor tile, carpeting and padding, lath and plaster walls, foil-covered insulation board, glass, or any other dense material.

Image: A man using the stud finder on a wall, with a warning bubble indicating the presence of live wires, emphasizing the safety feature of AC detection.
4. Setup
4.1 Battery Installation
- Locate the battery compartment on the back of the unit.
- Slide the battery compartment cover downwards to open it.
- Insert a 9V battery, ensuring the correct polarity (+/-) as indicated inside the compartment.
- Close the battery compartment cover by sliding it back into place until it clicks securely.

Image: Rear view of the HW-QB6 stud finder, showing the open battery compartment and the removable cover.
5. Operating Instructions
5.1 Power On and Calibration
- Press the red 'On/Off' button to power on the device.
- Place the stud finder flat against the wall surface where you intend to scan. Ensure there is no movement.
- Press and hold the 'Scan Button' (located below the On/Off button) to initiate calibration. The device will calibrate automatically. Wait for the calibration process to complete before moving the device.
5.2 Selecting Scan Modes
The HW-QB6 features dedicated buttons for mode selection:
- Stud Mode Button: Press this button to cycle through the 1/2", 1", and 1 1/2" stud scan modes. If you are unsure of the wall thickness, it is recommended to start with the 1/2" scan mode. If no detection occurs, proceed to 1" or 1 1/2" scan modes.
- Metal Mode Button: Press this button to activate the metal detection mode.
- AC Mode Button: Press this button to activate the live AC wire detection mode.
5.3 Scanning Procedure
- After calibration and mode selection, slowly slide the device horizontally across the wall surface.
- Observe the LCD display for indications of detected objects.
- When an object is detected, the signal bar will increase, and an arrow direction indicator will guide you towards the center of the object. The 'CENTER' icon will appear when the device is directly over the center of the stud or object.
- Mark the location on the wall using a pencil. For best accuracy, scan the area from both left and right directions and mark both edges and the center.
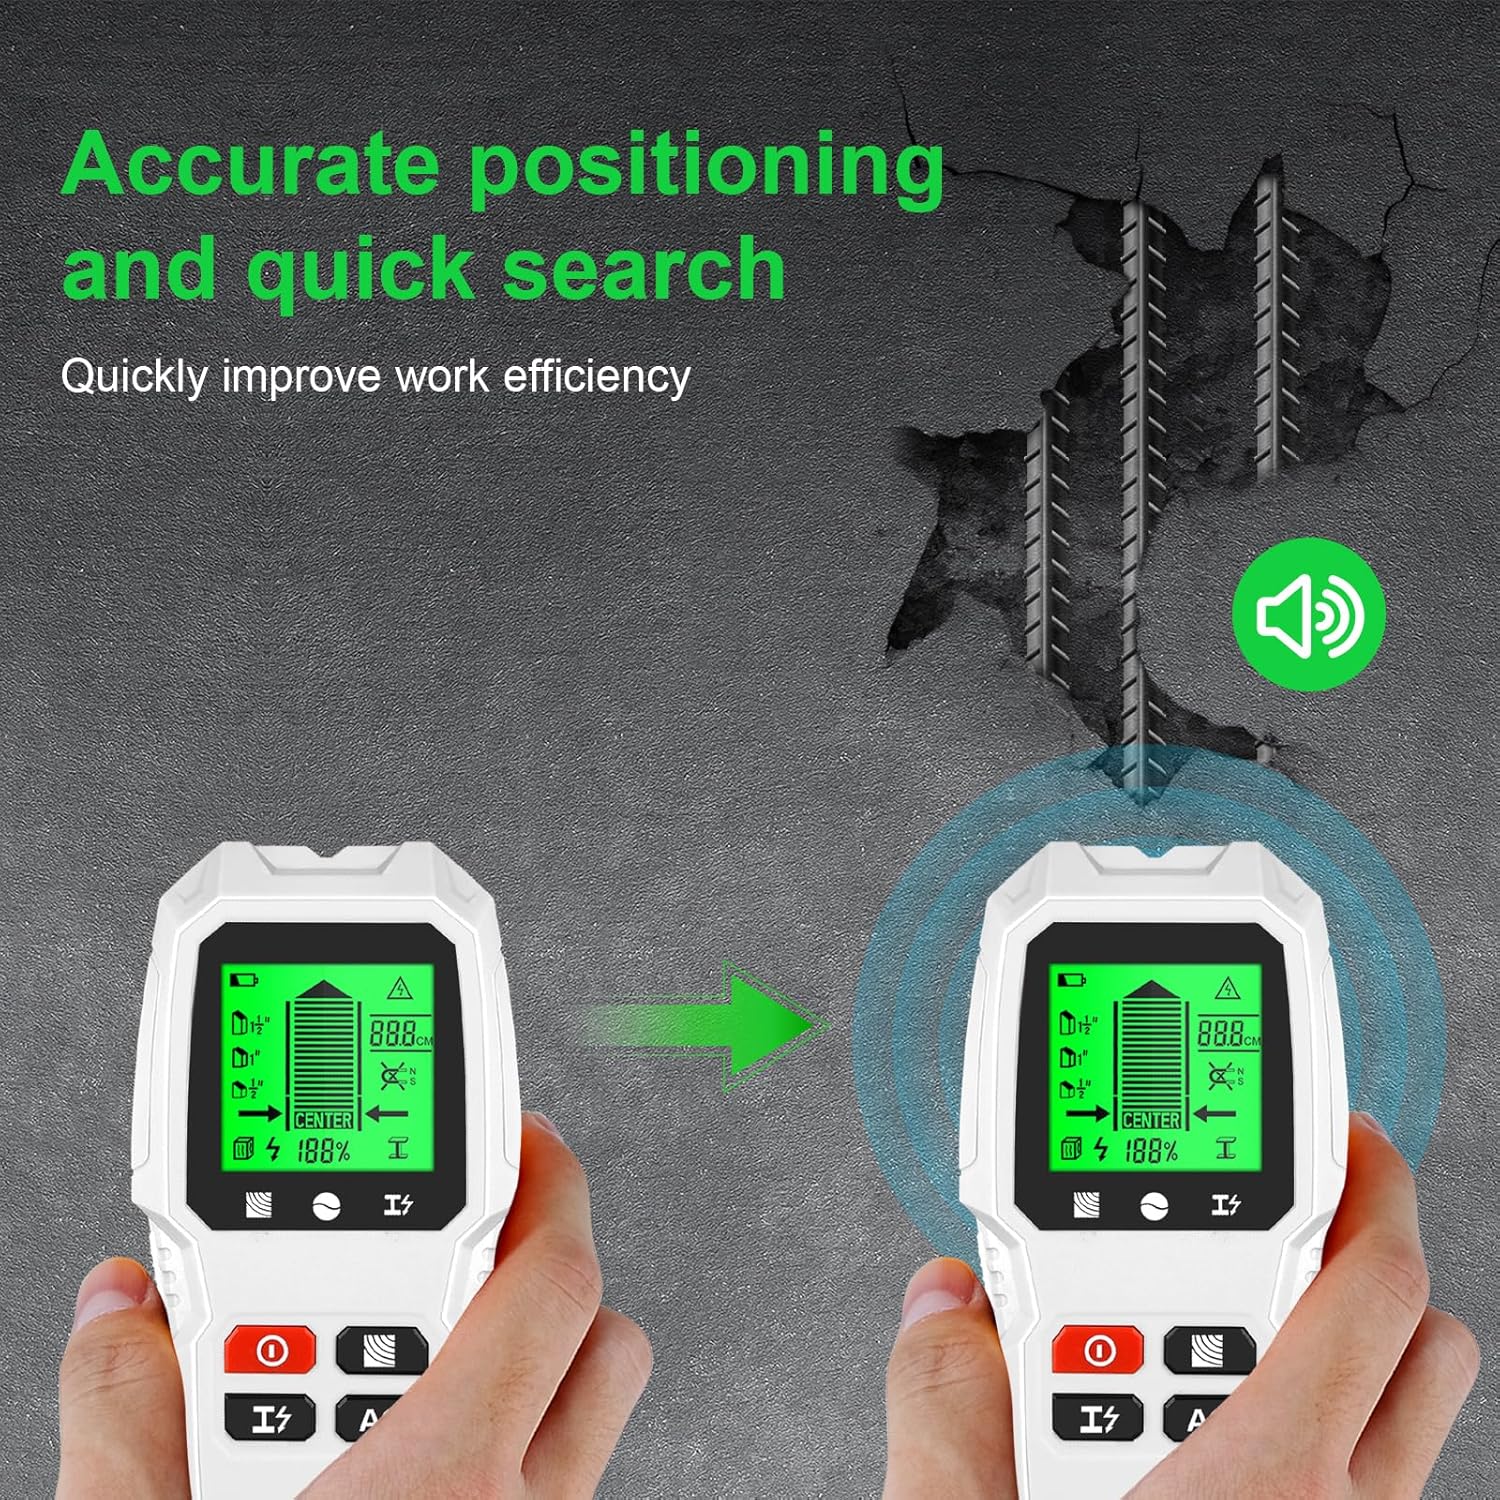
Image: Two stud finders on a wall, one indicating a strong signal and center detection, demonstrating accurate positioning and quick search capabilities.
6. Understanding the Display
The LCD screen provides critical information during operation:
- Low Battery Icon: Indicates when the battery needs replacement.
- Signal Bar: Shows the strength of the detected signal, increasing as you approach an object.
- 1/2", 1", 1 1/2" Scan Mode Icons: Indicate the currently selected stud scan depth.
- Arrow Direction: Guides you towards the center of the detected object.
- Signal %: Displays the percentage of signal strength.
- Stud Mode Icon: Indicates the device is in stud detection mode.
- AC Mode Icon: Indicates the device is in live AC wire detection mode.
- AC Warning Icon: Flashes when live AC wires are detected in any mode.
- Metal Depth Indication: Provides a visual representation of the depth of detected metal.
- Magnetic & Non-magnetic Icon: Differentiates between magnetic and non-magnetic metal.
- Metal Mode Indication: Indicates the device is in metal detection mode.
- Mark Pointing: A visual cue for marking the detected location.
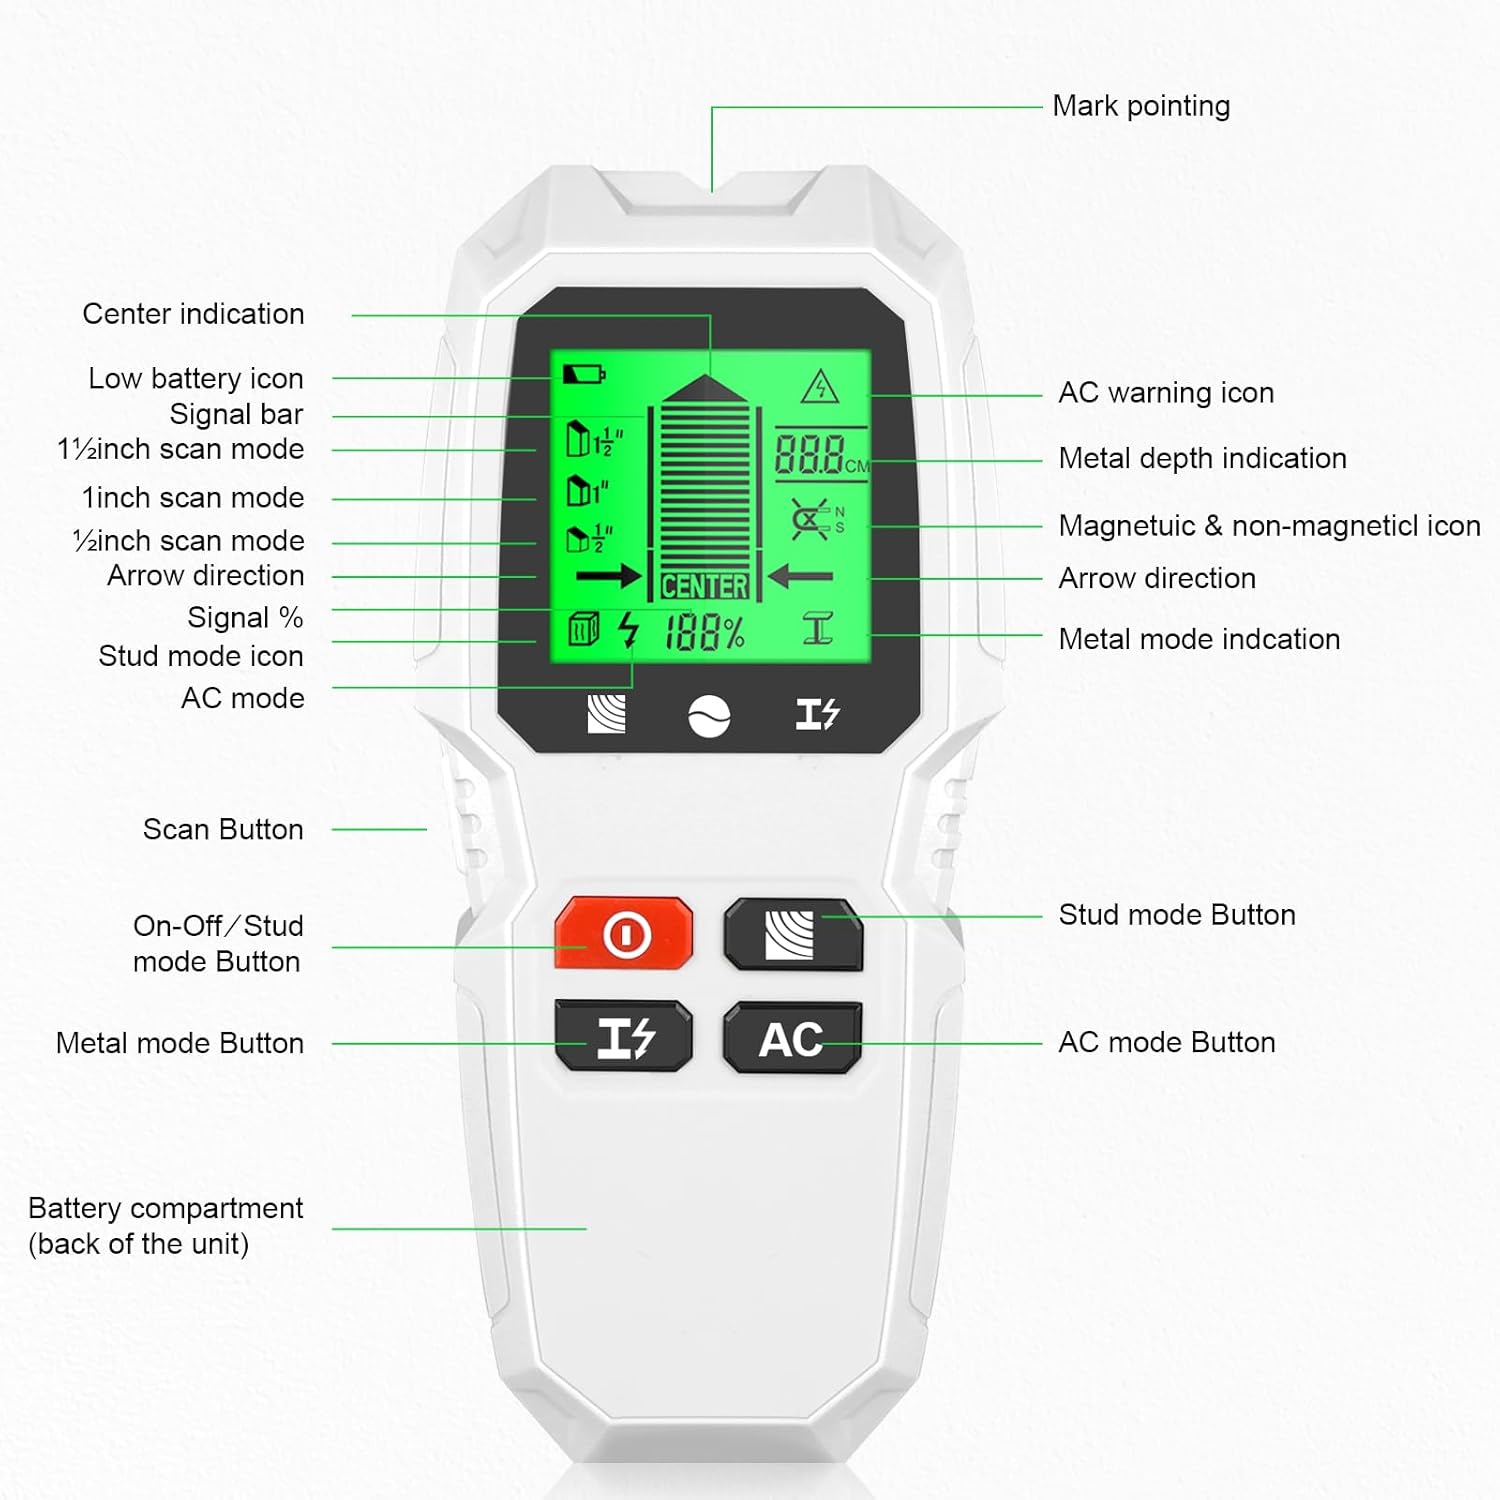
Image: Detailed view of the HW-QB6 LCD display with labels pointing to each icon and indicator, explaining their meaning.
7. Maintenance
- Keep the device clean and dry. Wipe with a soft, damp cloth. Do not use abrasive cleaners or solvents.
- Store the device in a cool, dry place away from direct sunlight and extreme temperatures.
- Remove the battery if the device will not be used for an extended period to prevent battery leakage.
- Avoid dropping the device or subjecting it to strong impacts.
8. Troubleshooting
| Problem | Possible Cause | Solution |
|---|---|---|
| Inaccurate readings or no detection. | Improper calibration; Wall material too dense/wet; Low battery; Device not flat against wall. | Recalibrate the device; Ensure wall is dry; Replace battery; Ensure device is flat and moved slowly. |
| AC warning icon always on. | Live wires present in the wall; Electrical interference. | Proceed with extreme caution; Verify with an electrician if unsure; Try scanning in a different area. |
| Device does not power on. | Dead or incorrectly installed battery. | Check battery polarity; Replace with a fresh 9V battery. |
9. Specifications
| Feature | Specification |
|---|---|
| Model Number | HW-QB6 |
| Brand | Generic |
| Color | White |
| Power Source | Battery Powered (9V battery required) |
| Material | Plastic |
| Item Weight | 0.44 Pounds (approx. 7 ounces) |
| 1/2" Stud Scan Depth | Up to 13mm (1/2 inch) |
| 1" Stud Scan Depth | Up to 25mm (1 inch) |
| 1 1/2" Stud Scan Depth | Up to 38mm (1 1/2 inches) |
| Metal Detection Depth | Up to 80mm (magnetic), 60mm (non-magnetic) |
| AC Wire Detection Depth | Up to 51mm (2 inches) for live unshielded wires |
| Automatic Shutdown | After 3 minutes of inactivity |
10. Warranty and Support
For product support, troubleshooting assistance, or warranty inquiries, please contact the retailer or manufacturer directly. Please refer to your purchase documentation for specific warranty terms and contact information.