1. Introduction
This manual provides essential information for the safe and effective operation of your Micsig STO1004 Tablet Oscilloscope. Please read this manual thoroughly before using the device to ensure proper functionality and to prevent damage.
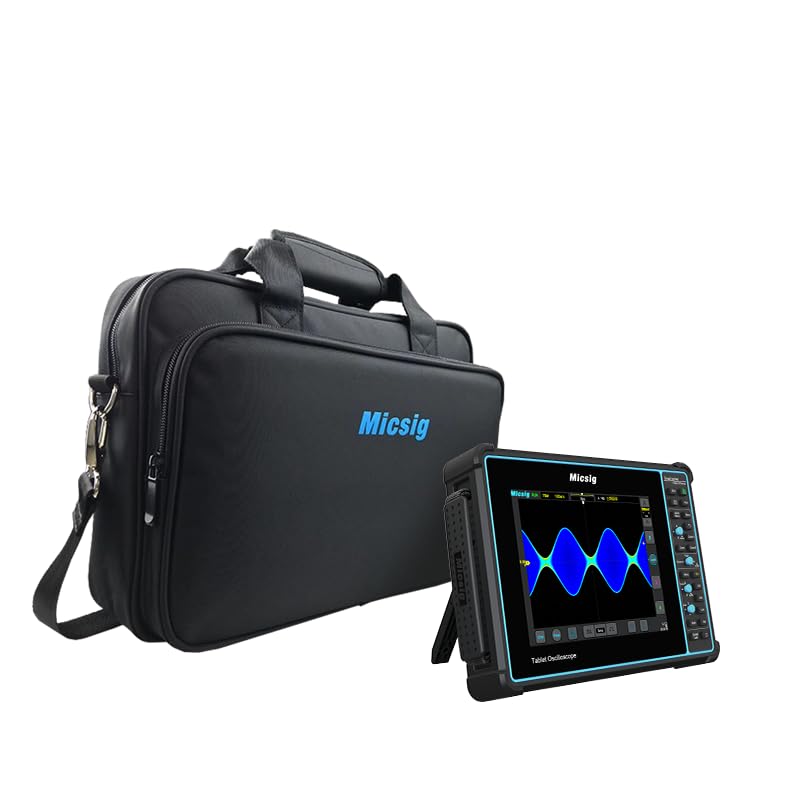
Figure 1: Micsig STO1004 Tablet Oscilloscope with its carrying bag.
Key Features
- Bandwidth: 100MHz
- Sampling Rate: 1GSa/s
- Channels: 4
- Memory Depth: 70Mpts
- Display: 8-inch, 800x600 resolution touchscreen
- Operating System: Android
- Internal Storage: 32GB
- Serial Bus Decodings: UART, LIN, CAN, I²C, SPI
- Battery: Built-in 7500mAh Li-ion battery for up to 5 hours of operation
2. Package Contents
Verify that all items listed below are included in your package. If any items are missing or damaged, please contact Micsig customer support.
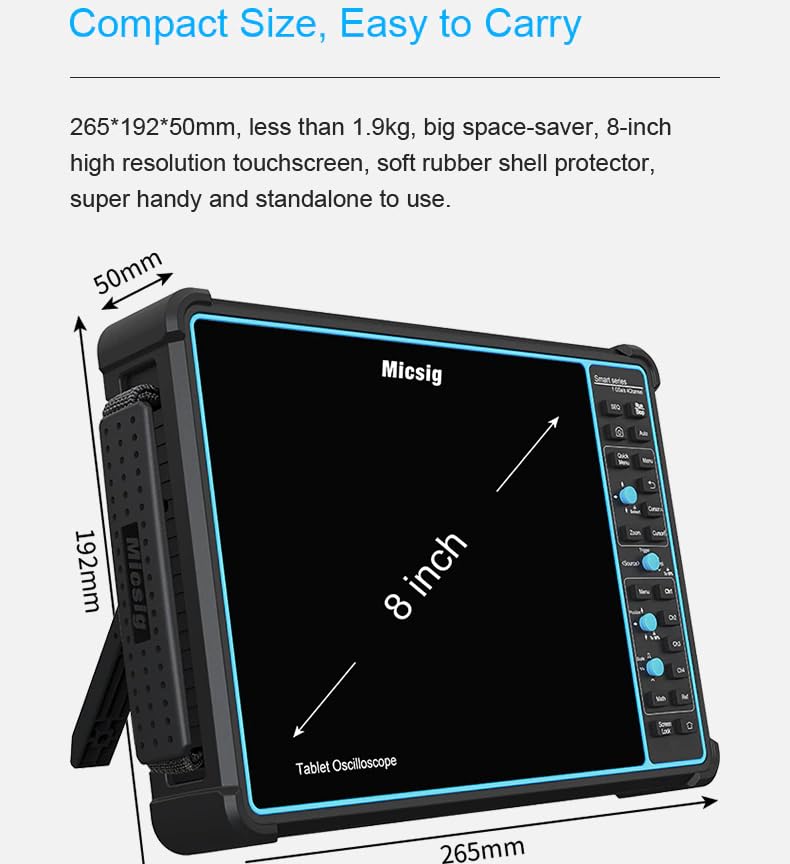
Figure 2: Contents of the Micsig STO1004 package.
- Oscilloscope Main Unit (1 pc)
- Probes (4 pcs)
- Power Adapter (1 pc)
- Power Cord (1 pc)
- Calibration Certificate (1 pc)
3. Device Overview
Physical Dimensions
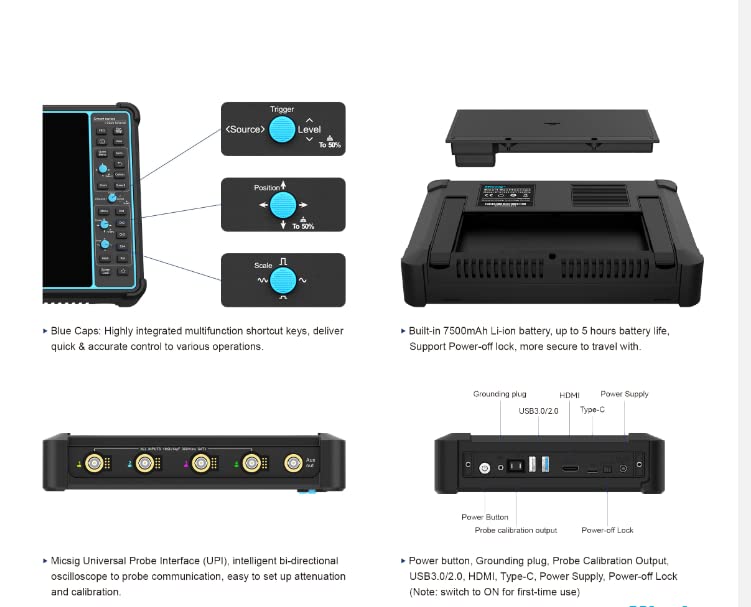
Figure 3: Physical dimensions of the oscilloscope.
The STO1004 features a compact design for portability and ease of use:
- Dimensions: 265 x 192 x 50 mm
- Weight: Less than 1.9 kg
- Display Size: 8 inches
Controls and Ports

Figure 4: Side panel controls and ports.
The device is equipped with various controls and ports for comprehensive functionality:
- Blue Caps: Highly integrated multifunction shortcut keys for quick and accurate control.
- USB 3.0/2.0 Ports: For data transfer and peripheral connections.
- HDMI Port: For external display output.
- Type-C Port: For power supply and data.
- Power Button: To turn the device on/off.
- Grounding Plug: For safety and signal integrity.
- Probe Calibration Output: For probe compensation.
- Power-off Lock: To prevent accidental power-off (switch to ON for first-time use).
- Micsig Universal Probe Interface (UPI): Intelligent bi-directional communication for automatic probe attenuation matching.
4. Setup
Initial Power On
- Ensure the device is fully charged or connected to the power adapter using the provided power cord.
- Locate the Power-off Lock switch on the side panel and ensure it is in the 'ON' position for initial use.
- Press and hold the Power Button until the Micsig logo appears on the screen.
- The device will boot into the Android operating system.
Connecting Probes
- Connect the BNC connector of the probe to the desired channel input on the oscilloscope.
- Attach the probe's ground clip to the circuit's ground reference.
- If using the Micsig Universal Probe Interface (UPI), ensure the probe is correctly seated for automatic attenuation detection.
5. Operating Instructions
The Micsig STO1004 features an intuitive touchscreen interface and dedicated physical controls.

Figure 5: Touchscreen operation.
Basic Waveform Acquisition
- Power On: Follow the steps in the Setup section.
- Connect Signal: Connect your probe to the signal source and the oscilloscope input.
- Auto Setup: Press the 'Auto' button on the control panel or tap the 'Auto' icon on the screen. The oscilloscope will automatically adjust vertical, horizontal, and trigger settings to display a stable waveform.
- Manual Adjustments: Use the dedicated knobs and touchscreen gestures to fine-tune settings such as vertical scale (Volts/Div), horizontal scale (Time/Div), and trigger level.
Trigger Functions
The oscilloscope offers powerful trigger functions to stabilize and capture specific events.

Figure 6: Video trigger settings interface.
Access trigger settings via the 'Trigger' menu. Options include Edge, Pulse Width, Video, Slope, Runt, and more.
Serial Bus Decoding
The STO1004 supports decoding for common serial communication protocols.

Figure 7: CAN bus decoding interface.
Navigate to the 'Decode' menu to select protocols like UART, LIN, CAN, I²C, and SPI. Configure parameters such as source channel and baud rate for accurate decoding.
Measurements and Analysis
Perform automatic measurements and advanced waveform analysis.

Figure 8: Automatic measurement display.
The device supports 31 automatic measurements. Access these through the 'Measure' menu. You can also use cursors for manual measurements and perform mathematical operations on waveforms.
Saving and Exporting Data
Waveforms and settings can be saved to the internal storage or exported.

Figure 9: Data saving options.
Use the 'Save' menu to store waveforms, screenshots, or settings. Data can be saved in various formats (e.g., WAV, CSV, BIN) to the internal 32GB storage or an external USB drive.
6. Maintenance
Cleaning the Device
- Turn off the oscilloscope and disconnect it from all power sources and probes before cleaning.
- Use a soft, damp cloth with a mild detergent to clean the exterior surfaces. Avoid abrasive cleaners or solvents.
- For the touchscreen, use a specialized screen cleaning solution and a microfiber cloth to prevent scratches.
- Ensure no liquid enters the device through ports or ventilation openings.
Battery Care
The device contains a built-in Li-ion battery. Follow these guidelines for optimal battery life:
- Avoid fully discharging the battery frequently.
- Store the device in a cool, dry place when not in use for extended periods.
- If storing for a long time, charge the battery to approximately 50-70% capacity.
- Do not expose the device to extreme temperatures.
Probe Calibration
Regularly calibrate your probes to ensure accurate measurements. Use the dedicated probe calibration output on the oscilloscope and follow the on-screen instructions for compensation.
7. Troubleshooting
This section addresses common issues you might encounter. For problems not listed here, please contact Micsig customer support.
| Problem | Possible Cause | Solution |
|---|---|---|
| Device does not power on. | Low battery; Power-off Lock engaged; Faulty power adapter. | Charge the battery; Ensure Power-off Lock is OFF; Try a different power source/adapter. |
| No waveform displayed. | Probe not connected; Incorrect trigger settings; Signal too small/large; Channel off. | Check probe connections; Use 'Auto' setup; Adjust vertical scale; Ensure channel is enabled. |
| Unstable waveform. | Incorrect trigger level or mode; Noise in signal. | Adjust trigger level; Change trigger mode (e.g., Edge, Video); Use averaging acquisition mode. |
| Touchscreen unresponsive. | Software glitch; Screen protector interference. | Restart the device; Ensure screen is clean and free of debris; Remove and reapply screen protector if applicable. |
8. Specifications
Detailed technical specifications for the Micsig STO1004 Tablet Oscilloscope.
| Feature | Specification |
|---|---|
| Model | STO1004 |
| Bandwidth | 100 MHz |
| Channels | 4 |
| Real-time Sample Rate | 1 GSa/s |
| Memory Depth | 70 Mpts |
| Display | 8-inch TFT LCD, 800x600 resolution, Capacitive Touchscreen |
| Operating System | Android |
| Internal Storage | 32 GB |
| Battery | 7500 mAh Li-ion (up to 5 hours operation) |
| Connectivity | USB 3.0/2.0, HDMI, Type-C |
| Dimensions (L x W x H) | 265 x 192 x 50 mm |
| Weight | Approx. 1.9 kg |
| Serial Decoding | UART, LIN, CAN, I²C, SPI |
9. Warranty and Support
Warranty Information
Micsig products are covered by a limited warranty. Please refer to the warranty card included in your package or visit the official Micsig website for detailed terms and conditions. Keep your proof of purchase for warranty claims.
Customer Support
For technical assistance, troubleshooting, or service inquiries, please contact Micsig customer support:
- Online Support: Visit the Micsig official website for FAQs, software updates, and contact forms.
- Email Support: Refer to your product documentation for the appropriate support email address.
- Phone Support: Contact numbers may be available on the Micsig website for your region.
When contacting support, please have your product model (STO1004) and serial number ready.


