plplaaoo plplaaoohdokrmc26f
plplaaoo DC Motor Controller User Manual
Model: plplaaoohdokrmc26f
1. Introduction
This user manual provides comprehensive instructions for the installation, operation, and maintenance of your plplaaoo DC Motor Controller. Designed for electric bikes and scooters, this controller offers reliable performance for 36V and 48V systems. Please read this manual thoroughly before installation and use to ensure proper function and safety.
2. Safety Information
Always prioritize safety when working with electrical components. Failure to follow these safety guidelines may result in injury, damage to the product, or property damage.
- Ensure the power supply is disconnected before performing any installation, maintenance, or troubleshooting.
- Wear appropriate personal protective equipment (PPE), such as safety glasses and insulated gloves.
- Do not expose the controller to water or excessive moisture.
- Verify all connections are secure and correctly wired to prevent short circuits.
- Only use the controller with compatible battery voltages (36V or 48V) and motor power ratings (250W-350W).
- If you are unsure about any step, consult a qualified technician.
3. Product Overview
The plplaaoo DC Motor Controller is a robust and efficient component designed to manage power delivery to your electric bike or scooter motor. It features a durable aluminum alloy casing with a groove design for enhanced heat dissipation.
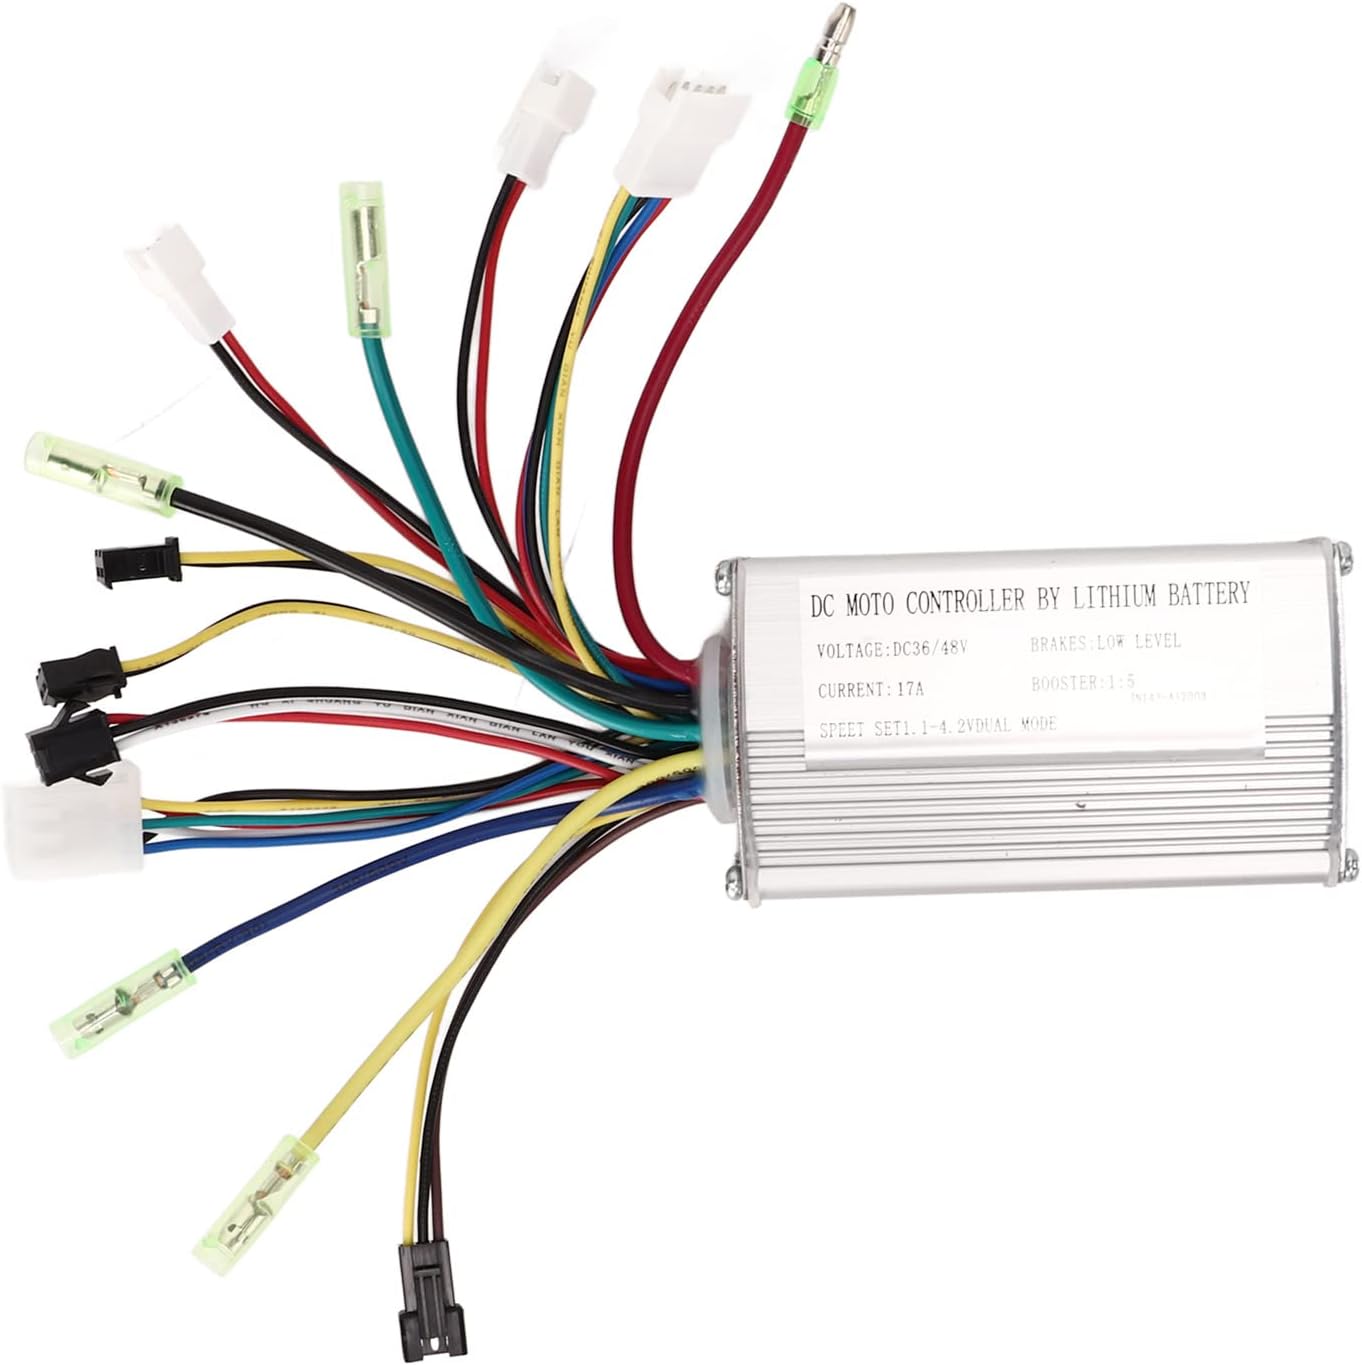
Figure 3.1: The plplaaoo DC Motor Controller with its integrated wire harness, showcasing the compact design and multiple connection points.

Figure 3.2: The controller unit, highlighting its 36V/48V compatibility, 250-350W motor applicability, groove design for heat dissipation, aluminum alloy shell, and stable wire interfaces.
Key Features:
- Versatile Compatibility: Supports both 36V and 48V systems, suitable for 250W to 350W motors.
- Stable Connections: Equipped with standard wiring and interfaces for reliable connections.
- Efficient Heat Management: Groove design on the shell enhances heat dissipation, preventing thermal overload.
- Durable Construction: Made from lightweight, corrosion-resistant aluminum alloy for long service life.
- Compact and Practical: Small structure for easy installation and space efficiency.
4. Setup and Installation
Careful installation is crucial for the proper functioning of the motor controller. Follow these steps to connect the controller to your electric bike or scooter system.
Wiring Diagram and Connections:
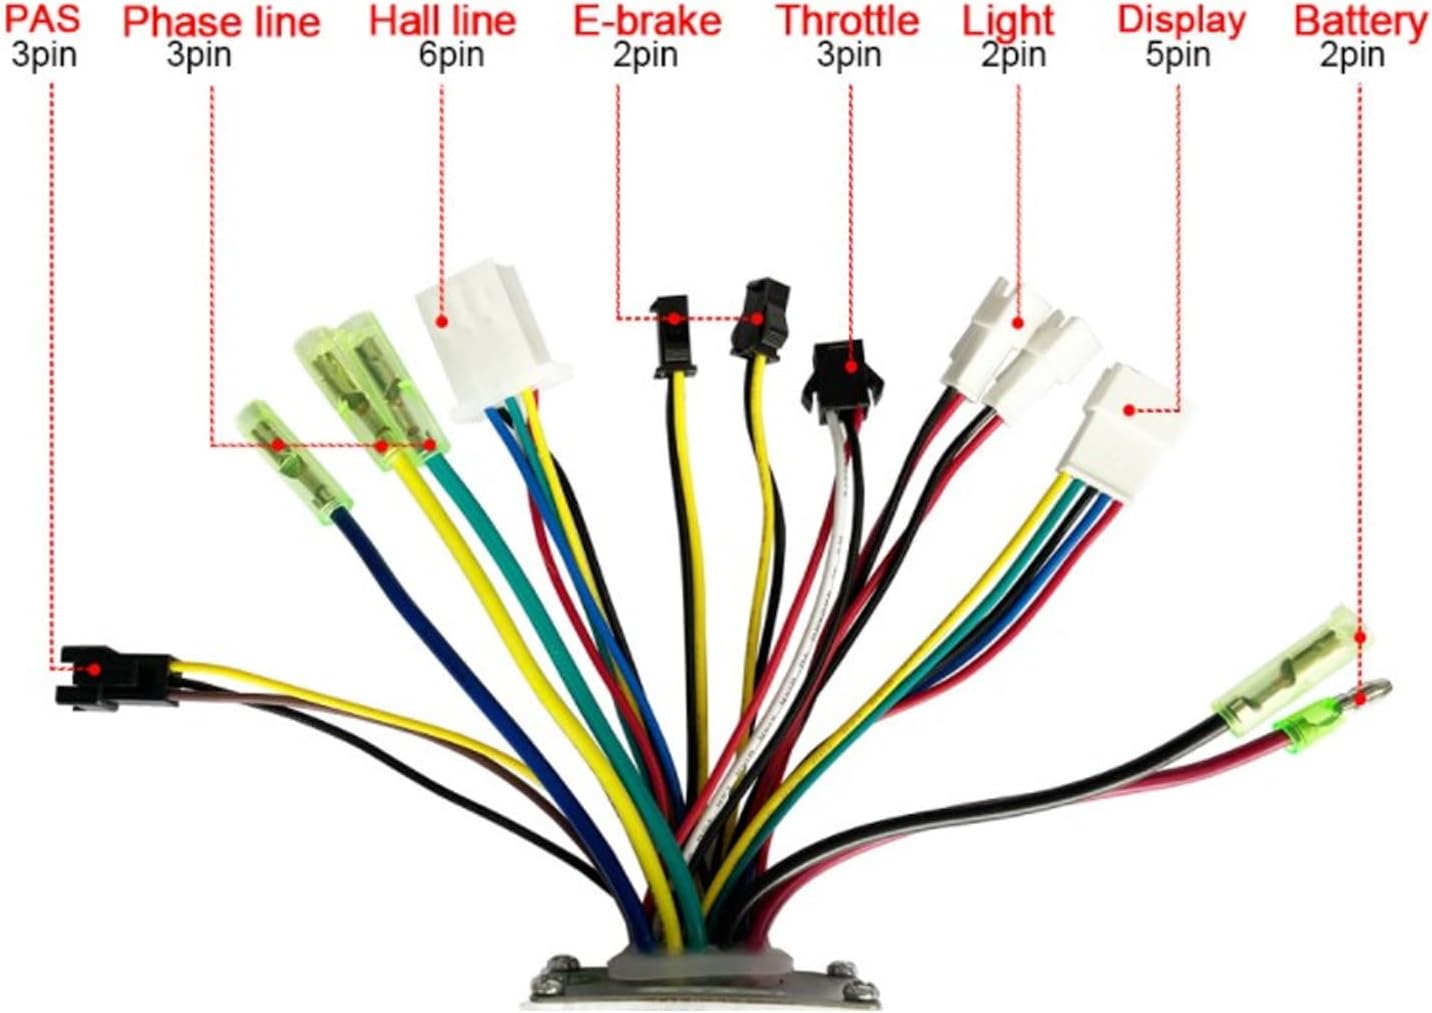
Figure 4.1: Detailed wiring diagram showing the various connectors and their functions. Ensure each connection matches the corresponding component on your electric bike/scooter.
- Battery (2-pin): Connect the main power cable from your 36V or 48V lithium battery to this connector. Ensure correct polarity.
- Phase Line (3-pin): Connect the three phase wires from your brushless DC motor to these terminals. These are typically thicker wires.
- Hall Line (6-pin): Connect the Hall sensor wires from your motor to this connector. These provide feedback on motor position.
- Throttle (3-pin): Connect your throttle assembly to this connector. This controls the motor speed.
- E-brake (2-pin): Connect your electronic brake levers to this connector. This will cut power to the motor when brakes are applied.
- Display (5-pin): Connect your display unit to this connector. This provides information such as speed, battery level, and mode.
- Light (2-pin): If your system includes a light, connect it here.
- PAS (Pedal Assist System) (3-pin): Connect your PAS sensor to this connector. This allows the motor to assist when pedaling.
Important Note: The controller requires an instrument that uses the Model 2 communication protocol. Ensure your display unit is compatible to avoid operational issues.
5. Operating Instructions
Once the controller is correctly installed and all connections are secure, you can begin operating your electric bike or scooter.
- Power On: Turn on the main power switch of your electric bike/scooter battery. The display unit should illuminate.
- Throttle Control: Gently twist the throttle to engage the motor. The motor speed will increase with further throttle input.
- Pedal Assist: If equipped with a PAS, pedaling will activate motor assistance, providing power based on your pedaling effort and the selected assist level on your display.
- Braking: Applying the brake levers will cut power to the motor, ensuring safe stopping.
- Power Off: Always turn off the main power switch after use to conserve battery life and ensure safety.
6. Maintenance
Regular maintenance helps ensure the longevity and optimal performance of your DC motor controller.
- Cleaning: Periodically clean the exterior of the controller with a dry, soft cloth. Do not use harsh chemicals or immerse in water.
- Connection Check: Regularly inspect all wire connections to ensure they are tight and free from corrosion or damage. Loose connections can lead to intermittent power or component failure.
- Heat Dissipation: Ensure the controller's housing is free from obstructions to allow for proper airflow and heat dissipation. Avoid covering the controller during operation.
- Cable Management: Keep all cables neatly routed and secured to prevent snagging or damage during riding.
7. Troubleshooting
If you encounter issues with your motor controller, refer to the following common problems and solutions:
| Problem | Possible Cause | Solution |
|---|---|---|
| Motor not responding / No power |
|
|
| Erratic motor behavior |
|
|
| Controller overheating |
|
|
If the problem persists after attempting these solutions, please contact customer support for further assistance.
8. Specifications
| Item Type | Motor Controller |
| Material | Aluminum Alloy |
| Rated Voltage | 36V / 48V Universal |
| Maximum Current | 17±1A |
| Applicable Motor Power | 250W to 350W |
| Dimensions (L x W x H) | Approx. 10 x 2 x 2.7 inches (25.4 x 5.08 x 6.86 cm) |
| Weight | Approx. 245 Grams (0.54 lbs) |
| Model Name | plplaaoohdokrmc26f |
9. Warranty and Support
For any questions, technical assistance, or warranty inquiries regarding your plplaaoo DC Motor Controller, please contact the seller or manufacturer directly. Refer to your purchase documentation for specific warranty terms and contact information.
Please note that improper installation, unauthorized modifications, or misuse of the product may void the warranty.
Ask a question about this manual
Ask about setup, troubleshooting, compatibility, parts, safety, or missing instructions. Manuals+ will review the question and use this page’s manual context to help answer it.