Product Overview
The KENWOOD DRV-A310W is a compact GPS dash camera designed to record your journeys in Full HD. It features a 2.0 MP front camera with a 2-inch LCD for clear video playback and settings adjustment. Equipped with a Galaxy Core Sensor, it delivers high-quality video, and its HDR/WDR capabilities ensure clear images in various lighting conditions, preventing underexposure or overexposure.
Key features include built-in Wi-Fi and Bluetooth connectivity for wireless access via the KENWOOD DASH CAM MANAGER app, allowing live footage viewing, GPS information access, settings adjustment, and over-the-air (OTA) updates. A built-in G-Sensor detects hard braking or collisions, automatically saving critical video files. Integrated GPS geo-tags your recordings with location, date, time, speed, and direction data.
The dash cam supports a Smart Parking Mode, which activates recording when the vehicle is disturbed while parked (requires optional hardwire kit). It also features loop recording, continuously overwriting the oldest footage when the memory card is full. The device accepts 8GB-256GB Micro SD cards (not included). Optional accessories like the KENWOOD KCA-R110 HD rear-view camera can be connected for comprehensive coverage.

Front view of the KENWOOD DRV-A310W GPS Dash Cam, highlighting its compact design and lens.

The dash cam installed on a car windshield, demonstrating its discreet placement near the rearview mirror.
Package Contents
Before beginning installation, please verify that all items listed below are included in your package:
- Dashboard Camera
- USB Car Charger
- 13' USB-A to USB-C Cable
- Camera Mount with adhesive base
- 2 Spare adhesive pads
- 4 Adhesive cable clips
- Static side film
- Quickstart Guide
- Warranty Card

Visual representation of the KENWOOD DRV-A310W package contents, including the dash cam, cables, mount, and documentation.
Setup and Installation
1. Choosing a Mounting Location
Select a location on your windshield that does not obstruct your view of the road. The ideal position is typically behind the rearview mirror, ensuring the camera lens has a clear, unobstructed view forward. Clean the windshield surface thoroughly before applying the mount.
2. Attaching the Camera Mount
- Apply the static side film to the chosen area on the windshield. This helps in easy removal of the mount later.
- Peel off the protective film from the adhesive base of the camera mount.
- Firmly press the mount onto the static film (or directly onto the windshield if not using film) for at least 30 seconds to ensure a secure bond.
- Slide the DRV-A310W dash camera onto the mount until it clicks into place.
3. Power Connection
- Connect the smaller end of the 13' USB-A to USB-C cable to the DC IN port on the dash camera.
- Plug the USB car charger into your vehicle's 12V accessory power outlet (cigarette lighter socket).
- Connect the USB-A end of the cable to the USB car charger.
- Route the power cable neatly along the edge of the windshield and dashboard, using the provided adhesive cable clips to secure it and prevent obstruction.
4. Micro SD Card Installation
The dash cam requires a Micro SD card (8GB-256GB, not included) for recording. Insert the Micro SD card into the designated slot on the camera until it clicks. Ensure the card is inserted correctly to avoid damage.

Detailed dimensions of the dash cam, useful for planning installation space.
Operating Instructions
1. Powering On/Off and Recording
The DRV-A310W is designed for automatic operation. It will power on and begin recording automatically when your vehicle's ignition is turned on and power is supplied to the USB car charger. Recording will stop and the device will power off shortly after the ignition is turned off.
2. Loop Recording
The dash cam continuously records video in short segments. When the Micro SD card is full, the oldest files are automatically overwritten by new recordings. This ensures continuous recording without manual intervention.
3. G-Sensor and Collision Detection
The built-in G-Sensor detects sudden impacts or rapid deceleration (e.g., during a collision or hard braking). When such an event occurs, the current video segment is automatically locked and saved to a protected folder on the Micro SD card, preventing it from being overwritten by loop recording.
4. GPS Functionality
The integrated GPS module records your vehicle's location, speed, date, and time data. This information is embedded into the video files and can be viewed during playback using the KENWOOD DASH CAM MANAGER app or compatible PC software.
5. Wi-Fi and Bluetooth Connectivity (KENWOOD DASH CAM MANAGER App)
To access advanced features and manage your recordings, download the KENWOOD DASH CAM MANAGER app (available for iOS and Android devices).
- Enable Bluetooth and Wi-Fi on your smartphone.
- Open the KENWOOD DASH CAM MANAGER app and follow the on-screen instructions to connect to your DRV-A310W.
- Through the app, you can view live footage, play back recorded videos, download files to your phone, adjust camera settings, and receive firmware updates.
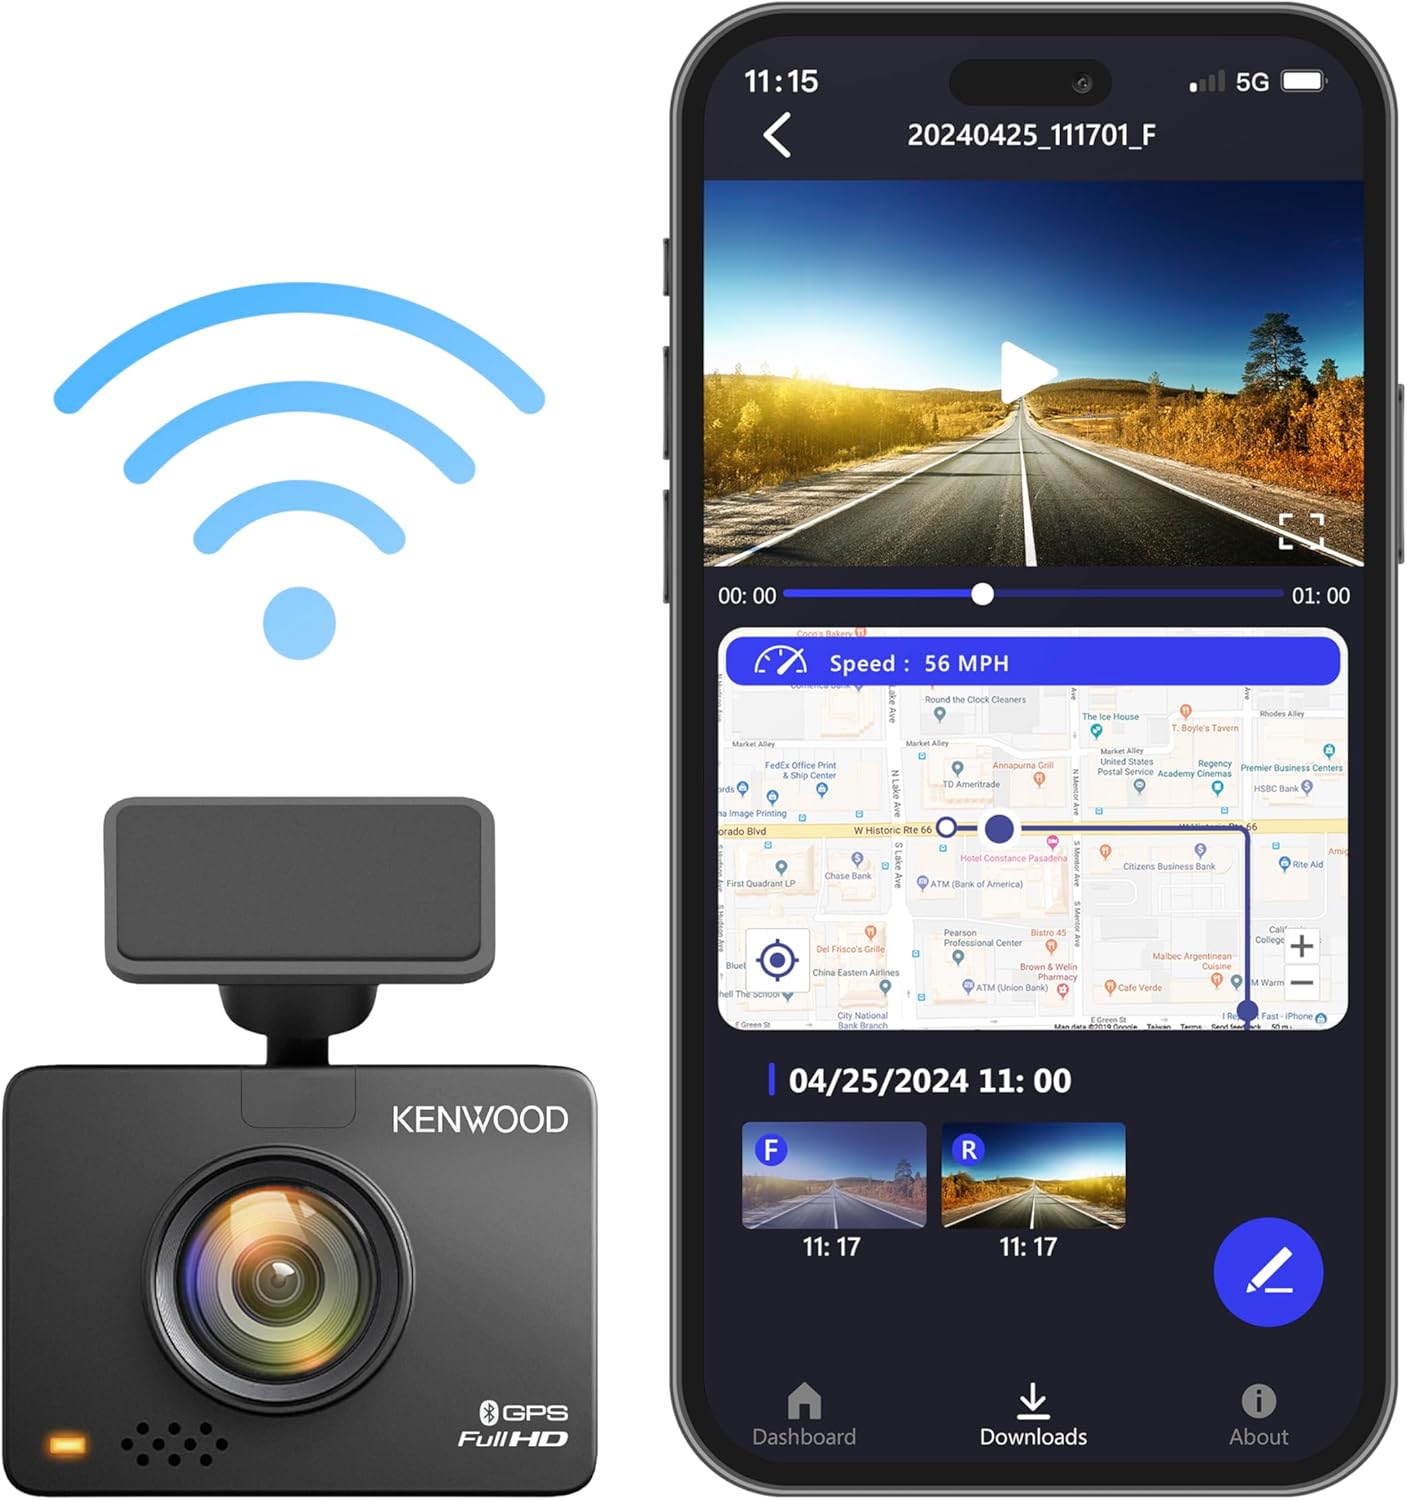
The dash cam displaying its screen while connected wirelessly to the KENWOOD DASH CAM MANAGER app on a smartphone, showing video playback and map data.
6. Smart Parking Mode
With the optional KENWOOD hardwire kit (sold separately), the Smart Parking Mode allows the dash cam to monitor your vehicle when parked. If a disturbance or impact is detected, the camera will automatically wake up and record the event, providing surveillance against theft or vandalism.
7. Optional Rear Camera Support
The DRV-A310W supports connection of the KENWOOD KCA-R110 HD rear-view camera (sold separately). This expands your recording coverage to include the rear of your vehicle, providing a more comprehensive record of events.
Maintenance
1. Cleaning the Dash Cam
To maintain optimal performance, regularly clean the camera lens and the device body. Use a soft, dry cloth to wipe the lens gently. For the body, a slightly damp cloth can be used, but ensure no moisture enters the ports or openings.
2. Memory Card Management
It is recommended to format the Micro SD card periodically (e.g., once a month) using the camera's menu settings. This helps maintain card health and prevents data corruption. Back up any important files before formatting, as it will erase all data on the card. Replace the Micro SD card if you experience frequent recording errors or data loss.
3. Firmware Updates
Keep your dash cam's firmware updated to ensure optimal performance, new features, and bug fixes. Firmware updates can be performed wirelessly via the KENWOOD DASH CAM MANAGER app. Follow the app's instructions for a smooth update process.

Visual representation of the Over-The-Air (OTA) firmware update process for the dash cam.
Troubleshooting
This section addresses common issues you might encounter with your KENWOOD DRV-A310W dash cam. If the problem persists after trying these solutions, please contact Kenwood customer support.
| Problem | Possible Cause | Solution |
|---|---|---|
| Camera does not power on. | No power from car charger; faulty cable; loose connection. | Check car charger connection and vehicle's 12V outlet. Ensure cable is securely connected to both camera and charger. Test with another 12V outlet if available. |
| Recording stops or is intermittent. | Micro SD card full or corrupted; slow Micro SD card; card error. | Format the Micro SD card via camera settings. Use a high-speed (Class 10 or U3) Micro SD card. Replace the Micro SD card if issues persist. |
| Wi-Fi connection issues with app. | Incorrect Wi-Fi password; app not updated; interference. | Ensure correct Wi-Fi password. Update KENWOOD DASH CAM MANAGER app. Restart both phone and dash cam. Try connecting in a different location to rule out interference. |
| Video quality is poor or blurry. | Lens is dirty; protective film still on lens; low light conditions. | Clean the camera lens with a soft cloth. Ensure any protective film has been removed from the lens. Verify HDR/WDR settings are enabled for challenging light. |
| G-Sensor sensitivity too high/low. | G-Sensor setting is not optimized for driving conditions. | Adjust the G-Sensor sensitivity setting through the camera's menu or the KENWOOD DASH CAM MANAGER app. |
Specifications
| Feature | Detail |
|---|---|
| Model Name | DRV-A310W |
| Product Dimensions | 2.28 x 0.94 x 1.69 inches (58.5 x 24.4 x 42.8 mm) |
| Item Weight | 10.7 ounces |
| Video Capture Resolution | 1080p Full HD (1920x1080) |
| Connectivity Technology | Bluetooth, USB, Wi-Fi |
| Special Features | Built-in GPS, Loop Recording, Built-in Wi-Fi, G-Sensor, Motion Sensing |
| Display Features | 2-inch LCD |
| Color | Black |
| Mounting Type | Windshield Mount |
| Vehicle Service Type | Bus, Minivan, RV, Truck |
| Power Compatibility | 12V/24V Compatible |
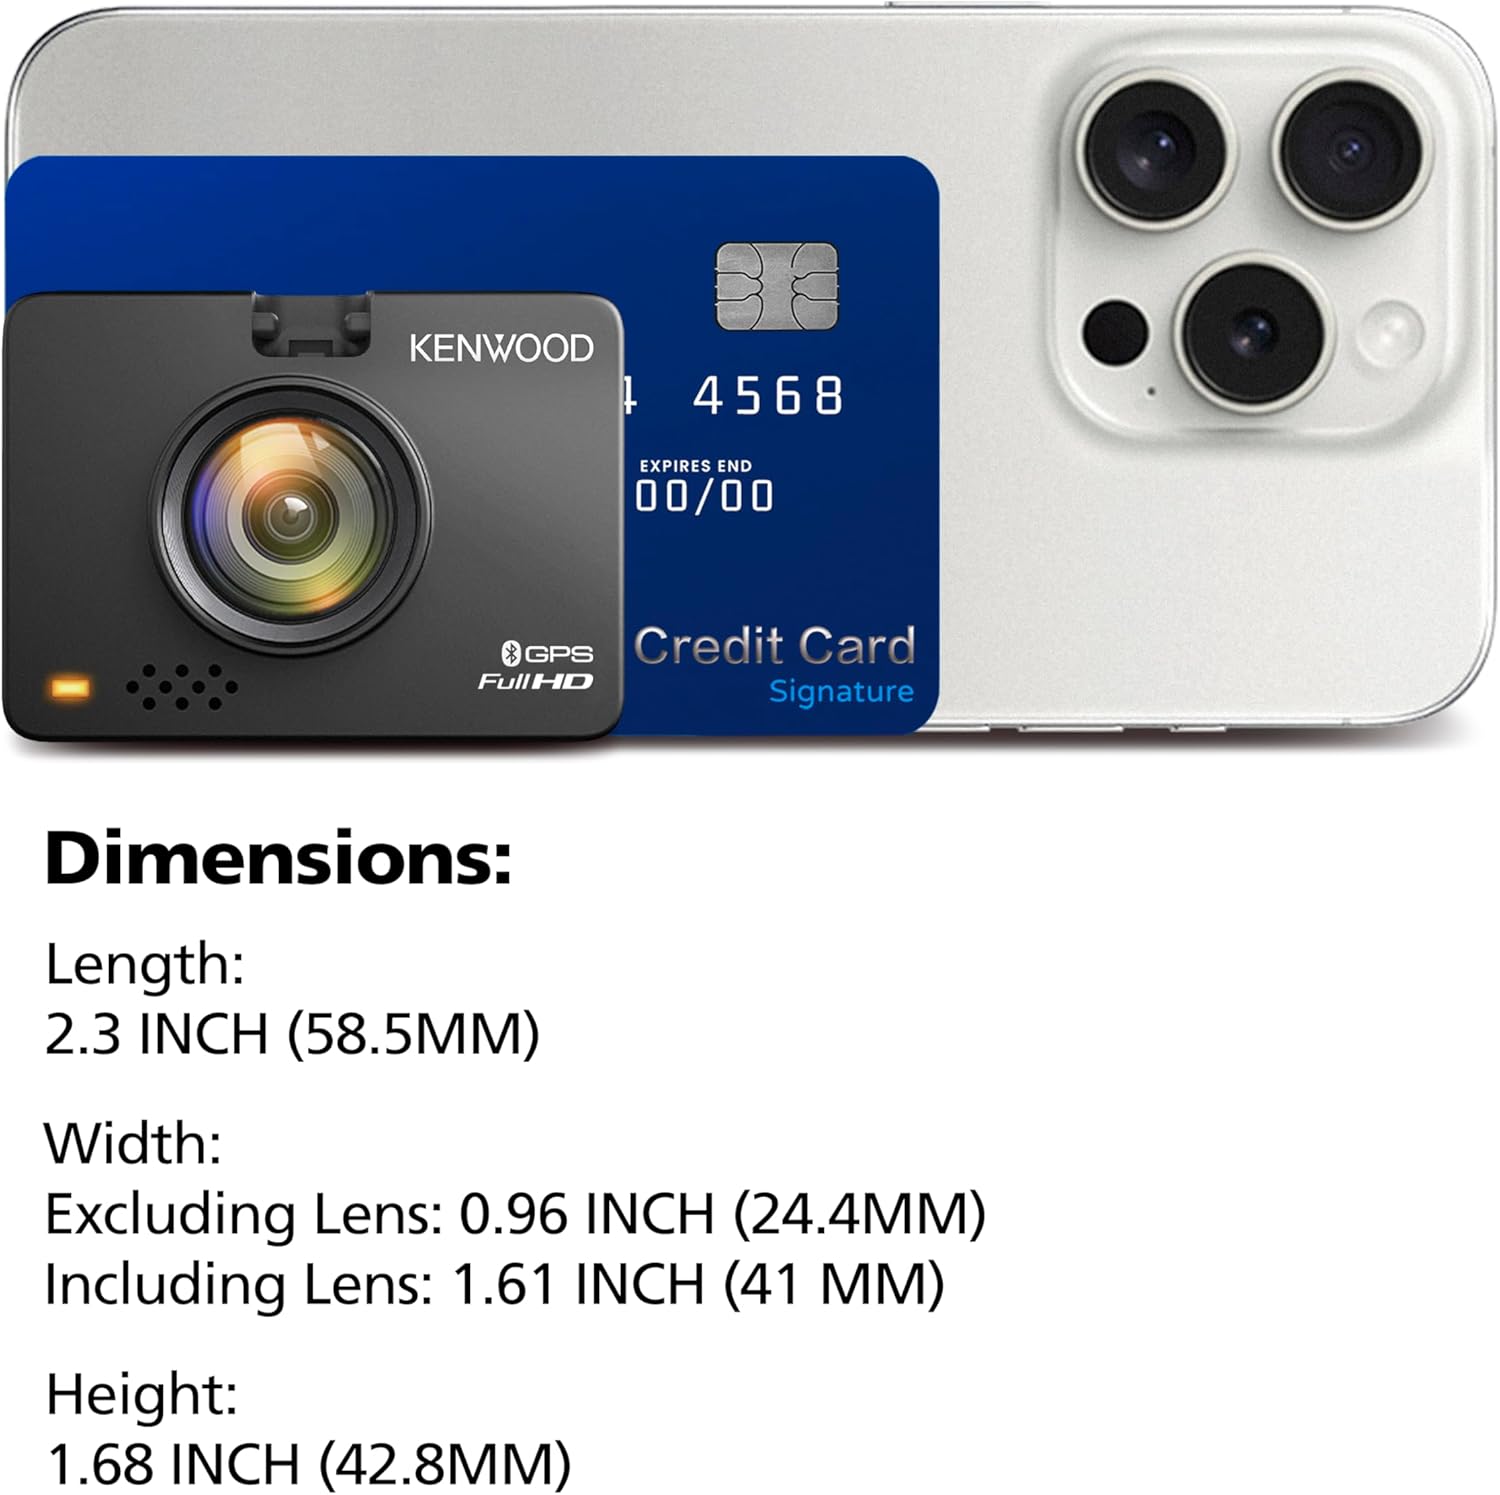
The compact size of the dash cam shown in comparison to a credit card and smartphone.
Warranty and Support
Your KENWOOD DRV-A310W GPS Dash Cam is covered by a manufacturer's warranty. Please refer to the Warranty Card included in your package for specific terms, conditions, and duration of coverage. Retain your proof of purchase for warranty claims.
For technical assistance, troubleshooting beyond this manual, or warranty service, please contact Kenwood customer support. You can find contact information on the Kenwood official website or in the Quickstart Guide provided with your product.
For the latest information, FAQs, and software downloads, visit the official Kenwood support page for the DRV-A310W model.