1. Introduction
This manual provides detailed instructions for the safe and effective use of your Copper Pro Essential Oil Distiller 2L. This equipment is designed for steam distillation, enabling the production of essential oils and hydrosols from various plant materials. Please read this manual thoroughly before operating the distiller.
2. Safety Information
Always prioritize safety when operating the distiller. Failure to follow these guidelines may result in injury or damage to the equipment.
- Heat Hazard: The distiller operates at high temperatures. Always handle hot components with heat-resistant gloves. Allow the unit to cool completely before cleaning or disassembling.
- Steam Pressure: Ensure all connections are secure before heating to prevent steam leaks. Never block the steam outlet.
- Ventilation: Operate the distiller in a well-ventilated area to dissipate steam and any plant material aromas.
- Stable Surface: Place the distiller on a stable, heat-resistant, and level surface during operation.
- Water Supply: Ensure a continuous and adequate water supply for the cooling system to prevent overheating and ensure proper condensation.
- Electrical/Gas Stove Use: If using an electrical or gas stove, ensure it is compatible with the distiller's base and follow all stove manufacturer safety guidelines.
- Children and Pets: Keep children and pets away from the distiller during operation and while it is cooling.
- Copper Use: Consult product documentation for specific safety information regarding the use of copper in essential oil distillation.
3. Package Contents
Verify that all components are present and undamaged upon unpacking. Refer to the image below for a visual guide to the included parts.

Figure 1: Labeled Package Contents
- 1. Boiler
- 2. Flavoring Column
- 3. Tri-clamp
- 4. Gasket
- 5. Sieve
- 6. Pipette
- 7. Glass Tubes
- 8. Bottles
- 9. Thermometer
- 10. Manual (this document)
- 11. Oil Separator
- 12. Tap Adapter
- 13. Water Hose
4. Setup Instructions
Follow these steps to assemble your Copper Pro Essential Oil Distiller.

Figure 2: Complete Distiller Kit Components
- Assemble the Main Unit: Place the gasket onto the rim of the boiler. Carefully position the flavoring column on top of the gasket, ensuring a snug fit. Secure the boiler and column together using the tri-clamp. Tighten the tri-clamp firmly to prevent steam leakage during operation.
- Prepare Plant Material: Place your desired herbs or flowers into the flavoring column. Ensure the plant material is loosely packed to allow steam to pass through effectively.
- Fill Boiler: Fill the boiler with water. The water level should be below the sieve plate where the plant material rests, ensuring only steam, not boiling water, contacts the plant material.
- Connect Cooling System: Attach one end of the water hose to the 'water in' port of the cooling coil (condenser) on the flavoring column. Connect the other end of this hose to a cold water tap using the tap adapter. Attach a second water hose to the 'water out' port of the cooling coil and direct it to a drain or collection bucket. Ensure a continuous flow of cold water will be available during distillation.
- Attach Oil Separator: Connect the oil separator (also known as an Essencier) to the outlet of the condenser. This device will separate the essential oil from the hydrosol.
- Position on Heat Source: Place the assembled distiller on a suitable electrical or gas stove. Ensure the distiller is stable and centered on the heat source.

Figure 3: Oil Separator Detail
5. Operating Instructions
Once the distiller is set up, follow these steps to begin the distillation process.
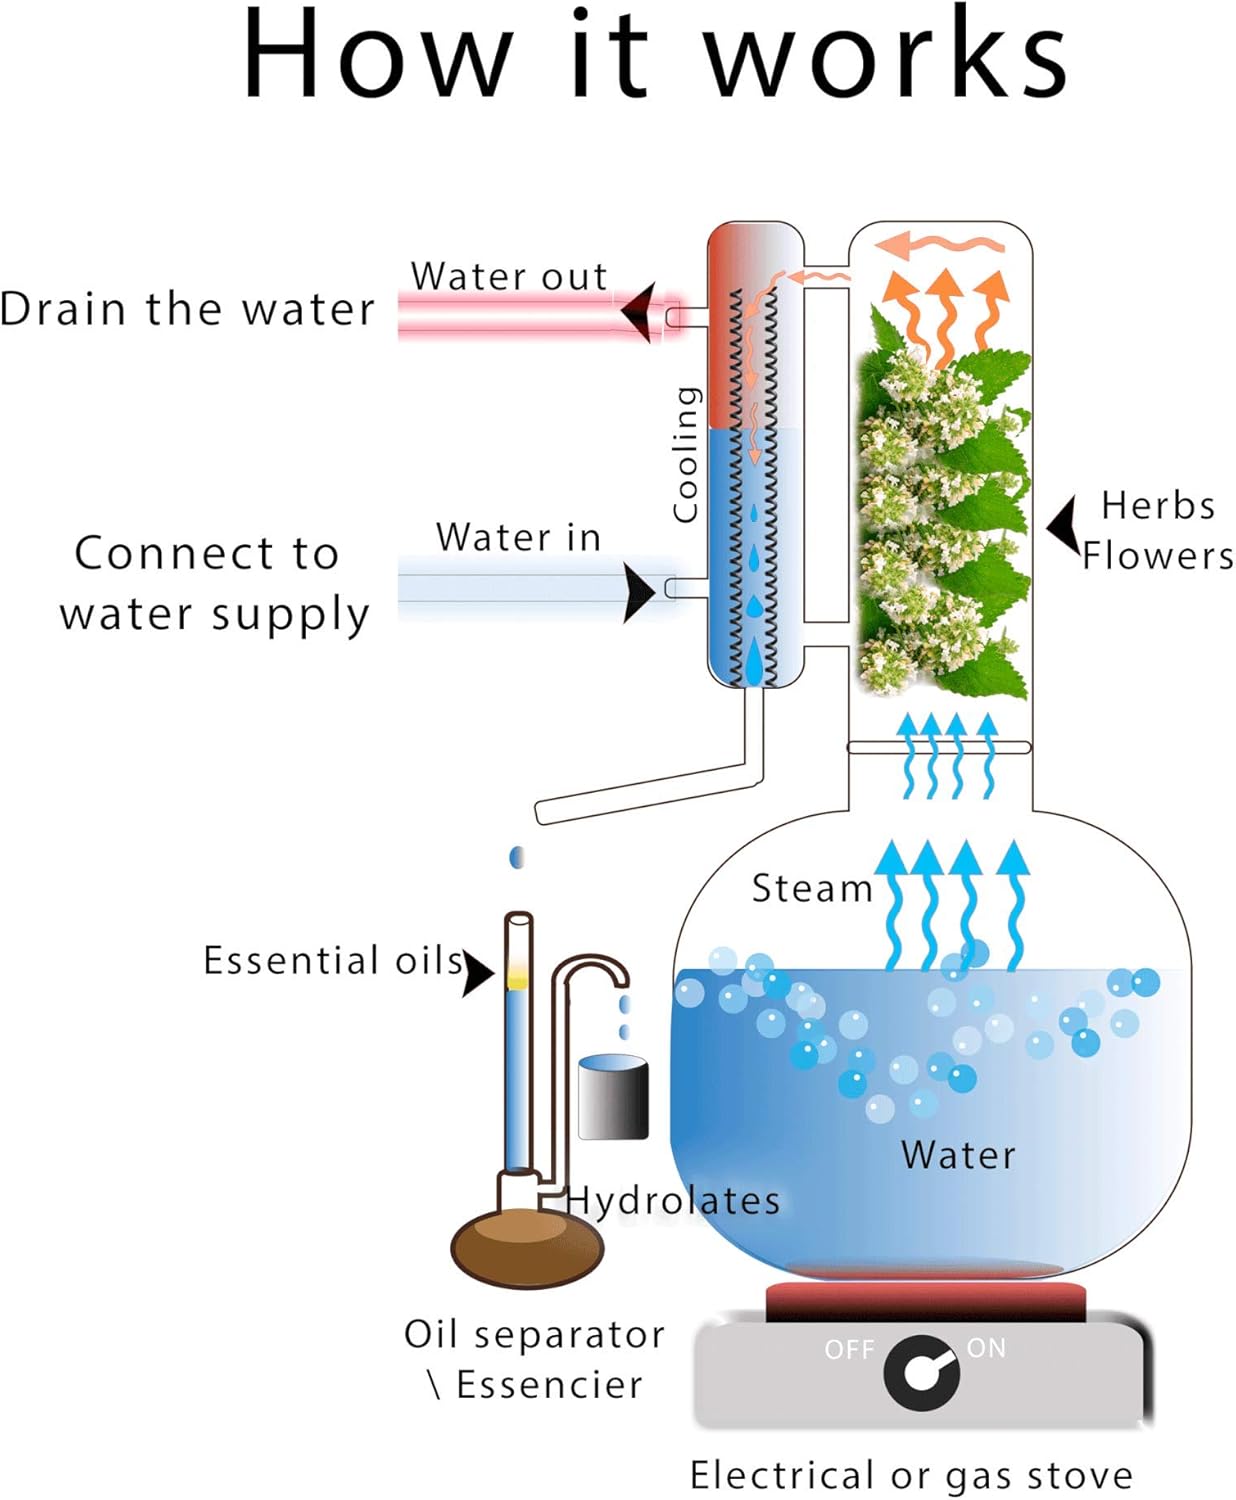
Figure 4: How the Distiller Works
- Start Heating: Turn on your electrical or gas stove to begin heating the water in the boiler. Monitor the temperature with the provided thermometer if applicable.
- Initiate Cooling Water: Once steam begins to rise, turn on the cold water supply to the cooling coil. Ensure a steady flow of cold water to maximize condensation efficiency.
- Observe Distillation: As steam passes through the plant material, it will carry volatile essential oil compounds. These vapors then enter the cooling coil, where they condense back into liquid (a mixture of essential oil and hydrosol) due to the cold water flow.
- Collect Product: The condensed liquid will flow into the oil separator. Due to differences in density, the essential oil will separate from the hydrosol. Essential oils typically float on top of the hydrosol (or sink, depending on density). Collect the essential oil using the pipette and store it in the provided bottles. The hydrosol can also be collected for various uses.
- Monitor Yield: The distiller can dispense approximately 6 ml of essential oil and 200-300 ml of hydrosol every 20 minutes, depending on the plant material and operating conditions.
- End Distillation: Continue distillation until the desired amount of product is collected or the plant material is exhausted. Turn off the heat source and the cooling water supply. Allow the distiller to cool down completely before disassembling.
6. Maintenance
Proper maintenance ensures the longevity and performance of your Copper Pro distiller.
- Cleaning After Each Use: After the distiller has cooled, disassemble all parts. Wash all copper components with warm water and a mild, non-abrasive soap. Rinse thoroughly to remove all soap residue.
- Copper Care: Copper naturally oxidizes over time, which can result in a darker patina. To restore its shine, you can use a copper-specific cleaner or a natural solution of lemon juice and salt. Apply, rub gently, rinse thoroughly, and dry immediately. Avoid harsh chemicals or abrasive scrubbers that can damage the copper surface.
- Gasket Inspection: Regularly inspect the gasket for any signs of wear, cracks, or damage. Replace the gasket if it shows signs of degradation to ensure a tight seal during distillation.
- Storage: Ensure all components are completely dry before storing. Store the distiller in a clean, dry place to prevent oxidation and dust accumulation.
7. Troubleshooting
Here are some common issues and their potential solutions:
| Problem | Possible Cause | Solution |
|---|---|---|
| No or low essential oil yield | Insufficient plant material; plant material not fresh or potent; improper heating; insufficient cooling. | Use more plant material; ensure plant material is fresh; adjust heat to a steady boil; ensure continuous cold water flow for cooling. |
| No condensation | Cooling water not flowing or not cold enough; steam leak. | Check cooling water connections and temperature; ensure tri-clamp is tight and gasket is properly seated. |
| Steam leakage from connections | Tri-clamp not tight enough; damaged gasket. | Tighten tri-clamp; inspect and replace gasket if damaged. |
| Essential oil and hydrosol not separating | Oil separator not level; specific gravity of oil is close to water. | Ensure oil separator is on a level surface; allow more time for separation; use a pipette to carefully separate layers. |
8. Specifications
- Model Number: CP-0204
- Brand: Copper Pro
- Material: High-quality Copper M1
- Capacity: 2 Liters
- Distillation Method: Steam Distillation
- Approximate Output: 6 ml essential oil and 200-300 ml hydrosol per 20 minutes (varies by plant material)
9. Video Tutorials
For a visual guide on setting up and operating your distiller, please refer to the official product video below.
Official product video demonstrating the Copper Pro Essential Oil Distiller.
10. Warranty and Support
Your Copper Pro Essential Oil Distiller is designed for durability and performance. While specific warranty details are not provided in this document, Copper Pro is committed to customer satisfaction.
The kit includes this manual, video tutorials, and an e-book with over 150 recipes for making essential oils to assist you in your distillation journey.
For any questions, technical support, or assistance with your product, please contact Copper Pro customer service through the retailer where you purchased the item or refer to the contact information provided with your product packaging.