
1. Introduction and Overview
The VEVOR Commercial Ice Maker Machine is designed for efficient and high-volume ice production, suitable for various commercial and home settings. With a powerful 850W compressor, it can produce up to 400 lbs of clear ice per day and store up to 350 lbs. Its intelligent LCD control panel allows for easy operation and monitoring.

Figure 1.1: VEVOR Commercial Ice Maker Machine with accessories and ice cubes.
This appliance is intended for indoor use only. Ensure the installation area is well-ventilated, with ambient temperatures between 10°C (50°F) and 32°C (90°F). Water inflow temperature should be between 5°C (41°F) and 25°C (77°F) for optimal performance.
2. Safety Instructions
- Do not install or operate the ice machine outdoors. Exposure to wind, rain, water spray, or drips can damage the unit and reduce ice production.
- Ensure the appliance is installed in a well-ventilated area to allow for proper heat dissipation.
- Connect the unit to a grounded electrical outlet with the correct voltage (110V/60Hz).
- Always disconnect the power supply before performing any maintenance or cleaning.
- Keep hands and foreign objects out of the ice bin and ice-making area during operation.
- Do not use abrasive cleaners or sharp objects to clean the unit, as this may damage surfaces.
3. What's in the Box
Your VEVOR Commercial Ice Maker Machine package includes the following components:
- Commercial Ice Maker Unit
- Water Filter (for turning tap water into pure water)
- Water Supply Hose
- Water Supply Connector
- Water Draining Hose
- Ice Scoop

Figure 3.1: All accessories included with the VEVOR Ice Maker.
4. Setup and Installation
The VEVOR Commercial Ice Maker is designed for freestanding installation and can be placed in various locations such as kitchens, basements, or garages, provided the environmental conditions meet the safety requirements.
4.1 Water Connection
Connect the water supply hose to a potable water source. Utilize the included water filter to ensure the ice produced is crystal clear and harder. Connect the water draining hose to a suitable drain.

Figure 4.1: Diagram illustrating the simple water filter installation process.
4.2 Initial Setup
Once connected, ensure the unit is level. Allow the unit to stand upright for at least 24 hours before plugging it in to allow refrigerants to settle.
Video 4.1: An overview of the VEVOR 110V Professional Commercial Ice machine, demonstrating its features and setup.
5. Operating Instructions
The ice maker features an intuitive LCD control panel for easy operation.
5.1 Control Panel Functions
The LCD panel displays real-time status and allows for various adjustments:
- Running Mode: Indicates current operation status.
- Auto Clean: Initiates the self-cleaning cycle.
- Thickness Adjustable: Allows you to customize ice cube thickness.
- Reservation Function: Schedule ice making in advance.
- Sensor Status: Displays information like water pressure, ice temperature.
- Ice Full Indicator: The appliance stops working when the ice bin is full. It will resume once ice is removed.
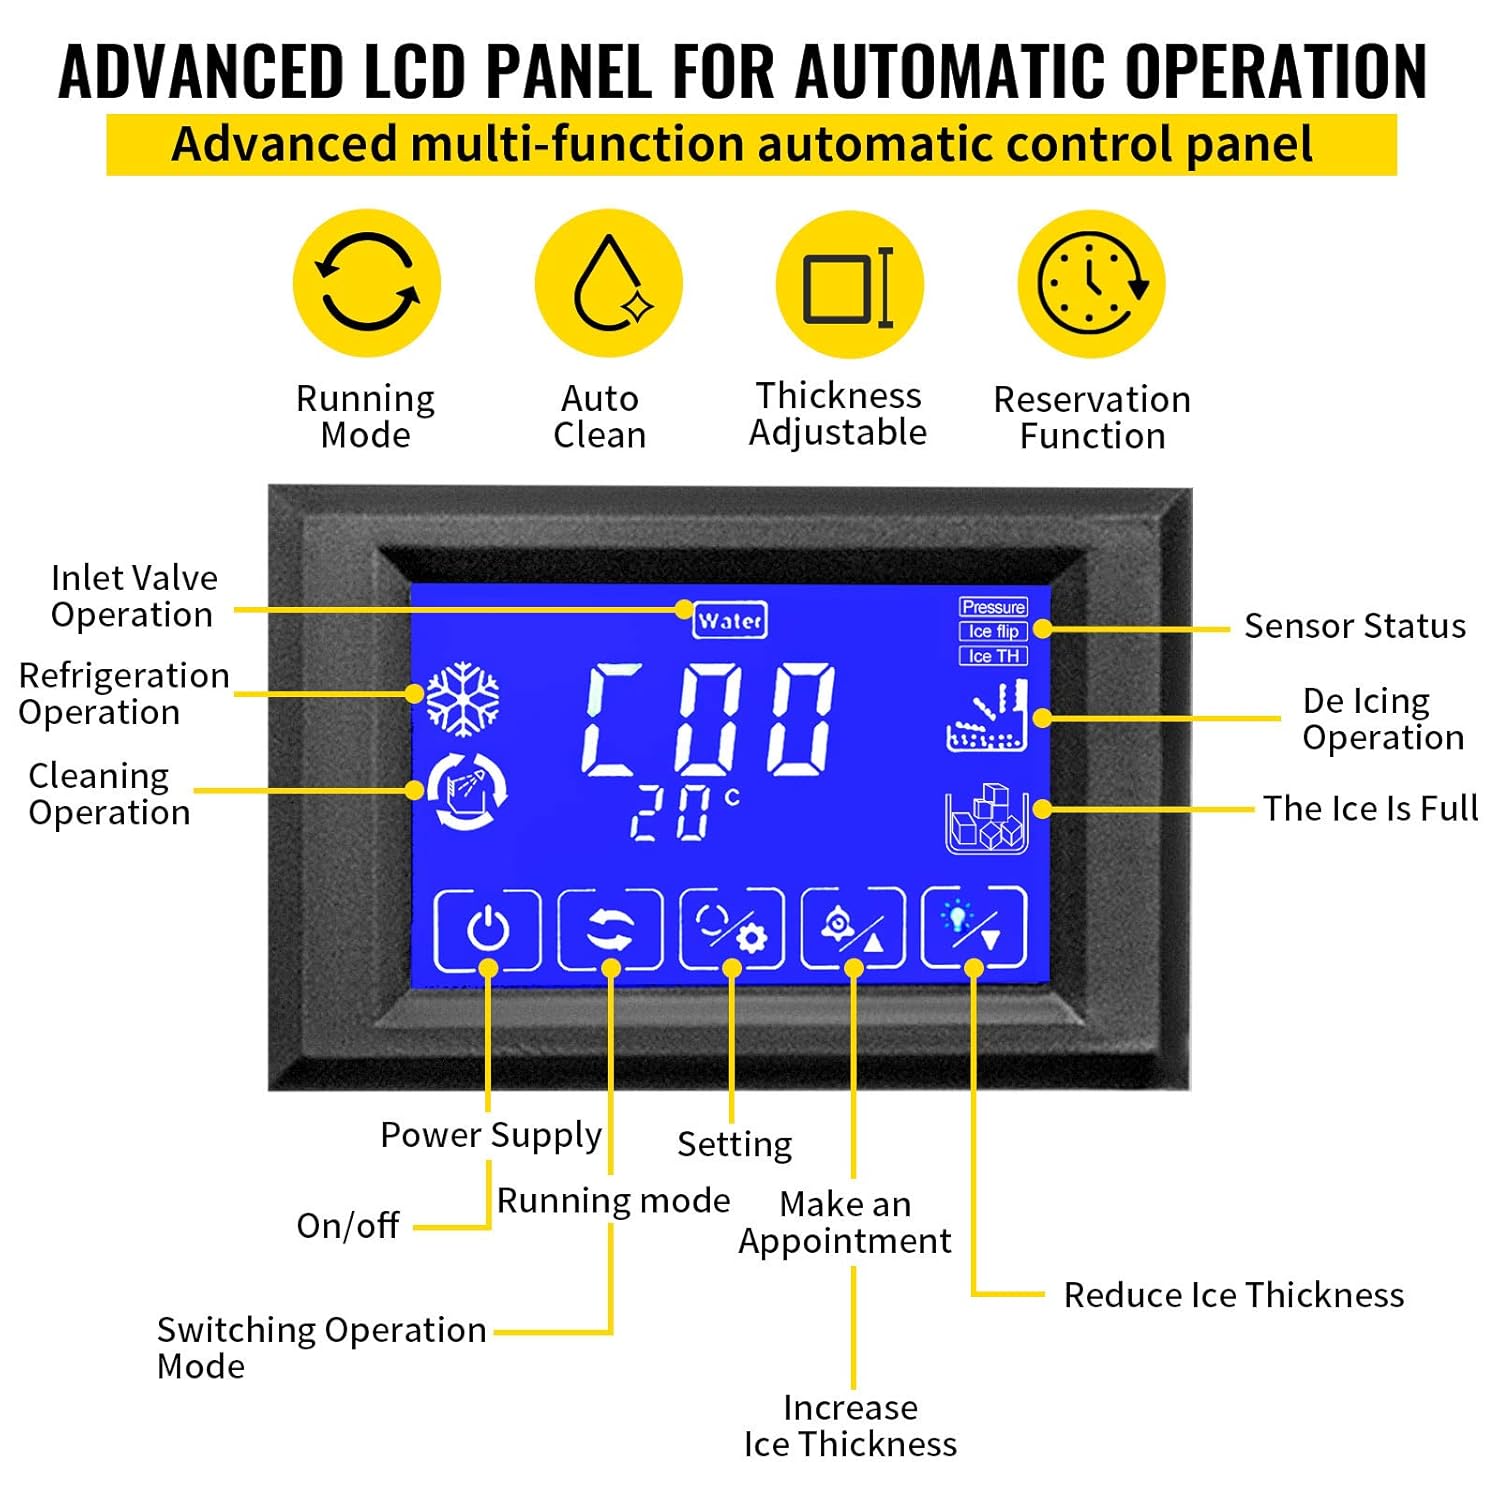
Figure 5.1: Detailed view of the advanced LCD control panel for automatic operation.
5.2 Ice Production
The machine produces 156 clear cubes per cycle, with each cycle taking approximately 8-15 minutes. You can adjust the ice cube thickness to suit your needs:
- Thin Ice: 5-8 minutes
- Medium Ice: 8-11 minutes
- Thick Ice: 11-15 minutes

Figure 5.2: Examples of different ice cube thicknesses that can be produced.
Video 5.1: Demonstration of the VEVOR Commercial Ice Maker Storage Bin and ice retrieval.

Figure 5.3: Ergonomic design for easy ice retrieval without bending over.
6. Maintenance
Regular maintenance ensures the longevity and optimal performance of your ice maker.
6.1 Self-Cleaning Function
The ice maker features an automatic self-cleaning function. To initiate, press the cleaning icon on the LCD control panel for 5 seconds. The machine will automatically begin the cleaning cycle and drain the water.

Figure 6.1: Visual representation of the self-cleaning process with automatic drain.
6.2 Water Filter Replacement
The included water filter helps maintain ice quality. Replace the filter periodically based on water quality and usage to ensure continued production of clear and hard ice.
6.3 General Cleaning
Periodically clean the exterior with a soft cloth and mild detergent. Ensure the ice bin is kept clean. For long-term storage, drain all water from the unit and clean thoroughly.
7. Troubleshooting
Refer to the LCD control panel for fault analysis and solutions. Below are some common issues and their resolutions:
| Fault | Analysis | Solution |
|---|---|---|
| Ice Full Indicator On | Ice bin is full. | Remove ice from the bin. The machine will resume operation automatically. |
| No Ice Production | Check water supply, power connection, and compressor operation. | Ensure water supply is on. Verify power. Check control panel for error codes. |
| Ice Melting Quickly | High ambient temperature or insulation issue. | Ensure unit is in a cool, well-ventilated area. Transfer ice to a refrigerator if not used instantly. |
For more detailed troubleshooting, consult the fault analysis table directly on the machine's control panel or contact customer support.
8. Specifications
| Feature | Specification |
|---|---|
| Model Name | Ice maker |
| Item Model Number | Professional Refrigeration Equipment |
| Product Dimensions | 55"D x 22"W x 33"H (890x565x1700 mm) |
| Product Weight | 75.2 lbs (34.1 kg) |
| 24H Ice Yield | Up to 400 lbs (181.4 kg) |
| Ice Storage Capacity | 350 lbs (158.7 kg) |
| Rated Power | 850 W |
| Voltage | 110V/60Hz |
| Ice-Making Cycle | 8-15 minutes |
| Built-in Ice Tray | 156 Pcs (12 x 13) |
| Ice Cube Size | 0.9 x 0.9 x 0.9 inch |
| Refrigerant Type | R404A |
| Material | 304 Stainless Steel |

Figure 8.1: Product dimensions and key specifications.
9. Warranty and Support
VEVOR offers a 30-day resend or return policy for quality problems or logistics damage from the original purchase date. Additionally, the product comes with a 1-year warranty from the original purchase date.
For any inquiries, technical assistance, or warranty claims, please contact VEVOR customer support. Refer to your purchase documentation for specific contact details.


