Introduction
This manual provides detailed instructions for the safe and effective use of your Cupluw Cupping Set. Please read all instructions carefully before first use and retain this manual for future reference. This set is designed for personal use in massage therapy and muscle pain relief.
Safety Information and Precautions
Important Safety Notes:
- Thoroughly clean skin and remove body hair from the application area before cupping. Excessive body hair can significantly reduce suction effectiveness.
- Do not take a bath or swim for 8 hours after cupping. Keep the treated area warm.
- Statements regarding dietary supplements have not been evaluated by the FDA and are not intended to diagnose, treat, cure, or prevent any disease or health condition. This product is for general wellness and relaxation purposes.
- Consult a healthcare professional before use if you have any underlying medical conditions, are pregnant, or have sensitive skin.
- Do not apply cups over open wounds, inflamed skin, varicose veins, or areas with skin lesions.
- Do not leave cups on for excessively long periods (recommended 10-15 minutes).
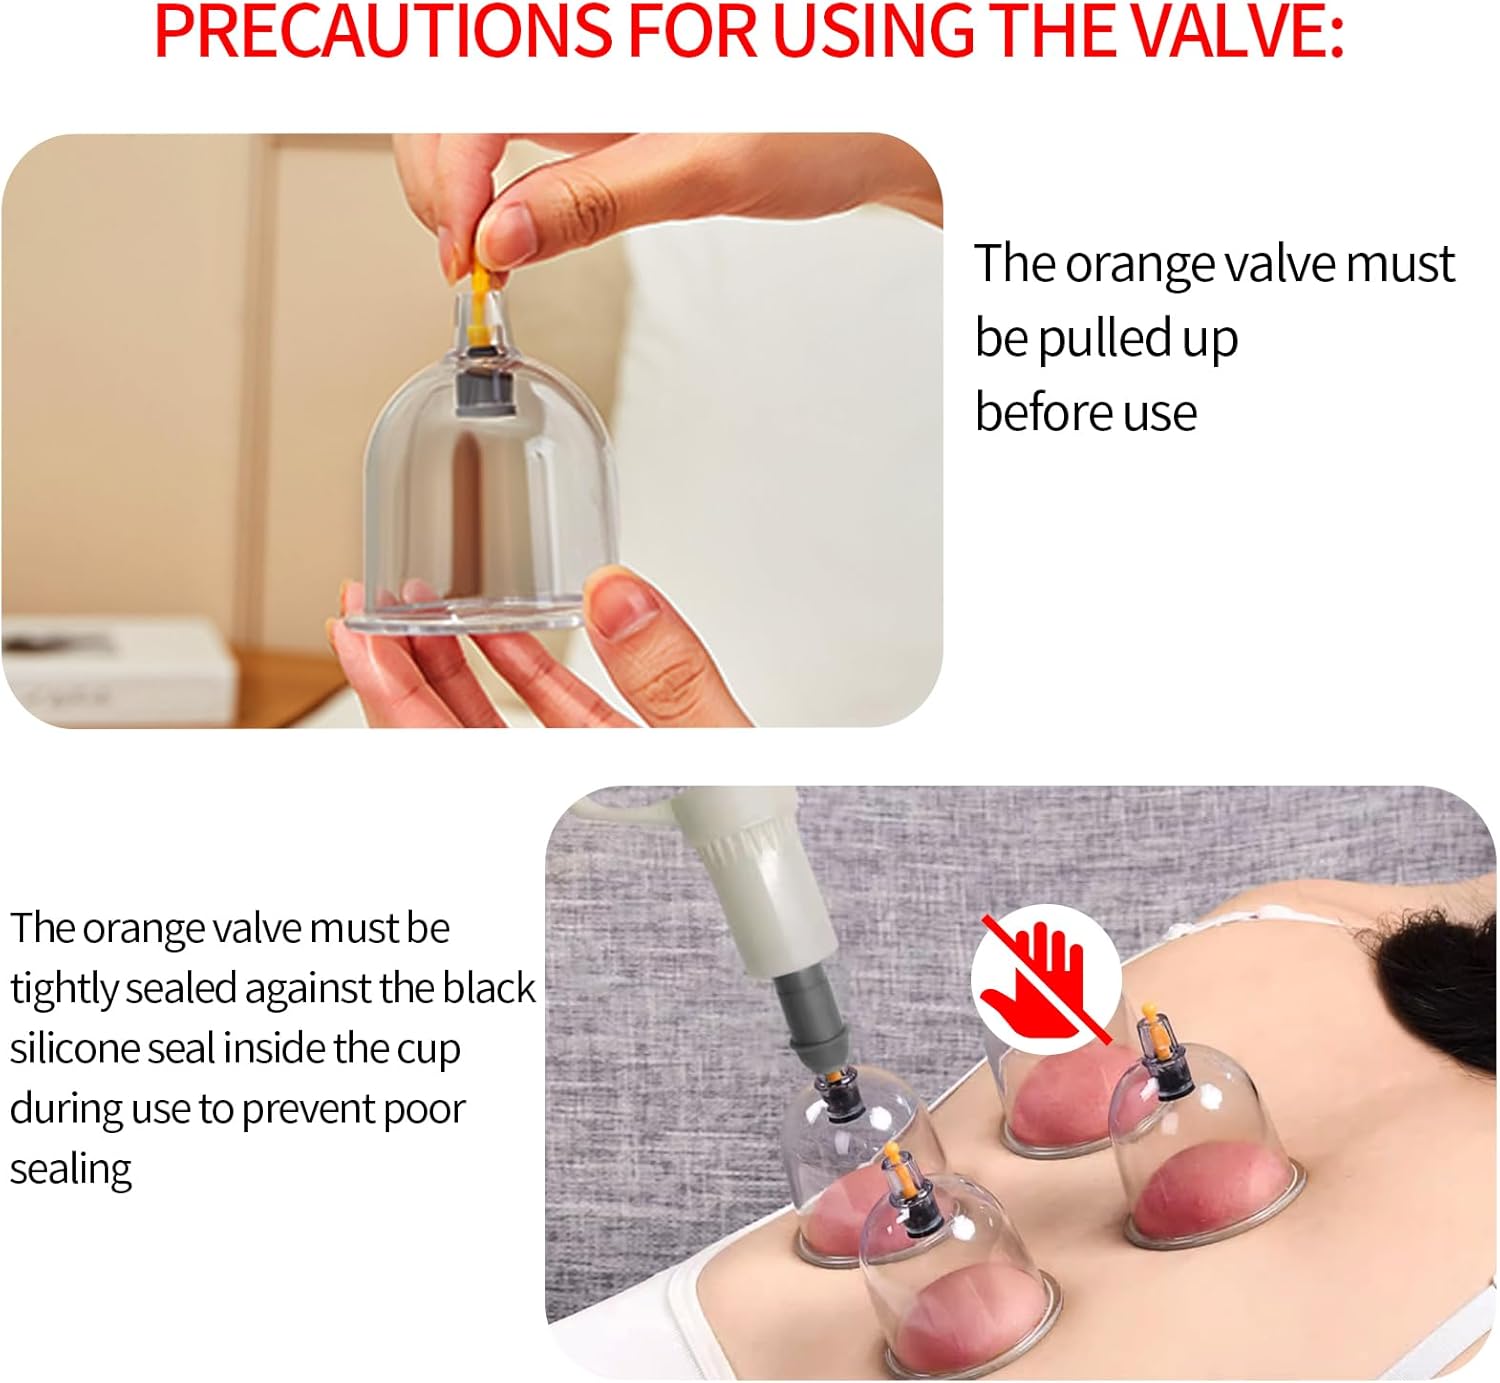
Figure 1: Valve Precautions. This image illustrates the correct handling of the orange valve. The top panel shows pulling the orange valve up before use. The bottom panel shows ensuring the orange valve is in close contact with the black silicone seal inside the cup to prevent air leakage.
Package Contents
Your Cupluw Cupping Set includes the following components:
- 24 Cupping Cups:
- 6 cups with Outer Diameter (OD) 2.67 inches
- 6 cups with OD 2.36 inches
- 4 cups with OD 1.69 inches
- 4 cups with OD 1.29 inches
- 2 U-shaped cups with OD 1.73 inches (for curved areas)
- 2 U-shaped cups with OD 2.04 inches (for curved areas)
- 1 ABS Hand Pump
- 1 Extension Tube (35 inches long)
- 12 Magnetic Points
- 1 Gua Sha Tool
- 1 English Instruction Manual (this document)

Figure 2: Cupping Set Components. This image displays all items included in the Cupluw 24-cup cupping therapy set, laid out clearly for identification.
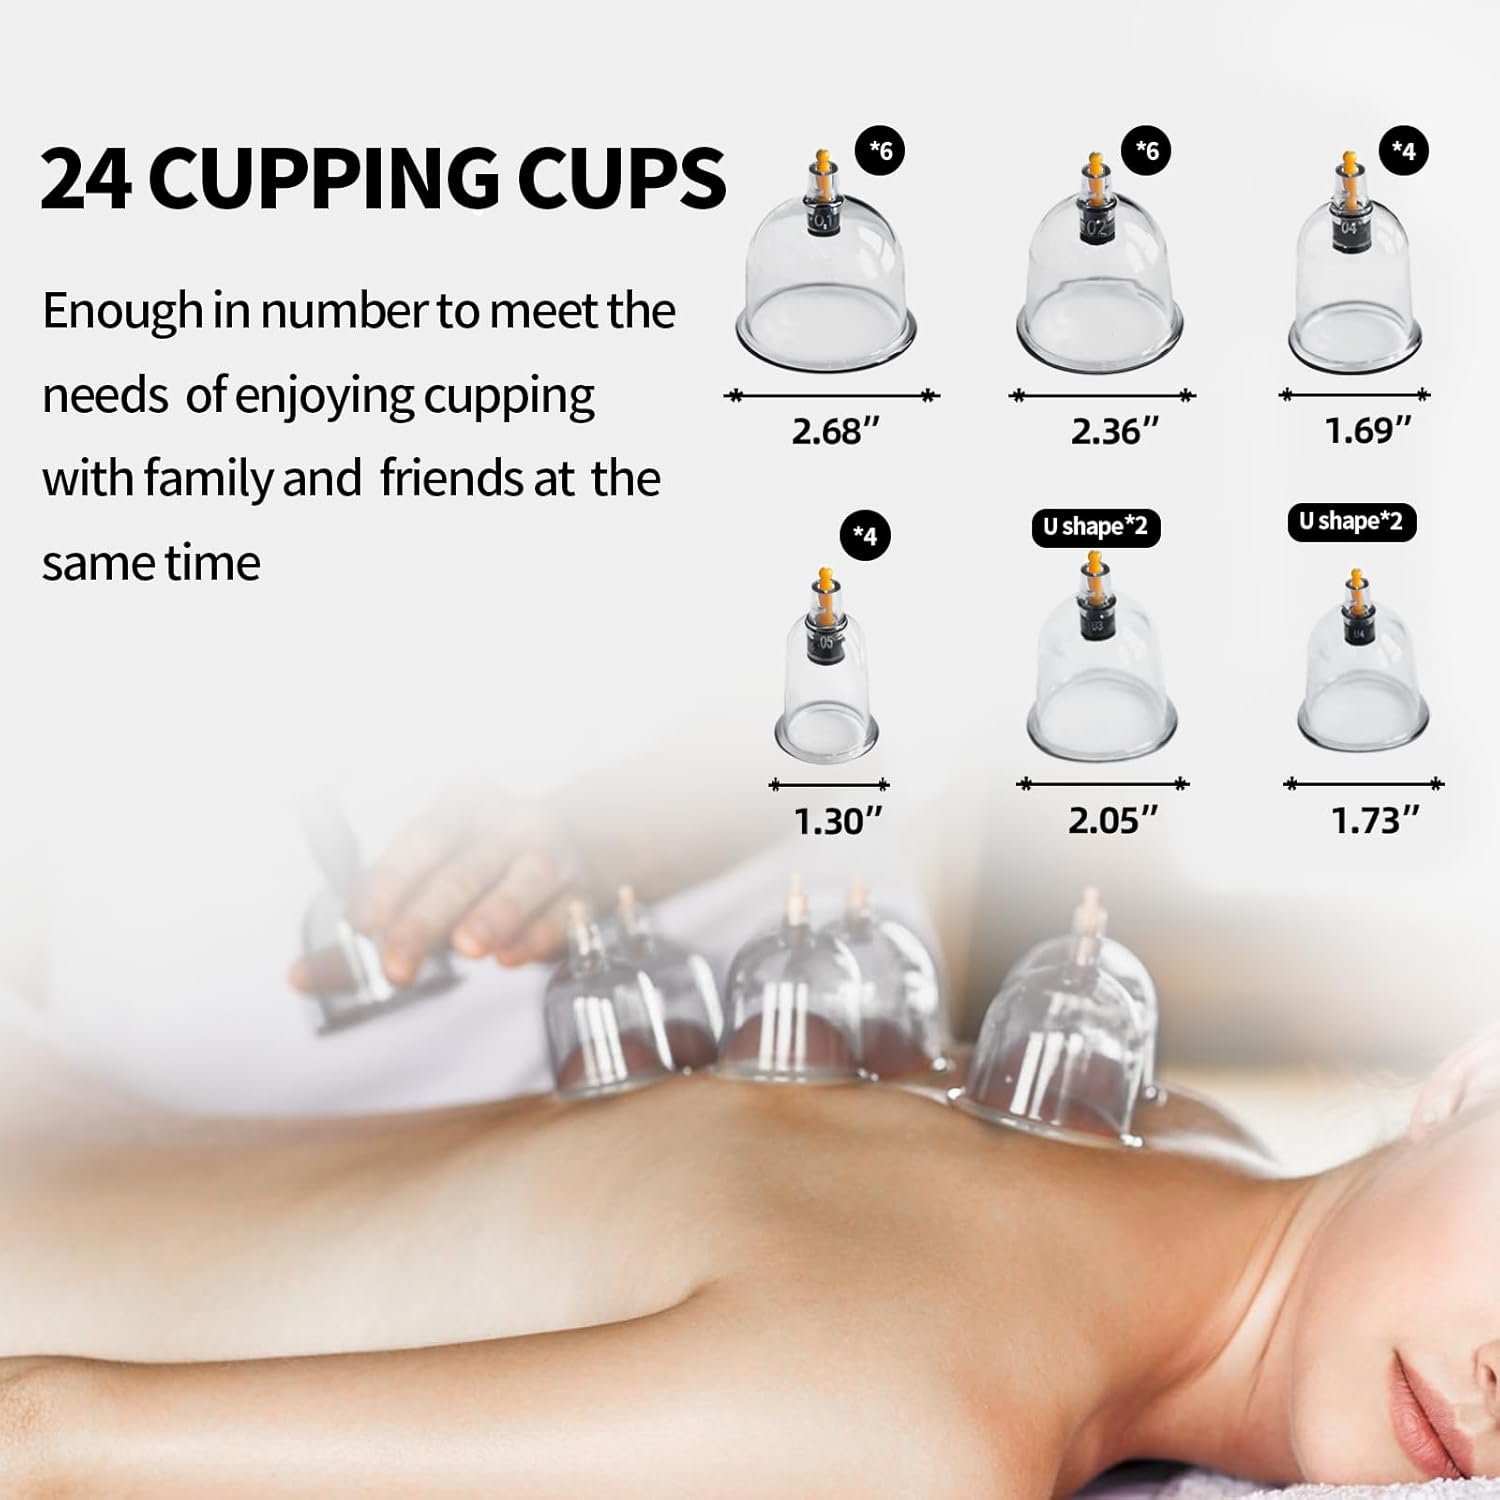
Figure 3: Cupping Cup Sizes. This image illustrates the different sizes and shapes of the 24 cupping cups provided, including flat-mouth cups for broad areas and U-shaped cups for curved body parts.
Setup
- Prepare the Skin: Thoroughly clean the skin area where cupping will be applied. Ensure it is free of oils, lotions, and excessive body hair. A small amount of essential oil can be applied to the skin to improve cup glide for dynamic cupping, but ensure it does not interfere with suction.
- Prepare the Cups: Before using the cups, ensure that the orange valve on each cup is in the "PULLED-OUT" position. This allows the vacuum pump to extract air effectively.
- Attach Magnetic Points (Optional): If desired, insert the magnetic points into the cups. These are removable and can enhance the therapy experience.
- Connect Pump: Connect the ABS hand pump directly to the orange valve of a cup, or use the 35-inch extension tube for hard-to-reach areas. To use the extension tube, connect one end to the pump and the other end to the cup's orange valve.

Figure 4: Pump and Accessories. This image highlights the upgraded ABS hand pump with its comfortable grip, the 35-inch extension tube for extended reach, and the removable magnetic massage points.
Operating Instructions
Follow these steps for effective cupping therapy:
- Apply Oil (Optional): Apply an appropriate amount of essential oil or massage oil to the cupping area. This helps create a better seal and allows for dynamic cupping.
- Position the Cup: Place the cup firmly on the skin. Ensure the orange valve is in close contact with the black silicone seal inside the suction cup to prevent poor sealing and reduced suction.
- Create Vacuum: Connect the hand pump to the orange valve. Pump 3-5 times until the skin inside the cup lifts slightly and a comfortable suction is achieved. Do not over-pump, as this can cause excessive discomfort or bruising.
- Remove Pump: Once the desired suction is achieved, carefully remove the hand pump from the cup's valve. The cup should remain attached to the skin.
- Duration: Keep the cup on the skin for 10-15 minutes. For beginners, start with shorter durations (5-7 minutes) to assess skin reaction.
- Release Suction: To remove the cup, gently lift the orange valve at the top of the cup. This will release the vacuum, and the cup will detach from the skin.

Figure 5: How to Operate. This image provides a six-step visual guide for using the cupping set, from applying oil to releasing the cups.
Cupping Methods

Figure 6: Cupping Methods. This image differentiates between static cupping (cups remain stationary) and dynamic cupping (cups are moved across the skin).
Static Cupping
In static cupping, cups are applied to specific points on the body and left in place for the recommended duration (10-15 minutes). This method is commonly used for localized pain relief and muscle relaxation.
Dynamic Cupping (Gliding Cupping)
For dynamic cupping, apply a generous amount of massage oil to the skin. After creating a comfortable suction, gently glide the cup across the skin. This method is often used for broader areas to promote circulation and myofascial release.
Maintenance and Cleaning
Proper maintenance ensures the longevity and hygiene of your cupping set:
- Cleaning Cups: After each use, thoroughly clean the suction cups. You can clean them with boiling water.
- Disassembly for Cleaning: When cleaning, please remove the orange valve and the black silicone seal sleeve from the cup. This allows for a more thorough cleaning of all components.
- Drying: Ensure all components are completely dry before reassembling and storing.
- Storage: Store the cupping set in a clean, dry place, away from direct sunlight and extreme temperatures.

Figure 7: Cleaning Instructions. This image shows cupping cups being cleaned in boiling water and illustrates the disassembled components (cup, orange valve, black silicone seal) for thorough cleaning.
Troubleshooting
- Weak Suction:
- Ensure the orange valve is in the "PULLED-OUT" position before pumping.
- Verify that the orange valve is in close contact with the black silicone seal inside the suction cup.
- Check for excessive body hair in the application area; remove if present.
- Ensure the skin is clean and free of debris. A thin layer of massage oil can improve the seal.
- Inspect cups and pump for any cracks or damage that might cause air leakage.
- Cups Not Adhering:
- Refer to the weak suction troubleshooting steps above.
- Ensure the skin surface is relatively flat and free of bony protrusions where a good seal cannot be formed.
- Discomfort During Use:
- Reduce the number of pump strokes to lessen the vacuum pressure.
- Do not leave cups on for longer than the recommended 10-15 minutes.
- Remove cups immediately if pain or severe discomfort occurs.
Product Specifications
| Brand | Cupluw |
| Model Number | Cupluw-[unique identifier] |
| Product Dimensions | 13.07 x 10.07 x 3.11 inches |
| Item Weight | 1.7 Pounds (0.77 Kilograms) |
| Material | Polystyrene (PS) |
| Power Source | Manual/Hand-powered motion |
| Use For | Body |


