Aigostar S10203R3E-209906
Aigostar Smart Ceiling Fan Light User Manual
Model: S10203R3E-209906
1. Introduction
Thank you for choosing the Aigostar Smart Ceiling Fan Light. This intelligent device combines efficient air circulation with versatile lighting, offering convenience and comfort through multiple control methods. Please read this manual thoroughly before installation and operation to ensure safe and optimal performance.
Safety Information
- Always disconnect power before installation, cleaning, or maintenance.
- Installation should be performed by a qualified electrician.
- Ensure the ceiling structure can support the weight of the fan light.
- Do not insert objects into the fan blades while operating.
- Keep children away from the fan during operation.
- This product is designed for indoor use only.
2. Package Contents
Please verify that all components are present and undamaged before proceeding with installation.
- Aigostar Smart Ceiling Fan Light Unit
- Remote Control
- Mounting Hardware (screws, anchors)
- User Manual (this document)

Image: The Aigostar Smart Ceiling Fan Light, showcasing its sleek design with integrated RGB lighting, along with the included remote control and compatibility with smart home devices like Alexa.
3. Installation Guide
Follow these steps carefully for proper installation. It is recommended to have two people for installation.
Step 1: Prepare the Ceiling
Mark the drilling points on the ceiling and drill holes for the mounting anchors. Ensure the holes are appropriately spaced for the mounting bracket.

Image: A hand holding a drill, preparing to drill holes in the ceiling for the fan's mounting bracket. Yellow anchors are visible in pre-drilled holes.
Step 2: Attach the Mounting Bracket
Secure the mounting bracket to the ceiling using the provided screws and anchors. Make sure it is firmly attached.

Image: The black circular mounting bracket being screwed into the ceiling, with two screws visible securing it.
Step 3: Secure the Safety Cable
Before connecting electrical wires, attach the fan unit's safety cable to the mounting bracket. This provides temporary support during wiring.

Image: The fan unit hanging by a safety cable from the ceiling mounting bracket, showing the cable hooked into a loop.
Step 4: Connect Electrical Wires
Connect the electrical wires from the ceiling to the fan unit. Ensure all connections are secure and follow local electrical codes. Refer to the wiring diagram if provided with the physical product.

Image: Close-up of electrical wires being connected between the fan unit and the ceiling wiring, showing white connectors.
Step 5: Mount the Fan Unit
Carefully lift the fan unit and align it with the mounting bracket. Rotate the unit to lock it into place, ensuring it is securely seated.

Image: The fan unit being lifted and rotated to secure it onto the ceiling mounting bracket, indicated by blue arrows and a circular rotation arrow.
Step 6: Final Securement
Once the fan unit is in place, use the remaining screws to fully secure it to the mounting bracket. This step ensures the fan is stable and safe.

Image: A hand using a power drill to insert a screw into the side of the fan unit, securing it to the ceiling bracket.
4. Operating Instructions
The Aigostar Smart Ceiling Fan Light offers multiple control methods for your convenience.
4.1 Control Methods
- Remote Control: Use the included remote for direct control.
- Aigosmart App: Download the Aigosmart app for smartphone control. Ensure your phone is connected to a 2.4GHz Wi-Fi network for initial setup. This fan is only compatible with the Aigosmart app.
- Voice Control (Alexa): Integrate with Amazon Alexa for hands-free operation.

Image: Infographic showing the fan's multiple functions: Remote Control, Lower Decibel, 6 Wind Speeds, Night Light Mode, Timing & Countdown Function, Summer and Winter Use, 55 Dynamic Modes, and Music Sync.

Image: Illustration of the smart ceiling fan light with logos for Amazon Alexa and Aigosmart, emphasizing 2.4GHz WiFi connectivity. A warning notes incompatibility with Smart Life, Google Assistant, and Apple HomeKit.

Image: Three panels illustrating the different wind modes: Sleeping Wind (person sleeping), Normal Wind (people socializing), and Natural Wind (person working on laptop), with a smartphone showing the Aigosmart app interface.
4.2 Remote Control Functions
The remote control provides comprehensive control over the fan and light functions.

Image: A detailed diagram of the remote control, with numbered labels pointing to each button and a corresponding list of functions.
- LED On/Off Switch: Toggles the light on or off.
- Fresh Air Mode for Fan: Press button 10 (Fan On/Off switch) and then this button to enter fresh air mode.
- Increase LED Light Brightness: Increases the light intensity.
- Decrease LED Light Color Temperature: Adjusts the light color towards warmer tones.
- Decrease LED Light Brightness: Decreases the light intensity.
- Set Timer for 1 Hour: Activates a 1-hour countdown timer for automatic shut-off.
- Fan Speed 1: Sets fan to the lowest speed.
- Fan Speed 2: Sets fan to speed 2.
- Fan Speed 3: Sets fan to speed 3.
- Fan On/Off Switch: Toggles the fan on or off.
- Fan Forward/Reverse Switch: Changes the fan rotation direction (summer/winter mode).
- RGB Lighting Mode / Night Light Mode: Short press for RGB lighting mode, long press to enter night light mode.
- Increase LED Light Color Temperature: Adjusts the light color towards cooler tones.
- Set Timer for 2 Hours: Activates a 2-hour countdown timer.
- Set Timer for 4 Hours: Activates a 4-hour countdown timer.
- Cancel Timer: Deactivates any active timer.
- Fan Speed 4: Sets fan to speed 4.
- Fan Speed 5: Sets fan to speed 5.
- Fan Speed 6: Sets fan to the highest speed.
4.3 Fan Modes and Features
- 6 Wind Speeds: The fan features a new generation DC pure copper motor, offering 6 adjustable wind speeds for various scenarios.

Image: An illustration highlighting the 6 wind speeds and the benefits of the DC pure copper frequency conversion motor: Energy Saving, Low Noise, and High Efficiency.
- Three Wind Types (App Control):
- Sleeping Wind: Low gear (1-2) with fixed wind speed for smooth operation, ideal for quiet sleep.
- Normal Wind: 1-6 gears of wind speed can be selected.
- Natural Wind: Random wind speed changes automatically, simulating a natural breeze.
- Forward and Reverse Rotation:
- Summer Forward Mode: Blows strong air downwards to cool the room quickly.
- Winter Reversal Mode: Directs airflow upwards, preventing air from drying out and helping to circulate warm air.
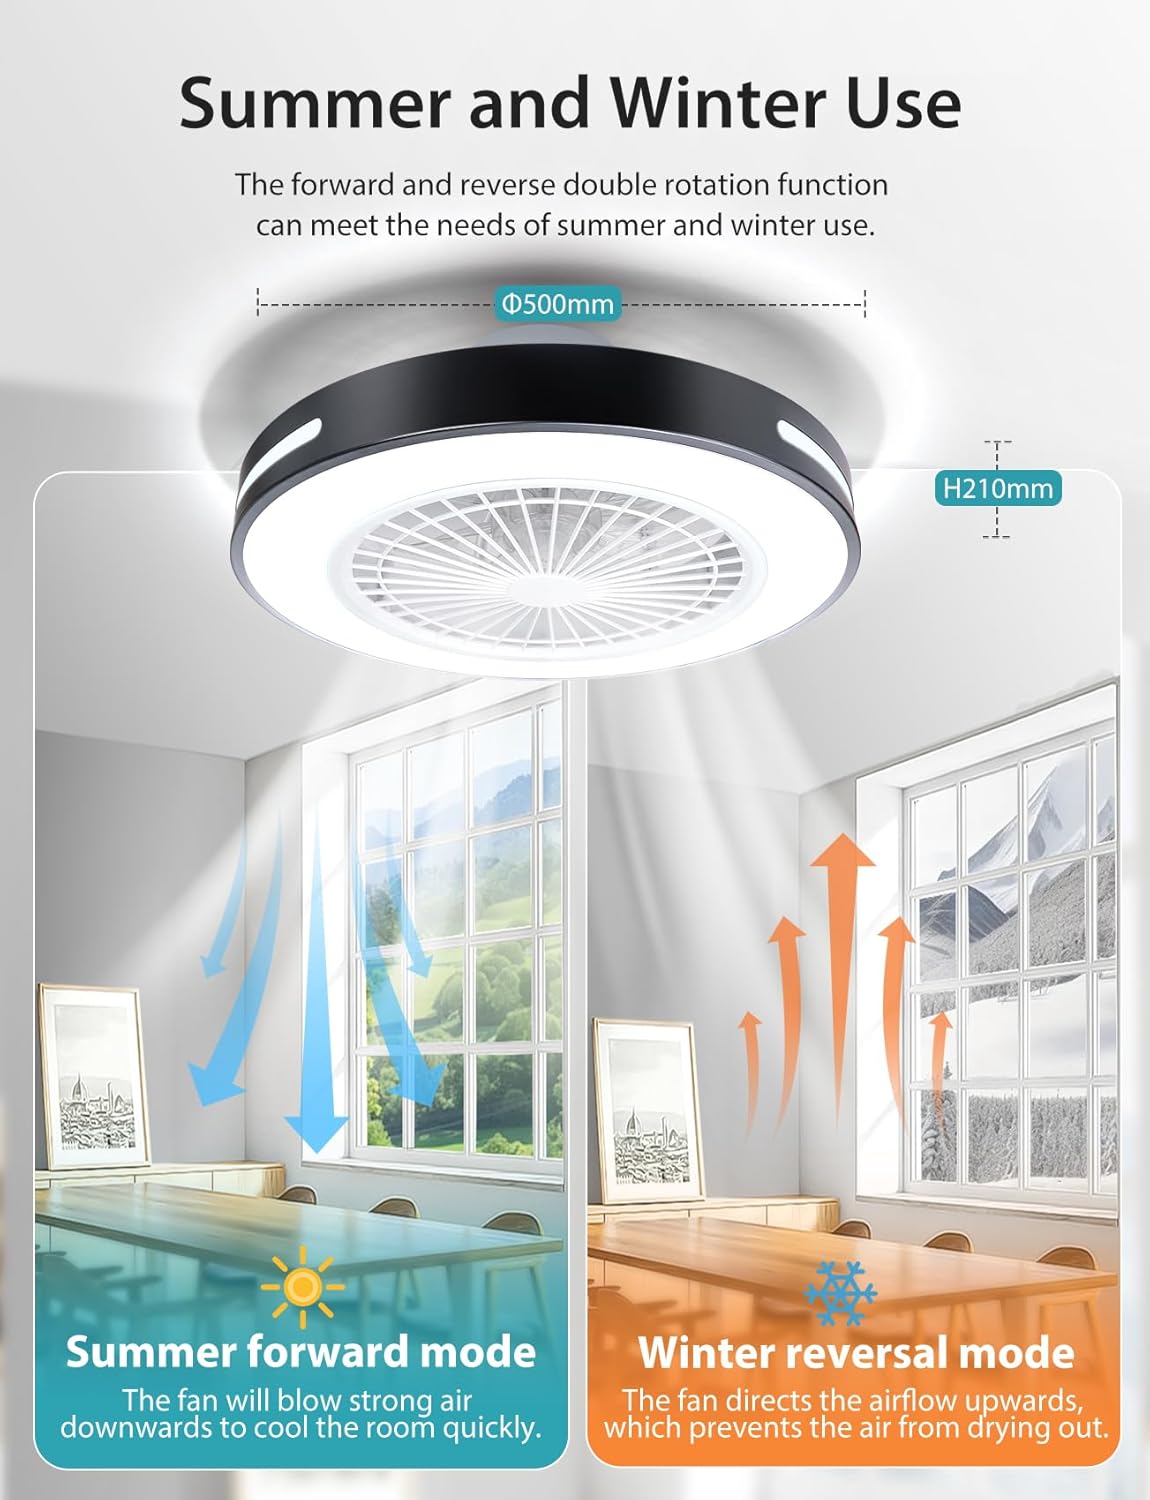
Image: A split image illustrating the fan's Summer Forward Mode (downward airflow for cooling) and Winter Reversal Mode (upward airflow for circulation).
- Low Noise Operation: The fan operates quietly, with the lowest decibel level at 35dB, creating a comfortable sleeping environment.

Image: A graph comparing noise levels, showing the smart fan light at less than 50dB, butterfly dancing at less than 30dB, and outdoor activities at more than 55dB. A sleeping child is shown in the foreground.
4.4 Lighting Modes and Features
- Adjustable Color Temperature and Brightness: Infinitely dimmable with a color temperature range of 2700K-6500K and brightness from 1% to 100%.
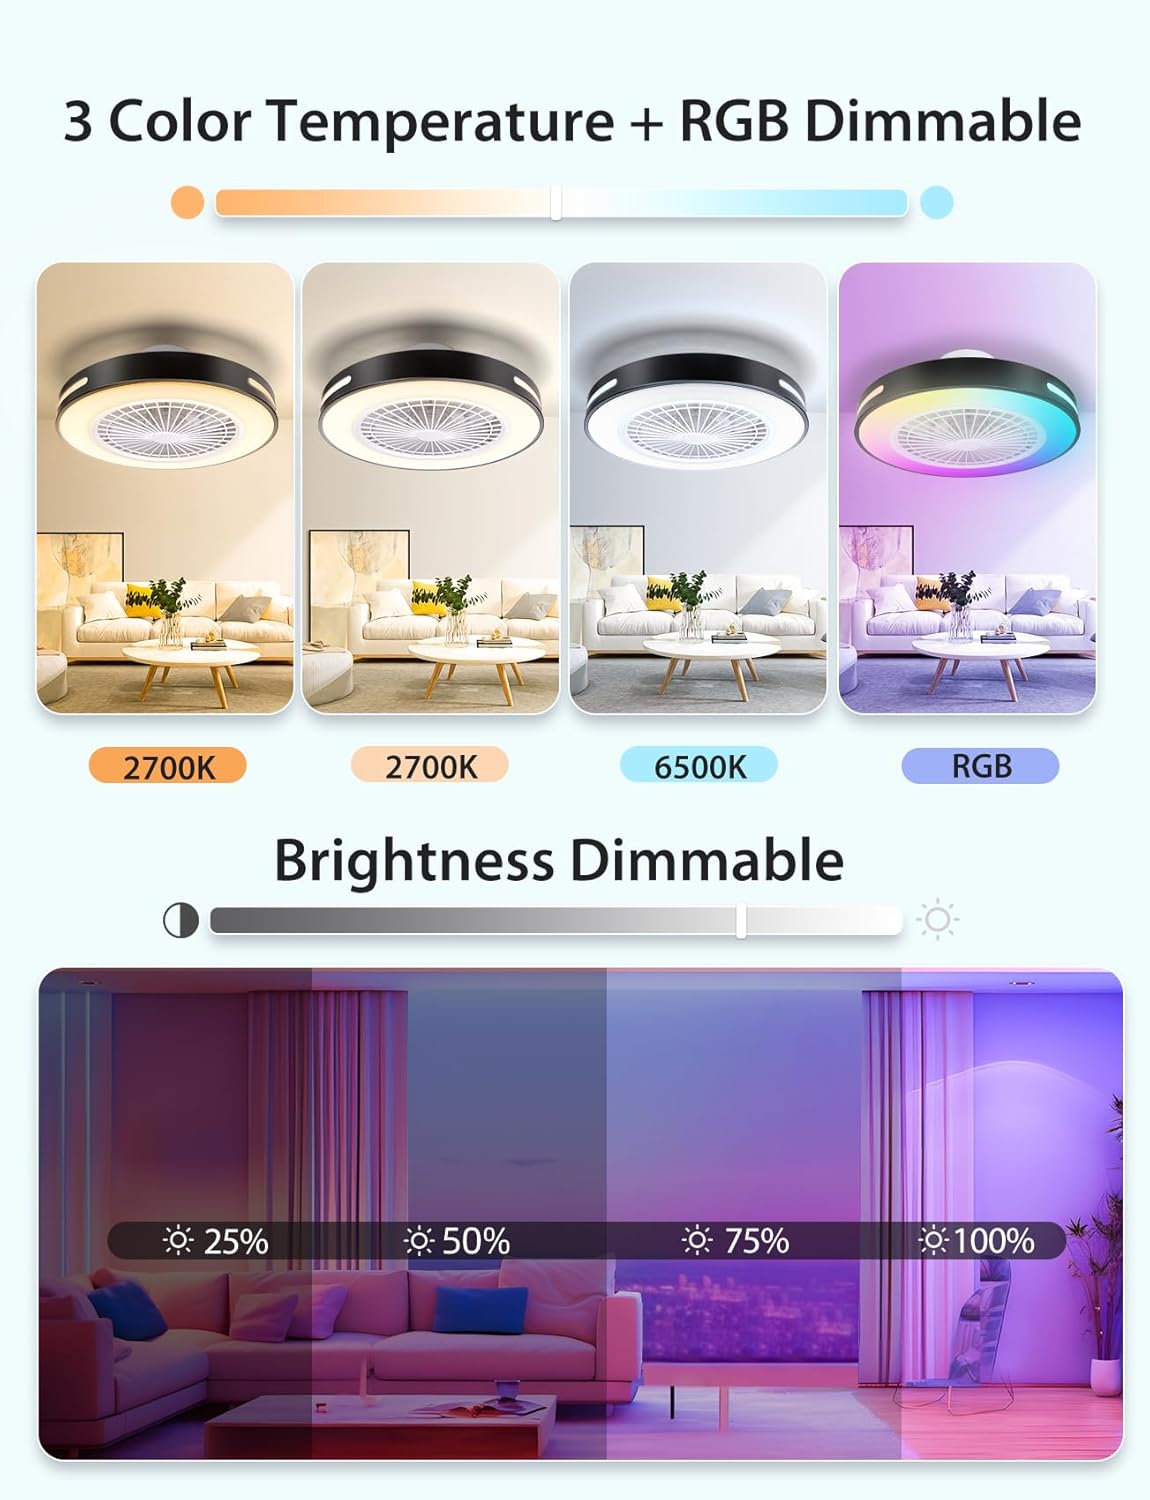
Image: Four panels demonstrating different light settings: 2700K (warm white), 6500K (cool white), and RGB (multicolor), along with a brightness dimmable slider from 25% to 100% in a living room setting.
- RGB Lighting: Features 16 million colors and 55 dynamic light modes.

Image: A woman wearing headphones looking at her phone, with the smart fan light in the background displaying RGB colors. Icons indicate 16 Million Colors, Image Recognition and Color Selection, 55 Dynamic Modes, and Music Synchronization.
- Music Synchronization: The light color changes with the rhythm of music, creating a dynamic atmosphere.
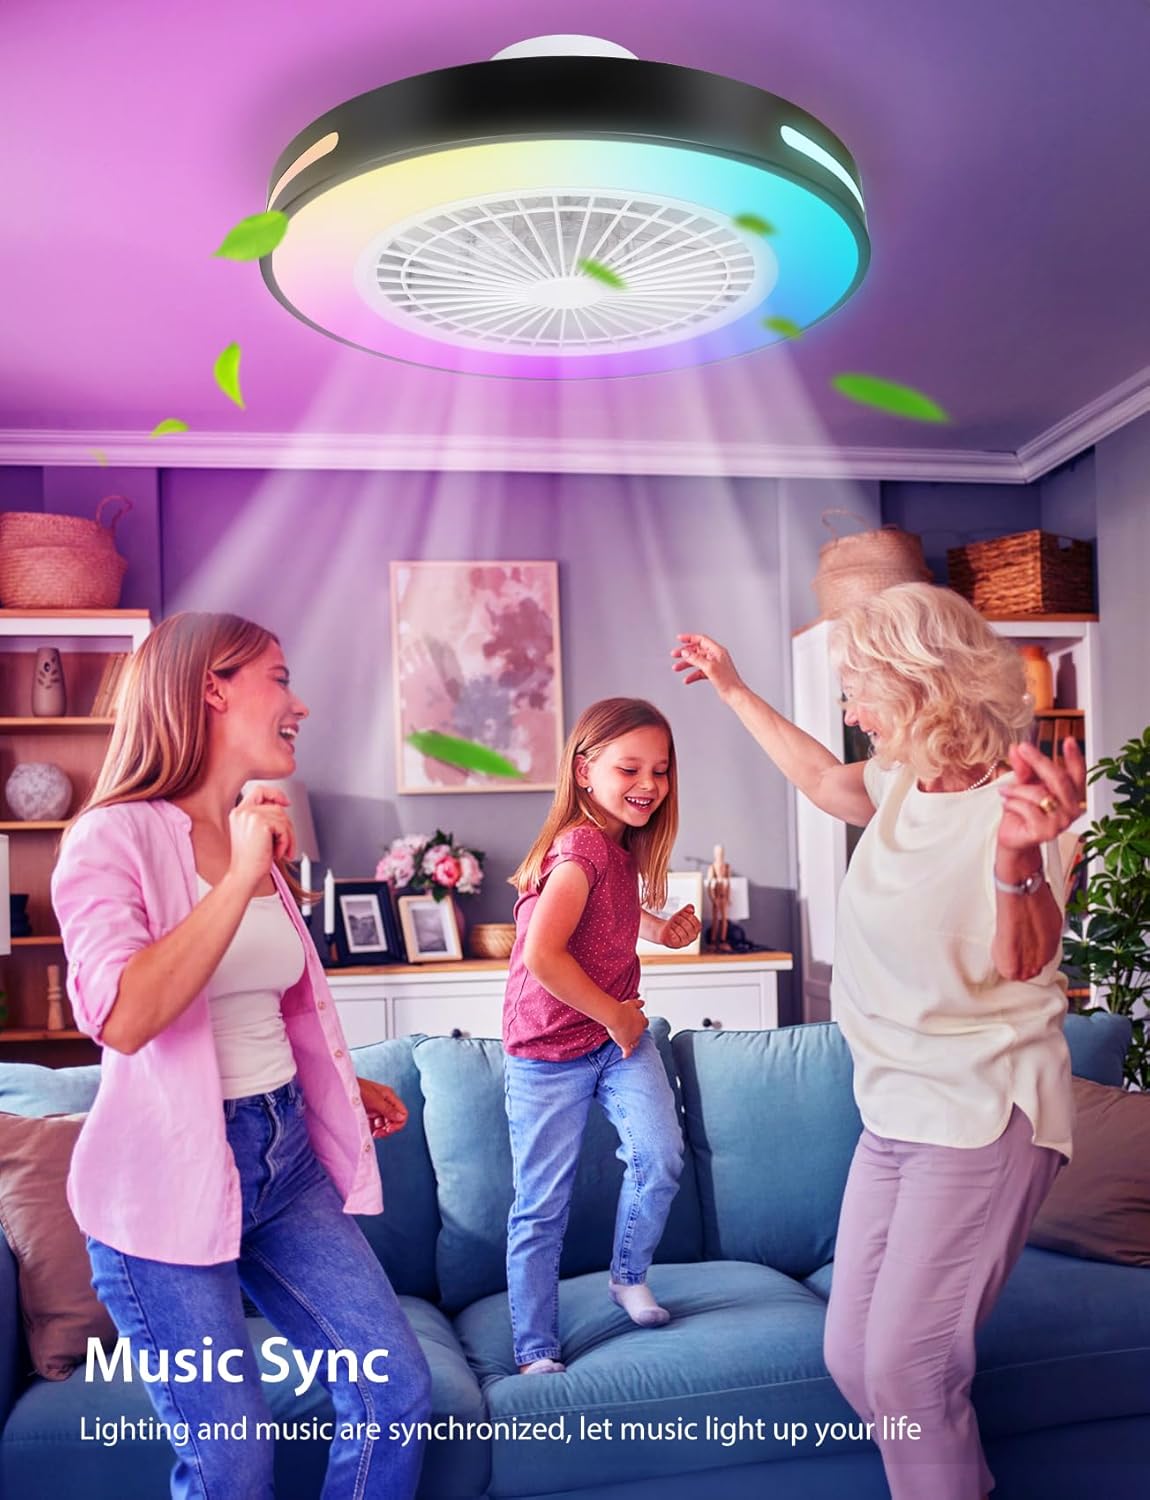
Image: Three people dancing in a living room, with the smart ceiling fan light above them displaying vibrant RGB colors, illustrating the music sync function.

Image: A family enjoying music in a living room with the smart ceiling fan light displaying synchronized colors. Text explains that light color changes with music rhythm.
- Night Light Mode: Provides a soft, warm light for nighttime use without being dazzling.
- Timing and Countdown Function: Set timers for 1H, 2H, or 4H to automatically turn off the light or fan, saving energy.
5. Maintenance
Regular maintenance ensures the longevity and optimal performance of your Aigostar Smart Ceiling Fan Light.
- Cleaning:
- Before cleaning, ensure the power supply to the fan is disconnected.
- Wipe the fan blades and light housing with a soft, damp cloth.
- Do not use abrasive cleaners or solvents, as they may damage the finish.
- For detailed information on cleaning and disposing of broken or deteriorated bulbs, refer to the product page's important information section.
- Bulb Replacement: The integrated LED light source is designed for long-term use (average durability of 20,000 hours). If replacement is needed, contact customer support for assistance. For general information on recycling bulbs, refer to the product page's important information section.
- Periodic Checks: Periodically check all screws and connections to ensure they are secure.
6. Troubleshooting
If you encounter issues with your Aigostar Smart Ceiling Fan Light, refer to the following common problems and solutions:
| Problem | Possible Cause | Solution |
|---|---|---|
| Fan or Light does not turn on. | No power supply; Loose wiring; Remote control battery low. | Check circuit breaker; Verify wiring connections (consult electrician if unsure); Replace remote control batteries. |
| Fan makes unusual noise. | Loose screws; Unbalanced blades; Obstruction. | Tighten all mounting screws; Ensure blades are balanced (if removable); Check for any objects interfering with fan rotation. |
| Remote control not responding. | Battery low/dead; Remote not paired; Obstruction between remote and fan. | Replace batteries; Refer to pairing instructions (if applicable, usually automatic); Ensure clear line of sight. |
| App connection issues. | Incorrect Wi-Fi frequency (not 2.4GHz); App not updated; Router issues. | Ensure phone is connected to 2.4GHz Wi-Fi; Update Aigosmart app; Restart router and fan. |
| Alexa voice control not working. | Incorrect skill enabled; Device not linked; Network issues. | Verify Aigosmart skill is enabled in Alexa app; Relink device in Alexa app; Check Wi-Fi connection. |
7. Specifications
Detailed technical specifications for the Aigostar Smart Ceiling Fan Light.
| Feature | Detail |
|---|---|
| Brand | Aigostar |
| Model Number | S10203R3E-209906 |
| Product Dimensions | 50 x 50 x 21 cm (Length x Width x Height) |
| Material | Plastic, Metal |
| Style | Modern |
| Color (Product Variant) | 55W (DC 15W+LED 40W), RGB and CCT, 1 unit |
| Number of Blades | 8 |
| Airflow Capacity | 20.9 Cubic Meters per Minute |
| Maximum Electrical Power (Light) | 40 Watts |
| Voltage | 220 Volts (AC) |
| Light Source Type | LED |
| Luminous Flux | 4400 Lumens |
| Incandescent Equivalent | 247 Watts |
| Color Temperature Range | 2700K-6500K (Adjustable) |
| Color Rendering Index (CRI) | 80.0 |
| Average Durability (LED) | 20,000 Hours |
| Control Features | Adjustable Speed Control, Countdown Timer, Automatic Shut-Off, Programmable, RGB, Music Sync |
| Energy Efficiency Rating | E Image: European Union energy efficiency label showing Aigostar HLLEDFM20-40W-RGBCW-WIFI with an 'E' rating and 40 kWh/1000h consumption. More information available via QR code or EPREL database. |
| Country of Origin | China |
8. Warranty and Support
Aigostar products are designed for reliability and performance. For warranty information, please refer to the terms and conditions provided at the time of purchase or visit the official Aigostar website.
For technical support, troubleshooting assistance, or inquiries regarding your product, please contact Aigostar customer service through their official channels or the retailer where the product was purchased.
You can also visit the Aigostar Brand Store on Amazon for more product information and support resources.
Ask a question about this manual
Ask about setup, troubleshooting, compatibility, parts, safety, or missing instructions. Manuals+ will review the question and use this page’s manual context to help answer it.