1. Introduction
This manual provides detailed instructions for the installation, operation, and maintenance of your Biorunn Android 13 Car Stereo Radio. Please read this manual thoroughly before using the product to ensure proper function and safety.
2. Safety Information
Observe the following safety precautions to prevent damage to the unit or injury to yourself:
- Do not attempt to disassemble or modify the unit.
- Ensure all wiring connections are secure and correctly matched to avoid short circuits.
- Consult a professional for installation if you are unsure about any steps.
- Do not operate the device in a manner that distracts you from driving.
3. Package Contents
Verify that all items are present in the package:
- Biorunn Android 13 Car Stereo Head Unit (9-inch IPS Touch Screen)
- Power Cable Harness
- GPS Antenna
- USB Cables (x2)
- RCA Input/Output Cables
- Installation Tools (plastic pry tools)
- User Manual (this document)

Image: Main head unit with included accessories such as wiring harnesses, GPS antenna, USB cables, and installation tools.
4. Product Overview
The Biorunn Android 13 Car Stereo features a 9-inch IPS touch screen, 1GB RAM, and 32GB ROM. It supports wireless CarPlay and Android Auto, Bluetooth 5.0, Wi-Fi, and FM RDS radio.
4.1 Key Features
- Operating System: Android 13
- Processor: 4-Core
- Display: 9-inch IPS Touch Screen, 1280x720 resolution
- Memory: 1GB RAM, 32GB ROM
- Connectivity: Wireless CarPlay, Android Auto, Bluetooth 5.0, Wi-Fi
- Radio: FM RDS
- Navigation: Built-in GPS
- Multimedia: Supports various audio and video formats
- Control: Steering wheel control compatibility
4.2 Rear View and Connections

Image: Rear view of the head unit detailing the various ports and connections, including USB, camera input, GPS, and the audio/video multifunctional plug.
5. Installation Guide
This section provides general installation steps. Specific vehicle wiring may vary. Professional installation is recommended.
5.1 Pre-Installation Check
- Ensure the vehicle's ignition is off and the battery is disconnected.
- Confirm compatibility with your SsangYong Tivoli Tivolan (2014-2017) model.
- Gather all necessary tools (included pry tools, screwdrivers, wire strippers, etc.).
5.2 Removing the Factory Radio
- Carefully use the provided pry tools to remove trim panels around the factory radio.
- Unscrew the mounting screws holding the factory radio in place.
- Gently pull out the factory radio and disconnect all wiring harnesses.

Image: Comparison view of a car dashboard before and after the installation of the Biorunn car stereo, demonstrating the integrated fit.
5.3 Wiring Connections
Refer to the wiring diagram on the back of the unit and the provided harness for correct connections.
- Power Harness: Connect the main power harness to the vehicle's wiring. Ensure ACC, B+, and Ground wires are correctly matched.
- GPS Antenna: Connect the GPS antenna and mount it in a location with a clear view of the sky (e.g., dashboard).
- USB Cables: Connect the USB cables for external devices or data transfer.
- Camera Input: If installing a reversing camera (not included), connect it to the "Camera In" port.
- Steering Wheel Control: Connect the steering wheel control wires (KEY1, KEY2) if your vehicle supports it.
- CANBUS: If your car requires a CANBUS decoder, connect it to the designated port.

Image: Detailed diagram illustrating the various wiring connections on the rear of the head unit, including power, audio/video, USB, GPS, and camera inputs.
5.4 Mounting the New Unit
- Carefully slide the new head unit into the dashboard opening.
- Secure it with the appropriate mounting screws.
- Reattach any trim panels removed earlier.
- Reconnect the vehicle battery.
6. Basic Operation
6.1 Power On/Off
Turn the vehicle ignition to the ACC or ON position. The unit will power on automatically. To turn off, turn off the vehicle ignition.
6.2 Touch Screen Interface
The 9-inch IPS capacitive multi-touch screen allows for quick and intuitive operation. Tap icons to open applications, swipe to navigate, and pinch-to-zoom where applicable.
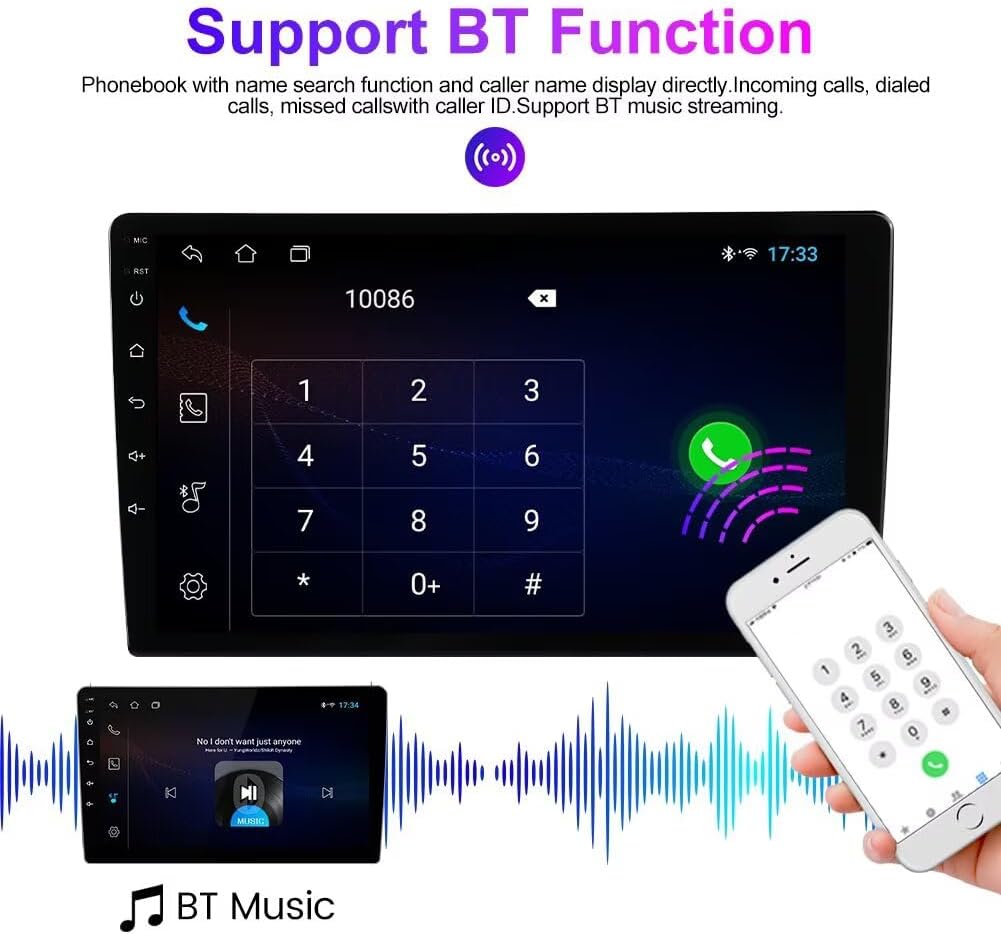
Image: The main user interface of the car stereo, displaying icons for various applications such as Radio, Music, Spotify, Phone, Settings, Calendar, and YouTube.
6.3 System Settings
Access the 'Settings' icon from the home screen to configure Wi-Fi, Bluetooth, display, sound, language, and other system preferences.
7. Advanced Features
7.1 Wireless CarPlay & Android Auto
Connect your smartphone wirelessly to access navigation, music, calls, and messages safely through the car stereo interface.
- Ensure Bluetooth and Wi-Fi are enabled on your smartphone.
- On the car stereo, select the "CarPlay" or "Android Auto" application.
- Follow the on-screen prompts to pair your device.

Image: Screen displaying the Carplay and Android Auto logos, indicating support for smartphone integration.
7.2 Bluetooth Functionality
Pair your phone via Bluetooth for hands-free calling and audio streaming.
- Go to "Settings" > "Bluetooth" on the head unit.
- Enable Bluetooth and search for available devices.
- Select your phone from the list and confirm the pairing code.
- Once paired, you can make/receive calls and play music through the stereo.

Image: The Bluetooth interface showing a phone dial pad and a music playback screen, demonstrating hands-free calling and audio streaming capabilities.
7.3 FM RDS Radio
Access the "Radio" application to listen to FM stations. The RDS function displays station information.
- Automatic Search: Tap "AS" to automatically scan and save available stations.
- Manual Tuning: Use the arrow buttons to manually adjust the frequency.
- Preset Stations: Save your favorite stations to the preset buttons (P1-P6).

Image: The FM RDS radio interface, showing frequency display, station presets, and search options.
7.4 GPS Navigation
The unit comes with a built-in global positioning system. Use pre-installed navigation apps or download others from the Google Play Store (requires Wi-Fi connection).
7.5 Split Screen Functionality
The split-screen feature allows two applications to be displayed simultaneously, enhancing multitasking capabilities.

Image: The car stereo screen displaying two applications side-by-side: a video player on the left and a navigation map on the right, demonstrating the split-screen feature.
7.6 Reversing Video Input
If a reversing camera is connected (camera not included), the display will automatically switch to the camera view when the vehicle is put into reverse gear, providing visual assistance for parking and maneuvering.
8. Maintenance
- Screen Cleaning: Use a soft, lint-free cloth to clean the touch screen. Do not use abrasive cleaners.
- Software Updates: Periodically check for system software updates via Wi-Fi to ensure optimal performance and access to new features.
- General Care: Avoid exposing the unit to extreme temperatures or direct sunlight for prolonged periods.
9. Troubleshooting
| Problem | Possible Cause | Solution |
|---|---|---|
| Unit does not power on. | Incorrect power wiring; Blown fuse; Vehicle battery disconnected. | Check power connections (ACC, B+, Ground). Inspect vehicle fuses. Reconnect battery. |
| No sound. | Speaker wires disconnected; Volume too low; Mute activated. | Verify speaker wiring. Increase volume. Check if mute is active. |
| Bluetooth not connecting. | Bluetooth off on phone/unit; Incorrect pairing process. | Ensure Bluetooth is enabled on both devices. Re-attempt pairing. Clear previous pairings. |
| GPS signal weak/lost. | GPS antenna improperly installed or obstructed. | Ensure GPS antenna has a clear view of the sky. Check antenna connection. |
| Touch screen unresponsive. | Temporary software glitch; Screen calibration issue. | Restart the unit (turn off/on vehicle ignition). If issue persists, perform a factory reset (data will be lost). |
10. Specifications
- Operating System: Android 13
- Core: 4-Core
- Screen Size: 9 Inches
- RAM: 1GB
- ROM: 32GB
- Resolution: 1280 x 720, IPS Touch Screen
- Bluetooth: BT 5.0
- Connectivity: Wi-Fi, Wireless CarPlay, Android Auto
- Navigation: Built-in GPS
- Audio Formats: MP3, WMA, AAC, RM, FALC, etc.
- Video Formats: MPEG-1/2/4, H264, H263, VC1, RV, RMVB, DivX, Sorenson SparK, Spark, VP8, AVS Stream
- Photo Formats: JPG/BMP/JEPG/GIF/PNG
- Steering Wheel Control: Supported
- USB Ports: USB1; USB2
11. Warranty and Support
For warranty information or technical support, please contact your retailer or visit the official Biorunn website. Keep your purchase receipt as proof of purchase.
Manufacturer: Shenzhen Rongnan International Electronics Co., Ltd.
Model Number: b7789703-ecb0-408e-bef9-2af62616bc6d