1. Introduction
This manual provides comprehensive instructions for the SAMSUNG ViewFinity S6 (S60UD) 24-inch QHD High Resolution Computer Monitor. It covers essential information regarding product setup, operation, maintenance, and troubleshooting to ensure optimal performance and user experience. Please read this manual thoroughly before using your monitor.

Front view of the SAMSUNG ViewFinity S6 (S60UD) 24-inch QHD Monitor, showcasing its sleek design and vibrant display.

Angled side view of the SAMSUNG ViewFinity S6 monitor, highlighting its slim profile and stable stand.
2. Setup
2.1 Unpacking and Stand Assembly
Carefully remove all components from the packaging. The Easy Setup Stand is designed for tool-free assembly, allowing for quick and convenient setup.
- Place the monitor panel face down on a soft, clean surface to prevent scratches.
- Align the stand neck with the slot on the back of the monitor panel.
- Gently push the stand neck into the slot until it clicks securely into place.
- Attach the base to the stand neck by aligning the tabs and pressing down until it locks.

Illustration demonstrating the simple, tool-free assembly process for the monitor stand, showing the stand components separating from the monitor.
2.2 Connecting Cables
Connect the necessary cables to the monitor and your computer or other devices. Ensure all connections are secure.

Rear view of the monitor displaying various input and output ports, including USB Type-A, Headphone, LAN, HDMI, Display In, Display Out, USB Type-B, USB Type-C, and Power.
- Power Cable: Connect the power cable to the monitor's power input and then to a wall outlet.
- USB-C Cable: For simultaneous video, data transfer, and 90W charging, connect a USB-C cable from your laptop to the monitor's USB Type-C port.
- HDMI/DisplayPort (DP) Cable: Connect an HDMI or DisplayPort cable from your computer's video output to the corresponding input on the monitor for video signal.
- LAN Port: For seamless Ethernet connectivity, connect an Ethernet cable to the monitor's built-in LAN port.
- USB Type-A Ports: Use the USB Type-A downstream ports for connecting peripherals like keyboards, mice, or USB drives.
- Headphone Jack: Connect headphones or external speakers to the headphone output.
2.3 Daisy Chain Setup
The monitor supports daisy chaining, allowing you to connect a second monitor to expand your workspace without needing additional adapters or docking stations.
- Connect your primary computer to the first monitor using a USB-C or DisplayPort cable.
- Connect a DisplayPort cable from the Display Out port of the first monitor to the Display In port of the second monitor.
- Ensure both monitors are powered on and configured correctly in your operating system's display settings.
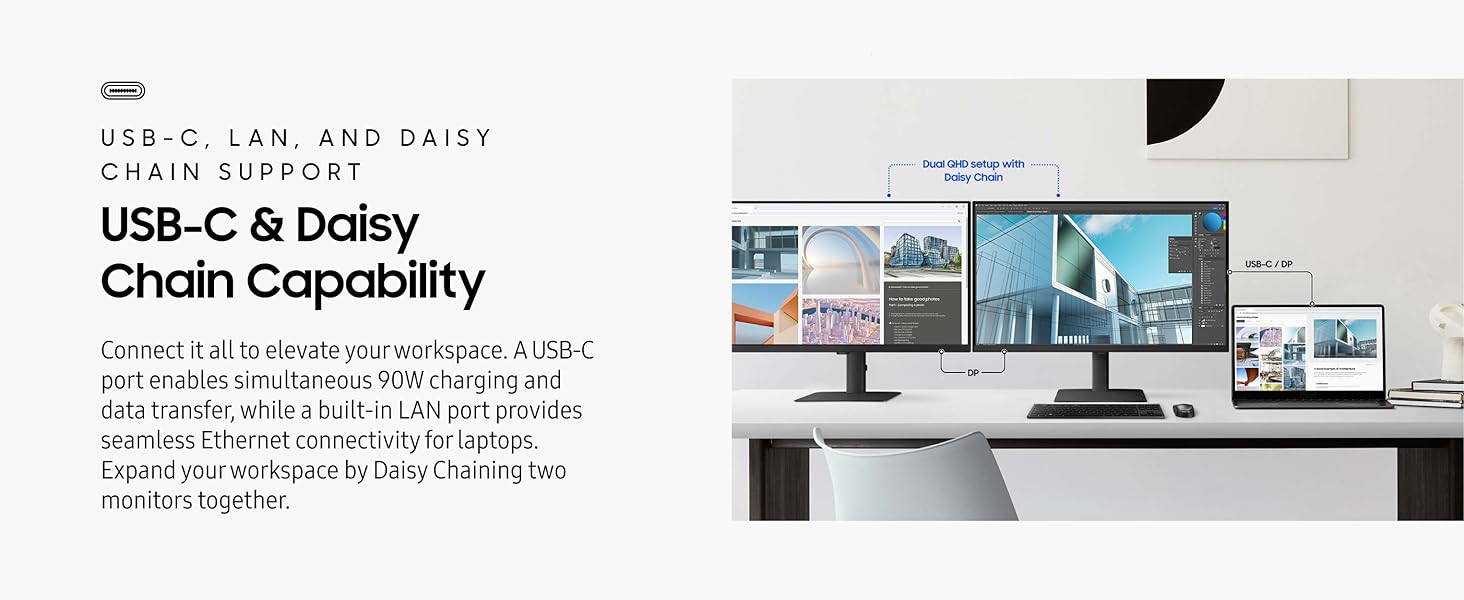
Visual representation of a dual QHD monitor setup, demonstrating how to connect two monitors using the daisy chain feature with USB-C and DisplayPort connections.
3. Operating Instructions
3.1 Power On/Off
Press the power button, typically located on the back or bottom of the monitor, to turn the monitor on or off. The power indicator light will illuminate when the monitor is on.
3.2 Input Selection and KVM Switch
The built-in KVM switch allows you to control two monitor sources with a single keyboard and mouse. Use the On-Screen Display (OSD) menu to switch between connected input sources (USB-C, HDMI, DisplayPort).
- Access the OSD menu using the joystick or buttons on the monitor.
- Navigate to the 'Input' or 'Source' section.
- Select the desired input source (e.g., USB-C, HDMI, DP).
- For KVM functionality, ensure your keyboard and mouse are connected to the monitor's USB ports, and switch the input source to control the corresponding computer.

Illustration of the KVM switch in action, allowing a single keyboard and mouse to control both a desktop PC and a laptop connected to the monitor.
3.3 Display Settings
Adjust various display settings through the OSD menu to optimize your viewing experience.
- Resolution and Refresh Rate: The monitor supports QHD (2560x1440) resolution and a 100Hz refresh rate. Ensure these settings are enabled in your computer's display settings for optimal clarity and smoothness.
- HDR10: This monitor supports HDR10, providing enhanced contrast and a wider color gamut. Enable HDR in your operating system and compatible applications for a more realistic visual experience.
- Intelligent Eye Care & Eye-Saver Mode: TÜV-certified features reduce screen flickering and protect against excessive blue light. These settings can be adjusted in the OSD menu to automatically optimize brightness and color temperature based on your environment.

Visual comparison demonstrating the enhanced realism and wider color gamut provided by HDR10 compared to SDR, showcasing 1.07 billion colors.

An image illustrating the smooth visuals and performance achieved with QHD (2560x1440) resolution and a 100Hz refresh rate.
3.4 Ergonomic Adjustments
The height-adjustable stand offers versatile positioning for optimal viewing comfort.
- Height Adjustment: Gently push or pull the monitor panel up or down to adjust its height.
- Tilt: Tilt the monitor panel forward or backward to find your preferred viewing angle.
- Swivel: Rotate the monitor left or right on its base.
- Pivot: The screen can pivot 90 degrees for vertical viewing, ideal for long documents or coding.

Illustrations demonstrating the ergonomic flexibility of the monitor stand, including tilt, swivel, height adjustment, and 90-degree pivot functionality.

The SAMSUNG ViewFinity S6 monitor displayed in a vertical (portrait) orientation, showcasing its pivot capability.
4. Maintenance
Proper maintenance ensures the longevity and optimal performance of your monitor.
- Cleaning the Screen: Gently wipe the screen with a soft, lint-free cloth. For stubborn marks, lightly dampen the cloth with water or a specialized screen cleaner. Avoid using harsh chemicals, alcohol, or abrasive materials.
- Cleaning the Casing: Use a soft, dry cloth to wipe the monitor casing.
- Ventilation: Ensure the monitor's ventilation openings are not blocked to prevent overheating.
- Power Off When Not in Use: Turn off the monitor when not in use for extended periods to conserve energy and prolong its lifespan.
5. Troubleshooting
If you encounter issues with your monitor, refer to the following common troubleshooting steps.
| Problem | Possible Solution |
|---|---|
| No image on screen |
|
| Image is blurry or distorted |
|
| Monitor does not detect signal after sleep |
|
| KVM switch not working |
|
6. Specifications
Detailed technical specifications for the SAMSUNG ViewFinity S6 (S60UD) 24-inch QHD Monitor.
| Feature | Detail |
|---|---|
| Model Number | LS24D606UANXZA |
| Screen Size | 24 Inches |
| Screen Resolution | 2560x1440 (QHD) |
| Max Screen Resolution | 2560 x 1440 Pixels |
| Refresh Rate | 100Hz |
| Aspect Ratio | 16:9 |
| Screen Surface Description | Flat |
| HDR Support | HDR10 |
| Color | Black |
| Item Weight | 11.9 pounds |
| Product Dimensions (LxWxH) | 8.66 x 21.29 x 21.1 inches |
| Voltage | 110 Volts |
| USB 3.0 Ports | 3 |
| Connectivity | HDMI, USB-C, DisplayPort, LAN Port |
6.1 What's in the Box
- DP Cable
- USB Type-C Cable
- Power Cable
7. Warranty and Support
7.1 Warranty Information
For specific warranty details, please refer to the warranty card included with your product or visit the official Samsung website. Warranty terms and conditions may vary by region and product.
7.2 Customer Support
If you require further assistance or encounter issues not covered in this manual, please contact Samsung Customer Support. You can find contact information and additional resources on the official Samsung website: