Important Safety Instructions
Please read and understand all instructions before using this appliance. Failure to follow these instructions may result in electric shock, fire, or serious personal injury.
- Ensure the voltage specified on the fan's rating label matches your local power supply voltage (220V).
- Do not operate any fan with a damaged cord or plug. Discard the fan or return to an authorized service facility for examination and/or repair.
- Do not run cord under carpeting. Do not cover cord with throw rugs, runners, or similar coverings. Arrange cord away from traffic area and where it will not be tripped over.
- To protect against electrical hazards, do not immerse the fan, plug, or cord in water or other liquids.
- Close supervision is necessary when any appliance is used by or near children.
- Unplug from outlet when not in use, when moving the fan from one location to another, and before cleaning.
- Avoid contact with moving parts.
- Do not operate in the presence of explosive and/or flammable fumes.
- Do not place the fan or any parts near an open flame, cooking or other heating appliance.
- Do not hang or mount the fan on a wall or ceiling unless it is specifically designed for such use. This fan is designed for wall mounting.
- Always use on a dry, level surface.
- Do not insert fingers or any other objects through the grille when the fan is operating.
Product Components
Familiarize yourself with the main components of your wall mount fan.
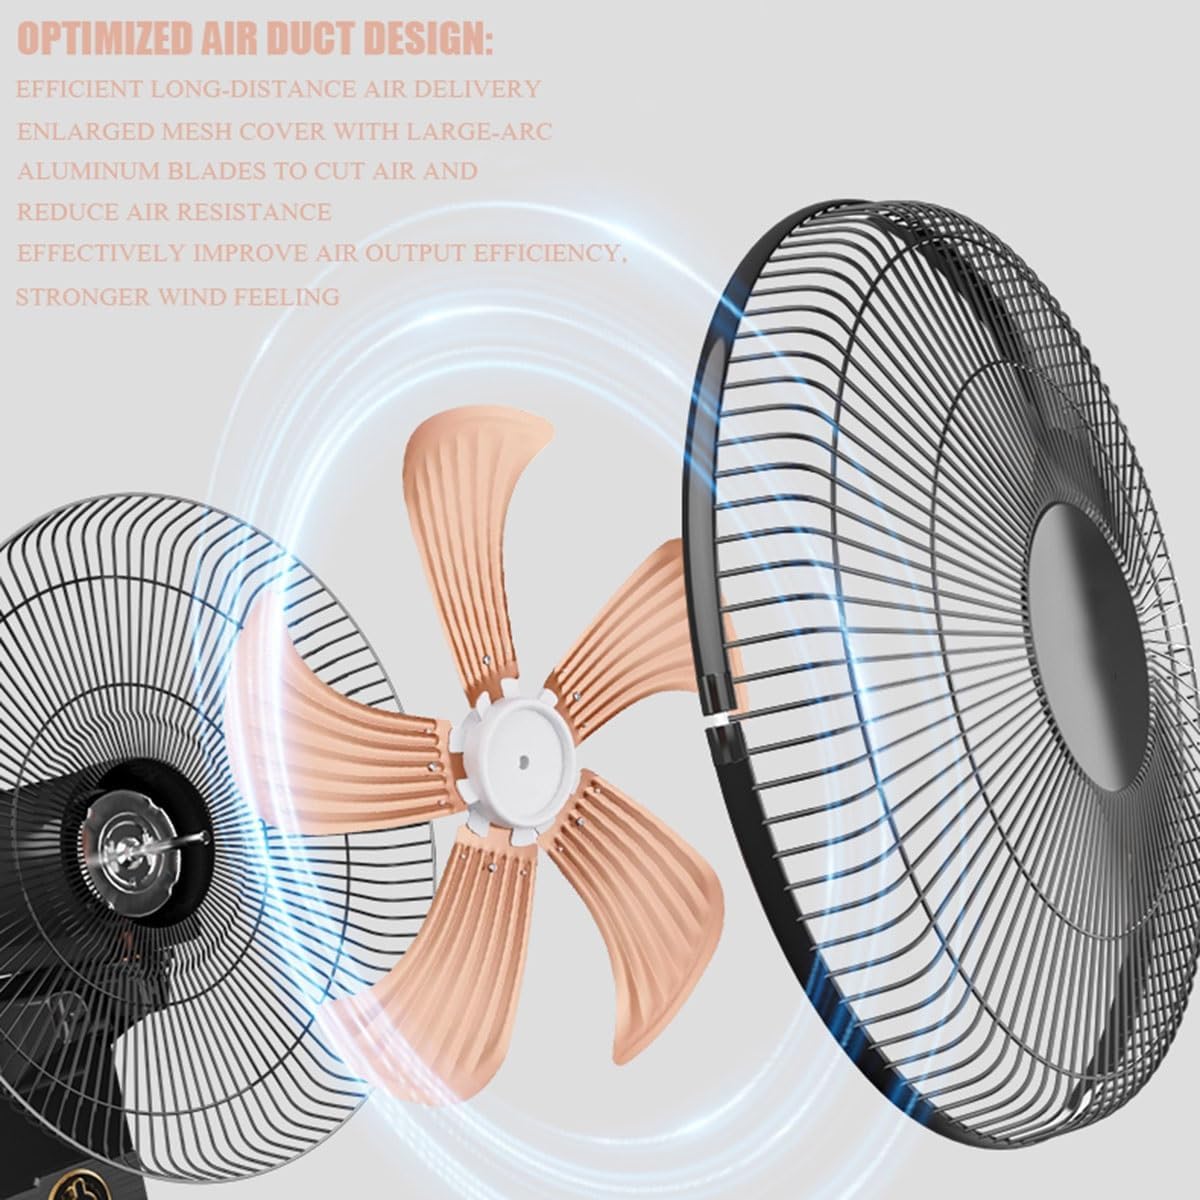
Image: Exploded view of the fan showing the motor, 5 aluminum blades, and the front and rear grilles. This illustrates the "Optimized Air Duct Design" for efficient air delivery.
- Fan Grille: Protective metal mesh cover.
- Fan Blades: Five aluminum blades for strong airflow.
- Motor Housing: Contains the fan motor.
- Mounting Bracket: For securing the fan to the wall.
- Control Panel: Mechanical buttons/pull rope for operation.
- Power Cord: For electrical connection.
Setup and Installation
This fan is designed for wall mounting. Follow these steps for proper installation.
- Unpacking: Carefully remove all components from the packaging. Verify that all parts listed in the packing list are present.
- Select Mounting Location: Choose a sturdy wall location that can support the fan's weight (approximately 2.5 kg / 6.28 lbs). Ensure there is a power outlet nearby and sufficient clearance for oscillation.
- Mark Drilling Points: Hold the mounting bracket against the wall at the desired height. Use a pencil to mark the positions for the mounting screws through the back hanging holes.
- Drill Holes: Drill appropriate holes for your wall type (e.g., concrete, drywall) and insert wall anchors if necessary.
- Secure Mounting Bracket: Attach the mounting bracket to the wall using suitable screws, ensuring it is firmly secured.
- Assemble Fan Head (if necessary): If the fan head is not pre-assembled, attach the rear grille, then the fan blades, and finally the front grille. Ensure all components are securely fastened. The mesh cover is detachable for cleaning.
- Mount Fan to Bracket: Carefully lift the fan and align the fan's back hanging holes with the mounting bracket. Secure the fan to the bracket.

Image: Details of the fan's back hanging hole, showing thickened metal sheet and double hanging hole reinforcement for secure wall mounting. Also visible is the mechanical control panel with pull rope operation.

Image: Illustration of the fan's 90-degree automatic left and right oscillation and 30-degree manual up and down adjustment, demonstrating its wide-angle air supply capabilities.
Operating Instructions
Your wall mount fan features mechanical controls for easy operation.
- Power On/Off: Plug the power cord into a 220V electrical outlet. Use the mechanical control knob or pull rope (if available) to turn the fan ON or OFF.
- Adjusting Fan Speed: The fan has 3 speed settings. Rotate the control knob or pull the rope repeatedly to cycle through the speeds:
- Speed 1: Low wind speed / Light breeze
- Speed 2: Medium wind speed / Sweeps away stuffiness
- Speed 3: High wind speed / Instant cool
- Oscillation Function: The fan features a 90° automatic left and right oscillation. Use the dedicated oscillation control (usually a pull-pin or button on the motor housing) to activate or deactivate this function.
- Vertical Tilt Adjustment: The fan head can be manually adjusted up and down by 30°. Loosen the adjustment knob on the side of the fan head, tilt to the desired angle, and then tighten the knob to secure it.

Image: The wall-mounted fan in operation, illustrating the three wind speed settings (low, medium, high) and the resulting airflow for cooling.
Maintenance and Cleaning
Regular cleaning and maintenance will ensure optimal performance and extend the lifespan of your fan.
- Before Cleaning: Always unplug the fan from the power outlet before cleaning or performing any maintenance.
- Cleaning the Grille and Blades: The mesh cover is detachable for easy cleaning.
- Remove the front grille by unscrewing or unlatching the clips.
- Wipe the fan blades and grilles with a soft, damp cloth. For stubborn dust, a mild soap solution can be used.
- Ensure all parts are completely dry before reassembling.
- Do not use abrasive cleaners or solvents as they may damage the fan's finish.
- Cleaning the Exterior: Wipe the exterior surfaces of the fan with a soft, dry cloth.
- Motor Maintenance: The motor is permanently lubricated and requires no additional oiling. Ensure the motor heat dissipation fence remains clear of obstructions.
- Storage: When not in use for extended periods, store the fan in a cool, dry place, preferably in its original packaging.
Image: Detailed view highlighting the thickened iron wire mesh cover, designed for durability and easy cleaning, and the motor heat dissipation fence, which helps maintain motor longevity.
Troubleshooting
If your fan is not operating correctly, consult the following common issues and solutions.
| Problem | Possible Cause | Solution |
|---|---|---|
| Fan does not turn on. | No power supply. Fan is not plugged in. Power outlet is faulty. | Ensure the fan is securely plugged into a 220V outlet. Check if the outlet is working by plugging in another appliance. Check household fuse/circuit breaker. |
| Weak airflow. | Fan speed is too low. Grille or blades are dirty. Obstruction in front or behind the fan. | Increase the fan speed setting. Clean the fan blades and grilles as per maintenance instructions. Remove any objects blocking the airflow. |
| Fan is noisy. | Loose parts. Fan is not mounted securely. Debris caught in blades. | Ensure all screws and fasteners are tight. Verify the fan is securely mounted to the wall. Unplug the fan and carefully check for any foreign objects in the blades or motor housing. |
| Oscillation not working. | Oscillation function is deactivated. Mechanism is jammed. | Activate the oscillation function using its control. Unplug the fan and gently check the oscillation mechanism for any obstructions. |
If the problem persists after attempting these solutions, please contact customer support.
Specifications
Detailed technical specifications for the Generic 16-inch Wall Mount Fan.
| Feature | Detail |
|---|---|
| Model Name | KCZZAAQAC-MECHANICALMODEL-16IN/40CM |
| Type | Wall Mount Fan |
| Size | 16 inches / 40 cm |
| Number of Blades | 5 (Aluminum) |
| Wind Speed Gears | 3 Speeds |
| Oscillation (Horizontal) | 90° Left and Right (Automatic) |
| Tilt Adjustment (Vertical) | 30° Up and Down (Manual) |
| Rated Power | 40W |
| Voltage | 220V |
| Maximum Noise | 45dB |
| Control Method | Mechanical / Push Button / Pull Rope |
| Air Supply Type | Internal Rotation Air Supply |
| Air Supply Distance | 10 meters / 32.8 feet |
| Mesh Cover Width | Approx. 42 cm / 16.5 inches |
| Complete Machine Height | Approx. 51 cm / 20 inches |
| Power Cord Length | 700 mm / 2.3 feet |
| Net Weight | 2.5 kg / 6.28 lbs |
| Material | Metal (Grille, Blades) |
| Indoor/Outdoor Usage | Indoor |

Image: A diagram illustrating the fan's key parameters such as mesh cover width (42cm/16.5in) and complete machine height (51cm/20in), alongside icons representing its six major configurations: low-noise wind, three wind speeds, wide-angle air supply, powerful motor, aluminum fan blades, and detachable/washable mesh cover.
Warranty and Support
Warranty Information: Specific warranty details for this product may vary by region and retailer. Please refer to the warranty card included with your purchase or contact your retailer for detailed warranty terms and conditions.
Customer Support: For technical assistance, troubleshooting beyond this manual, or inquiries regarding parts and service, please contact the retailer or manufacturer directly. Keep your purchase receipt and model number handy for faster service.
- Model Number: KCZZAAQAC-MECHANICALMODEL-16IN/40CM
- Brand: Generic
- Manufacturer: MCMMY


